AO and BPC/4 Work status Integration.
A work status that will be used in Analysis, has to be defined with SAP Business Planning and Consolidation (BPC), version for SAP NetWeaver embedded. The work status is configured in the
BPC Web Admin Tool and is based on a
BPC model. A model can include one or several Info Providers. All Info Providers in the model must contain the
owner dimension.
In order to create this workflow, first of all we need to create certain Planning objects. Here I have used a BPC 11.0.
Pre-requisites:
1.Create a planning enabled Advanced DSO.
I have used a DSO with the following structure
2.The dimension CITY, in this case the info object SP_CITY has 3 display attributes, of which OWNER and TEAM are mandatory and COUNTRY

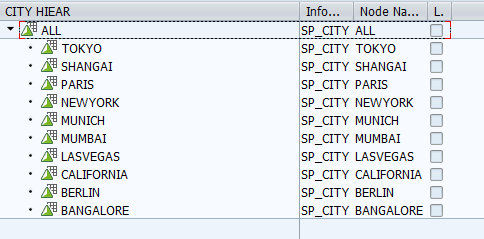
- Since I will be planning for a product in a city. It is necessary to create a hierarchy for the City Dimension in the backend via Tx: RSH1.
The hierarchy looks as follows.
- Create an aggregation Level and a query.
Once these prerequisites are done, we shall move towards BPC web Client
Configuration steps in BPC Web Client
- Launch BPC client:
http://<hostname>:<portnumber>/sap/bc/ui5_ui5/sap/bpc4webclient/index.html
- Create an environment
Go to settings, select the environment to which you have currently logged into, a
Connect to Environment dialog appears
To create a new environment à Manage all Environments

In Manage All Environments, click on Create. Enter type, name and description

Now connect to the environment created.
Once connected, check if you are in desired environment

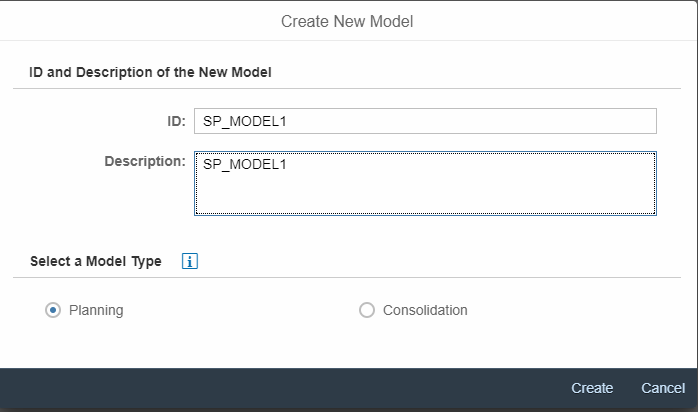
- Creation of Model:
Via the menu à navigate to Administration à Modeling à Models
Click on +New to create a new model. Specify a name and description and select the model type as Planning
Select the Planning enabled ADSO.
Click on – Click here to select an Info provider. Search for the info provider.
Save.

- Work Status Configuration
Navigate to Administration à Featuresà Work Status Configuration
Select the above created model
Add different Work states:


Consider
Order1 – Start Planning , only Manager can set it to this status and in this state Manual entry of values is not allowed by neither manager nor owner.
Similarly consider,
Order3- Planning in Progress , only Owner can set it to this state and manual entry is allowed only by owner .
For the dimension SP_CITY , since already a hiearrachy is defined, select it as
Owner Dimension and select the appropriate hieararchy
[Note that : if no hieararchy is defined then dimension cannot be slected as owner dimension ]
Under
Owner :
select
Owner Property : SP_OWNER ;
Team Property : SP_TEAM

In the Other dimensions , add the Other Dimensions , say SP_PROD
Check the option
And then to complete the work status configuration , save it .
- Creation of Teams:
Navigate to menu à Administration à Security àTeams
Click on + New, Add Team window opens up , Specify the name SP_PLAN_TEAM1 and appropriate description
Click on Next .
Add the users who should be part of team
Review and Add .

Similarly create another team SP_PLAN_TEAM2 and add users who would act as planners
Create another team SP_PLAN_MANAGE and add users who are managers
After completion of all the configuration in the BPC web client, we now should be able to set the work status in Analysis Office.
Setting work status in Analysis Office
- Launch Analysis Office and insert the planning enabled query.
To integrate the work status, it is necessary to assign the planning model. Go to the properties of the work book, Planning tab In the Planning model, select the Environment and then select the model , in this case, SP_MODEL1
The work status option will be effective only on reopening the workbook.
- Launch the workbook again ,this time login with the credentials of a manager , say a user who belongs to the SP_PLAN_MANAGE team .
- Select any cell for the planned Sales for the city and set the work status hierarchy via the ribbon menu Work Status ->Set Work Status Hierarchy

- Currently for the city Shanghai, the work status is unlocked, change it to Start Planning

Now you will see that the selected cell is not available for editing. Save the Data.
- Now close the workbook and launch again with the user credentials of a planner who belongs to SP_PLAN_TEAM1.
Now for the same data cell as selected in step13, the work status is
Planning in Progress
Manually change the value and set it to
Sent for Approval.
- Again launch the workbook, by logging in as manager, either approve or Reject the planning.
More information can be found here:
https://help.sap.com/viewer/a2049170bfeb4178ace32222842c3ec1/10.1/en-US/4c335371ad165792e10000000a15...
