
- SAP Community
- Products and Technology
- Technology
- Technology Blogs by SAP
- Commands in SAP IoT Application Enablement
Technology Blogs by SAP
Learn how to extend and personalize SAP applications. Follow the SAP technology blog for insights into SAP BTP, ABAP, SAP Analytics Cloud, SAP HANA, and more.
Turn on suggestions
Auto-suggest helps you quickly narrow down your search results by suggesting possible matches as you type.
Showing results for
former_member30
Explorer
Options
- Subscribe to RSS Feed
- Mark as New
- Mark as Read
- Bookmark
- Subscribe
- Printer Friendly Page
- Report Inappropriate Content
01-05-2018
11:10 PM
Introduction
Since release 1.46 SAP IoT Application Enablement provides a feature to send commands from Application Enablement directly to your device. Therefore, Application Enablement can not only store your thing data now, it can be the control center for your IoT scenarios. There is a strong demand for this features in a lot of use cases. In this blog post, we will get you up and running with this new feature.
Prerequisites
- A tenant for SAP IoT Application Enablement
- A tenant for SAP Cloud Platform Internet of Things for the Cloud Foundry Environment (IoT S)
- Both tenants must be connected
Scenario
We are going to model a robot with one component, the robot arm. The goal is to send a command to the hydraulics of this robot arm.
The command will be send to Application Enablement. Application Enablement will forward the request to the SAP Cloud Platform Internet of Things for the Cloud Foundry Environment, which will send the command to the device via MQTT [1].
Tenant configuration
At first, we must register and authenticate our IoT Services tenant as a provider for sensor data in Application Enablement. We can do this with the help of the API of Application Enablement [1]:
POST /tm-data-mapping/credentials


{

    "provider": "IoTServices4",

    "user": "< root user>",

    "password": "<root secret>",

    "host":  "<host>"

}
Please make sure that you enter the host without the protocol “http://” . For instructions on how to use the API of Application Enablement please read the referenced blog post [2].
Device onboarding
Next, we will onboard our physical device in SAP Cloud Platform Internet of Things for the Cloud Foundry Environment. At first, we will create two capabilities for our device. Both will represent the Arm of our robot: the first one represents the time series data of the arm, the second one represents the commands sent to the arm. For now, it´s important that both capabilities representing the arm have the same name and the same structure. Only the ID and the alternate ID should be different. You can create both with the following API calls:
POST /iot/core/api/v1/capabilities


{

  "name" : "Arm",

  "properties" : [

    {

      "name" : "Hydraulics",

      "dataType" : "float"

    }

  ]

}
POST /iot/core/api/v1/capabilities
{
"name" : "Arm",
"properties" : [
{
"name" : "Hydraulics",
"dataType" : "float"
}
]
}Please note down the id of both capabilities.
Now, we are going to bring both capabilities together in one SensorType:
POST /iot/core/api/v1/sensorTypes


{

  "name" : "Robot-Sensor",

  "capabilities" : [

    {

      "id" : "<capability id measure>",

       "type": "measure"

    },

    {

      "id" : "<capability id command>",

      "type": "command"

    }

  ]

}
Please note down the id of your sensor type.
Finally, we can create our robot device and attach a sensor for our robot arm to this device:
POST /iot/core/api/v1/devices


{

  "gatewayId" : "<mqtt gateway id>"

  "name": "Robot_ThingShadow"

}
POST /iot/core/api/v1/sensors
{
"deviceId" : "<your device id>",
"sensorTypeId" : "<your sensor type id>",
"name": "Robot-Arm-Sensor"
}Once again, please note down the id and the alternate id of your device and your sensor.
Thing onboarding
Now, we will create a Thing in Application Enablement. We are going to model a robot with one arm. At the end of this blog post, we are going to send commands to this robot arm via MQTT.
At first, we must create and configure a package for our robot. We can do this via the Configuration API of Application Enablement [3]. Our package must include three important entities for this scenario:
- A PropertySet for the robot arm with a property Hydraulics. We will send commands to this property hydraulics of our arm at the end of the blog post.
- A ReferencePropertySet for this robot arm: This reference property set will “shadow” our PropertySet and will store all commands. Within this shadow we will define a property type of attribute type com.sap.iot.core.Command to send a desired value to our robot device modeled in IoT Services. When we update or change the value of the property type, the command will be send to our device.
- A ThingType for our robot, which includes our shadowed PropertySet robot arm.
A package with the above described configuration is created by the following API call. Please make sure that you replace “sap.iotrig” with the name of your tenant.
POST /appiot-mds/appcore-conf/Configuration


Payload: https://gist.github.com/LukasBrin/6f6d9d18cf42e7de17e38d4d8d3b0025
Next, we will go to the thing modeler and create a thing there. At first, please familiarize yourself with the created ThingType Robot in the package thingshadow. You will see, that our robot type has a command field in the property Hydraulics.

Now we will create our robot thing. Add the following configuration to your new thing:

Please make sure, that you select the device and senor created in a previous step as well as your own authorization group. You should see the mapping of thing and device like this:

Please note down the id of your thing.
First Validation
To check if everything works as expected, we will send and receive commands via the User Interface now.
To send a command, go to your thing and add a command in the provided input field:

When you click the save button, the command will be sent to our device. To validate, that the command arrived in IoT services we will have a look at the command logs in the IoT Services cockpit classic.
Open the following url: https://<your iot s host>/iot/cockpit-classic/
Select the “command logs” in the panel on the left and sort the table descending by the timestamp:

The result will be a table like this, which should include a command. You can identify this command with the “sendCommand” entry in the column “API”.

If you can see such a command entry here, everything looks fine up to this point. If not, please go through the steps again and make sure that you have executed all the described steps.
In the next steps, we are going to send a command via the API as you don´t want to send command out of the ThingModeler in a productive scenario. We will then subscribe to commands sent to our device´s MQTT gateway.
Sending commands
Furthermore it´s possible to send commands via the API of Application Enablement, e.g. to trigger the command automatically from another system when a condition is fulfilled. This can be achieved with the following API call. Please add your thing id, replace "sap.iotrig" with your tenant and update the time stamp to the current time.
PUT /appiot-mds/Things('<your thing id>')/ReferenceProperties/sap.iotrig.thingshadow:Robot/Arm


{

  "value": [{

    "Command67428": "2",

    "_time": "2017-12-20T13:20:34Z"

  }]

}
This call will send the command “2” to the created in the previous steps device.
Subscribing to commands
In this tutorial, we will use our laptop as a device. For this kind of task, a program called paho client is available [4]. Please install the program now and come back to this blog post afterwards. Now, we will subscribe our laptop to the commands-topic of our device to demonstrate the receipt of a command. In a real use case you would subscribe your device to this commands-topic and trigger an action when you receive a command. Please create a new Paho connection and set the following configurations:
Server URI: ssl://<your iot s host>:8883

Client Id: <your device alternate id>

Enable ssl [x]

Key store location: <reference the certificate of your device (*.ks)

Key store password: <password from the pswd.properties>

Trust store location: <reference to your java keystore, e.g. “C:\Program Files\Java\jre1.8.0_151\lib\security\cacerts”>

Trust store password: “changeit”
You can download the certificate of your device directly from the Cockpit of SAP Cloud Platform Internet of Things for the Cloud Foundry Environment.
Next, connect to the system and enter the topic “commands/<your device alternate id>” to your subscriptions. Your connection should look like this afterwards:

Now, try to trigger a command with the help of the Application Enablement API again. You should see an additional entry in the history on the right side with the event type “Received”. A double click on this entry will open a view with all details of the received command:
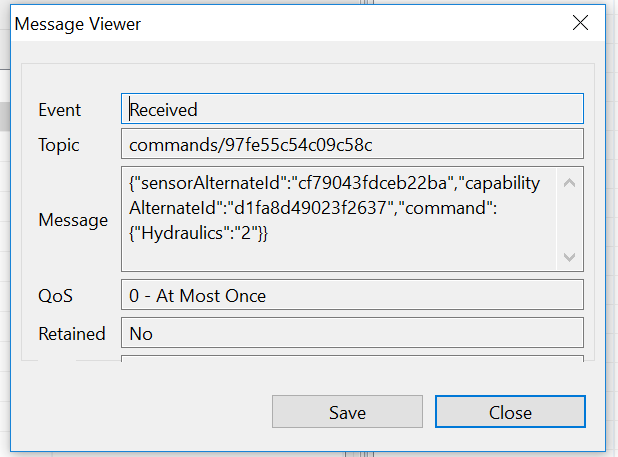
In a real world scenario, you would subscribe your device to this MQTT topic and trigger an action in case a specific command arrives.
Summary
That´s it! I hope you could follow all the explained steps and got an overview of the new capability of SAP IoT Application Enablement. Feel free to ask your questions in the comments.

[1] https://www.hivemq.com/blog/how-to-get-started-with-mqtt
[2] https://help.sap.com/viewer/350cb3262cb8496b9f5e9e8b039b52db/1.44.0.0/de-DE/c70e22b8435b4d97892953b3...
[3] https://blogs.sap.com/2017/10/13/access-the-sap-iot-application-enablement-apis-using-postman/
[4] https://help.sap.com/viewer/350cb3262cb8496b9f5e9e8b039b52db/1.44.0.0/en-US/2b0a947427f14ca69c76299b...
[5] https://www.eclipse.org/paho/
- SAP Managed Tags:
- Internet of Things,
- SAP Business Technology Platform
15 Comments
You must be a registered user to add a comment. If you've already registered, sign in. Otherwise, register and sign in.
Labels in this area
-
ABAP CDS Views - CDC (Change Data Capture)
2 -
AI
1 -
Analyze Workload Data
1 -
BTP
1 -
Business and IT Integration
2 -
Business application stu
1 -
Business Technology Platform
1 -
Business Trends
1,661 -
Business Trends
88 -
CAP
1 -
cf
1 -
Cloud Foundry
1 -
Confluent
1 -
Customer COE Basics and Fundamentals
1 -
Customer COE Latest and Greatest
3 -
Customer Data Browser app
1 -
Data Analysis Tool
1 -
data migration
1 -
data transfer
1 -
Datasphere
2 -
Event Information
1,400 -
Event Information
65 -
Expert
1 -
Expert Insights
178 -
Expert Insights
280 -
General
1 -
Google cloud
1 -
Google Next'24
1 -
Kafka
1 -
Life at SAP
784 -
Life at SAP
11 -
Migrate your Data App
1 -
MTA
1 -
Network Performance Analysis
1 -
NodeJS
1 -
PDF
1 -
POC
1 -
Product Updates
4,577 -
Product Updates
330 -
Replication Flow
1 -
RisewithSAP
1 -
SAP BTP
1 -
SAP BTP Cloud Foundry
1 -
SAP Cloud ALM
1 -
SAP Cloud Application Programming Model
1 -
SAP Datasphere
2 -
SAP S4HANA Cloud
1 -
SAP S4HANA Migration Cockpit
1 -
Technology Updates
6,886 -
Technology Updates
408 -
Workload Fluctuations
1
Related Content
- ABAP Cloud Developer Trial 2022 Available Now in Technology Blogs by SAP
- CF Deployment Error: Error getting tenant t0 in Technology Q&A
- Unify your process and task mining insights: How SAP UEM by Knoa integrates with SAP Signavio in Technology Blogs by SAP
- Corporate Git Setup on SAP BTP versus connecting to Corporate Git directly from SAP BAS in Technology Q&A
- SAP HANA Cloud Vector Engine: Quick FAQ Reference in Technology Blogs by SAP
Top kudoed authors
| User | Count |
|---|---|
| 13 | |
| 11 | |
| 10 | |
| 9 | |
| 9 | |
| 7 | |
| 6 | |
| 5 | |
| 5 | |
| 5 |