
- SAP Community
- Products and Technology
- CRM and Customer Experience
- CRM and CX Blogs by SAP
- Wechat development series 3 – Trigger C4C Account ...
CRM and CX Blogs by SAP
Stay up-to-date on the latest developments and product news about intelligent customer experience and CRM technologies through blog posts from SAP experts.
Turn on suggestions
Auto-suggest helps you quickly narrow down your search results by suggesting possible matches as you type.
Showing results for
Advisor
Options
- Subscribe to RSS Feed
- Mark as New
- Mark as Read
- Bookmark
- Subscribe
- Printer Friendly Page
- Report Inappropriate Content
12-13-2017
7:19 AM
- Wechat development series 1 – setup your development environment
- Wechat development series 2 – development Q&A service using nodejs
- Wechat development series 3 – Trigger C4C Account creation in Wechat app
- Wechat development series 4 – Send C4C Data change notification to Wechat app
- Wechat development series 5 – embedded your UI5 application to Wechat app
- Wechat development series 6 – Retrieve Wechat User info via oAuth2 and display it in UI5 application
- Wechat development series 7 – use Redis to store Wechat conversation history
- Wechat development series 8 – Map integration
- Wechat development series 9 – Create C4C Social Media Message and Service within Wechat app
- Wechat development series 10 – Use Wechat app to receive Service Request reply made from C4C
The complete source code used in this series could be found from my github repository.
Tencent’s WeChat, a social networking app with more than 760 million monthly active users, is becoming a dominant mobile channel connecting businesses and customers.
In previous blogs we have already setup the environment for Wechat development and build some toy services to get familar with overall process.
In this blog, we will implement some feature which interacts with C4C system.
The implementation contains purely nodejs development via Javascript and do not need any development in C4C side.
Implemented feature
Here below is my testing subscription account. When I scan it via my Wechat app,

I can click the Green button "关注" ( subscribe ) to finish subscription to this account.

After the button is pressed, I will received a welcome message sent automatically from this test subscription account:

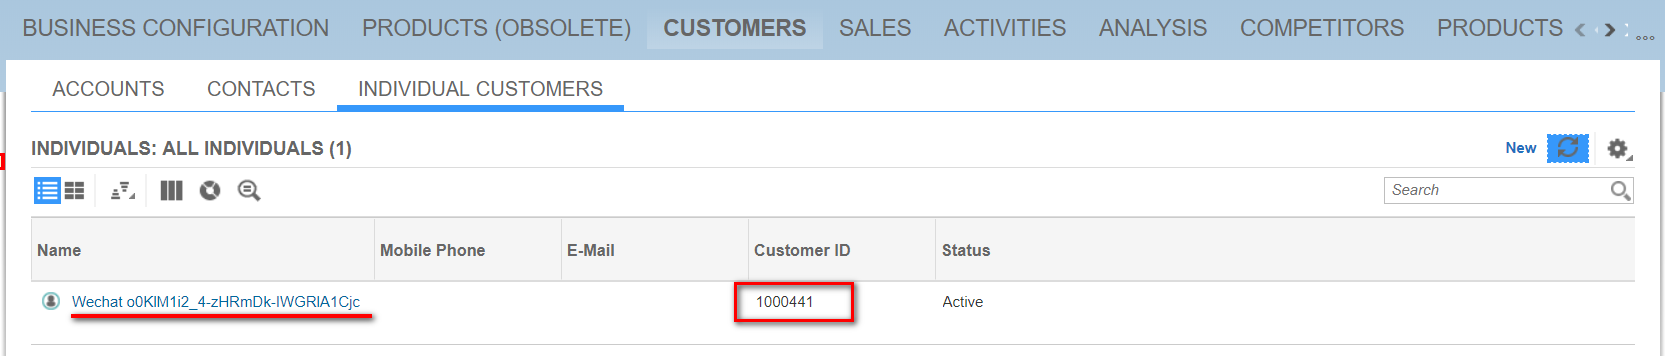
And then a new individual customer will be created in a configured C4C system via OData service. Once created, I will see the ID of created account in Wechat app:

This created account has first name as hard coded "Wechat" and last name equals to the technical id of Wechat account who has performed the QRCode scan activity. Here below is the screenshot of created account in C4C system.
Detail implementation steps
1. Create a configuration module in your nodejs project with the following settings:
var config = {

   individualCustomerurl: "https://<host_name>/sap/c4c/odata/v1/c4codata/IndividualCustomerCollection/",

   credential: "<your user name>:<your password>",

   accessToken: "access token of your test subscription account"

};

module.exports = config;
You must maintain a valid user name and password which could have access to create new individual customer in your C4C system.
The access token will be used when you try to send a message to an user who has subscribed your Wechat account via Wechat Restful API. It will expire by default 2 hours after generation. The token could be refreshed based on appid and secret. For simplification purpose I just generate the token and store it in configuration file.
2. Once a Wechat user presses "subscribe" button, an event with HTTP post will be sent to the Wechat server which is bound to your subscription account. As a result we have to react to this post request, parse the Wechat ID which has clicked the "subscribe" button, and create a new individual customer in C4C system based on this Wechat ID.
Here below is the source code how we react to the event with event key "subscribe".
(1) the welcome message "Welcome to Jerry's subscription account" is hard coded
(2) The Wechat ID of user who has finished subscription is stored in variable fromUserName
var request = require('request');

var createAccount = require("../service/createAccountInC4C.js");

var getXMLNodeValue = require("../tool/xmlparse.js");

var formattedValue = require("../tool/formatValue.js");

var replyMessage = require("../tool/replyMessage.js");


module.exports = function (app) {

  app.route('/').post(function(req,res){

    var _da;

    req.on("data",function(data){

        _da = data.toString("utf-8");

    });

    req.on("end",function(){

        console.log("new http post: " + _da);

        var msgType = formattedValue(getXMLNodeValue('MsgType',_da));

        if( msgType === "event"){

          var event = formattedValue(getXMLNodeValue('Event',_da));

          if( event === "subscribe"){

            var replyxml = replyMessage(_da, "Welcome to Jerry's subscription account");

            var fromUserName = formattedValue(getXMLNodeValue('FromUserName',_da));

            createAccount(fromUserName);

            res.send(replyxml);

          }

        }

    });

  });

};
3. The individual customer is created by C4C OData service implemented in module createAccountInC4C.js.
var config = require("../../config.js");

var request = require('request');

var postWCMessage = require("./postMessageToUser.js");


var getTokenOptions = {

        url: config.individualCustomerurl,

        method: "GET",

        json:true,

        headers: {

            "content-type": "application/json",

            'Authorization': 'Basic ' + new Buffer(config.credential).toString('base64'),

            "x-csrf-token" :"fetch"

        }

};


function getToken() {

  return new Promise(function(resolve,reject){

      var requestC = request.defaults({jar: true});

      requestC(getTokenOptions,function(error,response,body){

       var csrfToken = response.headers['x-csrf-token'];

       if(!csrfToken){

          reject({message:"token fetch error"});

          return;

       }

       resolve(csrfToken);

      }); // end of requestC

     });

}


function _createIndividualCustomer(token, fromUserName){

	return new Promise(function(resolve, reject){

		var oPostData = {

			"FirstName":"Wechat",

 			"LastName":fromUserName,

 		"RoleCode": "ZCRM01",

 		"CountryCode": "US",

 		"StatusCode": "2"

		};

		var requestC = request.defaults({jar: true});

        var createOptions = {

              url: config.individualCustomerurl,

              method: "POST",

              json:true,

              headers: {

                  "content-type": "application/json",

                  'x-csrf-token': token

              },

              body:oPostData

        };


        requestC(createOptions,function(error,response,data){

            if(error){

                reject(error.message);

            }else {

               resolve(data);

            }

        });// end of requestC

	});

}


module.exports = function createAccount(fromUserName){

  getToken().then(function(token) {

  console.log("token received: " + token);

  _createIndividualCustomer(token, fromUserName).then(function(data){

    var message = "account created: " + data.d.results.CustomerID;

    console.log(message);

    postWCMessage(fromUserName, message);

  });

});

};
In the code the first name of created account is hard code as Wechat and the last name is filled with variable fromUserName parsed from previous step.

4. Once individual customer is created in C4C system successfully, a responsible message will be sent to Wechat subscription account user to notify him/her with the ID of created account.

This reply is implemented by Wechat message Restful API:
var config = require("../../config.js");

var request = require("request");


function printObject(oData){

	for( var a in oData){

		console.log("key: " + a);

		console.log("value: " + oData[a]);

		if( typeof oData[a] === "object"){

			printObject(oData[a]);

		}

	}

}

function sendWCMeaasge(toUser,sMessage){

	console.log("begin to send message to user: " + toUser + " with message: " + sMessage);

    var options = {

            url:"https://api.weixin.qq.com/cgi-bin/message/custom/send?access_token=" +

            config.accessToken,

            method: "POST",

            json:true,

            headers: {

            	"content-type": "application/json"},

            body:{

              "touser":toUser,

              "msgtype":"text",

              "text":

              {

                   "content":sMessage

              }

                }

          };

      request(options,function(error,response,data){

        console.log("Status message: " + response.statusMessage);

        console.log("Data: " + data.errmsg);

      });

  }


module.exports = sendWCMeaasge;
It is very convenient to use this Restful API to send message to a given Wechat user who has subscribed the testing account. You could test it in postman:


The complete source code used in this series could be found from my github repository.
- SAP Managed Tags:
- JavaScript,
- Node.js,
- SAP Cloud for Customer add-ins,
- C4C Extensibility
You must be a registered user to add a comment. If you've already registered, sign in. Otherwise, register and sign in.
Labels in this area
-
Business Trends
270 -
Business Trends
11 -
chitchat
1 -
customerexperience
1 -
Event Information
256 -
Event Information
17 -
Expert Insights
30 -
Expert Insights
49 -
Life at SAP
133 -
Life at SAP
1 -
Product Updates
666 -
Product Updates
24 -
SAP HANA Service
1 -
SAPHANACloud
1 -
SAPHANAService
1 -
Technology Updates
453 -
Technology Updates
15
Related Content
- Error by Logon eclipse in CRM and CX Questions
- Innovate Faster: The Power Duo of SAP Activate and Scaled Agile Framework (SAFe) in CRM and CX Blogs by SAP
- Side-by-Side Extensibility with SAP Build Apps -E2E Service covering Customer Service, Field Service in CRM and CX Blogs by Members
- Create Custom Key Metrics with Kyma Serverless Functions in Sales and Service Cloud Version 2 in CRM and CX Blogs by Members
- SAP Inside Track 2024 – Bangalore – February 17 !!My experience as a Speaker in CRM and CX Blogs by Members
Top kudoed authors
| User | Count |
|---|---|
| 3 | |
| 2 | |
| 2 | |
| 1 | |
| 1 | |
| 1 | |
| 1 | |
| 1 | |
| 1 | |
| 1 |