
- SAP Community
- Products and Technology
- CRM and Customer Experience
- CRM and CX Blogs by Members
- Installing SAP Hybris Commerce Suite with Utility ...
CRM and CX Blogs by Members
Find insights on SAP customer relationship management and customer experience products in blog posts from community members. Post your own perspective today!
Turn on suggestions
Auto-suggest helps you quickly narrow down your search results by suggesting possible matches as you type.
Showing results for
Srinivas_Jayann
Explorer
Options
- Subscribe to RSS Feed
- Mark as New
- Mark as Read
- Bookmark
- Subscribe
- Printer Friendly Page
- Report Inappropriate Content
12-11-2017
1:06 PM
This blogs will provide installation steps for SAP Hybris Commerce Suite with Utility Accelerator:
Before start please make sure that your system meets minimum Hardware and Software requirements:

Step 1: Downloading Hybris Commerce Suite and Utility Accelerator:
Please note you need to have admin rights for your S-user id to download:
Step 2: Unzip the Hybris Commerce Suite:
Step 3: Recipe Installation:
Step 4: Unzip Utility Accelerator and add the extensions:
Step 5: Ant environment setup,Ant Build and Hybris Server Start:
To build SAP Hybris Commerce, following steps needs to be pe rformed:

Once server started goto hosts file(C:\Windows\System32\drivers\etc) and add entry for Utility.
Step 6: Login and Initialize:
Now in web-browser enter the enter url: https://localhost:9002.
System will now prompt to initialize Hybris suite.Click on Initialize button, it will take considerable amount of time. Do not close the browser or shutdown the system.


When the initialization process completes, you should see the following information. Click the Continue.. link.

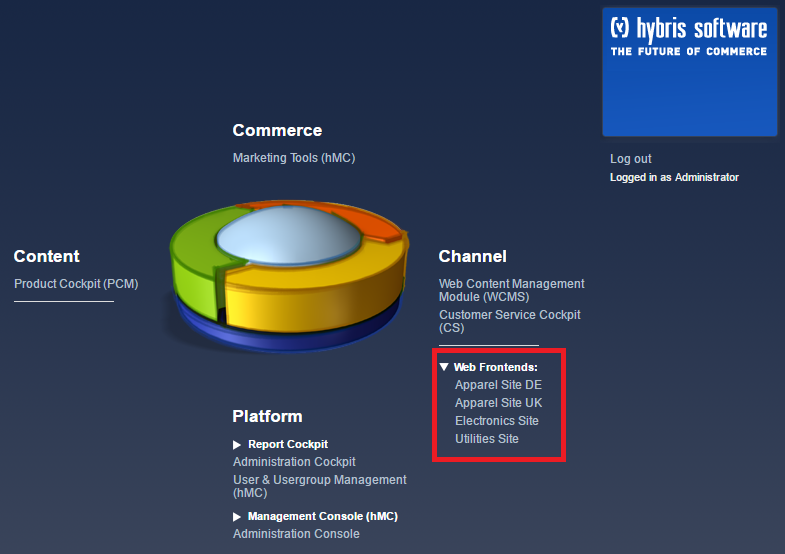
Step 8: Login to Hybris Admin Console(HAC) and Launch Utility Storefront from Multi ChannelCockpit (MCC):
https://localhost:9002/mcc
User Name: admin
Password : nimda
you can see below screen.Expand the Web Frontends and Click on Utility Site and you can see the below web page will be displayed.

Before start please make sure that your system meets minimum Hardware and Software requirements:
Step 1: Downloading Hybris Commerce Suite and Utility Accelerator:
- Download Hybris Commerce suite 6.0 or onward version. This blog is based on 6.0 version.
- Click here to download Utility Accelerator.
Please note you need to have admin rights for your S-user id to download:
Step 2: Unzip the Hybris Commerce Suite:
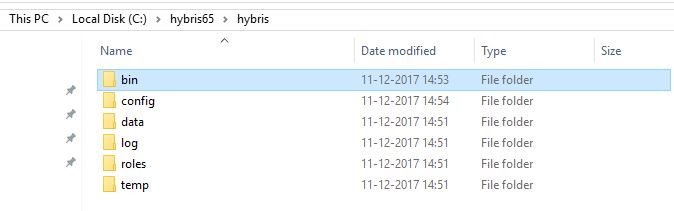
- Unzip Hybris Commerce Suite. It must be close to the system root directory (for example C:\hybris.You may download the files directly to the root directory, because the ZIP files already contain a hybris directory).Microsoft Windows requires the directory paths to be shorter than 255 characters. Any part of a directory path exceeding this limitation is truncated. The SAP Hybris Commerce modules installation creates several sub-directories,therefore use short directory paths.
- Don't use directory paths containing spaces (such as C:\hyb Platform). Building SAP Hybris Commerce fails if the directory path contains spaces.

- Goto <Hybris Dir>\hybris, there you can see only bin folder, once we complete installation other folders will be created by system.
Step 3: Recipe Installation:
- We will install sap_aom_som_b2b_b2c recipe as in coming blogs SAP ISU backend integration will be published. In case if you do not want to connect to SAP backend then just use the other recipe as per your requirement.
- Open command prompt with admin mode and navigate to <Hybris Dir>\hybris\installer and run the command install.bat -r sap_aom_som_b2b_b2c

- Now you can see system created many other directory in under hybris directory. All configuration files of SAP Hybris Commerce are in the config directory.
Step 4: Unzip Utility Accelerator and add the extensions:
- In the above step, system also created one custom folder(<Hybris Dir>\hybris\bin\custom) and in future if you wan install any of the custom accelerators then they must place under this folder. Now we will see how to place utility accelerator in the custom folder.

- Unzip the utility accelerator downloaded in step1 and navigate to
DATA_UNITS\INDUSTRY_PACK_UTILITIES_1_0\OSINDEP and you can find one more zip file YUTILITIES00P_0.Unzip this file to <Hybris Dir>\hybris\bin\custom.
- Now we need to add the extensions for the utilities accelerator. For that you need goto local. extensions in <Hybris Dir>\hybris\config and copy/paste below. Highlighted one for Utility accelerator. We have removed few of the extension which are created by sap_aom_som_b2b_b2c recipe as they are conflicting with Utility extensions.
| <extension name='mcc' /> |
| <extension name='backoffice' /> |
| <extension name='utilitiescockpits' /> |
| <extension name='utilitiesinitialdata' /> |
| <extension name='utilitiesfulfilmentprocess' /> |
| <extension name='utilitiesstorefront' /> |
| <extension name='utilitiescore' /> |
| <extension name='utilitiesfacades' /> |
| <extension name='datahubadapter' /> |
| <extension name='datahubbackoffice' /> |
| <extension name='sapcoreaddon' /> |
| <extension name='sapcorebol' /> |
| <extension name='sapcoreconfigurationbackoffice' /> |
| <extension name='sapcoreconfigurationhmc' /> |
| <extension name='sapcoreodata' /> |
| <extension name='sapmodel' /> |
| <extension name='sapmodelhmc' /> |
| <extension name='sapproductavailabilityhmc' /> |
| <extension name='sapcoretest' /> |
| <extension name='sapordermgmtbol' /> |
| <extension name='sapordermgmthmc' /> |
| <extension name='sapcommonbol' /> |
| <extension name='sappricinghmc' /> |
| <extension name='sappricingproductcarouseladdon' /> |
| <extension name='sapproducthmc' /> |
| <extension name='ysaporderfulfillment' /> |
| <extension name='commercesearchbackoffice' /> |
| <extension name='commerceservicesbackoffice' /> |
| <extension name='solrfacetsearchbackoffice' /> |
| <extension name='yaddon' /> |
| <extension name='promotionenginebackoffice' /> |
| <extension name='droolsruleengineservices' /> |
| <extension name='promotionenginesamplesaddon' /> |
| <extension name='warehousing' /> |
| <extension name='solrserver' /> |
| <extension name='rulebuilderbackoffice' /> |
| <extension name='electronicsstore' /> |
| <extension name='apparelstore' /> |
| <extension name='ycommercewebservices' /> |
| <extension name='hmc' /> |
| <extension name='platformhmc' /> |
| <extension name='smarteditwebservices' /> |
| <extension name='previewwebservices' /> |
| <extension name='cmswebservices' /> |
| <extension name='solrserver' /> |
| <extension name='sapisupricing' /> |
Step 5: Ant environment setup,Ant Build and Hybris Server Start:
To build SAP Hybris Commerce, following steps needs to be pe rformed:
- Set Up Apache Ant:
In the command prompt and navigate to the <Hybris Dir>\hybris\bin\platform directory and run setantenv.bat command.
- Build SAP Hybris Commerce:
Run ant clean all command and once build is successful then proceed to Hybris start.
- Hybris Server start and Hosts file entries:
You can start the server by navigating to <Hybris Dir>\hybris\bin\platform directory and run the command hyrbisserver.bat
Once server started goto hosts file(C:\Windows\System32\drivers\etc) and add entry for Utility.
Step 6: Login and Initialize:
Now in web-browser enter the enter url: https://localhost:9002.
System will now prompt to initialize Hybris suite.Click on Initialize button, it will take considerable amount of time. Do not close the browser or shutdown the system.
When the initialization process completes, you should see the following information. Click the Continue.. link.
Step 8: Login to Hybris Admin Console(HAC) and Launch Utility Storefront from Multi ChannelCockpit (MCC):
https://localhost:9002/mcc
User Name: admin
Password : nimda
you can see below screen.Expand the Web Frontends and Click on Utility Site and you can see the below web page will be displayed.
- SAP Managed Tags:
- Utilities,
- SAP Commerce
25 Comments
You must be a registered user to add a comment. If you've already registered, sign in. Otherwise, register and sign in.
Labels in this area
-
ABAP
1 -
API Rules
1 -
c4c
1 -
CAP development
1 -
clean-core
1 -
CRM
1 -
Custom Key Metrics
1 -
Customer Data
1 -
Determination
1 -
Determinations
1 -
Introduction
1 -
KYMA
1 -
Kyma Functions
1 -
open SAP
1 -
RAP development
1 -
Sales and Service Cloud Version 2
1 -
Sales Cloud
1 -
Sales Cloud v2
1 -
SAP
1 -
SAP Community
1 -
SAP CPQ
1 -
SAP CRM Web UI
1 -
SAP Customer Data Cloud
1 -
SAP Customer Experience
1 -
SAP CX
1 -
SAP CX extensions
1 -
SAP Integration Suite
1 -
SAP Sales Cloud v2
1 -
SAP Service Cloud v2
1 -
SAP Service Cloud Version 2
1 -
Service and Social ticket configuration
1 -
Service Cloud v2
1 -
side-by-side extensions
1 -
Ticket configuration in SAP C4C
1 -
Validation
1 -
Validations
1
Related Content
- SAP Commerce Cloud Q1 ‘24 Release Highlights in CRM and CX Blogs by SAP
- SAP Customer Data Cloud Integration with Commerce Cloud and Composable Storefront in CRM and CX Blogs by SAP
- SAP Commerce Cloud: Be Smart, Be Optimized, Be green in CRM and CX Blogs by SAP
- Managing Performance of Server Side Rendering in Commerce Cloud in CRM and CX Blogs by SAP
- SAP Variant Configuration and Pricing - How to work with audit logs? in CRM and CX Blogs by SAP
Top kudoed authors
| User | Count |
|---|---|
| 1 | |
| 1 | |
| 1 | |
| 1 | |
| 1 |