
- SAP Community
- Products and Technology
- Technology
- Technology Blogs by SAP
- How to add extension points to smart template appl...
Technology Blogs by SAP
Learn how to extend and personalize SAP applications. Follow the SAP technology blog for insights into SAP BTP, ABAP, SAP Analytics Cloud, SAP HANA, and more.
Turn on suggestions
Auto-suggest helps you quickly narrow down your search results by suggesting possible matches as you type.
Showing results for
former_member25
Explorer
Options
- Subscribe to RSS Feed
- Mark as New
- Mark as Read
- Bookmark
- Subscribe
- Printer Friendly Page
- Report Inappropriate Content
12-11-2017
8:27 AM
I work on SAPUI5 and smart templates as a Developer in SAP Labs, I found some interesting details on breakouts in Smart templates and hence I wanted to go for a blog on this topic.
As everyone would be aware of extending a smart template fiori app using breakouts, in this blog I will be explaining how to use the ReplaceFacet to add extension point on an existing section.
For example if there is a requirement to add a Bar Chart (or any control of your choice )in an Object page under any section, we can use extension points to add additional sections in the following places:
So now we with the help of ReplaceFacet we can make the List to render on a particular Facet of the Object page.
Before going through this blog, prerequisites for the UI5 / Non UI5 developers should be :
Now I have a smart template application created in https://code-fiori.dispatcher.cert.hana.ondemand.com/ with an Odata service, also it has a list view and an object page.
In my the Odata that I have used entity type is FirstEntity and EntitySet is FirstEntitySet.
In the Object page , there are two Facets written in the annotations.xml
I would like to insert the Bar Chart (sap.suite.ui.microchart.InteractiveBarChartBar) in the SecondFacet.
The most important step is to first set an ID to the facet where you would like to render the control. In my code snippet I have set the property value ID as "SecondFacet" under the UI.ReferenceFacet .
This ID will be used in a later step while configuring the app descriptor (manifest.json)
The next step is create the fragment for under which we should have the code for InteractiveBarChart.
Under webapp create a folder "ext" and under this folder create a fragment file as InteractiveBarChartControl.fragment.xml,

In the fragment xml copy the below sample snippet,
Next step is to tweak a little bit in the manifest.json file, navigate to the "extends" property and add the following extension definition.
Since the extension is done for a view under an ObjectPage, we put the fragment name inside the viewExtensions attribute and under the template "sap.suite.ui.generic.template.ObjectPage.view.Details".
Since we are replacing the Reference Facet of the "FirstEntity"( i.e "Second facet"), by the Bar Chart control we keep this as "ReplaceFacet|FirstEntitySet|SecondFacet".
Note : Format for the ReplaceFacet will be "ReplaceFacet|<<EntitySet>>|<<ID of the Facet to be used>>" Also, this is the most important step and make sure the IDs are kept unique for the facets defined.
Please refer the code snippet below for the extension in manifest,json
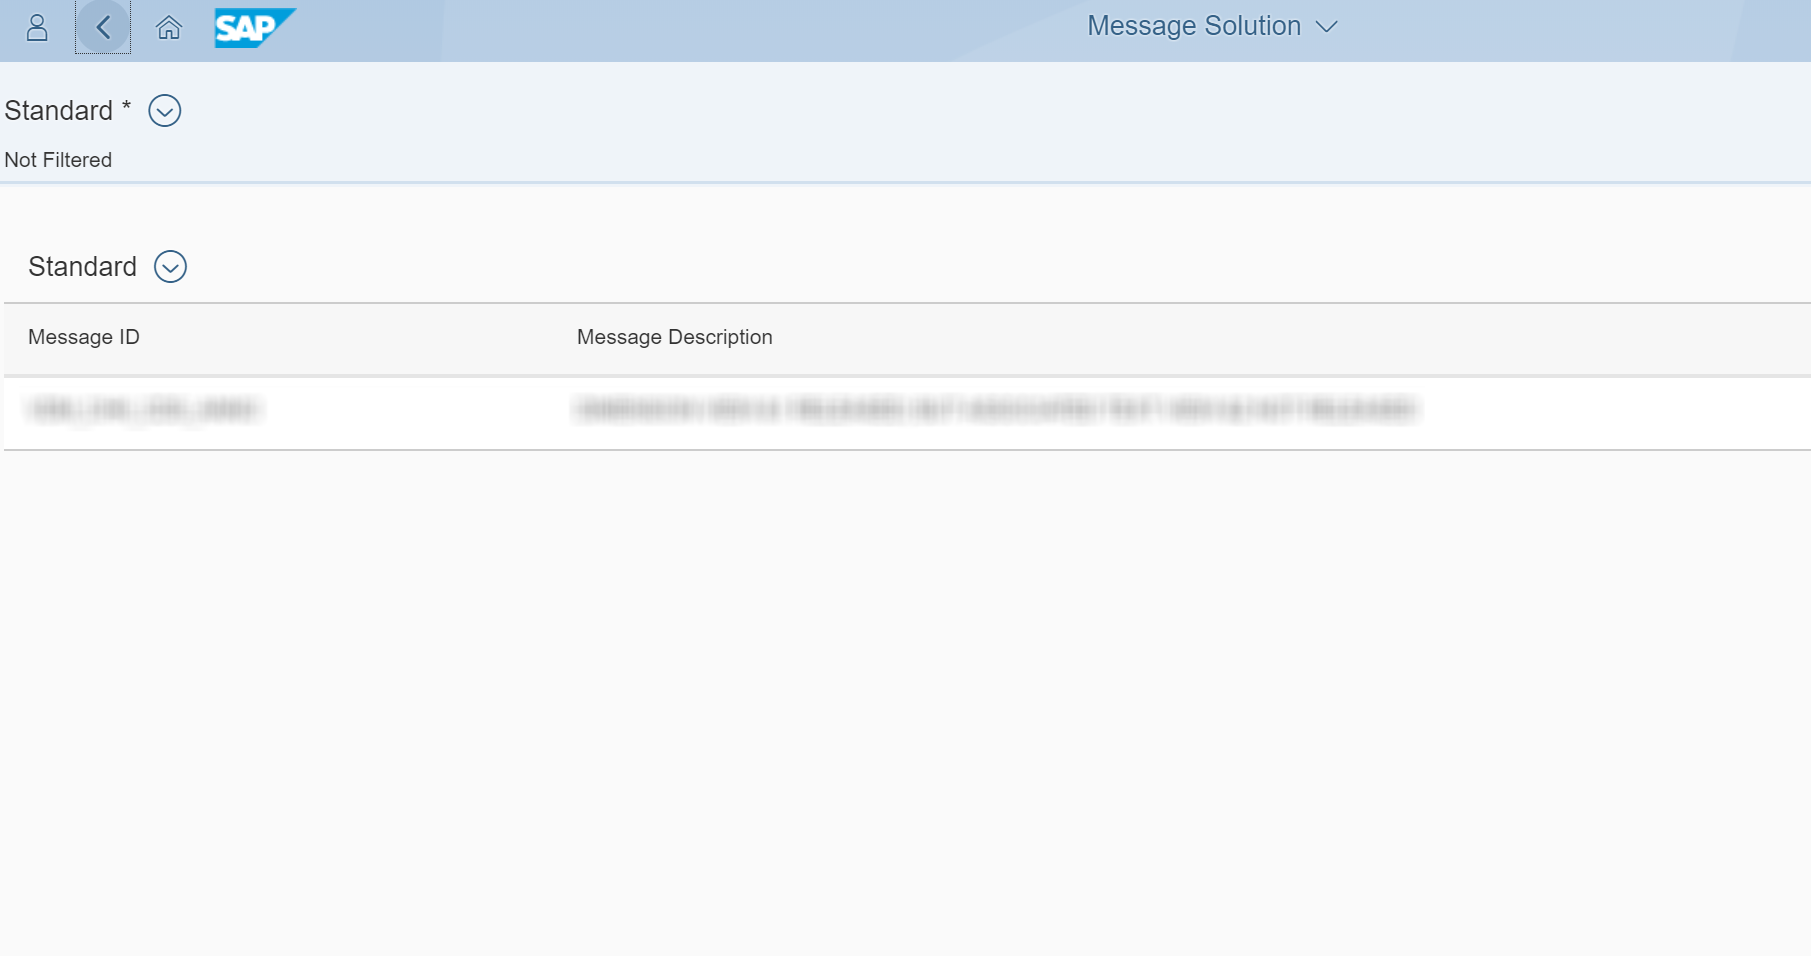
Now save the files and once the application is executed navigate from the list View to the object page, you will find the Interactive Bar Chart rendered as shown below.

By this way, developers can easily write breakouts by including the desired controls or even custom controls in a smart template fiori app.
Hope you find this blog helpful ?.
Further references and useful links regarding extensions in generated Fiori app:
https://sapui5.hana.ondemand.com/#/topic/92ad9968e41748aeb74971f7a08a91c8.html
With this you can understand the concept of replacing a facet with any control via breakouts. Also in my further blogs I will be explaining few more topics related to breakouts in SmartTemplates and more on SAPUI5 and Fiori.
Thank you
As everyone would be aware of extending a smart template fiori app using breakouts, in this blog I will be explaining how to use the ReplaceFacet to add extension point on an existing section.
For example if there is a requirement to add a Bar Chart (or any control of your choice )in an Object page under any section, we can use extension points to add additional sections in the following places:
BeforeFacet: The extension will be inserted before a given section.
ReplaceFacet: The extension will be rendered instead of an existing section.
- AfterFacet: The extension will be inserted after a given section.
So now we with the help of ReplaceFacet we can make the List to render on a particular Facet of the Object page.
Before going through this blog, prerequisites for the UI5 / Non UI5 developers should be :
- To know how to create a smart template application in Web IDE
- To know to concept of Annotations in smart template
- Basic UI5 knowledge on XML fragments, JS Views .
Now I have a smart template application created in https://code-fiori.dispatcher.cert.hana.ondemand.com/ with an Odata service, also it has a list view and an object page.
In my the Odata that I have used entity type is FirstEntity and EntitySet is FirstEntitySet.
In the Object page , there are two Facets written in the annotations.xml
<Annotations Target="NameSpace.FirstEntity">
<Annotation Term="UI.Facets">
<Collection>
<Record Type="UI.CollectionFacet">
<PropertyValue Property="ID" String="GeneralInformation"/>
<PropertyValue Property="Label" String="{@i18n>@GeneralInfoFacetLabel}"/>
<PropertyValue Property="Facets">
<Collection>
<Record Type="UI.ReferenceFacet">
<PropertyValue Property="Label" String="{@i18n>@GeneralInfoFacetLabel}"/>
<PropertyValue Property="Target" AnnotationPath="@UI.Identification"/>
</Record>
</Collection>
</PropertyValue>
</Record>
<Record Type="UI.ReferenceFacet">
<PropertyValue Property="Label" String="{@i18n>@SecondFacetLabel}"/>
<PropertyValue Property="Target" AnnotationPath="MessageSolutionSet/@UI.LineItem"/>
<PropertyValue Property="ID" String="SecondFacet"/>
</Record>
</Collection>
</Annotation>I would like to insert the Bar Chart (sap.suite.ui.microchart.InteractiveBarChartBar) in the SecondFacet.
The most important step is to first set an ID to the facet where you would like to render the control. In my code snippet I have set the property value ID as "SecondFacet" under the UI.ReferenceFacet .
This ID will be used in a later step while configuring the app descriptor (manifest.json)
The next step is create the fragment for under which we should have the code for InteractiveBarChart.
Under webapp create a folder "ext" and under this folder create a fragment file as InteractiveBarChartControl.fragment.xml,
In the fragment xml copy the below sample snippet,
<core:FragmentDefinition

	xmlns="sap.suite.ui.microchart"

	xmlns:m="sap.m"

	xmlns:core="sap.ui.core"

	>

	<m:FlexBox width="20rem" height="10rem" alignItems="Center" class="sapUiSmallMargin">

			<m:items>

				<InteractiveBarChart labelWidth="25%" selectionChanged="selectionChanged" press="press">

					<bars>

						<InteractiveBarChartBar label="Product 1" value="10" displayedValue="10%"/>

						<InteractiveBarChartBar label="Product 2" value="20" displayedValue="20%"/>

						<InteractiveBarChartBar label="Product 3" value="70" displayedValue="70%"/>

					</bars>

				</InteractiveBarChart>

			</m:items>

		</m:FlexBox>


</core:FragmentDefinition>
Next step is to tweak a little bit in the manifest.json file, navigate to the "extends" property and add the following extension definition.
Since the extension is done for a view under an ObjectPage, we put the fragment name inside the viewExtensions attribute and under the template "sap.suite.ui.generic.template.ObjectPage.view.Details".
Since we are replacing the Reference Facet of the "FirstEntity"( i.e "Second facet"), by the Bar Chart control we keep this as "ReplaceFacet|FirstEntitySet|SecondFacet".
Note : Format for the ReplaceFacet will be "ReplaceFacet|<<EntitySet>>|<<ID of the Facet to be used>>" Also, this is the most important step and make sure the IDs are kept unique for the facets defined.
Please refer the code snippet below for the extension in manifest,json
		"extends": {

			"extensions": {

				"sap.ui.viewExtensions":{

					"sap.suite.ui.generic.template.ObjectPage.view.Details": {

						"ReplaceFacet|FirstEntitySet|SecondFacet" : {

							"type": "XML",

							"className" : "sap.ui.core.Fragment",

							"fragmentName" : "TestApp.ext.InteractiveBarChartControl"

						}

					}

				}

			}

		},
Now save the files and once the application is executed navigate from the list View to the object page, you will find the Interactive Bar Chart rendered as shown below.
By this way, developers can easily write breakouts by including the desired controls or even custom controls in a smart template fiori app.
Hope you find this blog helpful ?.
Further references and useful links regarding extensions in generated Fiori app:
https://sapui5.hana.ondemand.com/#/topic/92ad9968e41748aeb74971f7a08a91c8.html
With this you can understand the concept of replacing a facet with any control via breakouts. Also in my further blogs I will be explaining few more topics related to breakouts in SmartTemplates and more on SAPUI5 and Fiori.
Thank you
- SAP Managed Tags:
- SAP Fiori,
- SAPUI5,
- User Interface
4 Comments
You must be a registered user to add a comment. If you've already registered, sign in. Otherwise, register and sign in.
Labels in this area
-
ABAP CDS Views - CDC (Change Data Capture)
2 -
AI
1 -
Analyze Workload Data
1 -
BTP
1 -
Business and IT Integration
2 -
Business application stu
1 -
Business Technology Platform
1 -
Business Trends
1,658 -
Business Trends
104 -
CAP
1 -
cf
1 -
Cloud Foundry
1 -
Confluent
1 -
Customer COE Basics and Fundamentals
1 -
Customer COE Latest and Greatest
3 -
Customer Data Browser app
1 -
Data Analysis Tool
1 -
data migration
1 -
data transfer
1 -
Datasphere
2 -
Event Information
1,400 -
Event Information
69 -
Expert
1 -
Expert Insights
177 -
Expert Insights
328 -
General
1 -
Google cloud
1 -
Google Next'24
1 -
GraphQL
1 -
Kafka
1 -
Life at SAP
780 -
Life at SAP
13 -
Migrate your Data App
1 -
MTA
1 -
Network Performance Analysis
1 -
NodeJS
1 -
PDF
1 -
POC
1 -
Product Updates
4,575 -
Product Updates
374 -
Replication Flow
1 -
REST API
1 -
RisewithSAP
1 -
SAP BTP
1 -
SAP BTP Cloud Foundry
1 -
SAP Cloud ALM
1 -
SAP Cloud Application Programming Model
1 -
SAP Datasphere
2 -
SAP S4HANA Cloud
1 -
SAP S4HANA Migration Cockpit
1 -
Technology Updates
6,872 -
Technology Updates
460 -
Workload Fluctuations
1
Related Content
- TechEd 2023 - Latest Innovations in SAP Master Data Governance in Technology Blogs by SAP
- Ideation of Use Cases for Low-Code and Citizen Development in Technology Blogs by SAP
- Top Picks: Innovations from SAP Business Technology Platform (Q4/2022) in Technology Blogs by SAP
- The Value of Contributing Time to the Community: SAP Community Member Interview with Mustafa Bensan in Technology Blogs by SAP
- SAP Fiori Elements: Breakout with sap.fe.macros in Technology Blogs by SAP
Top kudoed authors
| User | Count |
|---|---|
| 15 | |
| 10 | |
| 8 | |
| 6 | |
| 6 | |
| 6 | |
| 6 | |
| 6 | |
| 5 | |
| 4 |