
- SAP Community
- Products and Technology
- Human Capital Management
- HCM Blogs by Members
- SAP SuccessFactors: Adding Custom UI Screen
Human Capital Management Blogs by Members
Gain valuable knowledge and tips on SAP SuccessFactors and human capital management from member blog posts. Share your HCM insights with a post of your own.
Turn on suggestions
Auto-suggest helps you quickly narrow down your search results by suggesting possible matches as you type.
Showing results for
former_member70
Participant
Options
- Subscribe to RSS Feed
- Mark as New
- Mark as Read
- Bookmark
- Subscribe
- Printer Friendly Page
- Report Inappropriate Content
12-06-2017
5:52 AM
Hi All,
This blog will help you in creating a custom UI screen in SuccessFactors by following the steps, you can create, modify, maintain and delete custom objects easily and quickly.
Example: Assuming that there is a requirement to have a screen in SuccessFactors where they can get information about the Transports that all the employees are using to reach the work location. Currently, there are no such screen with fields to capture Transportation info of employees. Hence, we will now create a custom UI screen with required custom fields where the employees can input their information.
Step 1: Go to “Configure object definition” and create a new object using “Create new” Object Definition.

Step 2: Input values for Code, Effective Dating, API Visibility, Label, Description as required.

Step 3: As we are going to track transport details, Iam going to add three fields in the fields section such as 1. “Is it a Public Transport” 2. “Is it Own Vehicle” 3. “Vehicle Number”

Step 4: Click “Details” and Input the Label which you want to display on the screen for all fields.

Step 5: Click “Done” and “Save”. You will get a success message as Successfully saved.
Step 6: The next step is to create a user interface. So, we’ll click on Manage Configuration UI. That’s where we create these new user interfaces and screens.
Step 7: We are going to click on Create New. We need to give our new user interface an ID and remember that ID because we are going to need to reference it later. We are going to define which object is this based on. Ours is Transport.
Now we can see a nice screen here, with all the fields we created. And let’s go ahead and hit Save.

Step 8: The next step is to go and add that screen to one of our employee screens. That is done under Configure Employee Files. So go into Configure Employee Files and click Add New.

Step 9: Create new screen name Transport Details and “Save Dashboard” as below.

Step 10: Now add that user interface to that screen as below.

Step 11: To do that, we click at User Elements.

Step 12: Input the Portlet Title and MDF screen ID we talked about earlier called Transport and hit “Save”.

Friends, just few more clicks are needed to make new screen ready for users.
Step 13: Giving access. Click Admin Tools and go to my role-based permissions. Select a role and click Permissions…, Employee Views. Click the check to make it visible and Save.

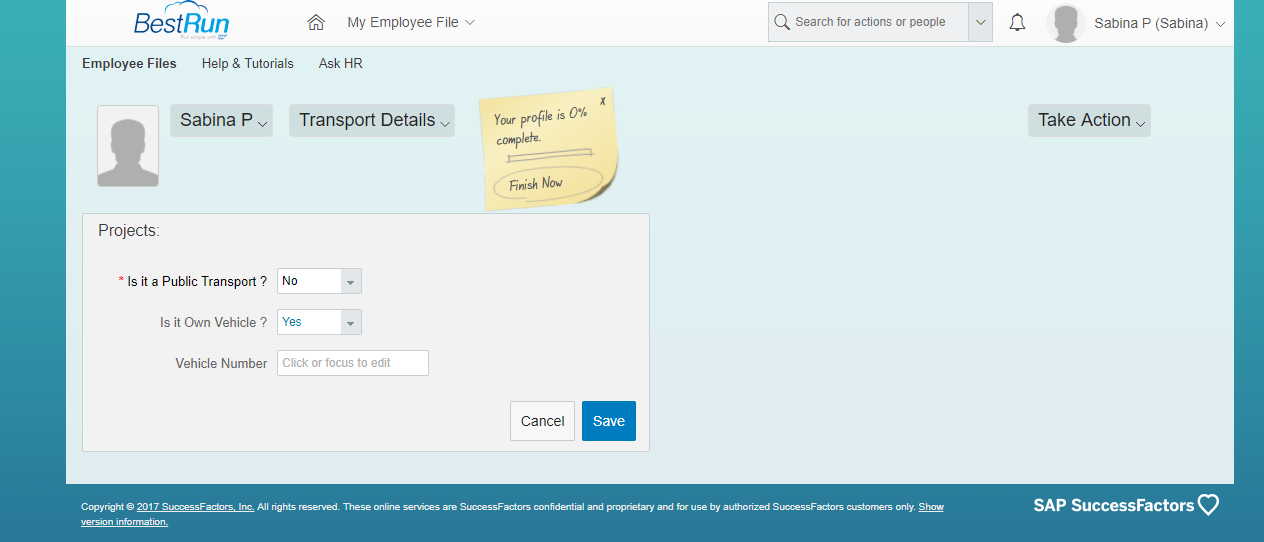
Go back to my home screen..My Employee files..you can see the new custom UI screen named, Transport Details…Click to open.

Guys you can also check my blog on how to add custom fields in successfactors screens in https://blogs.sap.com/2016/04/26/sap-successfactors-adding-custom-fields-field-types-picklist-values...
Adding custom link to Fiori Launchpad / External Application (or) any Website in below link.
https://blogs.sap.com/2018/02/28/sap-successfactors-adding-custom-link-to-fiori-launchpad-external-a...
Thanks & Regards
Sabina Paskuraj
This blog will help you in creating a custom UI screen in SuccessFactors by following the steps, you can create, modify, maintain and delete custom objects easily and quickly.
Example: Assuming that there is a requirement to have a screen in SuccessFactors where they can get information about the Transports that all the employees are using to reach the work location. Currently, there are no such screen with fields to capture Transportation info of employees. Hence, we will now create a custom UI screen with required custom fields where the employees can input their information.
Step 1: Go to “Configure object definition” and create a new object using “Create new” Object Definition.
Step 2: Input values for Code, Effective Dating, API Visibility, Label, Description as required.
Step 3: As we are going to track transport details, Iam going to add three fields in the fields section such as 1. “Is it a Public Transport” 2. “Is it Own Vehicle” 3. “Vehicle Number”
Step 4: Click “Details” and Input the Label which you want to display on the screen for all fields.
Step 5: Click “Done” and “Save”. You will get a success message as Successfully saved.
Step 6: The next step is to create a user interface. So, we’ll click on Manage Configuration UI. That’s where we create these new user interfaces and screens.
Step 7: We are going to click on Create New. We need to give our new user interface an ID and remember that ID because we are going to need to reference it later. We are going to define which object is this based on. Ours is Transport.
Now we can see a nice screen here, with all the fields we created. And let’s go ahead and hit Save.
Step 8: The next step is to go and add that screen to one of our employee screens. That is done under Configure Employee Files. So go into Configure Employee Files and click Add New.
Step 9: Create new screen name Transport Details and “Save Dashboard” as below.
Step 10: Now add that user interface to that screen as below.
Step 11: To do that, we click at User Elements.
Step 12: Input the Portlet Title and MDF screen ID we talked about earlier called Transport and hit “Save”.
Friends, just few more clicks are needed to make new screen ready for users.
Step 13: Giving access. Click Admin Tools and go to my role-based permissions. Select a role and click Permissions…, Employee Views. Click the check to make it visible and Save.
Go back to my home screen..My Employee files..you can see the new custom UI screen named, Transport Details…Click to open.
Guys you can also check my blog on how to add custom fields in successfactors screens in https://blogs.sap.com/2016/04/26/sap-successfactors-adding-custom-fields-field-types-picklist-values...
Adding custom link to Fiori Launchpad / External Application (or) any Website in below link.
https://blogs.sap.com/2018/02/28/sap-successfactors-adding-custom-link-to-fiori-launchpad-external-a...
Thanks & Regards
Sabina Paskuraj
- SAP Managed Tags:
- SAP SuccessFactors Employee Central - Employee Profile
2 Comments
You must be a registered user to add a comment. If you've already registered, sign in. Otherwise, register and sign in.
Labels in this area
-
1H 2024 Product Release
5 -
2H 2023 Product Release
1 -
ACCRUAL TRANSFER
1 -
Advanced Workflow
1 -
Anonymization
1 -
BTP
1 -
Business Rules
1 -
Canvas Report
1 -
Career Development
1 -
Certificate-Based Authentication
1 -
Cloud Platform Integration
1 -
Compensation
1 -
Compensation Information Management
1 -
Compensation Management
1 -
Compliance
2 -
Content
1 -
Conversational AI
2 -
Custom Data Collection
1 -
custom portlet
1 -
Data & Analytics
1 -
Data Integration
1 -
Dayforce
1 -
deep link
1 -
deeplink
1 -
Delimiting Pay Components
1 -
Deprecation
1 -
Employee Central
1 -
Employee Central Global Benefits
1 -
Employee Central Payroll
1 -
employee profile
1 -
Employee Rehires
1 -
external terminal
1 -
external time events
1 -
Generative AI
2 -
Getting Started
1 -
Global Benefits
1 -
Guidelines
1 -
H2 2023
1 -
HR
2 -
HR Data Management
1 -
HR Transformation
1 -
ilx
1 -
Incentive Management Setup (Configuration)
1 -
Integration Center
2 -
Integration Suite
1 -
internal mobility
1 -
Introduction
1 -
learning
3 -
LMS
2 -
LXP
1 -
Massively MDF attachments download
1 -
Mentoring
1 -
Metadata Framework
1 -
Middleware Solutions
1 -
OCN
1 -
OData APIs
1 -
ONB USA Compliance
1 -
Onboarding
2 -
Opportunity Marketplace
1 -
Pay Component Management
1 -
Platform
1 -
portlet
1 -
POSTMAN
1 -
Predictive AI
2 -
Recruiting
1 -
recurring payments
1 -
Role Based Permissions (RBP)
2 -
SAP CPI (Cloud Platform Integration)
1 -
SAP HCM (Human Capital Management)
2 -
SAP HR Solutions
2 -
SAP Integrations
1 -
SAP release
1 -
SAP successfactors
5 -
SAP SuccessFactors Customer Community
1 -
SAP SuccessFactors OData API
1 -
SAP Workzone
1 -
SAP-PAYROLL
1 -
skills
1 -
Skills Management
1 -
sso deeplink
1 -
Stories in People Analytics
3 -
Story Report
1 -
SuccessFactors
2 -
SuccessFactors Employee central home page customization.
1 -
SuccessFactors Onboarding
1 -
successfactors onboarding i9
1 -
Table Report
1 -
talent
1 -
Talent Intelligence Hub
2 -
talents
1 -
Tax
1 -
Tax Integration
1 -
Time Accounts
1 -
Workflows
1 -
XML Rules
1
Related Content
- Latest Updates to the Reimagined Applicant Management Tool in SAP SuccessFactors Recruiting in Human Capital Management Blogs by SAP
- Explore the Enhanced New Hire Experience in SAP SuccessFactors Onboarding in Human Capital Management Blogs by SAP
- 1H 2024 - Release highlights of SuccessFactors Career Development Planning in Human Capital Management Blogs by Members
- First Half 2024 Release: What’s New in SAP SuccessFactors HCM in Human Capital Management Blogs by SAP
- How to download the object data from SAP SuccessFactors Territory and Quota via Express Data Loader in Human Capital Management Blogs by SAP
Top kudoed authors
| User | Count |
|---|---|
| 13 | |
| 10 | |
| 5 | |
| 3 | |
| 3 | |
| 1 | |
| 1 | |
| 1 | |
| 1 | |
| 1 |