
- SAP Community
- Products and Technology
- Technology
- Technology Blogs by SAP
- SAML Authentication Rest Endpoint for BOE on Tomca...
Technology Blogs by SAP
Learn how to extend and personalize SAP applications. Follow the SAP technology blog for insights into SAP BTP, ABAP, SAP Analytics Cloud, SAP HANA, and more.
Turn on suggestions
Auto-suggest helps you quickly narrow down your search results by suggesting possible matches as you type.
Showing results for
shruthi_annappa
Explorer
Options
- Subscribe to RSS Feed
- Mark as New
- Mark as Read
- Bookmark
- Subscribe
- Printer Friendly Page
- Report Inappropriate Content
11-16-2017
12:35 PM
This document summarizes the planned enhancements in the next SAP BI 4.2 Support Package 5 for New Fiori BI Launchpad. As the SAP BI 4.2 SP5 content is still subject to change, please consider the below legal disclaimer statement:
The information in this presentation is confidential and proprietary to SAP and may not be disclosed without the permission of SAP. This presentation is not subject to your license agreement or any other service or subscription agreement with SAP. SAP has no obligation to pursue any course of business outlined in this document or any related presentation, or to develop or release any functionality mentioned therein. This document, or any related presentation and SAP’s strategy and possible future developments, products and or platforms directions and functionality are all subject to change and may be changed by SAP at any time for any reason without notice. The information in this document is not a commitment, promise or legal obligation to deliver any material, code or functionality. This document is provided without a warranty of any kind, either express or implied, including but not limited to, the implied warranties of merchantability, fitness for a particular purpose, or non-infringement. This document is for informational purposes and may not be incorporated into a contract. SAP assumes no responsibility for errors or omissions in this document, except if such damages were caused by SAP´s willful misconduct or gross negligence.
All forward-looking statements are subject to various risks and uncertainties that could cause actual results to differ materially from expectations. Readers are cautioned not to place undue reliance on these forward-looking statements, which speak only as of their dates, and they should not be relied upon in making purchasing decisions.
The SAML REST API can be invoked by any client which mimics the behavior of a web browser for SAML Authentication.
The rest end point for SAML Authentication is (http://host:<port>/biprws/v1/logon/saml), takes no query parameters. It reads the user principal from the HTTP request object and does a trusted authentication for that user principal and returns the serialized token.

The TrustedPrincipal.conf file is downloaded.
2.Modify the file in below location: <BOE Install Dir>\tomcat\webapps\biprws\WEB-INF/config/custom/biprws.properties as shown in screen shot below

3.Restart Tomcat
The IDP user has to created in BOE or imported through some SDK script or export using CSV option in CMC.The SAML based authentication relies on TrustedAuth from the web-server to the CMS. For this, the IDP users will have to be created in BOE as Enterprise users.
If you are using SAP Cloud Platform Identity Provider, export all the users and then import them to the BI platform. Refer How to import users in bulk from Central Management Console
To export SAP Cloud Platform users to CSV, refer Export Existing Users of a Tenant of SAP Cloud Platform Identity Authentication Service

A new filter has been introduced for SAML. The relevant section in the web.xml will be kept commented by default.
Enable filters in web.xml of RestWebServices by uncommenting the SAML section(s).
Web.xml file path: <BOE Install Dir>\tomcat\webapps\biprws\WEB-INF web.xml .
1.Uncomment the listener , context param, filter and filter mapping for SAML.
1.Web.XML before changes looks like as shown in screenshot below.
2.Web.XML after uncommenting SAML section(s) looks as shown in screenshot below
2.Delete the work folder under biprws in <BOE Install Dir>\tomcat\work.
To update the IDP metadata in SP, download the IDP metadata from the respective IDP service providers. Copy the metadata file to <BOE Install Dir>\tomcat\webapps\biprws\WEB-INF and rename it to idp-meta-downloaded.xml . For more details on downloading the IDP metadata, refer Tenant SAML 2.0 Configuration

If BOE is deployed on any Non -Windows machine, the path seperators in filepath to the IDP metadata under the bean FilesystemMetadataProvider should be changed in securityContext.xml under <BOE Install Dir>\tomcat\webapps\BOE\WEB-INF.
i.e <value type=”java.io.File”>/WEB-INF/idp-meta-downloaded.xml</value> has to be changed to <value type=”java.io.File”>\WEB-INF\idp-meta-downloaded.xml</value> .
This step is optional applicable only if you want to use your own keystore file.
SAML exchanges involve usage of cryptography for signing and encryption of data. A sample self-signed keystore sampletestKeystore.jks is packaged with the product and is valid till October 18, 2019.sampletestKeystore.jks has an alias name Testkey and password Password1. You can now generate a self-signed keystore file using the JAVA utility keytool. Follow the steps below to generate a keystore file:
Example
keytool -genkeypair -alias TestAlias -keypass AliasPassword -keystore sampleKeystore.jks -validity 735 .
b.Run the command: keytool -genkeypair -alias aliasname -keypass password -keystore samplekeystore.jks -validity numberofdays
The keystore file is generated at <INSTALLDIR>\SAP BusinessObjects Enterprise XI 4.0\win64_x64\sapjvm\bin.
<bean id=”keyManager” class=”org.springframework.security.saml.key.JKSKeyManager”> <constructor-arg value=”/WEB-INF/sampleKeystore.jks”/><constructor-arg type=”java.lang.String” value=”Password1″/><constructor-arg><map><entry key=” TestAlias ” value=”AliasPassword”/></map></constructor-arg><constructor-arg type=”java.lang.String” value=” TestAlias “/></bean>
Note: SP metadata has to be generated everytime this keystore file is changed.Our sample sp metadata will be working only with our sample keystore certificate.
Go to http://host:tomcatport/biprws/v1/logon/saml/saml/metadata. The XML file gets downloaded automatically after navigating to the above URL.Upload the XML file to the identity provider. Upload this in IDP using the relevant IDP’s feature support.
Note
A pre-generated service Provider (SP) metadata file is shipped by default. You can edit and upload the same metadata file. In <BOE Install Dir>\tomcat\webapps\biprws\WEB-INF spring_saml_metadata.xml, replace the XML tags <replace_withip> with the IP address or hostname of the machine depending on your network, and <replace_withport> with the Tomcat port number.
For example for HCP as IDP , Please follow following steps
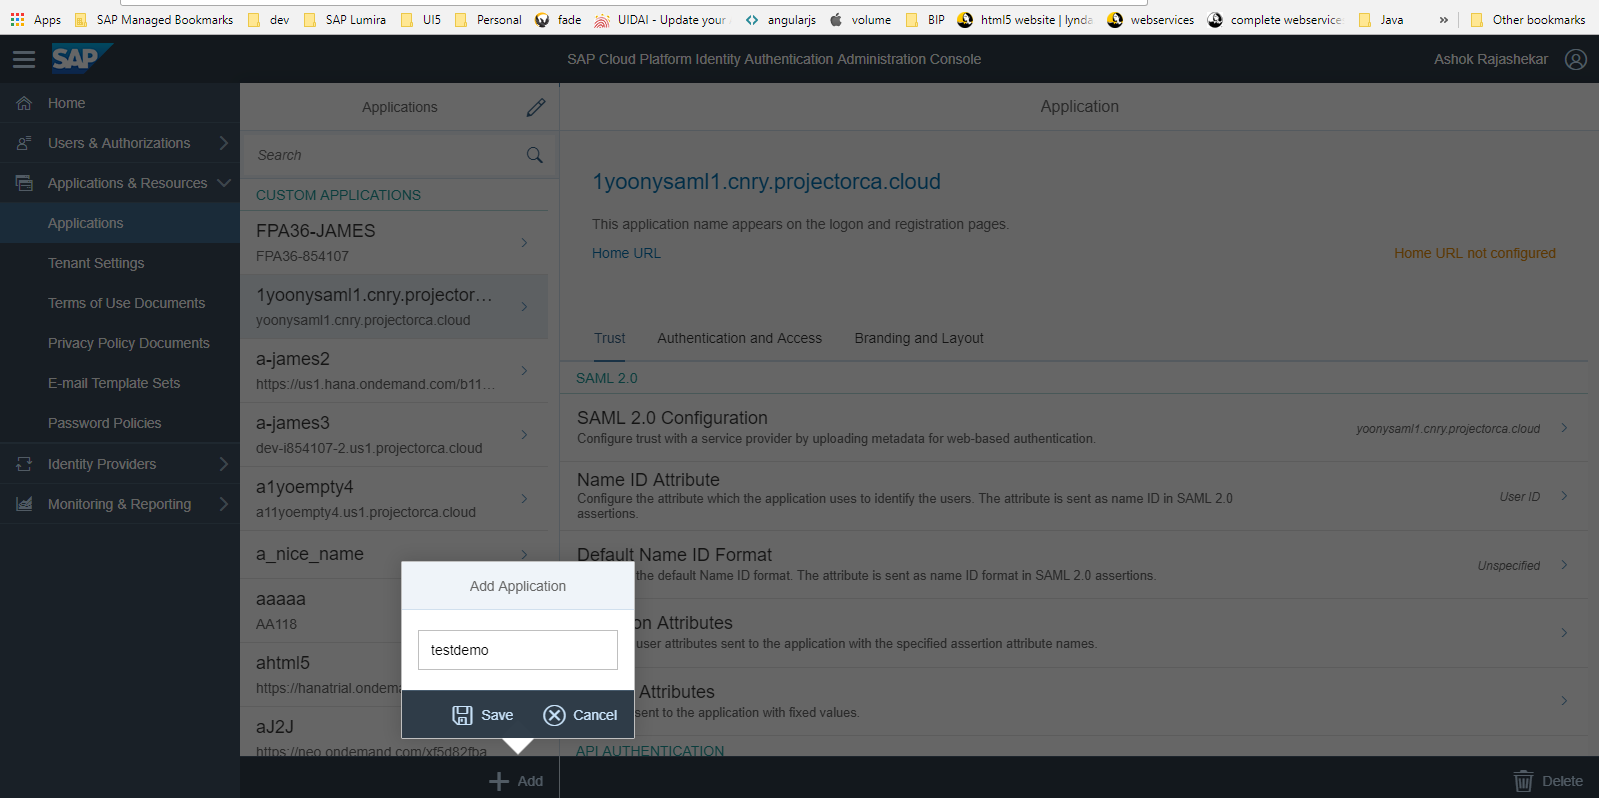
SP metadata should be uploaded on creation of a SAML application in HCP.
1.Create a new app underapplications
App Creation

The information in this presentation is confidential and proprietary to SAP and may not be disclosed without the permission of SAP. This presentation is not subject to your license agreement or any other service or subscription agreement with SAP. SAP has no obligation to pursue any course of business outlined in this document or any related presentation, or to develop or release any functionality mentioned therein. This document, or any related presentation and SAP’s strategy and possible future developments, products and or platforms directions and functionality are all subject to change and may be changed by SAP at any time for any reason without notice. The information in this document is not a commitment, promise or legal obligation to deliver any material, code or functionality. This document is provided without a warranty of any kind, either express or implied, including but not limited to, the implied warranties of merchantability, fitness for a particular purpose, or non-infringement. This document is for informational purposes and may not be incorporated into a contract. SAP assumes no responsibility for errors or omissions in this document, except if such damages were caused by SAP´s willful misconduct or gross negligence.
All forward-looking statements are subject to various risks and uncertainties that could cause actual results to differ materially from expectations. Readers are cautioned not to place undue reliance on these forward-looking statements, which speak only as of their dates, and they should not be relied upon in making purchasing decisions.
The SAML REST API can be invoked by any client which mimics the behavior of a web browser for SAML Authentication.
The rest end point for SAML Authentication is (http://host:<port>/biprws/v1/logon/saml), takes no query parameters. It reads the user principal from the HTTP request object and does a trusted authentication for that user principal and returns the serialized token.
To configure SAML for REST end point, follow the procedure below:
1.Configure Trusted Authentication for Rest Webservices on Tomcat with Websession as the option.
- Configure Shared Secret on CMC.
- Go to CMC Application, Authentication , Enterprise . Refer Screen below
- Enable Trusted Authentication.
- Set the Validity.
- Choose New Shared Secret.
- To download the generated shared secret, choose Download Shared Secret.
The TrustedPrincipal.conf file is downloaded.
- Paste the TrustedPrincipal.conf file in <INSTALLDIR>\SAP BusinessObjects Enterprise XI 4.0\win64_x64and <INSTALLDIR>\SAP BusinessObjects Enterprise XI 4.0\win64_x32
- Go to CMC Authentication Enterprise and choose Update.
2.Modify the file in below location: <BOE Install Dir>\tomcat\webapps\biprws\WEB-INF/config/custom/biprws.properties as shown in screen shot below
3.Restart Tomcat
2)User Creation on BOE .
The IDP user has to created in BOE or imported through some SDK script or export using CSV option in CMC.The SAML based authentication relies on TrustedAuth from the web-server to the CMS. For this, the IDP users will have to be created in BOE as Enterprise users.
If you are using SAP Cloud Platform Identity Provider, export all the users and then import them to the BI platform. Refer How to import users in bulk from Central Management Console
To export SAP Cloud Platform users to CSV, refer Export Existing Users of a Tenant of SAP Cloud Platform Identity Authentication Service
3)Configurations in the deployment descriptor – web.xml.
A new filter has been introduced for SAML. The relevant section in the web.xml will be kept commented by default.
Enable filters in web.xml of RestWebServices by uncommenting the SAML section(s).
Web.xml file path: <BOE Install Dir>\tomcat\webapps\biprws\WEB-INF web.xml .
1.Uncomment the listener , context param, filter and filter mapping for SAML.
1.Web.XML before changes looks like as shown in screenshot below.
2.Web.XML after uncommenting SAML section(s) looks as shown in screenshot below
2.Delete the work folder under biprws in <BOE Install Dir>\tomcat\work.
4.Update IDP Metadata
To update the IDP metadata in SP, download the IDP metadata from the respective IDP service providers. Copy the metadata file to <BOE Install Dir>\tomcat\webapps\biprws\WEB-INF and rename it to idp-meta-downloaded.xml . For more details on downloading the IDP metadata, refer Tenant SAML 2.0 Configuration
If BOE is deployed on any Non -Windows machine, the path seperators in filepath to the IDP metadata under the bean FilesystemMetadataProvider should be changed in securityContext.xml under <BOE Install Dir>\tomcat\webapps\BOE\WEB-INF.
i.e <value type=”java.io.File”>/WEB-INF/idp-meta-downloaded.xml</value> has to be changed to <value type=”java.io.File”>\WEB-INF\idp-meta-downloaded.xml</value> .
5).KeyStore Generation
This step is optional applicable only if you want to use your own keystore file.
SAML exchanges involve usage of cryptography for signing and encryption of data. A sample self-signed keystore sampletestKeystore.jks is packaged with the product and is valid till October 18, 2019.sampletestKeystore.jks has an alias name Testkey and password Password1. You can now generate a self-signed keystore file using the JAVA utility keytool. Follow the steps below to generate a keystore file:
- Navigate to <INSTALLDIR>\SAP BusinessObjects Enterprise XI 4.0\win64_x64\sapjvm\bin.
Example
keytool -genkeypair -alias TestAlias -keypass AliasPassword -keystore sampleKeystore.jks -validity 735 .
b.Run the command: keytool -genkeypair -alias aliasname -keypass password -keystore samplekeystore.jks -validity numberofdays
| Command | Description |
| -alias | Enter the alias name of the certificate |
| -keypass | Enter the certificate’s password |
| -keystore | Name of the keystore file |
| -validity | Validity of the certificate |
| numberofdays | Number of days for which the self-signed certificate is valid. |
- The following questions are prompted after executing the command:
- Enter keystore password: *****(Password1)
- Re-enter new password: *****(Password1)
- What is your first and last name? : Rohit Prasad
- What is the name of your organizational unit? : BusinessObjects
- What is the name of your organization? : SAP
- What is the name of your city and locality? : BLR
- What is the name of your State and Province? : KA
- What is the two-letter country code for this unit? : IN
- Stop the Tomcat application server.
The keystore file is generated at <INSTALLDIR>\SAP BusinessObjects Enterprise XI 4.0\win64_x64\sapjvm\bin.
- Move the keystore file to <INSTALLDIR>\tomcat\webapps\biprws\WEB-INF
- Edit the xmlfile located at <INSTALLDIR>\tomcat\webapps\biprws\WEB-INF with the new alias name, password, and keystore file name. Refer the XML code below:
<bean id=”keyManager” class=”org.springframework.security.saml.key.JKSKeyManager”> <constructor-arg value=”/WEB-INF/sampleKeystore.jks”/><constructor-arg type=”java.lang.String” value=”Password1″/><constructor-arg><map><entry key=” TestAlias ” value=”AliasPassword”/></map></constructor-arg><constructor-arg type=”java.lang.String” value=” TestAlias “/></bean>
| Refer the table below for understanding the arguments: | |
| XML Tag | Description |
| <constructor-arg value=”/WEB-INF/sampleKeystore.jks”/> | Locates the keystore file. |
| <constructor-arg type=”java.lang.String” value=”Password1″/> | Password for the keystore file. |
| <entry key=” TestAlias ” value=” AliasPassword”/> | Alias password |
| <constructor-arg type=”java.lang.String” value=” TestAlias “/> | Alias of the default certificate |
Note: SP metadata has to be generated everytime this keystore file is changed.Our sample sp metadata will be working only with our sample keystore certificate.
6)Restart the Tomcat application server.
7)Generate and upload the service provider metadata.
Go to http://host:tomcatport/biprws/v1/logon/saml/saml/metadata. The XML file gets downloaded automatically after navigating to the above URL.Upload the XML file to the identity provider. Upload this in IDP using the relevant IDP’s feature support.
Note
A pre-generated service Provider (SP) metadata file is shipped by default. You can edit and upload the same metadata file. In <BOE Install Dir>\tomcat\webapps\biprws\WEB-INF spring_saml_metadata.xml, replace the XML tags <replace_withip> with the IP address or hostname of the machine depending on your network, and <replace_withport> with the Tomcat port number.
For example for HCP as IDP , Please follow following steps
SP metadata should be uploaded on creation of a SAML application in HCP.
1.Create a new app underapplications
App Creation
2. Upload SP metadata as shown in screenshot.
- If you are using SAP Cloud Identity, to create a SAML application in IDP and upload the SP xmlin the IDP for configuring the SAML SSO to BIPlatform, refer Configure a Trusted Service Provider.
- Restart the Tomcat application server.
- SAP Managed Tags:
- SAP BusinessObjects Business Intelligence platform
You must be a registered user to add a comment. If you've already registered, sign in. Otherwise, register and sign in.
Labels in this area
-
ABAP CDS Views - CDC (Change Data Capture)
2 -
AI
1 -
Analyze Workload Data
1 -
BTP
1 -
Business and IT Integration
2 -
Business application stu
1 -
Business Technology Platform
1 -
Business Trends
1,658 -
Business Trends
110 -
CAP
1 -
cf
1 -
Cloud Foundry
1 -
Confluent
1 -
Customer COE Basics and Fundamentals
1 -
Customer COE Latest and Greatest
3 -
Customer Data Browser app
1 -
Data Analysis Tool
1 -
data migration
1 -
data transfer
1 -
Datasphere
2 -
Event Information
1,400 -
Event Information
74 -
Expert
1 -
Expert Insights
177 -
Expert Insights
348 -
General
1 -
Google cloud
1 -
Google Next'24
1 -
GraphQL
1 -
Kafka
1 -
Life at SAP
780 -
Life at SAP
14 -
Migrate your Data App
1 -
MTA
1 -
Network Performance Analysis
1 -
NodeJS
1 -
PDF
1 -
POC
1 -
Product Updates
4,575 -
Product Updates
391 -
Replication Flow
1 -
REST API
1 -
RisewithSAP
1 -
SAP BTP
1 -
SAP BTP Cloud Foundry
1 -
SAP Cloud ALM
1 -
SAP Cloud Application Programming Model
1 -
SAP Datasphere
2 -
SAP S4HANA Cloud
1 -
SAP S4HANA Migration Cockpit
1 -
Technology Updates
6,871 -
Technology Updates
482 -
Workload Fluctuations
1
Related Content
- Configuration as code (CaC) with destinations. in Technology Blogs by SAP
- SAP CAP - Could not work with on-premise remote odata service via destination - 401 authentication in Technology Q&A
- Connect to Data Source & Services in SAP FIORI APPLICATION (BAS) in Technology Q&A
- SAP CAP - Access HDI in a different cloud foundry space: Deployment Error (Invalid Role Name) in Technology Q&A
- New Release Available: SAP Cloud Connector 2.17.0 in Technology Blogs by SAP
Top kudoed authors
| User | Count |
|---|---|
| 15 | |
| 11 | |
| 10 | |
| 9 | |
| 8 | |
| 8 | |
| 7 | |
| 7 | |
| 7 | |
| 7 |