1. Background
Eclipse Paho client is mentioned in the official help document as the MQTT simulation tool to post MQTT messages to SAP IoT service 4.0, however, Paho is frequently crashing with MacOS 10.13 or sometimes on MacOS 10.12. Here MQTT.fx is alternative solution if you want to simulate the MQTT rest with a very user friend GUI.
In this document, we are mainly show you the configuration on the MQTT.fx side instead of showing you how to use SAP IoT service gateway.
You can download the latest MQTT.fx (
http://mqttfx.jensd.de/ ) from the download tab, you can download the latest version (based on your OS version).
Please install MQTT.fx firstly.
2. Send MQTT message to IoT Gateway Cloud using MQTT.fx
2.1 Download the certificate of your device and
generate the certifications with command
openssl pkcs12 -export -in certificate.pem -inkey key.pem -out client.ks
(you can refer to the help link for the steps of how to create device and download certificates
https://help.sap.com/viewer/e765b2a5b99540ce84da397c20cc1993/Cloud/en-US)

You will then have your private certificated generated for your device.
2.2 Configure the connection on MQTT.fx by Click the button or Or click Extras => Edit connection profiles on the menu
 2.3 Add a new profile and :
- use your IOT service tenant URL as the broker address (**.cp.iot.sap)
- use 8883 as the Broker port
- use Device alternate ID as the client ID
 2.4 Enable the SSL connection with your certificate
- find the cacerts file when your JVM installed (normally in the folder /Library/Java/JavaVirtualMachines/jdk1.8.0_152.jdk/Contents/Home/jre/lib/security)
- use changeit as the default key
- us the client.ks certificate file generated in step1
- Use the private key when you generate the certificate in step 2.1
- Input the private key again used in step 2.1
 2.5 Save the profile and connect to the IoT Service 4.0 Gateway Cloud and Update the topic and the message content in the MQTT.fx client:
- measures/deviceAlternateID as the topic ID
- Message payload shall be like the following format: {"capabilityAlternateId": "a480ac8a3d0f92a2", "sensorAlternateId": "cfcfed6bb78d724c", "measures": [["25"]] }
- Please replace the capability alternate ID and sensor alternate ID with your date
- Press publish
- * The first message publish will create a topic for this device
- * if the sensor is not created, the first handshake of the message will automatically create a sensor with the specified alternate ID

 2.6 You can also see the data in the data visualization tab in the IoT Service Cockpit
3. Send MQTT message to IoT Gateway EDGE using MQTT.fx
3.1
Start your gateway edge on your Mac
(you can refer to the help link for the steps of how to download and setup the IoT gateway
https://help.sap.com/viewer/c2717aff5c194576a9dd19d4cabef0ad/Cloud/en-US/4a0b1123bdb14bcd9876d636f28...)
 3.2 Configure the connection on MQTT.fx
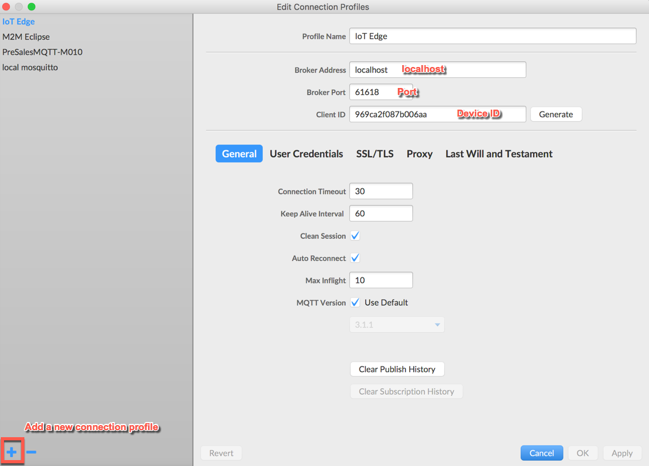
3.3 Add a new connection profile for IoT Gateway Edge:
3.2 Configure the connection on MQTT.fx
3.3 Add a new connection profile for IoT Gateway Edge:
- Broker address as localhost
- Port as 61618
- Client ID as Device Alternate ID
 3.4 Save the profile and connect to the IoT gateway edge
- Use measures/deviceAlternateIDas the topic
- Message payload shall be like the following format {"capabilityAlternateId": "a480ac8a3d0f92a2", "sensorAlternateId": "cfcfed6bb78d724c", "measures": [["25"]] }
- Replace the capability alternate ID and sensor alternate ID with your data
- Press publish
- * The first message publish will create a topic for this device
- * if the sensor is not created, the first handshake of the message will automatically create a sensor with the specified alternate ID
Logs in the MQTT.fx Client
 Logs in the IoT Gateway Edge
 3.5 You can also see the data in the data visualization tab in the IoT Service Cockpit
