
- SAP Community
- Products and Technology
- Technology
- Technology Blogs by SAP
- SAP HANA 2.0 XS Advanced: a host auto-failover ins...
Technology Blogs by SAP
Learn how to extend and personalize SAP applications. Follow the SAP technology blog for insights into SAP BTP, ABAP, SAP Analytics Cloud, SAP HANA, and more.
Turn on suggestions
Auto-suggest helps you quickly narrow down your search results by suggesting possible matches as you type.
Showing results for
former_member18
Participant
Options
- Subscribe to RSS Feed
- Mark as New
- Mark as Read
- Bookmark
- Subscribe
- Printer Friendly Page
- Report Inappropriate Content
11-13-2017
10:09 PM
Introduction
While the host-auto failover configuration with the core HANA Database is well known, the additional steps when XS Advanced (XSA) is installed are less well known. In below steps I give an example how it can be configured. When you read through the notes several decisions must be made for your own implementation, so your configuration may be different.
- Failover & High Availability with SAP HANA extended application services, advanced model
- Domains and routing configuration for SAP HANA extended application services, advanced model
- Providing SSL certificates for domains defined in SAP HANA extended application services, advanced model
Pay special attention to the routing mode, the default in the hdblcm installer uses ports routing, but as documented in SAP Note 2245631 for a production system hostname routing is recommended.
For this example, the setup will include:
- HANA Installed with two nodes in host auto-failover configuration
- Hostname routing
- Standalone SAP Web Dispatcher as the chosen failover router
- No SSL termination at the failover router
- XSA default domain is serge.xs2tests-wdf.sap.corp and configured in the DNS
- IP addresses:
- Failover Web Dispatcher ends in .198
- XSA Master ends in .199
- XSA Stand-by ends in .200
Please make sure the above decisions and data points are completed before performing the configuration.
Let’s start with testing the DNS pre-requisite, both serge.xs2tests-wdf.sap.corp and *. serge.xs2tests-wdf.sap.corp must resolve to the failover web dispatcher:

Failover Web Dispatcher
Install the Failover SAP Web Dispatcher guided by SAP Note 908097, my example uses version 7.49 patch 214. Make sure you can login to the SAP Web Dispatcher Administration URL. Depending on your end-users the SAP Web Dispatcher may be located in a separate zone such as the DMZ.
After the installation, update the SAP Web Dispatcher profile to reflect your hostnames and ports, for HANA the XSA port will be 3##33, where ## represents the HANA instance number. In below example the HANA instance number is 01 and the SID is PR1, adjust this your instance is different. Replace XSA Master and XSA Standby to reflect your hostnames (fqdn):
- icm/server_port_0=PROT=ROUTER, PORT=30133, TIMEOUT=60, PROCTIMEOUT=600
- wdisp/system_0 = NAME=PR1, SID=PR1, SRCVHOST=*:30133, EXTSRV=https://<XSA Master>:30133#MAIN_INSTANCE;https://<XSA Standby>:30133#FAILOVER_INSTANCE
- wdisp/server_0=NAME=MAIN_INSTANCE, LBJ=1, ACTIVE=1
- wdisp/server_1=NAME=FAILOVER_INSTANCE,LBJ=2147483647, ACTIVE=1
Other settings to consider:

Make sure that the SAP Web Dispatcher is running with the updated configuration before installing HANA. In addition, the port (in my example 30133) has to be open between the Failover Web Dispatcher server and the HANA servers in both directions.
HANA & XSA
Next install HANA and XSA, or if HANA is already installed, add XSA. Follow the official HANA installation guides on http://help.sap.com/hana to install the multi-node cluster for host-auto failover. The HANA 2.0 revision has to be at least revision 21.
In my example during the XS Advanced installation prompts for routing mode and XSA Domain Name:

After the installation, let’s check. Make sure you are logged in as the <sid>adm user, issue command “xs-admin-login” (or “xs login”) and enter the XSA_ADMIN password:

Next check the URL’s with command “xs service-urls” (or “xs a”):

Verify that the URL’s work, a quick example is to test the xsa-admin URL since the XSA_ADMIN user already has the required authorizations whereas it does not for the webide (see webide post-installation link for additional steps). Since we have not configured the SSL certificates yet, you will get a security warning from the browser because a self-signed certificate is used.
The expected xsa-admin url response:

When you inspect the certificate path you will see the self-signed certificate:

Depending on the browser you may be able to click through the warnings and get to the login page, but at this point it is not yet important to login. Just make sure the URL resolves and gets a response. If you get an error response, such as 503, check the output of “xs a” and make sure xsa-admin is in a running state:

For example, if it shows 0/1 then check why the instance was not started (check xs logs command in the admin guide). Note that it is normal for the apps ending in -db to be stopped, these will be started when needed and no user intervention is required.
Certificate Steps
To provide secure communication the next section will show the steps to install a signed certificate chain. There are multiple ways to do this, the steps below use the Common Name (CN) with a wildcard. For more information review the help documentation and SAP Note https://launchpad.support.sap.com/#/notes/2243019.
Note: As of SAP HANA2 SPS03 the help documentation provides an alternate option, namely it suggests to use SubjectAltNames. An example to use SubjectAltNames and its benefits is explained in this blog. The steps from the blog using SubjectAltNames can be used to replace the certificate steps below.
High level steps:
- in the SAP Web Dispatcher generate a wildcard certificate request, get it signed by your Certificate Authority of choice, import the certificate chain
- from the command line export the certificate in p12 format, convert it to pem format and prepare the certificate files for XSA import
- in the XSA environment, import the certificate files and restart HANA
Step 1
In the SAP Web Dispatcher generate a wildcard certificate request, get it signed by your Certificate Authority of choice, import the certificate chain.
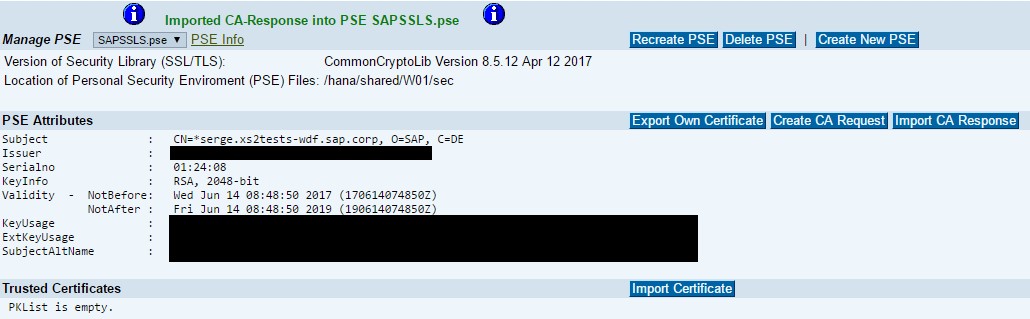
Login to the SAP Web Dispatcher Administrator URL and go to PSE Management. Next select SAPSSLS.pse and “Recreate PSE”

Recreate the PSE where the CN is set with a wildcard. In my example, my XSA domain name was set to serge.xs2tests-wdf.sap.corp, so I set the CN to CN=*. serge.xs2tests-wdf.sap.corp. By using the wildcard CN my certificate will apply for webide.serge.xs2tests-wdf.sap.corp, xsa-admin.serge.xs2tests-wdf.sap.corp, etc.

The next step is to create the CA request and have it signed by your CA. Make sure to have the full chain available for import including the root CA and intermediate signing certificates.


The result:
Step 2
From the command line export the certificate in p12 format, convert it to pem format and prepare the certificate files for XSA import.
Login to the Failover Web Dispatcher server as the <sid>adm user (or whichever user is the Linux owner of the Web Dispatcher directories/files). Change to the $SECUDIR directory, in my instance /hana/shared/W01/sec.
Export the certificate chain we just imported in .p12 format. Make sure to set a compliant password and have it available for the import step we’ll execute later. Command:
/hana/shared/W01/sapgenpse export_p12 -p /hana/shared/WD5/sec/SAPSSLS.pse star.serge.xs2tests-wdf.sap.corp.p12

The next step is to convert the exported .p12 file to .pem format. There are several websites that can do this for you, however using openssl installed locally is a more secure option.
Command:
openssl pkcs12 -in star.serge.xs2tests-wdf.sap.corp.p12 -out star.serge.xs2tests-wdf.sap.corp.pem -nodes

Please be aware that using the -nodes option exports the private key unencrypted. Hence cleanup of any files containing the unencrypted private key should be performed after completing the setup.
The next step is to take parts of the .pem file and create certificate files importable by XSA.
Use your favorite editor to create 2 new files, one will contain the private key and the other the certificate chain. Make sure the lines for “bad attributes”, “subject”, and “issuer” are not part of the new files.
In the private key file copy the “PRIVATE KEY” section, including begin and end line from the .pem file.
In the chain file copy the certificates, including begin and end line from the .pem file.
Example pkey.pem:
-----BEGIN PRIVATE KEY-----
Exported Private Key
-----END PRIVATE KEY-----
Example chain.pem:
-----BEGIN CERTIFICATE-----
Server certificate
-----END CERTIFICATE-----
-----BEGIN CERTIFICATE-----
Intermediate/Signing certificate
-----END CERTIFICATE-----
-----BEGIN CERTIFICATE-----
Root certificate
-----END CERTIFICATE-----
Once the files are created, copy both files to the Master XSA host as the <sid>adm user of the XSA Master HANA instance. As the target directory, you can select $SECUDIR, which defaults to /usr/sap/<SID>/HDB<##>/<hostname>/sec (example /usr/sap/PR1/HDB01/XSA-Master/sec).
Example:

Step 3
Next, we can import the certificates, note that a restart of the xscontroller will be required. Make sure you are logged in as the <sid>adm user, issue command “xs-admin-login” (or “xs login”) and enter the XSA_ADMIN password:

The command is:
xs set-certificate <XSA domain> -k <private keyfile> -c <chain file>
In my example:
xs set-certificate serge.xs2tests-wdf.sap.corp -k /usr/sap/PR1/HDB01/ld9994/sec/pkey -c /usr/sap/PR1/HDB01/ld9994/sec/chain

As shown in the screenprint next we need to restart the xscontroller. There are several ways in this example we show it from the HANA Studio (be aware that another option is to restart the entire XSA using command "XSA restart"). Open the administrator perspective connected to the SYSTEMDB, go to the Landscape tab, right click on xscontroller and choose stop. You will get a pop up message that the xscontroller might restart, since it is the default setting and a newly installed instance the xscontroller will start automatically.

And confirm:

You can monitor the xscontroller restart from the landscape tab in the HANA studio, or check the xscontroller_0.log file in the Diagnosis Files tab or at the OS level in the SAP HANA trace directory.
Once the xscontroller restarted, open a new browser and retest the xsa-admin url. Now the browser security status should show green after logging in:

When you inspect the certificate path you will see the full chain:

Now you are ready to test the failover. Make sure that the HANA 2.0 revision is at least revision 21.
- SAP Managed Tags:
- SAP HANA, platform edition
You must be a registered user to add a comment. If you've already registered, sign in. Otherwise, register and sign in.
Labels in this area
-
ABAP CDS Views - CDC (Change Data Capture)
2 -
AI
1 -
Analyze Workload Data
1 -
BTP
1 -
Business and IT Integration
2 -
Business application stu
1 -
Business Technology Platform
1 -
Business Trends
1,658 -
Business Trends
93 -
CAP
1 -
cf
1 -
Cloud Foundry
1 -
Confluent
1 -
Customer COE Basics and Fundamentals
1 -
Customer COE Latest and Greatest
3 -
Customer Data Browser app
1 -
Data Analysis Tool
1 -
data migration
1 -
data transfer
1 -
Datasphere
2 -
Event Information
1,400 -
Event Information
66 -
Expert
1 -
Expert Insights
177 -
Expert Insights
299 -
General
1 -
Google cloud
1 -
Google Next'24
1 -
Kafka
1 -
Life at SAP
780 -
Life at SAP
13 -
Migrate your Data App
1 -
MTA
1 -
Network Performance Analysis
1 -
NodeJS
1 -
PDF
1 -
POC
1 -
Product Updates
4,577 -
Product Updates
344 -
Replication Flow
1 -
RisewithSAP
1 -
SAP BTP
1 -
SAP BTP Cloud Foundry
1 -
SAP Cloud ALM
1 -
SAP Cloud Application Programming Model
1 -
SAP Datasphere
2 -
SAP S4HANA Cloud
1 -
SAP S4HANA Migration Cockpit
1 -
Technology Updates
6,873 -
Technology Updates
422 -
Workload Fluctuations
1
Top kudoed authors
| User | Count |
|---|---|
| 40 | |
| 25 | |
| 17 | |
| 13 | |
| 7 | |
| 7 | |
| 7 | |
| 6 | |
| 6 | |
| 6 |