
- SAP Community
- Products and Technology
- Enterprise Resource Planning
- ERP Blogs by Members
- How to Create a new company database in SAP Busine...
Enterprise Resource Planning Blogs by Members
Gain new perspectives and knowledge about enterprise resource planning in blog posts from community members. Share your own comments and ERP insights today!
Turn on suggestions
Auto-suggest helps you quickly narrow down your search results by suggesting possible matches as you type.
Showing results for
kenan_jaddeny
Contributor
Options
- Subscribe to RSS Feed
- Mark as New
- Mark as Read
- Bookmark
- Subscribe
- Printer Friendly Page
- Report Inappropriate Content
11-10-2017
3:37 PM
SAP Business One
Create New Company Database in SAP Business One Using Express Wizard
https://www.youtube.com/watch?v=lpbTW1ZsKEc&feature=youtu.be
Let’s Get Started…!
The establishment of a new company in SAP Business One, is being proceeded in two major sections, and there’s no other software we have to deal with such as DTW or SSMS:
- Before establishing the new company and its database
from Administration > Choose Company > New > New Using Wizard.
- After establishing the new company and its database
from Administration > System Initialization > Implementation Center > Implementation Tasks > Configure Company Settings.

Note: The Express Wizard covers the most common settings needed for a new company.
However, you may still need to access the Administration menus to complete the settings.
Before establishing the new company and its database
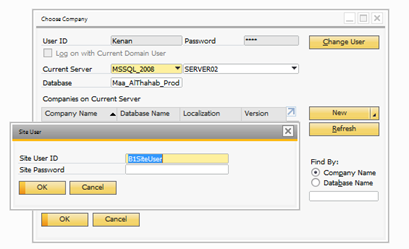
Open the Choose Company window to start creating the new company
from Administration > Choose Company > New > New Using Wizard.

Enter the Site User Credentials (Site User ID, Site Password) to open the Express Configuration Wizard.
Now the Express Configuration Wizard will be opened to start the establishing process

Company Details

License/Trail Version
we've 31-day trail version if we want to work without install a license.
Copy User-defined fields, Tables, and Objects
You can choose to copy the user-defined fields, tables and objects from your existing company to the new company.
Local Settings
we can't change the Localization after the company has been created. for that we've to be careful.
Chart of Accounts
SAP Business One is supplied with Chart of Account Templates for the selected localization. If you choose the “template” option, a default chart of accounts will be created automatically based on the localization; and you can edit these accounts as desired. Alternatively, you can choose the option “User-defined”. Only the top-level drawers are provided in a user-defined chart of accounts, allowing you to manually add accounts to the drawers.
Note: we can't change the Chart of Accounts option after we've made a transaction in the new database.
The Base Language
For the User Interface, you can select the Base Language which can be changed at any time, and we can change it for any user.
Posting Periods
finally, we have to define the Initial Posting periods for the first fiscal year.
if we want ti import or post journal entries or transactions for previous years that came before our fiscal year, once we've defined the initial period for the current year we can't add posting periods for previous years.

“manager” User
when we create a new company, the "manage" user is created by default. we can set up its password after our first log into the new company.

After that we have to accept the End User License Agreement (EULA) before using the SAP Business One.
also we do have to enter the NAME and JOB TITLE to the one who working on the establishment process of the company on the SAP Business One, then check the box that sign you confirmed on the EULA, and finally hit the “I Accept” button.

Now, we’re all set for the pre-establish step. We’ll continue through Express Configuration Wizard through the Administration model in the SAP default models.
After establishing the new company and its database
Open the Express Configuration Wizard from Administration > System Initialization > Implementation Center > Implementation Tasks > Configure Company Settings.
Then we have to choose the first option Configure Company Settings

Now we’re in the Express Configuration Wizard and we’re ready to dig in!
Note: Settings marked with exclamation mark(!) can be changed only before the first transaction (Journal Entry or Inventory Transaction) is executed or before a G/L account or master data is defined.

Company Details
First in the Company Details we have to check the correctness of the information that we’ve entered before and fill over the empty gabs if we want to.

If we don’t use one or more of the functions that listed in the left side we can just check its box to avoid its appearance in the main models.
If you do use all of them, you don’t have to check anything, just click the Next button.

Accounting
Defining Currencies and Exchange Rate Postings
Including Local and System currencies, default account currency and currency exchange rates.
There are several screens for accounting setup.
The equivalent configuration menu is Administration > System Initialization > Company Details – Basic Initialization tab.

Defining the Chart of Accounts
We have the option to select a different chart of accounts template. You cannot change the template after postings have been made.
We can enable the use of segmented accounts if available in the localization.
Administration > System Initialization > Company Details – Basic Initialization tab.

Determining G/L Accounts, Taxes, and Fixed Assets
In the accounting setup step, you can additionally:
- Add accounts to the chart of accounts. Financials > Chart of Accounts.
- Select accounts for the G/L account determination. If you choose chart of accounts as “user-defined”, you need to select the default accounts.
Administration > Setup > Financials > G/L Account Determination.
Set up tax-related information.
Administration > Setup > Financials > Tax. - Enable the use of fixed assets and other functionality, depending on localization.
If you enabled fixed assets, you will have the option to define depreciation types and areas and asset classes.

Defining Fixed Asset Settings
Specify the Accounts, Depreciation Types, Classes.

Defining the Inventory System
We can enable and set up information for perpetual inventory such as the default valuation method.
From Administration > System Initialization > Company details Basic Initialization tab.
Here you can also define warehouses and indicate the default warehouse.

Banking
we can do it from Administration > Setup > Banking.
The banks table holds the country codes and bank codes for the bank that the company deals with.
The house banks table holds bank and branch information for the bank codes defined in the banks table.

Business Partners
The business partners step allows you to define default payment terms and payment methods, dunning terms, and groups for business partners.
The equivalent configuration menus are Administration > General Settings – BP tab and Administration > Setup > Business Partners.

Inventory
In the inventory step, you can define:
- Units of measure and units of measure groups.
- Item groups and inventory cycles.
The equivalent configuration screens are found under the menu Administration > Setup > Inventory. - New Price Lists and item prices in a price list (assuming items exist in the new company).
- This is equivalent to menu Inventory > Price Lists.
- Bin Locations in warehouses.


Purchasing and Sales
In the sales and purchasing step, you can configure the common settings for sales and purchasing documents:
- General and per document type settings.
The configuration menu Administration > System Initialization > Document Settings.
- Global checkboxes for Permit more than one document type per series and manage Freight in Documents.
- How decimal places are displayed in documents.
The configuration menu Administration > System Initialization > General Settings – Display tab.
- Document numbering series for each document type.
The configuration menu is Administration > System Initialization > Document Numbering.

You can set the way gross profit is calculated in documents. You can also set up landed costs allocations for purchasing, and stages to define the company’s sales process.
The equivalent menus are Administration > Setup > Purchasing > Landed Costs, and Administration >Setup > Sales Opportunities.
You can select fields from documents as reference fields for journal entries.
The equivalent menu is Administration > Setup > General > Reference Field Links.

Users
In the users’ step, you can define user accounts and designate employees as sales employees or buyers.
This is equivalent to the administration menus Administration > Setup > General > Users and
Administration > Setup > General > Sales Employees/Buyers.
You can assign user licenses to user accounts -
equivalent to the administration menu Administration > License > License Administration.
You can grant general authorizations to users -
equivalent to the administration menu Administration > System Initialization > Authorizations.
You can create master data for the company’s employees - equivalent to the menu Human Resources > Employee Master Data. Employee master data is required in order to set up data ownership authorizations.

Finishing the process
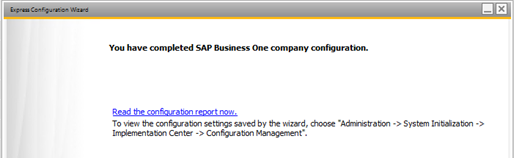
General Settings
To complete the configuration, we can set General Settings. These settings cover a wide range of defaults and initialization parameters for different areas.
Choose Administration > System Initialization > General Settings and select the required tab. Note that some vocalizations may have additional tabs in the General Settings.

Irreversible Settings
- Chart of Accounts Template
- Local and System Currencies
- Display Credit Balance with negative Sign
- Use Segmentation Accounts (Selected Localizations)
- Use Perpetual Inventory
- Manage Item Cost per Warehouse
- Use Purchase Accounts Posting System
- Permit more than one Document Type per Series
- Manage Freight-In Documents
These settings are grayed out in the wizard and cannot be changed after transactions are posted.
For more visit us https://glyceria.com
Best Regards.
KENAN JADDENE
- SAP Managed Tags:
- SAP Business One
3 Comments
You must be a registered user to add a comment. If you've already registered, sign in. Otherwise, register and sign in.
Labels in this area
-
"mm02"
1 -
A_PurchaseOrderItem additional fields
1 -
ABAP
1 -
ABAP Extensibility
1 -
ACCOSTRATE
1 -
ACDOCP
1 -
Adding your country in SPRO - Project Administration
1 -
Advance Return Management
1 -
AI and RPA in SAP Upgrades
1 -
Approval Workflows
1 -
Ariba
1 -
ARM
1 -
ASN
1 -
Asset Management
1 -
Associations in CDS Views
1 -
auditlog
1 -
Authorization
1 -
Availability date
1 -
Azure Center for SAP Solutions
1 -
AzureSentinel
2 -
Bank
1 -
BAPI_SALESORDER_CREATEFROMDAT2
1 -
BRF+
1 -
BRFPLUS
1 -
Bundled Cloud Services
1 -
business participation
1 -
Business Processes
1 -
CAPM
1 -
Carbon
1 -
Cental Finance
1 -
CFIN
1 -
CFIN Document Splitting
1 -
Cloud ALM
1 -
Cloud Integration
1 -
condition contract management
1 -
Connection - The default connection string cannot be used.
1 -
Custom Table Creation
1 -
Customer Screen in Production Order
1 -
Data Quality Management
1 -
Date required
1 -
Decisions
1 -
desafios4hana
1 -
Developing with SAP Integration Suite
1 -
Direct Outbound Delivery
1 -
DMOVE2S4
1 -
EAM
1 -
EDI
3 -
EDI 850
1 -
EDI 856
1 -
edocument
1 -
EHS Product Structure
1 -
Emergency Access Management
1 -
Energy
1 -
EPC
1 -
Financial Operations
1 -
Find
1 -
FINSSKF
1 -
Fiori
1 -
Flexible Workflow
1 -
Gas
1 -
Gen AI enabled SAP Upgrades
1 -
General
1 -
generate_xlsx_file
1 -
Getting Started
1 -
HomogeneousDMO
1 -
IDOC
2 -
Integration
1 -
Learning Content
2 -
LogicApps
2 -
low touchproject
1 -
Maintenance
1 -
management
1 -
Material creation
1 -
Material Management
1 -
MD04
1 -
MD61
1 -
methodology
1 -
Microsoft
2 -
MicrosoftSentinel
2 -
Migration
1 -
mm purchasing
1 -
MRP
1 -
MS Teams
2 -
MT940
1 -
Newcomer
1 -
Notifications
1 -
Oil
1 -
open connectors
1 -
Order Change Log
1 -
ORDERS
2 -
OSS Note 390635
1 -
outbound delivery
1 -
outsourcing
1 -
PCE
1 -
Permit to Work
1 -
PIR Consumption Mode
1 -
PIR's
1 -
PIRs
1 -
PIRs Consumption
1 -
PIRs Reduction
1 -
Plan Independent Requirement
1 -
Premium Plus
1 -
pricing
1 -
Primavera P6
1 -
Process Excellence
1 -
Process Management
1 -
Process Order Change Log
1 -
Process purchase requisitions
1 -
Product Information
1 -
Production Order Change Log
1 -
purchase order
1 -
Purchase requisition
1 -
Purchasing Lead Time
1 -
Redwood for SAP Job execution Setup
1 -
RISE with SAP
1 -
RisewithSAP
1 -
Rizing
1 -
S4 Cost Center Planning
1 -
S4 HANA
1 -
S4HANA
3 -
Sales and Distribution
1 -
Sales Commission
1 -
sales order
1 -
SAP
2 -
SAP Best Practices
1 -
SAP Build
1 -
SAP Build apps
1 -
SAP Cloud ALM
1 -
SAP Data Quality Management
1 -
SAP Maintenance resource scheduling
2 -
SAP Note 390635
1 -
SAP S4HANA
2 -
SAP S4HANA Cloud private edition
1 -
SAP Upgrade Automation
1 -
SAP WCM
1 -
SAP Work Clearance Management
1 -
Schedule Agreement
1 -
SDM
1 -
security
2 -
Settlement Management
1 -
soar
2 -
Sourcing and Procurement
1 -
SSIS
1 -
SU01
1 -
SUM2.0SP17
1 -
SUMDMO
1 -
Teams
2 -
User Administration
1 -
User Participation
1 -
Utilities
1 -
va01
1 -
vendor
1 -
vl01n
1 -
vl02n
1 -
WCM
1 -
X12 850
1 -
xlsx_file_abap
1 -
YTD|MTD|QTD in CDs views using Date Function
1
- « Previous
- Next »
Related Content
- Define Bank Accounts to be Included in PEPPOL in Enterprise Resource Planning Q&A
- Advance Return Management complete configuration(SAP ARM) in Enterprise Resource Planning Blogs by Members
- Posting Journal Entries with Tax Using SOAP Posting APIs in Enterprise Resource Planning Blogs by SAP
- Automate [Inventory Valuation Simulation Report] in SAP Business One in Enterprise Resource Planning Q&A
- SAP S/4HANA Cloud, public edition, ABAP Environment Case 8: Material Shelf Life Management in Enterprise Resource Planning Blogs by SAP
Top kudoed authors
| User | Count |
|---|---|
| 5 | |
| 2 | |
| 2 | |
| 2 | |
| 2 | |
| 2 | |
| 2 | |
| 1 | |
| 1 | |
| 1 |