
- SAP Community
- Products and Technology
- Technology
- Technology Blogs by SAP
- Getting started with SAP Cloud Platform Workflow -...
Technology Blogs by SAP
Learn how to extend and personalize SAP applications. Follow the SAP technology blog for insights into SAP BTP, ABAP, SAP Analytics Cloud, SAP HANA, and more.
Turn on suggestions
Auto-suggest helps you quickly narrow down your search results by suggesting possible matches as you type.
Showing results for
Product and Topic Expert
Options
- Subscribe to RSS Feed
- Mark as New
- Mark as Read
- Bookmark
- Subscribe
- Printer Friendly Page
- Report Inappropriate Content
11-06-2017
12:25 PM
This blog continues my previous blogs on "Getting started with the Workflow service in the free trial account".
I have shown how to model a simple workflow, using the SAP Web IDE, how to start it from the Fiori Launchpad and how to see the approval task in the My Inbox application.
Now, in order to actually complete the task and thereby the workflow itself, we need to implement a SAPUI5 application.
The application will have a page (in SAPUI5 this is called “View”), which will be shown when the user opens the task in My Inbox.
Open the SAP Web IDE Full-Stack and create a new Project in your workspace (File – New – Project from template)
Choose the “SAPUI5 Application” template.

On the next page, enter a project name – e.g. BookUIApplication and click “Next”.
Enter a name for the view – e.g. “ApproveBookView” - and click “Finish”.
The page is still empty. We need to add now the necessary UI controls for displaying the book details, like title and price.
Open the newly created view using the Layout Editor in the “BookUIApplication” project under the webapp/view folder.
Add a Form to the page by selecting the “Simple Form” control from the palette and placing it on the editor canvas.
Note: You need to enable the “sap.ui.layout” package in the project settings in order to use the Form layout.

Select the “Title” element and change the title text in the properties section to “Book Details”.
Also change the “Label 1” text to “Title” and “Label 2” to “Price”.
Remove the second input control in the first row by selecting it and then pressing the delete key.
Your page layout should now look like this:

We now need to bind the UI controls to data from the workflow context.
This is done via the “Value” field in the properties of the input control.
For the first input control (with label “Title”), enter “{/product}”.
For the second input control (with label “Price”), enter “{/price}”.

Finally, we do not want the approver to be able to change the title or price.
Therefore, set the “Editable” property to “false” for both input elements.
In order to make the workflow context available to the UI controls, we need to retrieve the task context data.
We will do this by calling the Workflow REST API with the task ID of the currently shown task instance in My Inbox. My Inbox will pass this data to our component via the startup parameters.
Open the Component.js file (located under the webapp folder).
Find the init function and add the following code to its body:
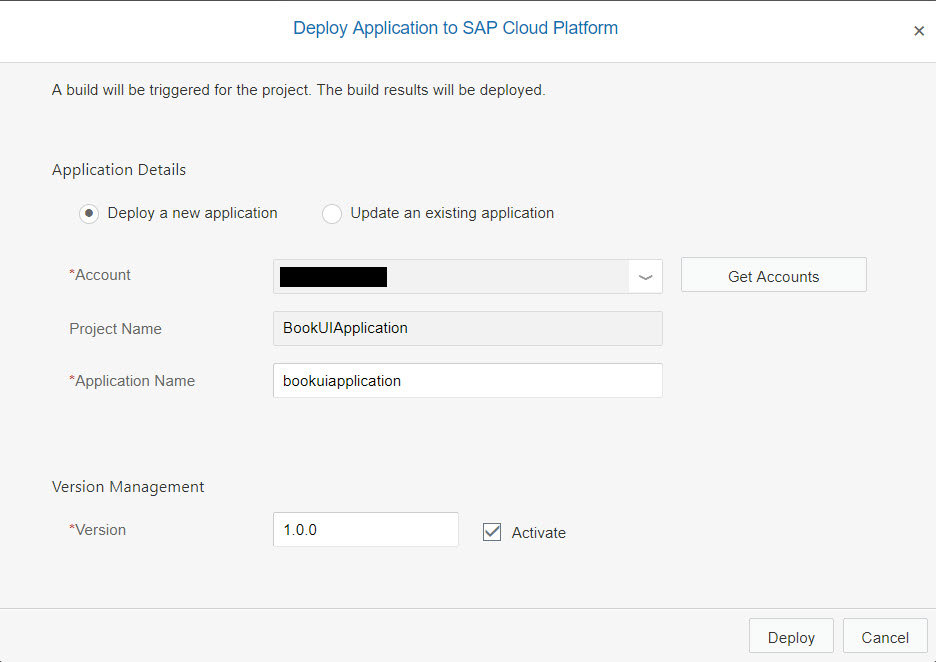
Now you can deploy the project: select the project in the workspace and choose “Deploy – Deploy to SAP Cloud Platform” from the menu.
On the following screen, just click the “Deploy” action.
After deployment, you could open the application in the browser.
However, you will only see a blank page, since the UI will only work when running inside the My Inbox application.
We can now refer to the deployed UI5 application from our approval task in the workflow.
Open the workflow again and select the “ApproveBook” task.
Under “Details” section in the user task properties, find the properties for specifying the User Interface.
Click the “Select” button and select the “BookUIApplication” project and the “webapp” Component path, then confirm with “OK”.

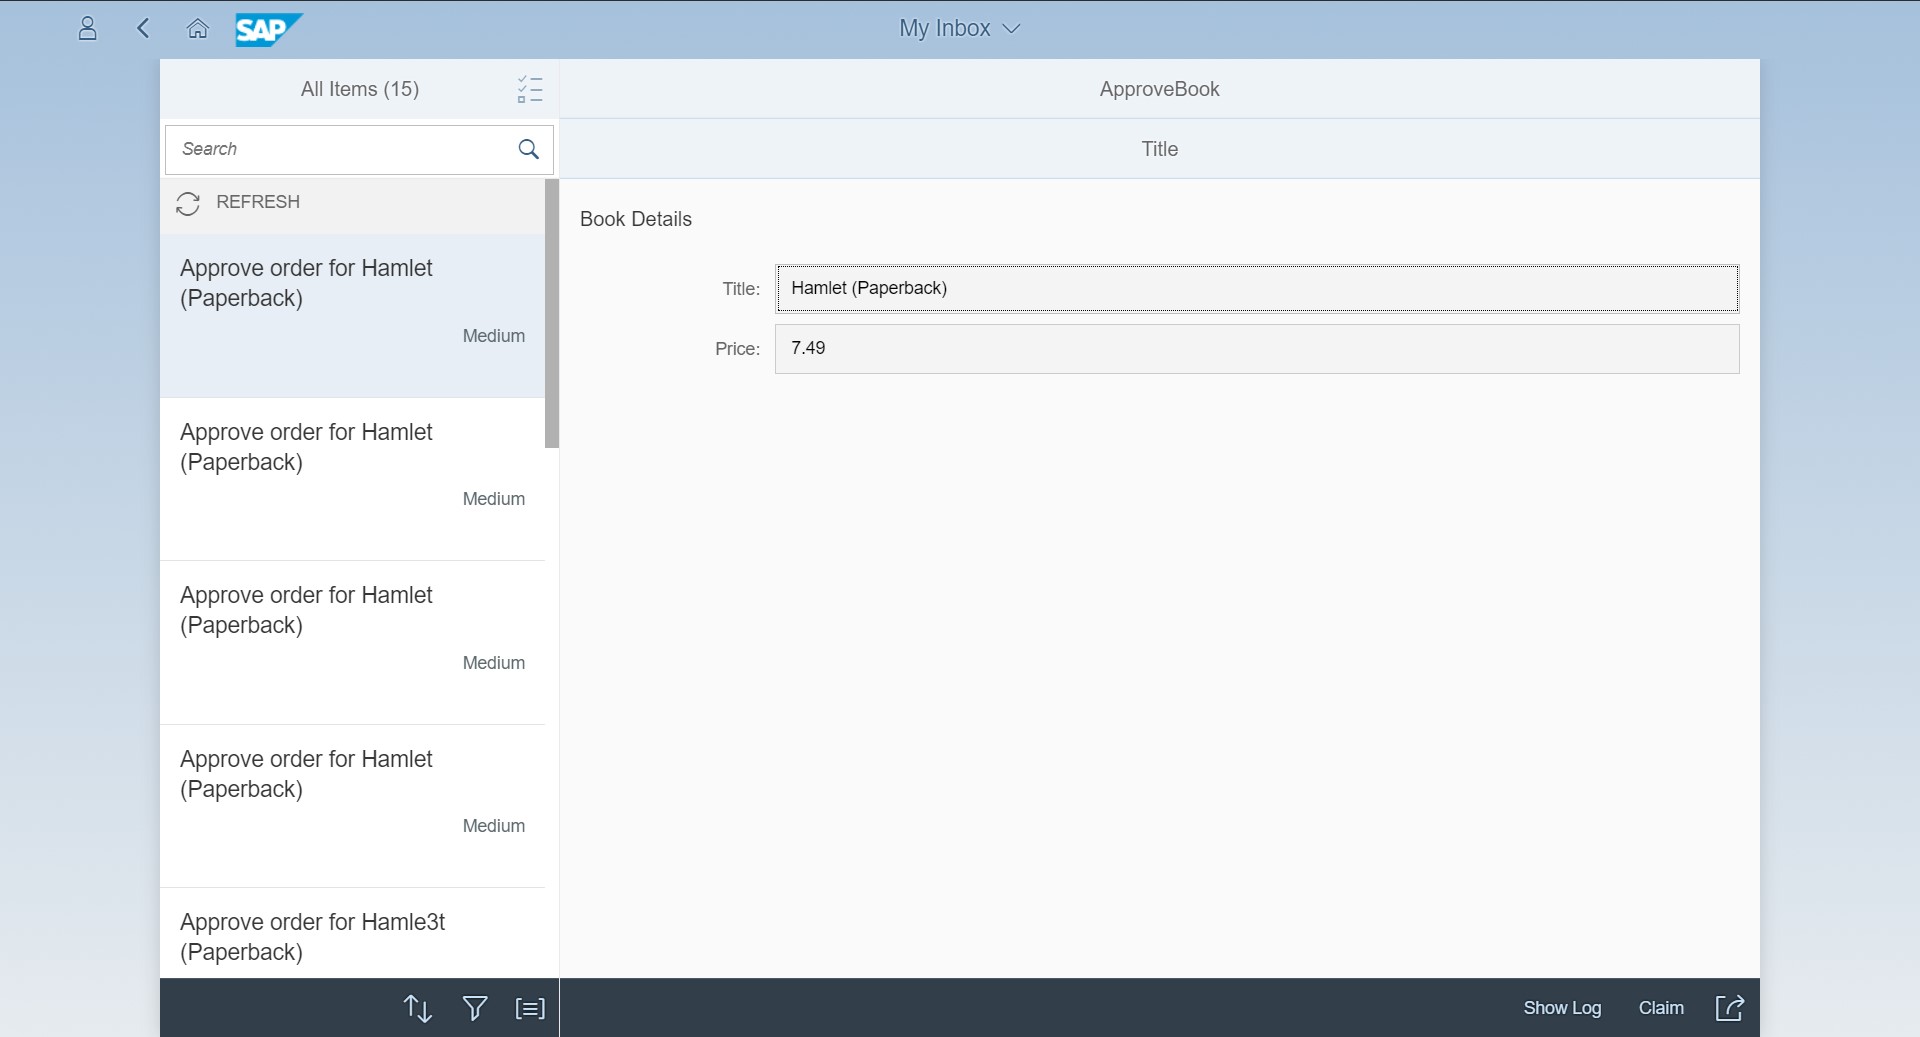
You can now deploy and test the workflow, by starting a new instance from the Monitor Workflow application and opening the task in My Inbox.
You should see the task details now shown as below:
As a last step, we need to add approve and reject actions to actually complete the task.
For this, we need to go back and edit the Component.js file again.
Copy and paste the following code snippet into the file – right after the closing bracket of the init function:
This adds three functions to our component:
With these functions in place, we can now add the following code into the body of the init function within the Component.js file:
This code will tell My Inbox to add an “Approve” and a “Reject” button to its action footer. When the buttons are pressed, the _completeTask function will be called.
You can now deploy the BookUIApplication project again to the SAP Cloud Platform, and then refresh My Inbox to check the updated UI for the task.
Note: You may have to clean the browser cache or force a “hard reload” to see the new buttons.

Complete the workflow by hitting “Approve” or “Reject”.
The task should disappear from My Inbox, and the workflow instance should disappear from the “Monitor Workflows” instance list.
You now have successfully completed the implementation of first version of our “Book ordering” workflow.
If you want to learn more about the integration of workflow into your UIs, please check out this blog by archana.shukla.
I have shown how to model a simple workflow, using the SAP Web IDE, how to start it from the Fiori Launchpad and how to see the approval task in the My Inbox application.
Now, in order to actually complete the task and thereby the workflow itself, we need to implement a SAPUI5 application.
The application will have a page (in SAPUI5 this is called “View”), which will be shown when the user opens the task in My Inbox.
Creating a new SAPUI5 application
Open the SAP Web IDE Full-Stack and create a new Project in your workspace (File – New – Project from template)
Choose the “SAPUI5 Application” template.
On the next page, enter a project name – e.g. BookUIApplication and click “Next”.
Enter a name for the view – e.g. “ApproveBookView” - and click “Finish”.
Create the form layout
The page is still empty. We need to add now the necessary UI controls for displaying the book details, like title and price.
Open the newly created view using the Layout Editor in the “BookUIApplication” project under the webapp/view folder.
Add a Form to the page by selecting the “Simple Form” control from the palette and placing it on the editor canvas.
Note: You need to enable the “sap.ui.layout” package in the project settings in order to use the Form layout.
Select the “Title” element and change the title text in the properties section to “Book Details”.
Also change the “Label 1” text to “Title” and “Label 2” to “Price”.
Remove the second input control in the first row by selecting it and then pressing the delete key.
Your page layout should now look like this:
Add data binding
We now need to bind the UI controls to data from the workflow context.
This is done via the “Value” field in the properties of the input control.
For the first input control (with label “Title”), enter “{/product}”.
For the second input control (with label “Price”), enter “{/price}”.
Finally, we do not want the approver to be able to change the title or price.
Therefore, set the “Editable” property to “false” for both input elements.
Initialize the data model
In order to make the workflow context available to the UI controls, we need to retrieve the task context data.
We will do this by calling the Workflow REST API with the task ID of the currently shown task instance in My Inbox. My Inbox will pass this data to our component via the startup parameters.
Open the Component.js file (located under the webapp folder).
Find the init function and add the following code to its body:
// get task data

var startupParameters = this.getComponentData().startupParameters;

var taskModel = startupParameters.taskModel;

var taskData = taskModel.getData();

var taskId = taskData.InstanceID;


// initialize model

var contextModel = new sap.ui.model.json.JSONModel("/bpmworkflowruntime/rest/v1/task-instances/" + taskId + "/context");

contextModel.setDefaultBindingMode(sap.ui.model.BindingMode.OneWay);

this.setModel(contextModel);
Now you can deploy the project: select the project in the workspace and choose “Deploy – Deploy to SAP Cloud Platform” from the menu.
On the following screen, just click the “Deploy” action.
After deployment, you could open the application in the browser.
However, you will only see a blank page, since the UI will only work when running inside the My Inbox application.
Link the UI5 component to the user task
We can now refer to the deployed UI5 application from our approval task in the workflow.
Open the workflow again and select the “ApproveBook” task.
Under “Details” section in the user task properties, find the properties for specifying the User Interface.
Click the “Select” button and select the “BookUIApplication” project and the “webapp” Component path, then confirm with “OK”.
You can now deploy and test the workflow, by starting a new instance from the Monitor Workflow application and opening the task in My Inbox.
You should see the task details now shown as below:
Adding approve and reject actions
As a last step, we need to add approve and reject actions to actually complete the task.
For this, we need to go back and edit the Component.js file again.
Copy and paste the following code snippet into the file – right after the closing bracket of the init function:
,


		_completeTask: function(taskId, approvalStatus) {

			var token = this._fetchToken();

			$.ajax({

				url: "/bpmworkflowruntime/rest/v1/task-instances/" + taskId,

				method: "PATCH",

				contentType: "application/json",

				async: false,

				data: "{\"status\": \"COMPLETED\", \"context\": {\"approved\":\"" + approvalStatus + "\"}}",

				headers: {

					"X-CSRF-Token": token

				}

			});

			this._refreshTask(taskId);

		}


		, _fetchToken: function() {

			var token;

			$.ajax({

				url: "/bpmworkflowruntime/rest/v1/xsrf-token",

				method: "GET",

				async: false,

				headers: {

					"X-CSRF-Token": "Fetch"

				},

				success: function(result, xhr, data) {

					token = data.getResponseHeader("X-CSRF-Token");

				}

			});

			return token;

		},


		_refreshTask: function(taskId) {

			this.getComponentData().startupParameters.inboxAPI.updateTask("NA", taskId);

		}
This adds three functions to our component:
- _fetchToken will retrieve an XSRF token from the Workflow service API, which will be used to authenticate when calling the POST method to complete the task
- _completeTask will call the Workflow service API to complete the current task, and pass on the approval status (“true” or “false”) via the JSON payload to the workflow context.
- _refreshTask will tell My Inbox to remove the task on completion from the list
With these functions in place, we can now add the following code into the body of the init function within the Component.js file:
	//add actions

			startupParameters.inboxAPI.addAction({

				action: "Approve",

				label: "Approve"

			}, function(button) {

				this._completeTask(taskId, true);

			}, this);

			startupParameters.inboxAPI.addAction({

				action: "Reject",

				label: "Reject"

			}, function(button) {

				this._completeTask(taskId, false);

			}, this);
This code will tell My Inbox to add an “Approve” and a “Reject” button to its action footer. When the buttons are pressed, the _completeTask function will be called.
Completing the workflow
You can now deploy the BookUIApplication project again to the SAP Cloud Platform, and then refresh My Inbox to check the updated UI for the task.
Note: You may have to clean the browser cache or force a “hard reload” to see the new buttons.
Complete the workflow by hitting “Approve” or “Reject”.
The task should disappear from My Inbox, and the workflow instance should disappear from the “Monitor Workflows” instance list.
You now have successfully completed the implementation of first version of our “Book ordering” workflow.
If you want to learn more about the integration of workflow into your UIs, please check out this blog by archana.shukla.
- SAP Managed Tags:
- SAP Fiori,
- SAPUI5,
- SAP Web IDE,
- SAP Workflow Management, workflow capability,
- SAP Business Technology Platform
26 Comments
You must be a registered user to add a comment. If you've already registered, sign in. Otherwise, register and sign in.
Labels in this area
-
ABAP CDS Views - CDC (Change Data Capture)
2 -
AI
1 -
Analyze Workload Data
1 -
BTP
1 -
Business and IT Integration
2 -
Business application stu
1 -
Business Technology Platform
1 -
Business Trends
1,658 -
Business Trends
93 -
CAP
1 -
cf
1 -
Cloud Foundry
1 -
Confluent
1 -
Customer COE Basics and Fundamentals
1 -
Customer COE Latest and Greatest
3 -
Customer Data Browser app
1 -
Data Analysis Tool
1 -
data migration
1 -
data transfer
1 -
Datasphere
2 -
Event Information
1,400 -
Event Information
66 -
Expert
1 -
Expert Insights
177 -
Expert Insights
299 -
General
1 -
Google cloud
1 -
Google Next'24
1 -
Kafka
1 -
Life at SAP
780 -
Life at SAP
13 -
Migrate your Data App
1 -
MTA
1 -
Network Performance Analysis
1 -
NodeJS
1 -
PDF
1 -
POC
1 -
Product Updates
4,577 -
Product Updates
345 -
Replication Flow
1 -
RisewithSAP
1 -
SAP BTP
1 -
SAP BTP Cloud Foundry
1 -
SAP Cloud ALM
1 -
SAP Cloud Application Programming Model
1 -
SAP Datasphere
2 -
SAP S4HANA Cloud
1 -
SAP S4HANA Migration Cockpit
1 -
Technology Updates
6,873 -
Technology Updates
427 -
Workload Fluctuations
1
Related Content
- Supporting Multiple API Gateways with SAP API Management – using Azure API Management as example in Technology Blogs by SAP
- SAP Build Process Automation Pre-built content for Finance Use cases in Technology Blogs by SAP
- Deadline Monitoring for PO is not triggering E-mail. in Technology Q&A
- Streamlining Time Sheet Approvals in SuccessFactors: Time Sheet Approval Center in Technology Blogs by Members
- Hack2Build on Business AI – Highlighted Use Cases in Technology Blogs by SAP
Top kudoed authors
| User | Count |
|---|---|
| 40 | |
| 25 | |
| 17 | |
| 14 | |
| 8 | |
| 7 | |
| 7 | |
| 7 | |
| 6 | |
| 6 |