
- SAP Community
- Products and Technology
- Technology
- Technology Blogs by SAP
- Setting up an SMTP server on Virtual Machine in SA...
Technology Blogs by SAP
Learn how to extend and personalize SAP applications. Follow the SAP technology blog for insights into SAP BTP, ABAP, SAP Analytics Cloud, SAP HANA, and more.
Turn on suggestions
Auto-suggest helps you quickly narrow down your search results by suggesting possible matches as you type.
Showing results for
former_member19
Active Participant
Options
- Subscribe to RSS Feed
- Mark as New
- Mark as Read
- Bookmark
- Subscribe
- Printer Friendly Page
- Report Inappropriate Content
11-03-2017
7:58 AM
For those of you who wants to understand the basics of SAP Cloud Platform, I would recommend reading the overview here. One of the many features that SAP Cloud Platform offers is the runtime-containers. One of the capabilities that many would want is to enjoy full control over the virtualized hardware resource and that is where SAP Cloud Platform Virtual Machine in Neo environment contributes.
In order to provide more flexibility we introduced Virtual Machines (VM), generic containers which are fully controlled & managed by customers – here, customers can install arbitrary software components as needed to complement their cloud solutions. For more detail on SAP Cloud Platform Virtual Machine, you can refer the document here. A quick look at the components involved in building a virtual machine is as shown below:

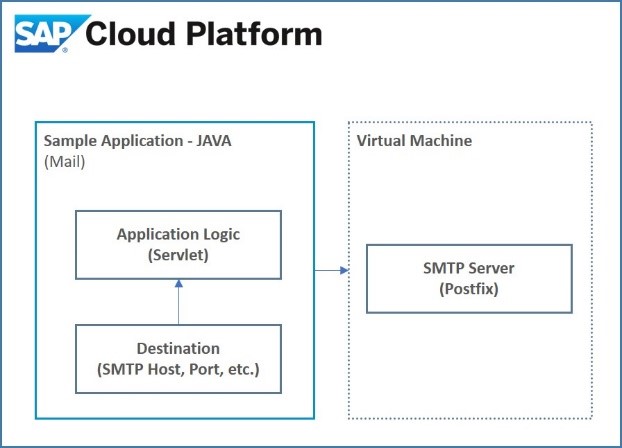
As mentioned above, one of the use cases of having the virtual machine on SAP Cloud Platform is to set up an SMTP server in order to allow an application running on the PaaS layer to trigger a mail to the recipients based on certain conditions. This blogs talks about one such application (typically JAVA) running on SAP Cloud Platform Neo environment that calls the SMTP server that is set up on the virtual machine on SAP CP.
The architecture of such an application involves a JAVA application that consumes the service from the SMTP server setup on SAP CP Virtual Machine. The architecture would look like the one illustrated below:
The blog explains how to create an instance of Virtual Machine on SAP Cloud Platform. The final part of the blog also explains the steps to access the virtual instance from local machine through the ssh tunnels created. There is also an alternate way to access virtual machine through service channels. The details and procedures can be found here.
A quick view on the list of items I have so far:
A Virtual Machine instance on SAP Cloud Platform. I have named it ‘mailer’.

SAP Cloud Connector setup to access the virtual machine shown above.

Putty settings to access the virtual machine:

The VM that is considered here has got OpenSUSE 12 SP 1. We will be using zypper to add repository and upgrade the necessary software from the repository. You can check the version using the command

We will use postfix (just as an example) to create the SMTP server. Ideally, no other mail server should be up and running. Check if "sendmail" service is active and running. If so, use the command “service sendmail stop” to stop the service. It is fine even if it says there is no such service.
Zypper is a command line package manager which provides functionalities like repository access, package installation, etc. We will use zypper to add the repository and install postfix. Add the repo [Link] to the zypper repository using the command
This will create a repository with the name “server_mail”. You can check the same by executing

Do a refresh of the repo by executing
and then install/upgrade postfix. We will install the latest version of the postfix with the command
or with the latest version available now.
Now, we need to configure postfix to accept the external/SAP Cloud Platform communications. To do so, we will work on the main.cf and master.cf files. Open the main.cf file using the vi editor. The file would be available in the location /etc/postfix. Use the command
Goto line number 22 (by pressing ‘Esc’ followed by “:22”). Uncomment the lines 22 – 32 (These were the lines for the version of postfix we installed).

Under the smtpd_relay_restrictions ensure to have the parameters
These are necessary to ensure postfix trusts the communications from the set of network IP addresses you will be mentioning in the main.cf and to defer the calls from any other network.
Save the file and exit the editor (by pressing ‘Esc’ followed by “:wq”). Open the file main.cf using the vi editor (“vi /etc/postfix/main.cf”). Ensure to do the following changes/additions.
After the aforementioned changes are done, save the file (by pressing ‘Esc’ followed by “:wq”). The next step is to edit the hostfile, do so by entering the command “vi /etc/hosts”.
Ensure that the host file looks like the one mentioned below:
Ensure that the necessary firewall is set by executing
Now, your postfix is ready to service the SMTP requests. Restart the postfix by executing the command
Create a user and provide a password to access the service from a third-party application:
Execute these in the VM shell.
Now that the SMTP server is set for consumption, let’s try to send a sample mail from the server directly. In the command prompt, enter the command
replace the email id with the mail id of your choice. It would prompt for the subject, enter a sample subject and press enter to provide the body of the mail. Once completed, press “.” Followed by ‘Enter’ to send the mail.

If you don’t get a mail, verify the previous steps and restart postfix. You would have got a mail from root (in my case - root root@sapcppm.local) based on the domain you have specified.
Now that we have the SMTP server setup, let’s try to communicate with the SMTP server from a JAVA application that is deployed on SAP Cloud Platform.
For ease of code, I have pushed a sample application the git repository – link. Clone the resitory and perform the following changes:
Change the properties in the pom.xml file to point to the VM instance that you created. Replace “<<VM_FLoating_IP>>” with the floating IP of the Virtual Machine that can be found in the SAP Cloud Platform Cockpit under the VM overview.

Replace the following with the domain (that you mentioned in the SMTP server) and mail id (of your choice):
Navigate to the Session file and replace the floating IP. This is the file we will use to create the destination in the application.
Now, build the application using Maven (Right click on the application in Eclipse and click Run as -> Goals - clean install). You will find the war file generated under target folder which we will use to deploy the application on SAP Cloud Platform.
Navigate to SAP Cloud Platform Cockpit and deploy the application as shown in the image below:

Once the application is deployed, don’t start it yet. There are a couple more important steps to be done before the application is runnable.
We will create the destination using the Neo SDK (setting up Neo SDK) where the SMTP details can be configured. This connectivity service is used by the application to send the mail details to the SMTP server on the VM.
We will use the put-destination command on Neo SDK (Syntax) to create the destination in the JAVA application.
This will create the destination as shown below:

The next step is to create security rules for the VM to allow the JAVA application to communicate to the VM through the ports. We will use the Neo SDK command for this (Syntax). We will open up the ports 25 and 587 – You can use either of them.
Post the execution of the command, you can find these rules in the SAP Cloud Platform cockpit.

Your application is now ready! Navigate to the JAVA application overview and start the application. Once the application is started, you will get the URL under Application URLs. Click on the same. In the form that opens up, just enter the From address as “root@<<domainname>>” and your email address and a sample subject and mail body and click on ‘Send Mail’.

In order to provide more flexibility we introduced Virtual Machines (VM), generic containers which are fully controlled & managed by customers – here, customers can install arbitrary software components as needed to complement their cloud solutions. For more detail on SAP Cloud Platform Virtual Machine, you can refer the document here. A quick look at the components involved in building a virtual machine is as shown below:
The use case
As mentioned above, one of the use cases of having the virtual machine on SAP Cloud Platform is to set up an SMTP server in order to allow an application running on the PaaS layer to trigger a mail to the recipients based on certain conditions. This blogs talks about one such application (typically JAVA) running on SAP Cloud Platform Neo environment that calls the SMTP server that is set up on the virtual machine on SAP CP.
The architecture of such an application involves a JAVA application that consumes the service from the SMTP server setup on SAP CP Virtual Machine. The architecture would look like the one illustrated below:
Setting up an SMTP server on SAP Cloud Platform Virtual Machine
The blog explains how to create an instance of Virtual Machine on SAP Cloud Platform. The final part of the blog also explains the steps to access the virtual instance from local machine through the ssh tunnels created. There is also an alternate way to access virtual machine through service channels. The details and procedures can be found here.
A quick view on the list of items I have so far:
A Virtual Machine instance on SAP Cloud Platform. I have named it ‘mailer’.
SAP Cloud Connector setup to access the virtual machine shown above.
Putty settings to access the virtual machine:
The VM that is considered here has got OpenSUSE 12 SP 1. We will be using zypper to add repository and upgrade the necessary software from the repository. You can check the version using the command
cat /etc/os-releaseWe will use postfix (just as an example) to create the SMTP server. Ideally, no other mail server should be up and running. Check if "sendmail" service is active and running. If so, use the command “service sendmail stop” to stop the service. It is fine even if it says there is no such service.
Zypper is a command line package manager which provides functionalities like repository access, package installation, etc. We will use zypper to add the repository and install postfix. Add the repo [Link] to the zypper repository using the command
zypper addrepo -n server_mail http://download.opensuse.org/repositories/server:/mail/SLE_12_SP1/server:mail.repoThis will create a repository with the name “server_mail”. You can check the same by executing
zypper lrDo a refresh of the repo by executing
zypper refreshand then install/upgrade postfix. We will install the latest version of the postfix with the command
zypper install postfix-3.2.4-310.1.x86_64or with the latest version available now.
Configuring SMTP server
Now, we need to configure postfix to accept the external/SAP Cloud Platform communications. To do so, we will work on the main.cf and master.cf files. Open the main.cf file using the vi editor. The file would be available in the location /etc/postfix. Use the command
vi /etc/postfix/master.cfGoto line number 22 (by pressing ‘Esc’ followed by “:22”). Uncomment the lines 22 – 32 (These were the lines for the version of postfix we installed).
Under the smtpd_relay_restrictions ensure to have the parameters
permit_mynetworks,permit_sasl_authenticated,defer_unauth_destinationThese are necessary to ensure postfix trusts the communications from the set of network IP addresses you will be mentioning in the main.cf and to defer the calls from any other network.
Save the file and exit the editor (by pressing ‘Esc’ followed by “:wq”). Open the file main.cf using the vi editor (“vi /etc/postfix/main.cf”). Ensure to do the following changes/additions.
| Line No | Change | Comments |
| 67 | mail_owner = postfix | |
| 83 | myhostname = mailer | Hostname is mostly the name you provided for the VM. You can confirm by entering the command “hostname” |
| 91 | mydomain = sapcppm.local | You can provide any domain name of your choice |
| 106 | myorigin = $myhostname | Uncomment the line |
| 121 | inet_interfaces = all | Uncomment the line. If you want to be specific, mention the hostname/domain |
| 169 | mydestination = $myhostname, localhost.$mydomain, localhost, $mydomain | |
| 268 | mynetworks = 168.100.189.0/28, 127.0.0.0/8, 155.56.128.0/17, 10.78.134.169, 10.0.0.0/8, 10.10.1.56 | This includes the IP of the VM. You can also mention the whole of local IPs as mentioned here. You can also find it from ifconfig command. This also includes the IP range of SAP Cloud Platform - Refer. |
| 317 | relayhost = $mydomain | Uncomment |
| 423 | home_mailbox = Maildir/ | Uncomment |
| 559 | smtpd_banner = $myhostname ESMTP | Uncomment |
| 673 | inet_interfaces = all inet_protocols = all | Uncomment/Add |
| 706 | smtpd_recipient_restrictions = permit_mynetworks,reject_unauth_destination | Uncomment/Add |
After the aforementioned changes are done, save the file (by pressing ‘Esc’ followed by “:wq”). The next step is to edit the hostfile, do so by entering the command “vi /etc/hosts”.
Ensure that the host file looks like the one mentioned below:
127.0.0.1       localhost localhost.localdomain localhost4 localhost4.localdomain4


# special IPv6 addresses

::1             localhost ipv6-localhost ipv6-loopback localhost.localdomain localhost6 localhost6.localdomain6


fe00::0         ipv6-localnet

ff00::0         ipv6-mcastprefix

ff02::1         ipv6-allnodes

ff02::2         ipv6-allrouters

ff02::3         ipv6-allhosts


# Found the IP with ifconfig

10.10.1.56 sapcppm.local
Ensure that the necessary firewall is set by executing
vi /etc/sysconfig/SuSEfirewall2.d/services/smtp## Name: SMTP with Postfix
## Description: Firewall Configuration file for postfix
# space separated list of allowed TCP ports
TCP="25 465 587"
# space separated list of allowed UDP ports
UDP=""
….Now, your postfix is ready to service the SMTP requests. Restart the postfix by executing the command
service postfix restart

or

service postfix start
Create a user and provide a password to access the service from a third-party application:
Execute these in the VM shell.
# useradd test1


# passwd test1
Verification of SMTP server
Now that the SMTP server is set for consumption, let’s try to send a sample mail from the server directly. In the command prompt, enter the command
mail test@test.comreplace the email id with the mail id of your choice. It would prompt for the subject, enter a sample subject and press enter to provide the body of the mail. Once completed, press “.” Followed by ‘Enter’ to send the mail.
If you don’t get a mail, verify the previous steps and restart postfix. You would have got a mail from root (in my case - root root@sapcppm.local) based on the domain you have specified.
JAVA Application setup
Now that we have the SMTP server setup, let’s try to communicate with the SMTP server from a JAVA application that is deployed on SAP Cloud Platform.
For ease of code, I have pushed a sample application the git repository – link. Clone the resitory and perform the following changes:
pom.xml
Change the properties in the pom.xml file to point to the VM instance that you created. Replace “<<VM_FLoating_IP>>” with the floating IP of the Virtual Machine that can be found in the SAP Cloud Platform Cockpit under the VM overview.
Replace the following with the domain (that you mentioned in the SMTP server) and mail id (of your choice):
<mail.from.address>root@sappm.local</mail.from.address>


<mail.to.address><<Your_mail_ID>></YourmailID></mail.to.address>
Session
Navigate to the Session file and replace the floating IP. This is the file we will use to create the destination in the application.
Application build
Now, build the application using Maven (Right click on the application in Eclipse and click Run as -> Goals - clean install). You will find the war file generated under target folder which we will use to deploy the application on SAP Cloud Platform.
Navigate to SAP Cloud Platform Cockpit and deploy the application as shown in the image below:
Once the application is deployed, don’t start it yet. There are a couple more important steps to be done before the application is runnable.
Using the connectivity service
We will create the destination using the Neo SDK (setting up Neo SDK) where the SMTP details can be configured. This connectivity service is used by the application to send the mail details to the SMTP server on the VM.
We will use the put-destination command on Neo SDK (Syntax) to create the destination in the JAVA application.
neo put-destination --account <account_name> --host <hostname> --application <application_name> --user <p/s user id> --localpath <path to the Session file>This will create the destination as shown below:
The next step is to create security rules for the VM to allow the JAVA application to communicate to the VM through the ports. We will use the Neo SDK command for this (Syntax). We will open up the ports 25 and 587 – You can use either of them.
neo create-security-rule --account <<account>> --host <<host>> --user <<user id>> --name <<VM Name>> --source-id <<JAVA app name>> --source-type JAVA --from-port 25 --to-port 25


neo create-security-rule --account <<account>> --host <<host>> --user <<user id>> --name <<VM Name>> --source-id <<JAVA app name>> --source-type JAVA --from-port 587 --to-port 587
Post the execution of the command, you can find these rules in the SAP Cloud Platform cockpit.
Your application is now ready! Navigate to the JAVA application overview and start the application. Once the application is started, you will get the URL under Application URLs. Click on the same. In the form that opens up, just enter the From address as “root@<<domainname>>” and your email address and a sample subject and mail body and click on ‘Send Mail’.
- SAP Managed Tags:
- SAP Business Technology Platform
2 Comments
You must be a registered user to add a comment. If you've already registered, sign in. Otherwise, register and sign in.
Labels in this area
-
ABAP CDS Views - CDC (Change Data Capture)
2 -
AI
1 -
Analyze Workload Data
1 -
BTP
1 -
Business and IT Integration
2 -
Business application stu
1 -
Business Technology Platform
1 -
Business Trends
1,661 -
Business Trends
88 -
CAP
1 -
cf
1 -
Cloud Foundry
1 -
Confluent
1 -
Customer COE Basics and Fundamentals
1 -
Customer COE Latest and Greatest
3 -
Customer Data Browser app
1 -
Data Analysis Tool
1 -
data migration
1 -
data transfer
1 -
Datasphere
2 -
Event Information
1,400 -
Event Information
65 -
Expert
1 -
Expert Insights
178 -
Expert Insights
280 -
General
1 -
Google cloud
1 -
Google Next'24
1 -
Kafka
1 -
Life at SAP
784 -
Life at SAP
11 -
Migrate your Data App
1 -
MTA
1 -
Network Performance Analysis
1 -
NodeJS
1 -
PDF
1 -
POC
1 -
Product Updates
4,577 -
Product Updates
330 -
Replication Flow
1 -
RisewithSAP
1 -
SAP BTP
1 -
SAP BTP Cloud Foundry
1 -
SAP Cloud ALM
1 -
SAP Cloud Application Programming Model
1 -
SAP Datasphere
2 -
SAP S4HANA Cloud
1 -
SAP S4HANA Migration Cockpit
1 -
Technology Updates
6,886 -
Technology Updates
408 -
Workload Fluctuations
1
Related Content
- SAP HANA Cloud Vector Engine: Quick FAQ Reference in Technology Blogs by SAP
- 10+ ways to reshape your SAP landscape with SAP Business Technology Platform - Blog 7 in Technology Blogs by SAP
- 10+ ways to reshape your SAP landscape with SAP Business Technology Platform – Blog 4 in Technology Blogs by SAP
- Top Picks: Innovations Highlights from SAP Business Technology Platform (Q1/2024) in Technology Blogs by SAP
- Error submitting iOS App to AppStore in Technology Q&A
Top kudoed authors
| User | Count |
|---|---|
| 13 | |
| 10 | |
| 10 | |
| 7 | |
| 6 | |
| 5 | |
| 5 | |
| 5 | |
| 4 | |
| 4 |