
- SAP Community
- Products and Technology
- Technology
- Technology Blogs by SAP
- Connecting SAP Fiori Cloud App Approve Purchase Or...
Technology Blogs by SAP
Learn how to extend and personalize SAP applications. Follow the SAP technology blog for insights into SAP BTP, ABAP, SAP Analytics Cloud, SAP HANA, and more.
Turn on suggestions
Auto-suggest helps you quickly narrow down your search results by suggesting possible matches as you type.
Showing results for
cezar_manechini
Explorer
Options
- Subscribe to RSS Feed
- Mark as New
- Mark as Read
- Bookmark
- Subscribe
- Printer Friendly Page
- Report Inappropriate Content
10-18-2017
11:49 AM
This is the Part III of a 3 blog series to connect SAP Fiori Cloud to On-Premise Landscape.
The blogs series consists of:
In this Blog I’m going to describe the application consultant steps we have followed to connect SAP Fiori Cloud to On-Premise landscape.
This blog covers the steps A2 to A6 from @Elizabeth Thorburn’s blog:
https://blogs.sap.com/2016/06/16/back-end-connectivity-with-sap-fiori-cloud-edition-extended-demo-ac...
A2. Backend test
Now it is time to test the standard scenario for Purchase Orders Approval. We have created a PO and we can see that the release strategy has been triggered, in transaction ME23N.

In the workflow inbox, we can also see that there is a task for approval, in transaction SBWP.

Here we came back to SAP Gateway and tested the service with our data:
In SAP Gateway:
Transaction: /IWFND/MAINT_SERVICE
Service: GBAPP_POAPPROVAL
Click “SAP Gateway Client”

Call the service URL, which gives the list of tasks to be approved:
/sap/opu/odata/sap/GBAPP_POAPPROVAL/WorkflowTaskCollection?$format=xml
(or)
/sap/opu/odata/sap/GBAPP_POAPPROVAL;mo/WorkflowTaskCollection?$format=xml
Now you will be able to check if the OData service is working properly.

In our case, since it was a POC, we created the same user names in SAP Gateway and in SAP ERP, we mapped the same user in the RFC that connects from SAP Gateway to SAP ERP.
For productive scenarios, you will need additional settings for principal propagation.
A3. Extending App
We have used the standard App with no modification. In our case, we executed no activities in this step.
A4. Backend Config
In SPRO, access the following path:
Materials Management > Purchasing > Purchase Order > Approve Purchase Orders App > Specify Workflow Task IDs for Approve Purchase Orders App
Then specify the task IDs that are relevant for the Purchase Order Approval scenario.

It is good to have someone who knows the Workflow settings for Approving POs. In our case the customer had implemented a custom workflow for Approving POs. In our case the Task ID was “WS91000003”, but if your customer is using the standard workflow template, the Task ID is “WS20000075”.
Follow a part of the application help that gives some hints on how to get the Task ID:
To find the workflow tasks you need to enter in this Customizing activity, proceed as follows:
In the Navigation Area, you see a list of steps.
A5. Fiori Configuration Cockpit
Now it is time to Add a Tile in Fiori Cloud for the FrontEnd component of the App. You also have to use the destination you created in step S3.
Follow the screenshots.
Getting into the administration area.

Under “Content Management”

Create New App.

Create a Catalog.

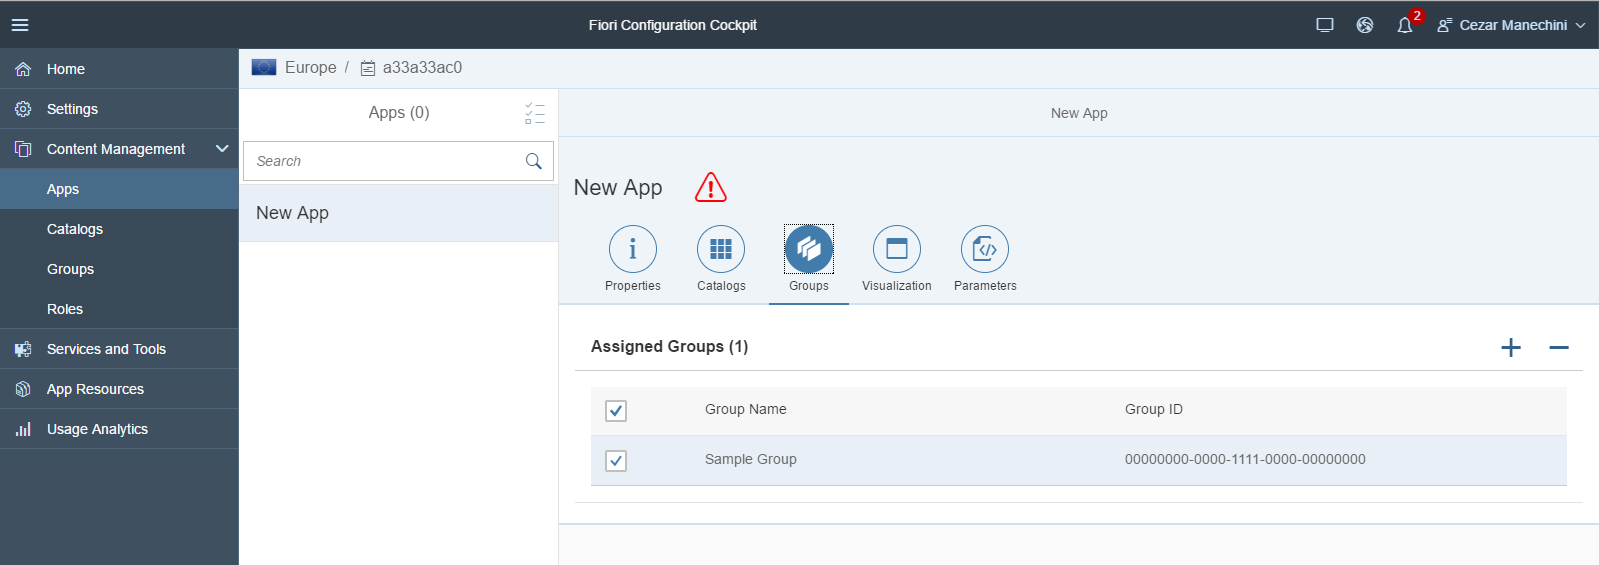
Define a Group.
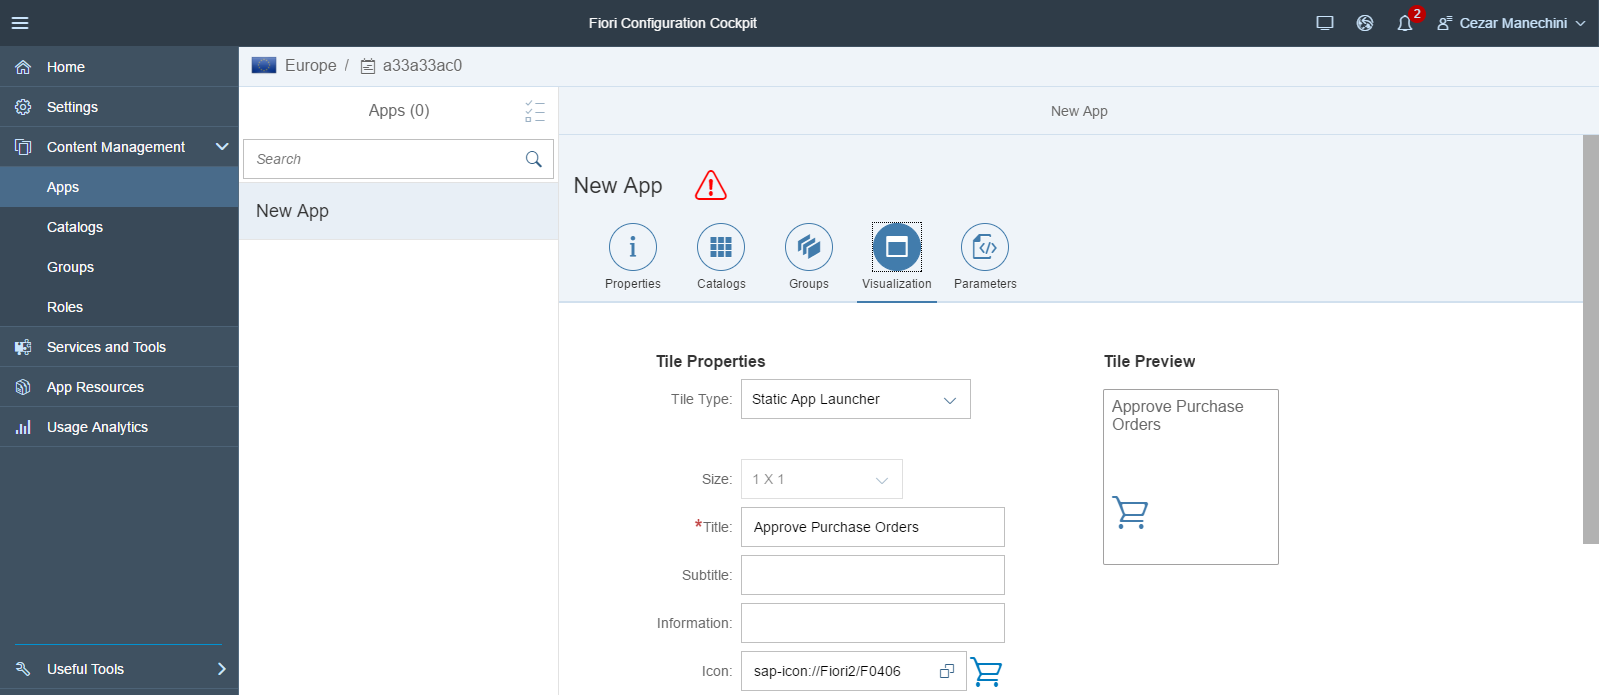
Define the Visualization of your tile.
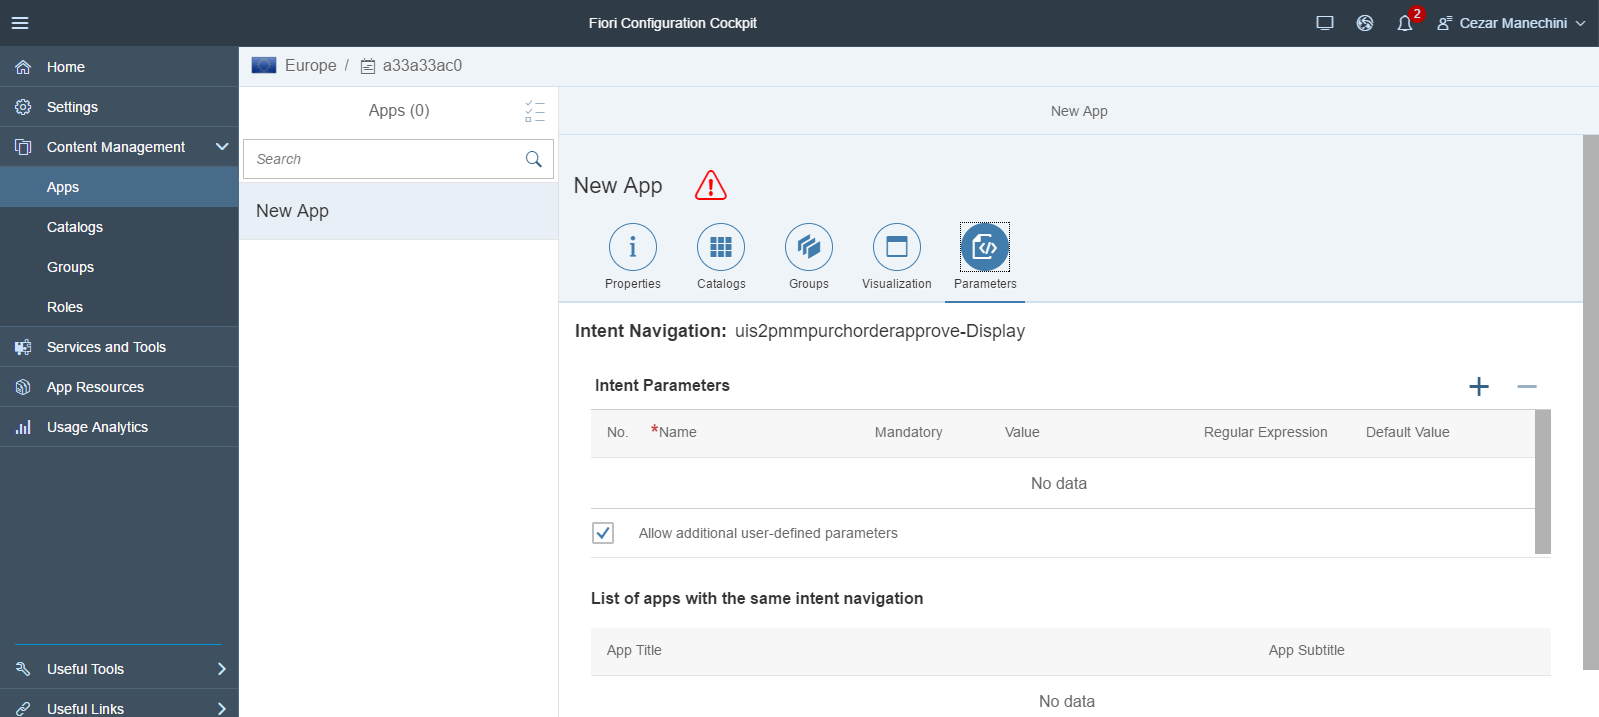
Parameters.
Now check the catalog.

Check Apps.

Important: Change the Fiori App to use the customer’s destination.

Click Edit.
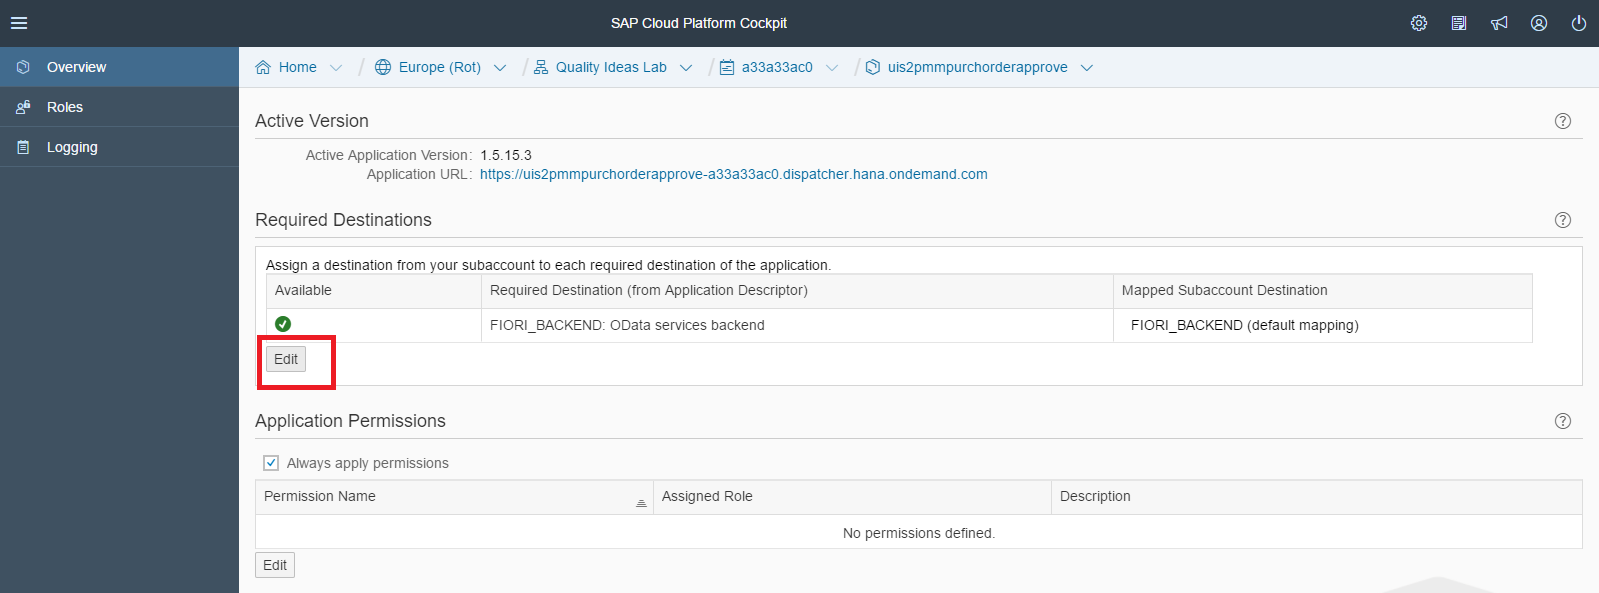
Choose the name of your destination.

A6. Testing
In our case, the Approval Process didn’t work at the beginning.
Customer had a custom implementation of the Purchase Order Approval Workflow.
The App was getting the list of Orders to be approved, but when pushing the “Approve” button we were getting the error “No Release Code maintained for Purchase Order xxxx”
List of Purchase Orders:

Error when clicking Approve button.

We had to adjust the context elements of the approval task.
We followed the Chapter 3 of the below blog (from @masayuki Sekihara) to fix it:
https://blogs.sap.com/2015/06/15/how-to-adjust-custom-workflow-templates-for-sap-fiori/
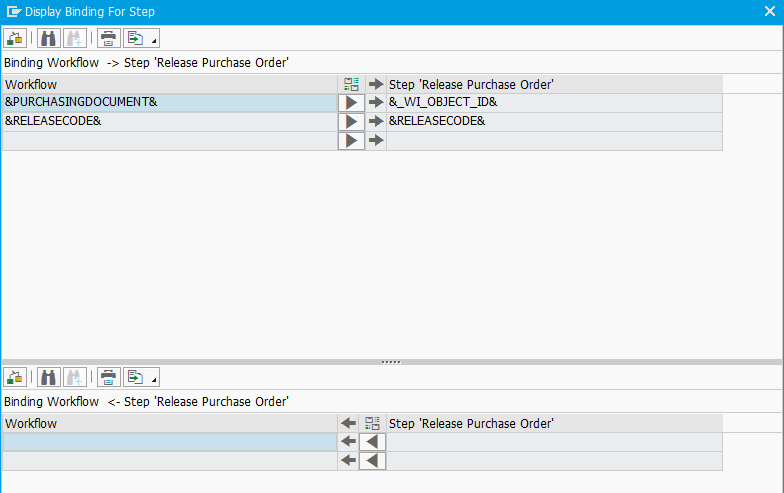
Original binding for our custom approval task:

Custom Approval Task After the adjustment:
After the workflow adjustments, the Approval step started to work in Fiori Cloud App.
Follow the screenshots!!!

Relevant documentation used at the POC
App configuration guide (we have followed only backend components, since Front-End is in Fiori Cloud):
https://uacp2.hana.ondemand.com/doc/e6b109a54c374c67bfe5902f847fc093/1.0%202016-07/en-US/frameset.ht...
The blogs series consists of:
- Part I - Describes the initial steps (A1 & S1) and architecture of the solution.
- Part II - Describes the technical steps that must be carried by a system admin (steps S2 to S6).
- Part III - Describes the business steps that must be carried by an Application Consultant (steps A2 to A6).
In this Blog I’m going to describe the application consultant steps we have followed to connect SAP Fiori Cloud to On-Premise landscape.
This blog covers the steps A2 to A6 from @Elizabeth Thorburn’s blog:
https://blogs.sap.com/2016/06/16/back-end-connectivity-with-sap-fiori-cloud-edition-extended-demo-ac...
A2. Backend test
Now it is time to test the standard scenario for Purchase Orders Approval. We have created a PO and we can see that the release strategy has been triggered, in transaction ME23N.
In the workflow inbox, we can also see that there is a task for approval, in transaction SBWP.
Here we came back to SAP Gateway and tested the service with our data:
In SAP Gateway:
Transaction: /IWFND/MAINT_SERVICE
Service: GBAPP_POAPPROVAL
Click “SAP Gateway Client”
Call the service URL, which gives the list of tasks to be approved:
/sap/opu/odata/sap/GBAPP_POAPPROVAL/WorkflowTaskCollection?$format=xml
(or)
/sap/opu/odata/sap/GBAPP_POAPPROVAL;mo/WorkflowTaskCollection?$format=xml
Now you will be able to check if the OData service is working properly.
In our case, since it was a POC, we created the same user names in SAP Gateway and in SAP ERP, we mapped the same user in the RFC that connects from SAP Gateway to SAP ERP.
For productive scenarios, you will need additional settings for principal propagation.
A3. Extending App
We have used the standard App with no modification. In our case, we executed no activities in this step.
A4. Backend Config
In SPRO, access the following path:
Materials Management > Purchasing > Purchase Order > Approve Purchase Orders App > Specify Workflow Task IDs for Approve Purchase Orders App
Then specify the task IDs that are relevant for the Purchase Order Approval scenario.
It is good to have someone who knows the Workflow settings for Approving POs. In our case the customer had implemented a custom workflow for Approving POs. In our case the Task ID was “WS91000003”, but if your customer is using the standard workflow template, the Task ID is “WS20000075”.
Follow a part of the application help that gives some hints on how to get the Task ID:
To find the workflow tasks you need to enter in this Customizing activity, proceed as follows:
- Start transaction SWETYPV.
- Find a line to which the following applies:
- The ObjectType is BUS2012 (purchase order).
- The Event is RELEASESTEPCREATED.
- The checkbox Type linkage active is selected.
- Copy the entry for Receiver Type in the same line to your clipboard.
- Start the Workflow Builder (transaction SWDD).
- Enter the content of the clipboard into the Workflow field and press ENTER.
In the Navigation Area, you see a list of steps.
- For those steps that you want to use in the app, navigate to the Control tab and find out the ID of the task.
A5. Fiori Configuration Cockpit
Now it is time to Add a Tile in Fiori Cloud for the FrontEnd component of the App. You also have to use the destination you created in step S3.
Follow the screenshots.
Getting into the administration area.
Under “Content Management”
Create New App.
Create a Catalog.
Define a Group.
Define the Visualization of your tile.
Parameters.
Now check the catalog.
Check Apps.
Important: Change the Fiori App to use the customer’s destination.
Click Edit.
Choose the name of your destination.
A6. Testing
In our case, the Approval Process didn’t work at the beginning.
Customer had a custom implementation of the Purchase Order Approval Workflow.
The App was getting the list of Orders to be approved, but when pushing the “Approve” button we were getting the error “No Release Code maintained for Purchase Order xxxx”
List of Purchase Orders:
Error when clicking Approve button.
We had to adjust the context elements of the approval task.
We followed the Chapter 3 of the below blog (from @masayuki Sekihara) to fix it:
https://blogs.sap.com/2015/06/15/how-to-adjust-custom-workflow-templates-for-sap-fiori/
Original binding for our custom approval task:
Custom Approval Task After the adjustment:
After the workflow adjustments, the Approval step started to work in Fiori Cloud App.
Follow the screenshots!!!
Relevant documentation used at the POC
App configuration guide (we have followed only backend components, since Front-End is in Fiori Cloud):
https://uacp2.hana.ondemand.com/doc/e6b109a54c374c67bfe5902f847fc093/1.0%202016-07/en-US/frameset.ht...
- SAP Managed Tags:
- SAP Fiori,
- SAP Fiori Cloud,
- SAP Gateway,
- SAP Business Technology Platform
1 Comment
You must be a registered user to add a comment. If you've already registered, sign in. Otherwise, register and sign in.
Labels in this area
-
ABAP CDS Views - CDC (Change Data Capture)
2 -
AI
1 -
Analyze Workload Data
1 -
BTP
1 -
Business and IT Integration
2 -
Business application stu
1 -
Business Technology Platform
1 -
Business Trends
1,658 -
Business Trends
91 -
CAP
1 -
cf
1 -
Cloud Foundry
1 -
Confluent
1 -
Customer COE Basics and Fundamentals
1 -
Customer COE Latest and Greatest
3 -
Customer Data Browser app
1 -
Data Analysis Tool
1 -
data migration
1 -
data transfer
1 -
Datasphere
2 -
Event Information
1,400 -
Event Information
66 -
Expert
1 -
Expert Insights
177 -
Expert Insights
297 -
General
1 -
Google cloud
1 -
Google Next'24
1 -
Kafka
1 -
Life at SAP
780 -
Life at SAP
13 -
Migrate your Data App
1 -
MTA
1 -
Network Performance Analysis
1 -
NodeJS
1 -
PDF
1 -
POC
1 -
Product Updates
4,577 -
Product Updates
343 -
Replication Flow
1 -
RisewithSAP
1 -
SAP BTP
1 -
SAP BTP Cloud Foundry
1 -
SAP Cloud ALM
1 -
SAP Cloud Application Programming Model
1 -
SAP Datasphere
2 -
SAP S4HANA Cloud
1 -
SAP S4HANA Migration Cockpit
1 -
Technology Updates
6,873 -
Technology Updates
420 -
Workload Fluctuations
1
Related Content
- ABAP Cloud Developer Trial 2022 Available Now in Technology Blogs by SAP
- 10+ ways to reshape your SAP landscape with SAP Business Technology Platform – Blog 4 in Technology Blogs by SAP
- Top Picks: Innovations Highlights from SAP Business Technology Platform (Q1/2024) in Technology Blogs by SAP
- CAP LLM Plugin – Empowering Developers for rapid Gen AI-CAP App Development in Technology Blogs by SAP
- 10+ ways to reshape your SAP landscape with SAP BTP - Blog 3 Interview in Technology Blogs by SAP
Top kudoed authors
| User | Count |
|---|---|
| 37 | |
| 25 | |
| 17 | |
| 13 | |
| 7 | |
| 7 | |
| 7 | |
| 6 | |
| 6 | |
| 6 |