
- SAP Community
- Products and Technology
- Technology
- Technology Blogs by SAP
- Embedding SAP Analytics Cloud Story with URL API a...
Technology Blogs by SAP
Learn how to extend and personalize SAP applications. Follow the SAP technology blog for insights into SAP BTP, ABAP, SAP Analytics Cloud, SAP HANA, and more.
Turn on suggestions
Auto-suggest helps you quickly narrow down your search results by suggesting possible matches as you type.
Showing results for
former_member23
Discoverer
Options
- Subscribe to RSS Feed
- Mark as New
- Mark as Read
- Bookmark
- Subscribe
- Printer Friendly Page
- Report Inappropriate Content
09-30-2017
8:11 PM
This blog post is intended to help customers and partners using SAP Analytics Cloud (SAC) to embed story into Corporate Web site. We will address specific settings of SAC URL API, Single Sign-on with SAML2 federation in the context of embedded Story in an iFrame.
For this proof of concept (PoC), I did with a french customer, I used the Open Source application WSO2 Identity Server (WSO2 IS) as Identity Provider (IdP) to configure SAML2 Single Sign-on with SAP Analytics Cloud.
Embedding SAC story in an iFrame requires to control ClickJacking Protection of IdP authentication page and SAML2 posting. By choosing WSO2 IS, I am able to customize my authentication page and show how you can set suitable X-FRAME-OPTIONS in Tomcat Server.
The setup of SSO between SAP Analytics Cloud and WSO2 IS is divided into 3 main steps:
To Install and setup WSO2 Identity Server, please refer to documentation by clicking on WSO2 Installation & Prerequisite.
For this PoC, I have installed WSO2 IS on Linux Ubuntu 16.04 LTS 64-bit and set adequate network settings to enable access from User Browser.
To complete setup do not forget to change default IdP settings to be in Production configuration by clicking on WSO2 Deploying Identity Server in Production.
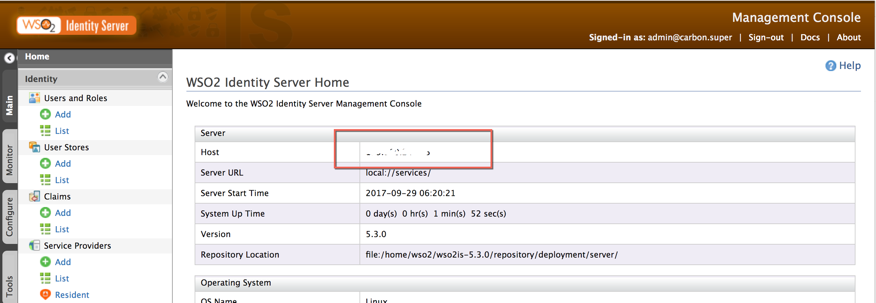
Warning : If you do not set Host Name accessible from SAP Analytics Cloud, metadata will mention localhost by default...
Then, before starting any Service Provider setup, please check host name in WSO2 IS Server Home page.
From your preferred browser, open the WSO2 admin console url:
https://<WSO2-server>:<WSO2-port>/carbon/admin/login.jsp
Log as admin user. The first time, default password is admin. It has to be changed as soon as possible.

At this step, we are going to create a WSO2 IS Service Provider for SAC.
Select Add in Service Provider folder from WSO2 IS Identity Server home page

Enter your Service Provider name and description and select Register
Select folder Inbound Authentication Configuration folder and click to Configure

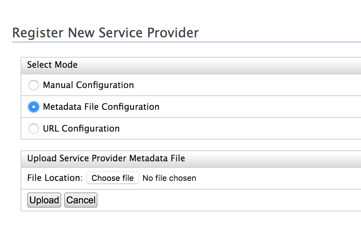
Choose Metadata file configuration.
You need to upload SAC SAML2 metadata into WSO2 IS Service Provider definition.
Now, login to your SAC tenant with admin privileges and navigate to System/Administration/ Security folder.
Click on Edit connection and choose SAML Single Sign-On:

Then, click on Download button

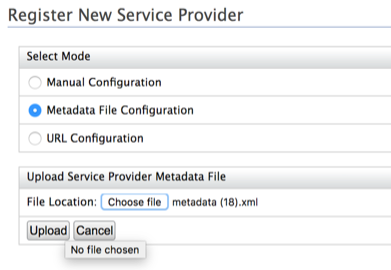
On WSO2 IS application in the current Service Provider Definition, select Choose file, select your previously SAC downloaded metadata file and click to Upload button:
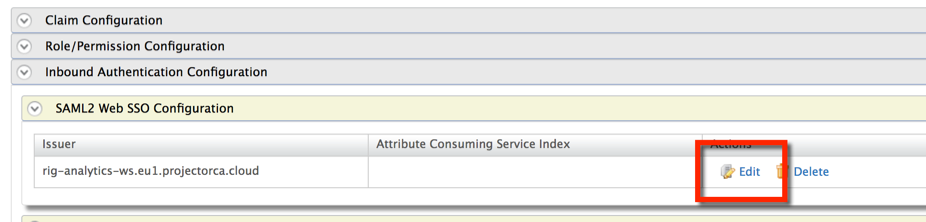
Now select Inbound Authentication Configuration/SAML2 Web SSO Configuration folder and Edit:
You should get the following page with prefilled Service Provider definition:

Click on Cancel button and go to the Claim Configuration folder, select Use Local Claim Dialect and choose http://WSO2.org/claims/emailaddress Subject claim URI dropdown list box. By applying such settings, we have chosen to use eMail address as user attribute to map with the Identity Provider

Then, you have completed Service Provider settings.
Select Add in Identity folder / Users and Roles

Select Add a New User

Enter User Name and password and click Next.

Select your Service Provider in the role list and click Finish. You have now to update your user profile. Select User Profile for the newly created user.

Enter eMail address which is required for IdP attribute mapping and click Update.

At this step, we are going to change SAC Identity Provider from standard SCI IdP to our own WSO2 IS IdP. Let’s first get metadata file from our resident IdP in WSO2 IS. As you can guess, we are going to use the resident IDP available in WSO2 IS. By the way, We could also have set WSO2 IS pointing on another third party IdP.
Select Resident from Identity Providers folder.

Then, open Inbound Authentication Configuration / SAML2 Web SSO Configuration folder.
Please check and change if necessary Destination URLs to ensure that host name is pointing to your IDP server. Do not take care about SSO URL and Logout URL pointing on Localhost, I did not find the way to change it (a bug maybe…). We will update Metadata later on, if necessary.

Then, now you can now click on Download SAML MetaData.
Edit the downloaded Metadata file and check if SingleLogoutService and SingleSignOnService point to IDP Server name and port:
You are now able to upload your IdP Metadata file into SAC. Switch to your SAC tenant which should be still opened on System/Administration/Security (see step: Setup Service Provider).
Go to step 2 :

Click on Upload…, choose your Metadata file and click Open.
To have details, please select

Step 3: Select email to map user attribute between IDP and SAC.

Check Dynamic User Creation to automatically create user account if the selected attribute does not match an existing user.
Step 4: Now, let’s check. Enter your email address and click Verify Account.
In appearing pop-up windows, copy Login URL.
Open a new Incognito window in Chrome Browser. Paste your URL.
If setting runs fine you should get the following screen:

Close the incognito window, and return to your previous SAC windows and click
You should now get the following screen: Account Verified !

Save your configuration and click Convert.

Clear you Browser cache, and now try to access your SAC Tenant:
You should get the following login page:

Sign-in, you should be on your SAC Home Page…
I want to share the following beautiful story with responsive page available in my SAC tenant:

Let’s build the story URL to be used in iFrame later on.
First I have to identify parameters to build URL API.
When you open story in SAC, you have the following URL:
to build your story API URL, you have to match the Story ID, Tenant ID, and Tenant URI information into the following embeddable URL API:
<yourStoryID> = "C8CCB759884B288CE10000000A78A940"
<youTenantID> = "016"
<youSACtenantURI> = SAC host name
For parameters, I use mode=embed and pagebar=disable as parameter of my page.
“embed” parameter sets the story into embed mode. In embed mode, you can see the pagebar with a filter button, but main bar and toolbar do not appear. If “pageBar” is set to 'disable', then the page bar will not be displayed.
For more information about SAP Analytics Cloud URL API, please refer to the following help https://help.sap.com/doc/a4406994704e4af5a8559a640b496468/release/en-US/index.html
You can also get story definition from an HTTP GET request which allows fetching a listing of stories along with metadata for each story. Full path is https://<your tenant URL>/api/v1/stories.
You can get your Story definition from the result of above query:
Then, my final API URL is ready to be embedded in an iframe :
To improve the protection of web applications against clickjacking, meta XFRAME-OPTIONS header directive describes the X-Frame-Options HTTP header field, which declares a policy, communicated from the server to the client browser, regarding whether the browser may display the transmitted content in frames that are part of other web pages. For more information : https://tools.ietf.org/html/rfc7034
When SAC runs in an iframe SAML2 redirects some POST to WSO2 IS Identity Provider into iframe. That requires WSO2 authentication page has to be displayed with clickjacking protection disabled.
In Tomcat WSO2 IS Server, let’s edit:
Add the following parameters below in your Tomcat configuration:
We also have to enable /samlsso post into iframe. Add the following parameters in your Tomcat configuration:
Add the following parameters below in your Tomcat configuration:
You can notice, above configuration disables Clickjacking protection which is not really convenient in production. It is very convenient for testing. Then, in production to be much more secured you have to use the below parameters. We use antiClickJackingOption parameter ALLOW-FROM and antiClickJackingURI to disable XFRAME-OPTIONS for a specific origin URI (ie: Corporate Web site) :
You also need to enable SAC Story to be embedded in iFrame. Then, login to your SAC tenant with admin privilege and navigate to System/Administration/System Configuration folder.
Click on Edit connection and switch parameter Enable embedding inside an iframe on.

Let’s now create a very simple html file:
Let’s now run …

Sign-in …

Thanks for reading!
Additional helpful articles:
For this proof of concept (PoC), I did with a french customer, I used the Open Source application WSO2 Identity Server (WSO2 IS) as Identity Provider (IdP) to configure SAML2 Single Sign-on with SAP Analytics Cloud.
Embedding SAC story in an iFrame requires to control ClickJacking Protection of IdP authentication page and SAML2 posting. By choosing WSO2 IS, I am able to customize my authentication page and show how you can set suitable X-FRAME-OPTIONS in Tomcat Server.
The setup of SSO between SAP Analytics Cloud and WSO2 IS is divided into 3 main steps:
- Setup of WSO2 Identity Server
- Installation & prerequisites
- WSO2 IS Setup
- Service Provider settings
- Create a User and apply privileges
- Identity Provider settings
- Create an embeddable story with SAC
- Creating a web page with iFrame and SAC story
- Disable X-FRAME-OPTIONS in IDP Tomcat Server
- Setting SAC to embed Story
- Create an html page with embedded story and test
Setup of WSO2 Identity Server
Installation & prerequisites
To Install and setup WSO2 Identity Server, please refer to documentation by clicking on WSO2 Installation & Prerequisite.
For this PoC, I have installed WSO2 IS on Linux Ubuntu 16.04 LTS 64-bit and set adequate network settings to enable access from User Browser.
To complete setup do not forget to change default IdP settings to be in Production configuration by clicking on WSO2 Deploying Identity Server in Production.
Warning : If you do not set Host Name accessible from SAP Analytics Cloud, metadata will mention localhost by default...
Then, before starting any Service Provider setup, please check host name in WSO2 IS Server Home page.
From your preferred browser, open the WSO2 admin console url:
https://<WSO2-server>:<WSO2-port>/carbon/admin/login.jsp
Log as admin user. The first time, default password is admin. It has to be changed as soon as possible.
WSO2 IS Setup
Service Provider settings
At this step, we are going to create a WSO2 IS Service Provider for SAC.
Select Add in Service Provider folder from WSO2 IS Identity Server home page
Enter your Service Provider name and description and select Register
Select folder Inbound Authentication Configuration folder and click to Configure
Choose Metadata file configuration.
You need to upload SAC SAML2 metadata into WSO2 IS Service Provider definition.
Now, login to your SAC tenant with admin privileges and navigate to System/Administration/ Security folder.
Click on Edit connection
Then, click on Download button
On WSO2 IS application in the current Service Provider Definition, select Choose file, select your previously SAC downloaded metadata file and click to Upload button:
Now select Inbound Authentication Configuration/SAML2 Web SSO Configuration folder and Edit:
You should get the following page with prefilled Service Provider definition:
Click on Cancel button and go to the Claim Configuration folder, select Use Local Claim Dialect and choose http://WSO2.org/claims/emailaddress Subject claim URI dropdown list box. By applying such settings, we have chosen to use eMail address as user attribute to map with the Identity Provider
Then, you have completed Service Provider settings.
Create a User and apply privileges
Select Add in Identity folder / Users and Roles
Select Add a New User
Enter User Name and password and click Next.
Select your Service Provider in the role list and click Finish. You have now to update your user profile. Select User Profile for the newly created user.
Enter eMail address which is required for IdP attribute mapping and click Update.
Identity Provider settings
At this step, we are going to change SAC Identity Provider from standard SCI IdP to our own WSO2 IS IdP. Let’s first get metadata file from our resident IdP in WSO2 IS. As you can guess, we are going to use the resident IDP available in WSO2 IS. By the way, We could also have set WSO2 IS pointing on another third party IdP.
Select Resident from Identity Providers folder.
Then, open Inbound Authentication Configuration / SAML2 Web SSO Configuration folder.
Please check and change if necessary Destination URLs to ensure that host name is pointing to your IDP server. Do not take care about SSO URL and Logout URL pointing on Localhost, I did not find the way to change it (a bug maybe…). We will update Metadata later on, if necessary.
Then, now you can now click on Download SAML MetaData.
Edit the downloaded Metadata file and check if SingleLogoutService and SingleSignOnService point to IDP Server name and port:
<?xml version="1.0" encoding="UTF-8"?>

<EntityDescriptor xmlns="urn:oasis:names:tc:SAML:2.0:metadata" entityID="localhost">

<IDPSSODescriptor protocolSupportEnumeration="urn:oasis:names:tc:SAML:2.0:protocol" validUntil="2017-09-29T07:49:27.889Z">

<KeyDescriptor use="signing">

<KeyInfo xmlns="http://www.w3.org/2000/09/xmldsig#">

<X509Data>

<X509Certificate>MIICNTCCAZ6gAwIBAgIES343gjANBgkqhkiG9w0BAQUFADBVMQswCQYDVQQGEwJVUzELMAkGA1UECAwCQ0ExFjAUBgNVBAcMDU1vdW50YWluIFZpZXcxDTALBgNVBAoMBFdTTzIxEjAQBgNVBAMMCWxvY2FsaG9zdDAeFw0xMDAyMTkwNzAyMjZaFw0zNTAyMTMwNzAyMjZaMFUxCzAJBgNVBAYTAlVTMQswCQYDVQQIDAJDQTEWMBQGA1UEBwwNTW91bnRhaW4gVmlldzENMAsGA1UECgwEV1NPMjESMBAGA1UEAwwJbG9jYWxob3N0MIGfMA0GCSqGSIb3DQEBAQUAA4GNADCBiQKBgQCUp/oV1vWc8/TkQSiAvTousMzOM4asB2iltr2QKozni5aVFu818MpOLZIr8LMnTzWllJvvaA5RAAdpbECb+48FjbBe0hseUdN5HpwvnH/DW8ZccGvk53I6Orq7hLCv1ZHtuOCokghz/ATrhyPq+QktMfXnRS4HrKGJTzxaCcU7OQIDAQABoxIwEDAOBgNVHQ8BAf8EBAMCBPAwDQYJKoZIhvcNAQEFBQADgYEAW5wPR7cr1LAdq+IrR44iQlRG5ITCZXY9hI0PygLP2rHANh+PYfTmxbuOnykNGyhM6FjFLbW2uZHQTY1jMrPprjOrmyK5sjJRO4d1DeGHT/YnIjs9JogRKv4XHECwLtIVdAbIdWHEtVZJyMSktcyysFcvuhPQK8Qc/E/Wq8uHSCo=

</X509Certificate>

</X509Data>

</KeyInfo>

</KeyDescriptor>

<SingleLogoutService Binding="urn:oasis:names:tc:SAML:2.0:bindings:HTTP-Redirect" Location="https://<your IDP servername>:<your port>/samlsso"

ResponseLocation="https://<your IDP servername>:<your port>/samlsso"/>

<NameIDFormat>urn:oasis:names:tc:SAML:1.1:nameid-format:unspecified</NameIDFormat>

<SingleSignOnService Binding="urn:oasis:names:tc:SAML:2.0:bindings:HTTP-POST" Location="https://<your IDP servername>:<your port>/samlsso"/>

<SingleSignOnService Binding="urn:oasis:names:tc:SAML:2.0:bindings:HTTP-Redirect" Location="https://<your IDP servername>:<your port>/samlsso"/>

</IDPSSODescriptor>

</EntityDescriptor>
You are now able to upload your IdP Metadata file into SAC. Switch to your SAC tenant which should be still opened on System/Administration/Security (see step: Setup Service Provider).
Go to step 2 :
Click on Upload…, choose your Metadata file and click Open.
To have details, please select
Step 3: Select email to map user attribute between IDP and SAC.
Check Dynamic User Creation to automatically create user account if the selected attribute does not match an existing user.
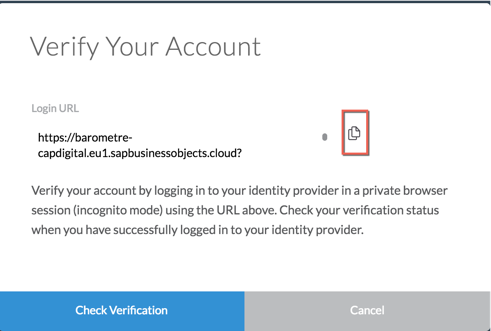
Step 4: Now, let’s check. Enter your email address and click Verify Account.
In appearing pop-up windows, copy Login URL.
Open a new Incognito window in Chrome Browser. Paste your URL.
If setting runs fine you should get the following screen:
Close the incognito window, and return to your previous SAC windows and click
You should now get the following screen: Account Verified !
Save your configuration and click Convert.
Clear you Browser cache, and now try to access your SAC Tenant:
You should get the following login page:
Sign-in, you should be on your SAC Home Page…
Create an embeddable story with SAC
I want to share the following beautiful story with responsive page available in my SAC tenant:
Let’s build the story URL to be used in iFrame later on.
First I have to identify parameters to build URL API.
When you open story in SAC, you have the following URL:
https://<yourSACtenant>/sap/fpa/ui/tenants/016/app.html#;view_id=story;storyId=C8CCB759884B288CE1000...;to build your story API URL, you have to match the Story ID, Tenant ID, and Tenant URI information into the following embeddable URL API:
<yourStoryID> = "C8CCB759884B288CE10000000A78A940"
<youTenantID> = "016"
<youSACtenantURI> = SAC host name
https://<yourSACtenantURI>/sap/fpa/ui/tenants/<yourTenantID>/bo/story/<yourStoryID>?<Parameters>;For parameters, I use mode=embed and pagebar=disable as parameter of my page.
“embed” parameter sets the story into embed mode. In embed mode, you can see the pagebar with a filter button, but main bar and toolbar do not appear. If “pageBar” is set to 'disable', then the page bar will not be displayed.
For more information about SAP Analytics Cloud URL API, please refer to the following help https://help.sap.com/doc/a4406994704e4af5a8559a640b496468/release/en-US/index.html
You can also get story definition from an HTTP GET request which allows fetching a listing of stories along with metadata for each story. Full path is https://<your tenant URL>/api/v1/stories.
You can get your Story definition from the result of above query:
{

		"id": "C8CCB759884B288CE10000000A78A940",

		"name": "CapDigitalDashboard",

		"description": "",

		"created": "2017-09-12T05:57:49.901Z",

		"createdBy": "TPIERRE",

		"changed": "2017-09-29T16:44:38.260Z",

		"changedBy": "TPIERRE",

		"openURL": "/sap/fpa/ui/tenants/016/bo/story/C8CCB759884B288CE10000000A78A940",

		"isTemplate": false,

		"isSample": false

	},
Then, my final API URL is ready to be embedded in an iframe :
https://<yourSACTenant>/sap/fpa/ui/tenants/016/bo/story/C8CCB759884B288CE10000000A78A940?mode=embed&...Creating a web page with iFrame and SAC story
Control X-FRAME-OPTIONS in IDP Tomcat Server
To improve the protection of web applications against clickjacking, meta XFRAME-OPTIONS header directive describes the X-Frame-Options HTTP header field, which declares a policy, communicated from the server to the client browser, regarding whether the browser may display the transmitted content in frames that are part of other web pages. For more information : https://tools.ietf.org/html/rfc7034
When SAC runs in an iframe SAML2 redirects some POST to WSO2 IS Identity Provider into iframe. That requires WSO2 authentication page has to be displayed with clickjacking protection disabled.
In Tomcat WSO2 IS Server, let’s edit:
<WSO2-home>/repository/deployment/server/webapps/authenticationendpoint/WEB-INF/web.xmlAdd the following parameters below in your Tomcat configuration:
<filter>

        <filter-name>HttpHeaderSecurityFilter</filter-name>

        <filter- class>org.apache.catalina.filters.HttpHeaderSecurityFilter</filter-class>

        <init-param>

            <param-name>hstsEnabled</param-name>

            <param-value>false</param-value>

        </init-param>

        <init-param>

          <param-name>antiClickJackingEnabled</param-name>

          <param-value>false</param-value>

        </init-param>

</filter>
We also have to enable /samlsso post into iframe. Add the following parameters in your Tomcat configuration:
<WSO2-home>/repository/conf/tomcat/carbon/WEB-INF/web.xmlAdd the following parameters below in your Tomcat configuration:
<filter>

<filter-name>HttpHeaderSecurityFilter_EnableAntiClickJacking</filter-name>

      <filter-class>org.apache.catalina.filters.HttpHeaderSecurityFilter</filter-class>

      <init-param>

                <param-name>antiClickJackingEnabled</param-name>

                <param-value>false</param-value>

      </init-param>

</filter>
You can notice, above configuration disables Clickjacking protection which is not really convenient in production. It is very convenient for testing. Then, in production to be much more secured you have to use the below parameters. We use antiClickJackingOption parameter ALLOW-FROM and antiClickJackingURI to disable XFRAME-OPTIONS for a specific origin URI (ie: Corporate Web site) :
<filter>

      <filter-name>HttpHeaderSecurityFilter_EnableAntiClickJacking</filter-name>

      <filter-class>org.apache.catalina.filters.HttpHeaderSecurityFilter</filter-class>

                <init-param>

                      <param-name>antiClickJackingEnabled</param-name>

                      <param-value>true</param-value>

                </init-param>

                <init-param>

                      <param-name>antiClickJackingOption</param-name>

                      <param-value>ALLOW-FROM</param-value>

                </init-param>

                <init-param>

                      <param-name>antiClickJackingUri</param-name>

                      <param-value>https://<ServerEmbbeddingSACStory>:<port></param-value>

                </init-param>

                <init-param>

                <param-name>blockContentTypeSniffingEnabled</param-name>

                <param-value>false</param-value>

                </init-param>

      <init-param>

        <param-name>hstsEnabled</param-name>

        <param-value>false</param-value>

      </init-param>

      <init-param>

        <param-name>blockContentTypeSniffingEnabled</param-name>

        <param-value>false</param-value>

      </init-param>

      <init-param>

        <param-name>xssProtectionEnabled</param-name>

        <param-value>false</param-value>

      </init-param>

    </filter>
Setting SAC to embed Story
You also need to enable SAC Story to be embedded in iFrame. Then, login to your SAC tenant with admin privilege and navigate to System/Administration/System Configuration folder.
Click on Edit connection
Create an html page with embedded story and test
Let’s now create a very simple html file:
<CTYPE html>

<html>

<head>

<meta charset="UTF-8">

<title>Embedded SAC Story</title>

</head>

<body>

<h1>Embedded SAP Analytics Cloud example</h1>

<iframe  width="1024" height="800" src="https://<yourSACTenant>/sap/fpa/ui/tenants/016/bo/story/C8CCB759884B288CE10000000A78A940?mode=embed&pagebar=disable"></iframe>

</body>

</html>
Let’s now run …
Sign-in …
Thanks for reading!
Additional helpful articles:
- SAML authentication in SAP Analytics Cloud
https://blogs.sap.com/2017/07/13/saml-authentication-in-sap-analytics-cloud/
- Multiple IDP’s for HANA XS Artifact – BusinessObjects Enterprise Platform Perspective
https://blogs.sap.com/2017/06/05/multiple-IdPs-for-hana-xs-artifact-businessobjects-enterprise-platf...
- KBA 2487116 for AD FS configuration and KBA 2487567 with steps on troubleshooting SAML.
- SAP Analytics Cloud URL API Help https://help.sap.com/doc/a4406994704e4af5a8559a640b496468/release/en-US/index.html
- WSO2 Identity Server Documentation
https://docs.wso2.com/display/IS530/WSO2+Identity+Server+Documentation
- SAP Managed Tags:
- SAP Analytics Cloud
5 Comments
You must be a registered user to add a comment. If you've already registered, sign in. Otherwise, register and sign in.
Labels in this area
-
ABAP CDS Views - CDC (Change Data Capture)
2 -
AI
1 -
Analyze Workload Data
1 -
BTP
1 -
Business and IT Integration
2 -
Business application stu
1 -
Business Technology Platform
1 -
Business Trends
1,661 -
Business Trends
88 -
CAP
1 -
cf
1 -
Cloud Foundry
1 -
Confluent
1 -
Customer COE Basics and Fundamentals
1 -
Customer COE Latest and Greatest
3 -
Customer Data Browser app
1 -
Data Analysis Tool
1 -
data migration
1 -
data transfer
1 -
Datasphere
2 -
Event Information
1,400 -
Event Information
65 -
Expert
1 -
Expert Insights
178 -
Expert Insights
280 -
General
1 -
Google cloud
1 -
Google Next'24
1 -
Kafka
1 -
Life at SAP
784 -
Life at SAP
11 -
Migrate your Data App
1 -
MTA
1 -
Network Performance Analysis
1 -
NodeJS
1 -
PDF
1 -
POC
1 -
Product Updates
4,577 -
Product Updates
330 -
Replication Flow
1 -
RisewithSAP
1 -
SAP BTP
1 -
SAP BTP Cloud Foundry
1 -
SAP Cloud ALM
1 -
SAP Cloud Application Programming Model
1 -
SAP Datasphere
2 -
SAP S4HANA Cloud
1 -
SAP S4HANA Migration Cockpit
1 -
Technology Updates
6,886 -
Technology Updates
408 -
Workload Fluctuations
1
Related Content
- Top Picks: Innovations Highlights from SAP Business Technology Platform (Q1/2024) in Technology Blogs by SAP
- SAP Successfactors Implementation and Maintenance in Projects in 2024 in Technology Blogs by Members
- Enhanced Data Analysis of Fitness Data using HANA Vector Engine, Datasphere and SAP Analytics Cloud in Technology Blogs by SAP
- Unveiling Customer Needs: SAP Signavio Community supporting our customer`s adoption in Technology Blogs by SAP
- Analytic privilige issue in Embedded SAC in Technology Q&A
Top kudoed authors
| User | Count |
|---|---|
| 13 | |
| 11 | |
| 10 | |
| 9 | |
| 9 | |
| 7 | |
| 6 | |
| 5 | |
| 5 | |
| 5 |