
- SAP Community
- Products and Technology
- Technology
- Technology Blogs by SAP
- Media Product Master in SAP S/4HANA: Extend the Pr...
Technology Blogs by SAP
Learn how to extend and personalize SAP applications. Follow the SAP technology blog for insights into SAP BTP, ABAP, SAP Analytics Cloud, SAP HANA, and more.
Turn on suggestions
Auto-suggest helps you quickly narrow down your search results by suggesting possible matches as you type.
Showing results for
former_member23
Explorer
Options
- Subscribe to RSS Feed
- Mark as New
- Mark as Read
- Bookmark
- Subscribe
- Printer Friendly Page
- Report Inappropriate Content
09-18-2017
4:18 PM
Introduction
With SAP ERP, the Media Product Master is an extension of the Material Master that is shipped as part of the media business function set (IS-Media). A set of media-specific fields are shipped as part of the Media Product Master. Adding new customer-specific fields is a time-consuming task that requires development skills.
In SAP S/4HANA, SAP provides a more flexible concept. Instead of shipping a fixed set of fields SAP provides an easy way of defining and adding new fields to the product master. In this blog post, you will learn how to define new fields for the product master and how to add them to the Fiori UI.
Prerequisites
You have the following authorization roles assigned in the front-end system:
- The SAP_BR_PRODMASTER_SPECIALIST specialist role. This allows access to the Manage Product Master app.
- The SAP_NW_APS_EXT_CFL_APP role. This allows use of the Custom Fields and Logic app. For more information about system requirements, see SAP Note 2283716.
- The SAP_UI_FLEX_KEY_USER role. This allows you to adapt Fiori UI.
In addition, the business catalog SAP_CMD_BC_PR_MAINT_PC must be assigned to your user. This allows you to adapt the UI of the Product Master app.
Process
There are 3 steps involved in extending the Product Master:
- Create a Custom Field
Generate the persistence for the new field in the backend - Add New Field to the Fiori UI
Define where the new field is placed on the Fiori UI - Extend CDS View
Define a CDS view extension for the CDS view C_MDProductHierarchyQuery
As an example, for a custom field we will use field Genre with a code list.
1: Create a Custom Field
- Open the Custom Fields and Logic application from the SAP Fiori launchpad and click Create.
- In the opening pop-up, choose Product Master General for Business Context and enter the Label Genre.
- Change the editable pre-filled Identifier and Tooltip if required.
- Choose Type Code List and enter the Length of the ID, for example 4.
- Now you can enter the code list. As an example, enter Code Value SCFI and Description Science Fiction.
- When you are finished entering the allowed values, click Create and Edit.
- Go to UIs and Reports.
- Click Enable Usage for Product Basic Data, Master Data Product Filter and Master Data Product Hierarchy Query.
- For Product Basic Data select the Search Relevance checkbox. Then you can enter values for genre in the basic search field when searching for your products.
- Save the data and then choose the Publish button.
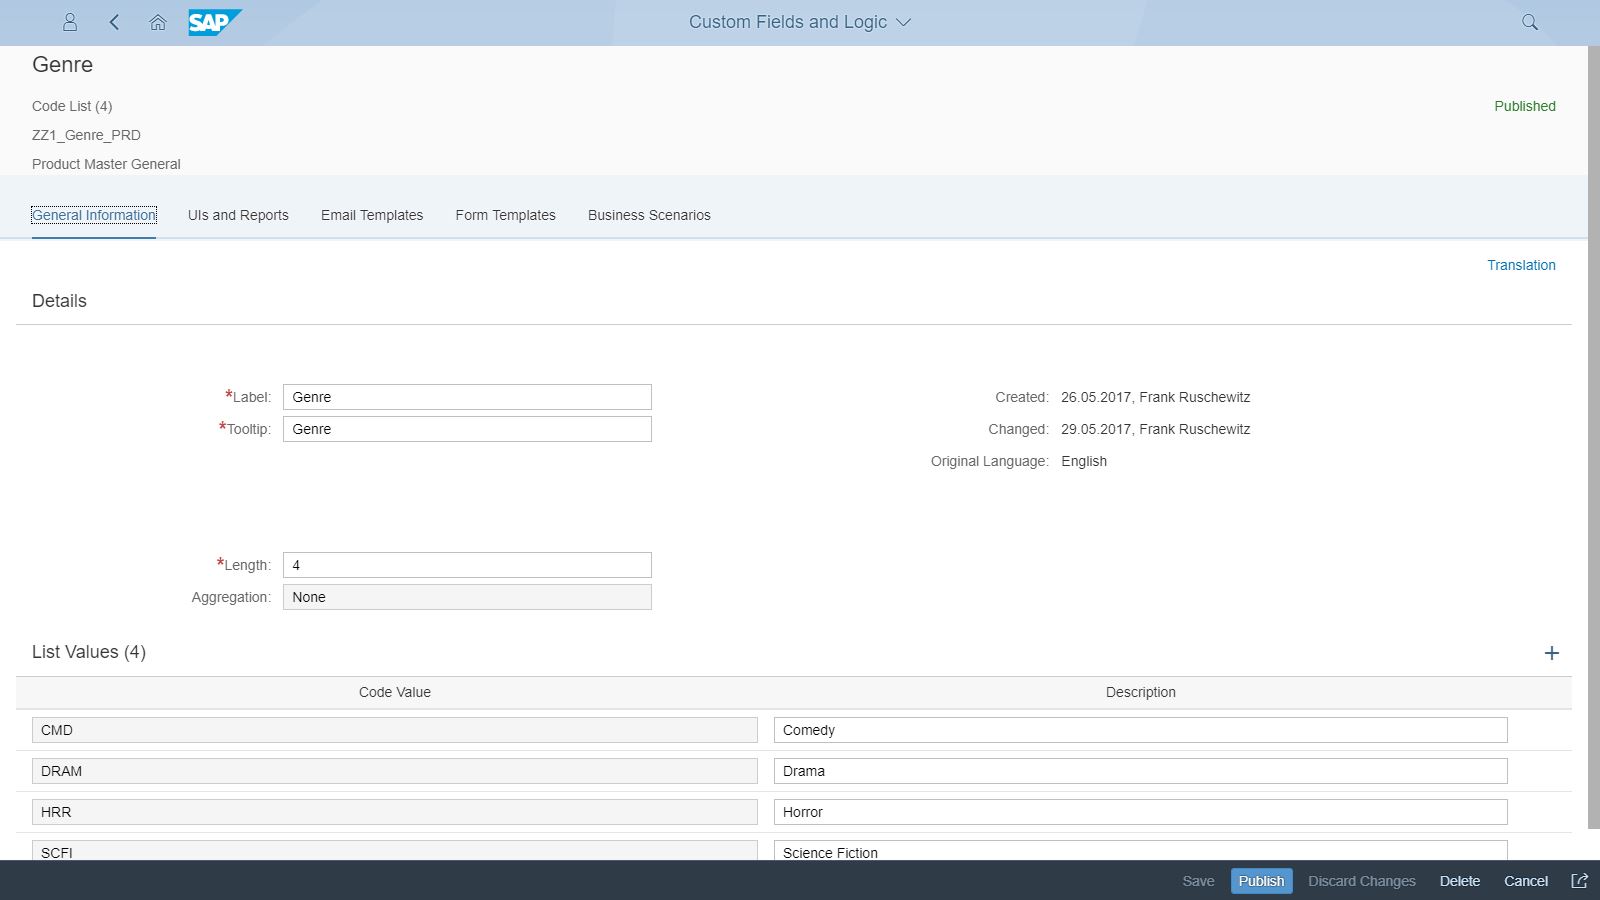
This creates the persistence of the field and makes it available in adaptation mode of the chosen UI. Once the status for the new field changes from Publishing to Published you can continue with the next step.
Tip: you can define several custom fields and publish them all together.
Result: As part of the generation that happens during the publishing process, a domain ZZ1_GENRE and a data element ZZ1_GENRE are created. Using these DDIC objects a field ZZ1_GENRE_PRD was appended to the MARA table. Here we assume that in the Adaptation Transport Organizer (ATO, transaction S_ATO_SETUP) a prefix “ZZ1_” was defined.
2: Add New Field to the Fiori UI
In this step, you define where the new field is placed on the SAP Fiori UI.
- Open the Product Master application from the SAP Fiori launchpad. Search for an existing product and go to the object page of that product.
- Click on your image in the upper left corner to access the Me area.
- Click Adapt UI. The Product Master object page is displayed in UI adaptation mode.
Note: When you mouseover the UI, different areas are highlighted. With a right-click several options are displayed for the highlighted area of the screen. - Select the area to the right of the Created By/On and Last Changed By/On fields.
- Right-click and choose Create Group from the menu and enter Title Data as a title for this new group.
- To place the new field Genre, select the new group, right-click and choose Add Field.

- In the list of Available Fields search for Genre. The fields Genre and Genre (Desc.) are displayed. Select Genre and click OK.
- Choose the Publish button to publish the UI changes. Choose Exit to close the UI adaptation mode.
3: Extend CDS View
Finally, you define a CDS view extension for the CDS view C_MDProductHierarchyQuery . This allows you to use the custom fields in tree table columns of the Product Master Hierarchy application. This is required, since in SAP S/4HANA 1709 the Custom Fields and Logic app generates the custom fields only into the CDS view C_MDProductHierarchyQuery for usage as filter attributes. If you would like to have the custom fields available for usage as columns in the tree table of the Product Master Hierarchy application, this must be added manually via the extension view.
- Open the SAP HANA Studio and connect to the SAP S/4HANA back-end system.
- Switch to the ABAP perspective. If your development system is not yet registered, create a new ABAP project for your development system.
- Right-click System Library and choose New → Other ABAP Repository Object.
- Open the Core Data Services folder, select Data Definition, and click on Next.
- Enter the Package, the Name (for example ZEXT_HPC_ProdHierarchyQ) and the Description (for example extension view for fields in tree table columns).
- Click Finish and copy the following text into the text editor:
@AbapCatalog.sqlViewAppendName: 'ZPRODHRYQEXT'
@EndUserText.label: 'Extension for C_MDProductHierarchyQuery'
extend view C_MDProductHierarchyQuery with ZEXT_HPC_ProdHierarchyQ
{
_Product.ZZ1_Genre_PRD as ZZ1_Tree_Genre,
_Product.ZZ1_ReleaseDate_PRD as ZZ1_Tree_ReleaseDate,
_Product.ZZ1_Title_PRD as ZZ1_Tree_Title
}
For each custom field that will appear in the product hierarchy tree table, you must add a line such as “_Product.ZZ1_<name>_PRD as ZZ1_<Alternative name>” . - Click on Activate button to activate the new extension view. It should now be considered as extension of the C_MDProductHierarchyQuery view.

In the Product Master Hierarchy App, you can add the field Genre to filter attributes by choosing Adapt Filters. To add the field to the columns, you need to click the Settings button.
Conclusion
With these steps you can extend the product master by the required custom fields and add these fields to the UI of the Product Master App and the Product Master Hierarchy App. In addition these fields are available in the corresponding CDS view, so that you can make them available for analytics.
- SAP Managed Tags:
- Media,
- SAP Fiori for SAP S/4HANA,
- SAP S/4HANA
4 Comments
You must be a registered user to add a comment. If you've already registered, sign in. Otherwise, register and sign in.
Labels in this area
-
ABAP CDS Views - CDC (Change Data Capture)
2 -
AI
1 -
Analyze Workload Data
1 -
BTP
1 -
Business and IT Integration
2 -
Business application stu
1 -
Business Technology Platform
1 -
Business Trends
1,661 -
Business Trends
88 -
CAP
1 -
cf
1 -
Cloud Foundry
1 -
Confluent
1 -
Customer COE Basics and Fundamentals
1 -
Customer COE Latest and Greatest
3 -
Customer Data Browser app
1 -
Data Analysis Tool
1 -
data migration
1 -
data transfer
1 -
Datasphere
2 -
Event Information
1,400 -
Event Information
65 -
Expert
1 -
Expert Insights
178 -
Expert Insights
280 -
General
1 -
Google cloud
1 -
Google Next'24
1 -
Kafka
1 -
Life at SAP
784 -
Life at SAP
11 -
Migrate your Data App
1 -
MTA
1 -
Network Performance Analysis
1 -
NodeJS
1 -
PDF
1 -
POC
1 -
Product Updates
4,577 -
Product Updates
330 -
Replication Flow
1 -
RisewithSAP
1 -
SAP BTP
1 -
SAP BTP Cloud Foundry
1 -
SAP Cloud ALM
1 -
SAP Cloud Application Programming Model
1 -
SAP Datasphere
2 -
SAP S4HANA Cloud
1 -
SAP S4HANA Migration Cockpit
1 -
Technology Updates
6,886 -
Technology Updates
408 -
Workload Fluctuations
1
Related Content
- Hack2Build on Business AI – Highlighted Use Cases in Technology Blogs by SAP
- It’s Official - SAP BTP is Again a Leader in G2’s Reports in Technology Blogs by SAP
- Unify your process and task mining insights: How SAP UEM by Knoa integrates with SAP Signavio in Technology Blogs by SAP
- SAP Fiori Frontend 6.0 App installation and connection to SAP Business Suite in Technology Q&A
- Data Proposal for Sales Order Requests - Determination with Reference to Order Creation History in Technology Blogs by SAP
Top kudoed authors
| User | Count |
|---|---|
| 13 | |
| 11 | |
| 10 | |
| 9 | |
| 9 | |
| 7 | |
| 6 | |
| 5 | |
| 5 | |
| 5 |