
- SAP Community
- Products and Technology
- Technology
- Technology Blogs by SAP
- Managing your custom service in cloud foundry mark...
Technology Blogs by SAP
Learn how to extend and personalize SAP applications. Follow the SAP technology blog for insights into SAP BTP, ABAP, SAP Analytics Cloud, SAP HANA, and more.
Turn on suggestions
Auto-suggest helps you quickly narrow down your search results by suggesting possible matches as you type.
Showing results for
Employee
Options
- Subscribe to RSS Feed
- Mark as New
- Mark as Read
- Bookmark
- Subscribe
- Printer Friendly Page
- Report Inappropriate Content
09-15-2017
11:59 AM
Cloud foundry marketplace is one stop shop to explore all cloud foundry service offering. This blog discusses the procedure to make your own service available in Cloud foundry marketplace also I'll discuss how to manage that exposed custom service.
We are implementing something called service broker to expose our service in cloud foundry marketplace. A service broker in cloud foundry is a special type of application which manages the complete life cycle of a cloud foundry service like service instance creation, deletion and update and binding and unbinding of service with an application.
We will implement this service broker in NodeJS using Express, but you can use any other language of your choice which cloud foundry runtime supports.
Application: An application is any deployed code in cloud foundry
Service: Service in cloud foundry is a managed software offering which can be used by an application.
Service broker: Service broker is an application which manages the complete lifecycle of a service.
Service broker API: service broker API is an HTTP interface which allows communication between cloud foundry marketplace and service broker.
Service instance: service instance is an instantiation of serice.
Service binding: service binding is a relationship between application and service.
Service catalog: Service catalog contains metadata about service like name, plans, quota etc
When we say implementing service broker, it means we are just implementing service broker API so that operation like creation, deletion and update of service instance and binding and unbinding of service can take place from cloud foundry service marketplace. We will implement this in NodeJs with
We will implement this in NodeJs with Express so it will be helpful if you have a prior knowledge of Node and Express. You can refer to one of my prior blog https://blogs.sap.com/2014/11/15/integrate-sap-ui5-or-open-ui5-with-nodejs/
In the below section I have explained different components of my service broker application
In app.js we are just configuring our application and starting a basic HTTP server.
package.json contains metadata of the project with dependencies. One important thing is to specify the script attribute to start the application else cloud foundry will not be able to start it.
route.js contains actual API endpoint for service broker implementation.
Service broker API specification says all the endpoint should be protected via basic authorization. I have hard coded the credential but you should store in the system provided variable in cloud foundry. You need to tell this credential to cloud controller while registering your application as a service broker. I have used express-basic-auth NPM package for authorization check, not used Passport as it's a very simple basic auth implementation and to keep it light.
This endpoint gives the cloud controller complete metadata about the service broker like name, id, description, plans, dependencies etc.
Following is the catalog.JSON file which the above endpoint is serving. This is a dummy metadata, you need to change it to cater to your requirments:
These are the endpoint for service instance provisioning, deprovisonig and update. It just sends status code with {} response object, you need to enhance it to cater to your requirements.
These are the endpoint for service instance binding and un-binding. It just sends status code with {} response object, you need to enhance it to cater to your requirements.
Cloud foundry waits for very little time for service broker for processing, it's 30 seconds if I remember correctly. Anything more than that is a time out. If you need more time you can use tell cloud controller to poll for your operation progress by adding the query parameter
I have used express-validation NPM for validation of query parameters and body:
Now since you have your implementation code ready, you can now deploy that application using below command in cloud foundry CLI:
where cloud-foundry-service-broker-node-implementation is the name of your application. You can give any name to your baby 🙂
Now since you have your service broker implementation up and running in cloud foundry, you can register it as a service broker by using the following command in cloud foundry CLI:
Where custom-service-broker admin is the name of your service broker
admin supersecret is the name and password which via which you have protected your endpoints
https://cloud-foundry-service-broker-node-implementation.cfapps.eu10.hana.ondemand.com is the URL of your service broker implementation application
I have registered it at space level, hence it will be available with in the space. You can registering ot globallly also so that it will be available across all ORGs and spaces. You need appropiate credentials to do so.
after executing the above command successfully your service will be available in cloud foundry marketplace.
in case you need to make some code changes to your registered service broker, you just need to make the changes locally and push it again to cloud foundry using push command, no need to re-register it unless you have changed the name of the application while pushing which will eventually change the URL of the application.
Now we have implemented, deployed, registered and tested our custom service broker in cloud platform. You can find complete code for re-use at the below Git repository
https://github.com/ashishcorg/cloud-foundry-service-broker-node-implementation
Feedbacks welcome as always !!! 🙂 🙂
What are we building?
We are implementing something called service broker to expose our service in cloud foundry marketplace. A service broker in cloud foundry is a special type of application which manages the complete life cycle of a cloud foundry service like service instance creation, deletion and update and binding and unbinding of service with an application.
We will implement this service broker in NodeJS using Express, but you can use any other language of your choice which cloud foundry runtime supports.
Few jargons for better understanding
Application: An application is any deployed code in cloud foundry
Service: Service in cloud foundry is a managed software offering which can be used by an application.
Service broker: Service broker is an application which manages the complete lifecycle of a service.
Service broker API: service broker API is an HTTP interface which allows communication between cloud foundry marketplace and service broker.
Service instance: service instance is an instantiation of serice.
Service binding: service binding is a relationship between application and service.
Service catalog: Service catalog contains metadata about service like name, plans, quota etc
Writing your own service broker implementation
When we say implementing service broker, it means we are just implementing service broker API so that operation like creation, deletion and update of service instance and binding and unbinding of service can take place from cloud foundry service marketplace. We will implement this in NodeJs with
We will implement this in NodeJs with Express so it will be helpful if you have a prior knowledge of Node and Express. You can refer to one of my prior blog https://blogs.sap.com/2014/11/15/integrate-sap-ui5-or-open-ui5-with-nodejs/
In the below section I have explained different components of my service broker application
app.js
In app.js we are just configuring our application and starting a basic HTTP server.
/**

 * External Module dependencies.

 */


var express = require('express'),

http = require('http'),

path = require('path'),

bodyParser = require("body-parser"),

validate = require("express-validation");


/**

 * Internal module dependencies.

 */

var serviceBrokerRoute = require('./routes/route');


/**

 * Application configuration

 */

var app = express();

app.use(bodyParser.urlencoded({

	extended : true

}));

app.use(bodyParser.json());


/**

 * Route registration

 */

app.use("/v2", serviceBrokerRoute);


/**

 * error handler

 */

app.use(function(err, req, res, next) {

	if (err instanceof validate.ValidationError)

		return res.status(err.status).json(err);

	return res.status(500);

});


/**

 * start server

 */

http.createServer(app).listen(process.env.PORT || 3000, function() {

	console.log('Express server listening on port ' + process.env.PORT || 3000);

});
Package.json
package.json contains metadata of the project with dependencies. One important thing is to specify the script attribute to start the application else cloud foundry will not be able to start it.
{

  "name": "service-broker-node-implementation",

  "version": "0.0.1",

  "private": true,

  "scripts": {

    "start": "node app.js"

  },

  "dependencies": {

    "express": "~4.13.4",

    "body-parser": "1.18.1",

    "express-basic-auth": "~1.1.2",

    "express-validation": "~1.0.2",

    "joi": "~10.6.0"

  }

}
route.js
route.js contains actual API endpoint for service broker implementation.
Managing authorization
Service broker API specification says all the endpoint should be protected via basic authorization. I have hard coded the credential but you should store in the system provided variable in cloud foundry. You need to tell this credential to cloud controller while registering your application as a service broker. I have used express-basic-auth NPM package for authorization check, not used Passport as it's a very simple basic auth implementation and to keep it light.
/**

 * Middleware for authorization check

 */

router.use(basicAuth({

    users: { 'admin': 'supersecret' },

    challenge: true,

    realm: 'Imb4T3st4pp'

}));
/v2/catalog
This endpoint gives the cloud controller complete metadata about the service broker like name, id, description, plans, dependencies etc.
/**

 * end point for service catalog

 */

router.get('/catalog', function(req,res){

	res.send(catalogJSON);

});
Following is the catalog.JSON file which the above endpoint is serving. This is a dummy metadata, you need to change it to cater to your requirments:
{

  "services": [{

    "name": "fake-service",

    "id": "acb56d7c-XXXX-XXXX-XXXX-feb140a59a66",

    "description": "fake service",

    "tags": ["no-sql", "relational"],

    "requires": ["route_forwarding"],

    "bindable": true,

    "metadata": {

      "provider": {

        "name": "The name"

      },

      "listing": {

        "imageUrl": "http://example.com/cat.gif",

        "blurb": "Add a blurb here",

        "longDescription": "A long time ago, in a galaxy far far away..."

      },

      "displayName": "The Fake Broker"

    },

    "dashboard_client": {

      "id": "398e2f8e-XXXX-XXXX-XXXX-19a71ecbcf64",

      "secret": "277cabb0-XXXX-XXXX-XXXX-7822c0a90e5d",

      "redirect_uri": "http://localhost:1234"

    },

    "plan_updateable": true,

    "plans": [{

      "name": "fake-plan-1",

      "id": "d3031751-XXXX-XXXX-XXXX-a42377d3320e",

      "description": "Shared fake Server, 5tb persistent disk, 40 max concurrent connections",

      "max_storage_tb": 5,

      "metadata": {

        "costs":[

            {

               "amount":{

                  "usd":99.0

               },

               "unit":"MONTHLY"

            },

            {

               "amount":{

                  "usd":0.99

               },

               "unit":"1GB of messages over 20GB"

            }

         ],

        "bullets": [

          "Shared fake server",

          "5 TB storage",

          "40 concurrent connections"

        ]

      }

    }, {

      "name": "fake-plan-2",

      "id": "0f4008b5-XXXX-XXXX-XXXX-dace631cd648",

      "description": "Shared fake Server, 5tb persistent disk, 40 max concurrent connections. 100 async",

      "max_storage_tb": 5,

      "metadata": {

        "costs":[

            {

               "amount":{

                  "usd":199.0

               },

               "unit":"MONTHLY"

            },

            {

               "amount":{

                  "usd":0.99

               },

               "unit":"1GB of messages over 20GB"

            }

         ],

        "bullets": [

          "40 concurrent connections"

        ]

      }

    }]

  }]

}
v2/service_instances/:instance_id
These are the endpoint for service instance provisioning, deprovisonig and update. It just sends status code with {} response object, you need to enhance it to cater to your requirements.
/**

 * end point for service instance create

 */

router.put('/service_instances/:instance_id',validate(validator.serviceInstanceCreateRequestValidator), function(req,res){

	res.status(201).send({});

});


/**

 * end point for service instance update

 */

router.patch('/service_instances/:instance_id',validate(validator.serviceInstanceUpdateRequestValidator), function(req,res){

	res.status(200).send({});

});


/**

 * end point for service instance delete

 */

router.delete('/service_instances/:instance_id',validate(validator.deleteRequestValidator), function(req,res){

	res.status(200).send({});

});
v2/service_instances/:instance_id/service_bindings/:binding_id
These are the endpoint for service instance binding and un-binding. It just sends status code with {} response object, you need to enhance it to cater to your requirements.
/**

 * end point for service instance binding

 */

router.put('/service_instances/:instance_id/service_bindings/:binding_id',validate(validator.bindServiceInstanceRequestValidator), function(req,res){

	res.status(201).send({});

});


/**

 * end point for service instance unbinding

 */

router.delete('/service_instances/:instance_id/service_bindings/:binding_id',validate(validator.deleteRequestValidator), function(req,res){

	res.status(200).send({});

});
Polling for asynchronous operations
Cloud foundry waits for very little time for service broker for processing, it's 30 seconds if I remember correctly. Anything more than that is a time out. If you need more time you can use tell cloud controller to poll for your operation progress by adding the query parameter
accepts_incomplete=true to the request. Then the cloud controller will keep polling at regular interval of time via below endpoint:/**
* end point for operation status polling
*/
router.get('/service_instances/:instance_id/last_operation', function(req,res){
res.status(200).send({});
});Validation
I have used express-validation NPM for validation of query parameters and body:
var joi = require('joi');


this.serviceInstanceCreateRequestValidator={

		body: {

			service_id: joi.required(),

			plan_id: joi.required(),

			space_guid: joi.required()

		  }

};

this.serviceInstanceUpdateRequestValidator={

		body: {

			service_id: joi.required()

		  }

};

this.deleteRequestValidator={

		query: {

			service_id: joi.required(),

			plan_id: joi.required()

		  }

};

this.bindServiceInstanceRequestValidator={

		body: {

			service_id: joi.required(),

			plan_id: joi.required()

		  }

};

module.exports = this;
Deploying your service broker application to cloud foundry
Now since you have your implementation code ready, you can now deploy that application using below command in cloud foundry CLI:
cf push cloud-foundry-service-broker-node-implementation
where cloud-foundry-service-broker-node-implementation is the name of your application. You can give any name to your baby 🙂
Registering your service broker
Now since you have your service broker implementation up and running in cloud foundry, you can register it as a service broker by using the following command in cloud foundry CLI:
cf create-service-broker custom-service-broker admin supersecret https://cloud-foundry-service-broker-node-implementation.cfapps.eu10.hana.ondemand.com --space-scoped
Where custom-service-broker admin is the name of your service broker
admin supersecret is the name and password which via which you have protected your endpoints
https://cloud-foundry-service-broker-node-implementation.cfapps.eu10.hana.ondemand.com is the URL of your service broker implementation application
I have registered it at space level, hence it will be available with in the space. You can registering ot globallly also so that it will be available across all ORGs and spaces. You need appropiate credentials to do so.
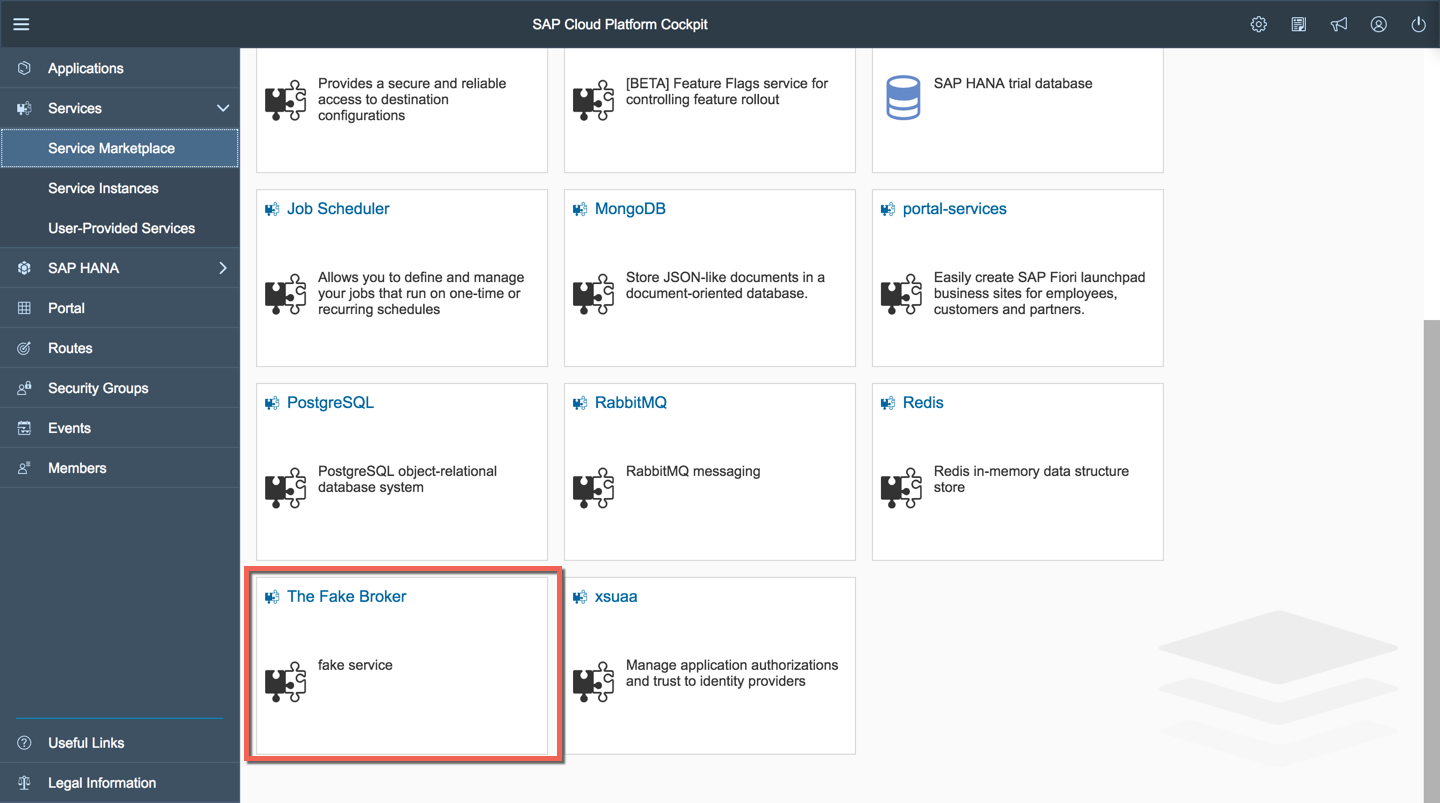
after executing the above command successfully your service will be available in cloud foundry marketplace.
Making changes to your deployed code
in case you need to make some code changes to your registered service broker, you just need to make the changes locally and push it again to cloud foundry using push command, no need to re-register it unless you have changed the name of the application while pushing which will eventually change the URL of the application.
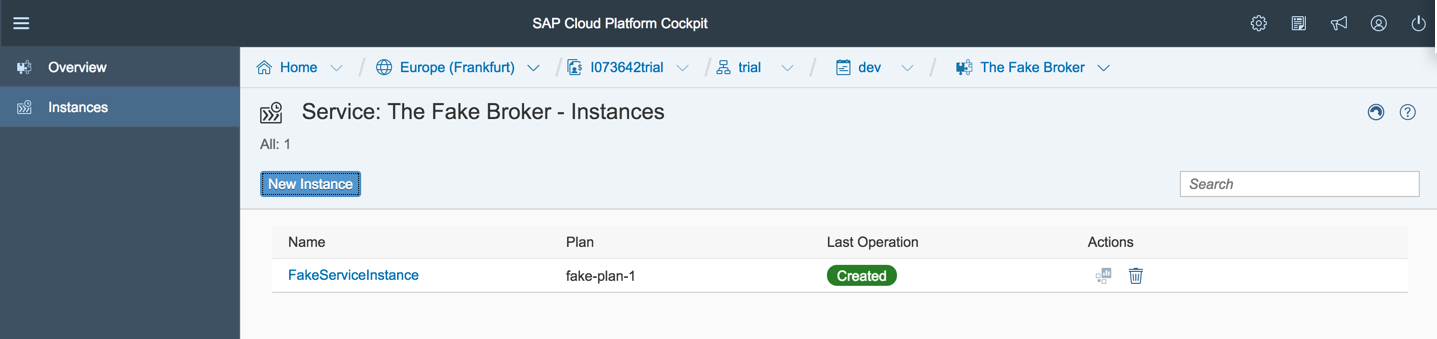
Creating service instance (Provisioning)
- Click on the service title
- Go to instances tab from the side menu
- click on create instance button
- Fill mandatory inputs and finish
Deleting service instance (De-provisioning)
- Click on the delete button
- Confirm the confirm box
Conclusion
Now we have implemented, deployed, registered and tested our custom service broker in cloud platform. You can find complete code for re-use at the below Git repository
https://github.com/ashishcorg/cloud-foundry-service-broker-node-implementation
Feedbacks welcome as always !!! 🙂 🙂
- SAP Managed Tags:
- Node.js,
- SAP Business Technology Platform
1 Comment
You must be a registered user to add a comment. If you've already registered, sign in. Otherwise, register and sign in.
Labels in this area
-
ABAP CDS Views - CDC (Change Data Capture)
2 -
AI
1 -
Analyze Workload Data
1 -
BTP
1 -
Business and IT Integration
2 -
Business application stu
1 -
Business Technology Platform
1 -
Business Trends
1,661 -
Business Trends
87 -
CAP
1 -
cf
1 -
Cloud Foundry
1 -
Confluent
1 -
Customer COE Basics and Fundamentals
1 -
Customer COE Latest and Greatest
3 -
Customer Data Browser app
1 -
Data Analysis Tool
1 -
data migration
1 -
data transfer
1 -
Datasphere
2 -
Event Information
1,400 -
Event Information
64 -
Expert
1 -
Expert Insights
178 -
Expert Insights
273 -
General
1 -
Google cloud
1 -
Google Next'24
1 -
Kafka
1 -
Life at SAP
784 -
Life at SAP
11 -
Migrate your Data App
1 -
MTA
1 -
Network Performance Analysis
1 -
NodeJS
1 -
PDF
1 -
POC
1 -
Product Updates
4,578 -
Product Updates
323 -
Replication Flow
1 -
RisewithSAP
1 -
SAP BTP
1 -
SAP BTP Cloud Foundry
1 -
SAP Cloud ALM
1 -
SAP Cloud Application Programming Model
1 -
SAP Datasphere
2 -
SAP S4HANA Cloud
1 -
SAP S4HANA Migration Cockpit
1 -
Technology Updates
6,886 -
Technology Updates
397 -
Workload Fluctuations
1
Related Content
- It has never been easier to print from SAP with Microsoft Universal Print in Technology Blogs by Members
- Unlocking Full-Stack Potential using SAP build code - Part 1 in Technology Blogs by Members
- Redis on SAP BTP, Hyperscaler Option Now Available for Customers on BTP@China! in Technology Blogs by SAP
- BTP@China环境上的Redis on SAP BTP, Hyperscaler Option可面向客户提供! in Technology Blogs by SAP
- Redis on SAP BTP, Hyperscaler Option Now Available for Customers on BTP@China! in Technology Blogs by SAP
Top kudoed authors
| User | Count |
|---|---|
| 11 | |
| 10 | |
| 9 | |
| 9 | |
| 7 | |
| 7 | |
| 7 | |
| 6 | |
| 6 | |
| 5 |