
- SAP Community
- Products and Technology
- Technology
- Technology Blogs by SAP
- How to develop a transactional app using the ABAP ...
Technology Blogs by SAP
Learn how to extend and personalize SAP applications. Follow the SAP technology blog for insights into SAP BTP, ABAP, SAP Analytics Cloud, SAP HANA, and more.
Turn on suggestions
Auto-suggest helps you quickly narrow down your search results by suggesting possible matches as you type.
Showing results for
Product and Topic Expert
Options
- Subscribe to RSS Feed
- Mark as New
- Mark as Read
- Bookmark
- Subscribe
- Printer Friendly Page
- Report Inappropriate Content
09-14-2017
7:51 PM
| 🔥 Check out the blog post Evolution of the ABAP Programming Model and the SAP Community page Modern ABAP Development with RAP to find out more about the ABAP RESTful Application Programming Model which you should use when you are on SAP S/4HANA 2020 or later. |
Introduction
The purpose of this how to guide is not to simply duplicate the content of the SAP Online Help, but to provide guidance for the participants of a SAP CodeJam event. Participants of a SAP CodeJam event shall be guided to create their own repository objects and services in one system without messing up the implementation of the other participants. Therefore, all repository objects contain the participant / group number indicated by a hash # as a suffix.
The steps described in this how to guide are based on the SAP Online Help
https://help.sap.com/viewer/cc0c305d2fab47bd808adcad3ca7ee9d/7.51.2/en-US/971e03cd952a47458e57f87fc5...
Data model
From bottom to top, you see the so-called interface view ZDEMO_I_SalesOrder_TX_# which is a CDS view that selects data from the respective database table ZTAB_SO_#. The interface views can contain model information like CRUD (Create, Read, Update and Delete) and Draft enablement, text associations, value helps and many more non-UI-specific metadata.

On top of the interface view there is a so-called consumption view ZDEMO_C_SalesOrder_TX_#. The consumption views, as you can assume from its name, represents the data model layer where to define scenario-specific data model and consumption-specific information. This is for example the appropriate layer for exposing a given data model as OData service. Each scenario can have its own consumption views if needed, whereas the interface views are common to different scenarios.
As of SAP NetWeaver 7.51 the metadata extensions can be used to enrich a given consumption data model with UI-specific metadata (using CDS annotations), thus separating them from the data model (i.e. separation of concerns).
If your system runs on top of SAP NetWeaver 750, UI-specific metadata is maintained in the consumption view as well.
Since we are creating a new data model that is based on new database tables we can leverage BOPF objects.
If your data is stored in existing database tables and is updated via existing API’s such as BAPI’s or classes, you can also leverage CDS views as a data model and the SADL runtime for a generic read access without having to write a single line of ABAP code. In this case updates will be best implemented using the referenced data source approach where the existing API’s can be called via code based implementation. This approach is described in the following two blogs:
OData service development with SAP Gateway using CDS via Referenced Data Sources
OData service development with SAP Gateway using CDS via Referenced Data Sources – How to implement ...
How to section
In the following you will perform the following steps to create a transactional app using the new SAP Fiori programming model
- Create a database table to store the sales order header data
- Create an interface view to read the data from the database table
- Create a consumption view to expose the CDS-based data model as OData service using the annotation @OData.publish: true
- Activate the generated OData service in the transaction /IWFND/MAINT_SERVICE
- Test your OData service in the browser
- Generate a SAP Fiori Elements Application to consume the OData service
Create a database table
- Start transaction SE11. In ABAP in Eclipse you can do so by pressing ALT+F8.

- Enter the following values:
Database Table: ZTAB_SO_#
where # has to be replaced by your group number and press Create
- On the screen Dictionary : Change Table enter the following values in the tab Delivery and Maintenance
 Description : sales order header data group #
Delivery Class: L
Data Browser / Table View Editing: Display/Maintenance AllowedWe choose the option to allow table maintenance here for demo purposes and convenience only. This way you are able to create and maintain the demo data easily also without a UI. - In the Tab Fields You can use cut and paste from the following table to enter the field names and data elements.
Field
Data Element
CLIENT
MANDT
SALESORDER
SNWD_SO_ID
BUSINESSPARTNER
SNWD_PARTNER_ID
CURRENCYCODE
SNWD_CURR_CODE
GROSSAMOUNT
SNWD_TTL_GROSS_AMOUNT
NETAMOUNT
SNWD_TTL_NET_AMOUNT
BILLINGSTATUS
SNWD_SO_CF_STATUS_CODE
OVERALLSTATUS
SNWD_SO_OA_STATUS_CODE
.INCLUDE
/BOBF/S_LIB_ADMIN_DATA
Then chosse the check boxes key and initial value for both fields Client and Salesorder.

- Tab Currency/Quantity FieldsOn the Currency/Quantity Fields tab, define the Reference field CURRENCYCODE and Reference table ZTAB_SO_# for the both fields GROSSAMOUNT and NETAMOUNT.

- Finally do not forget to maintain the technical settings.

- Actvate the table
Create the interface view
- Right click on the package $TMP within your favorite packages
- Select New --> Other ABAP Repository Object

- Choose Core Data Services -> Data Definition and press Next

- Here enter the following valuesName: ZDEMO_I_SalesOrder_TX_#
Description: Sales Order for transactional app - group #and press Finish.

- Copy the DDL source code from the following box and use Ctrl+F to replace the string ### with your group number (here 35) and choose Replace All.The code contains a specific set of @ObjectModel CDS annotations which add business object semantics to the data model.A detailed explanation can be found here:SAP Online Help
@AbapCatalog.sqlViewName: 'ZDEMO_I_SO_###'
@AbapCatalog.compiler.compareFilter: true
@AccessControl.authorizationCheck: #NOT_REQUIRED
@EndUserText.label: 'Sales Order for transactional app - group ###'
@ObjectModel.semanticKey: 'SalesOrder'
@ObjectModel.modelCategory: #BUSINESS_OBJECT
@ObjectModel.compositionRoot: true
@ObjectModel.transactionalProcessingEnabled: true
@ObjectModel.writeActivePersistence: 'ZTAB_SO_###'
@ObjectModel.createEnabled: true
@ObjectModel.deleteEnabled: true
@ObjectModel.updateEnabled: true
define view ZDEMO_I_SalesOrder_TX_###
as select from ztab_so_### as SalesOrder -- the sales order table is the data source for this view
association [0..1] to SEPM_I_BusinessPartner as _BusinessPartner on $projection.BusinessPartner = _BusinessPartner.BusinessPartner
association [0..1] to SEPM_I_Currency as _Currency on $projection.CurrencyCode = _Currency.Currency
association [0..1] to SEPM_I_SalesOrderBillingStatus as _BillingStatus on $projection.BillingStatus = _BillingStatus.SalesOrderBillingStatus
association [0..1] to Sepm_I_SalesOrdOverallStatus as _OverallStatus on $projection.OverallStatus = _OverallStatus.SalesOrderOverallStatus
{
key SalesOrder.salesorder as SalesOrder,
@ObjectModel.foreignKey.association: '_BusinessPartner'
SalesOrder.businesspartner as BusinessPartner,
@ObjectModel.foreignKey.association: '_Currency'
@Semantics.currencyCode: true
SalesOrder.currencycode as CurrencyCode,
@Semantics.amount.currencyCode: 'CurrencyCode'
SalesOrder.grossamount as GrossAmount,
@Semantics.amount.currencyCode: 'CurrencyCode'
SalesOrder.netamount as NetAmount,
@ObjectModel.foreignKey.association: '_BillingStatus'
SalesOrder.billingstatus as BillingStatus,
@ObjectModel.foreignKey.association: '_OverallStatus'
SalesOrder.overallstatus as OverallStatus,
/* Associations */
_BusinessPartner,
_Currency,
_BillingStatus,
_OverallStatus
}

Do not forget to activate your changes - After you have activated the interface view you will notice that a BOPF object has been generated as well

Create a consumption view
- In the folder of the package $TMP expand the folder Core Data Services right click on the folder Data Definition and choose New Data Defintion.

- In the following screen enterDescription: Sales Order for transactional app - group #Name: ZDEMO_C_SalesOrder_TX_#and press Finsih.

- In the editor cut and paste the following DDL source code.The code contains several @ObjectModel annotations and also @UI annotations that are used by the SAP Fiori elements apps.A detailed description what these annotations do can be found here: SAP Online Help
@AbapCatalog.sqlViewName: 'ZDEMO_C_SO_###'
@AccessControl.authorizationCheck: #NOT_REQUIRED
@EndUserText.label: 'Sales Order for transactional app - group ###'
@ObjectModel.semanticKey: 'SalesOrder'
@ObjectModel.transactionalProcessingDelegated: true
@ObjectModel.createEnabled: true
@ObjectModel.deleteEnabled: true
@ObjectModel.updateEnabled: true
@UI.headerInfo: { typeName: 'Sales Order', typeNamePlural: 'Sales Orders' }
@OData.publish: true
define view ZDEMO_C_SalesOrder_TX_###
as select from ZDEMO_I_SalesOrder_TX_### as Document
{
@UI.lineItem.position: 10
@UI.identification.position: 10
key Document.SalesOrder,
@UI.lineItem.position: 20
@UI.identification.position: 20
Document.BusinessPartner,
Document.CurrencyCode,
@UI.lineItem.position: 50
@UI.identification.position: 50
Document.GrossAmount,
@UI.lineItem.position: 60
@UI.identification.position: 60
Document.NetAmount,
@UI.lineItem.position: 30
@UI.selectionField.position: 30
@UI.identification.position: 30
Document.BillingStatus,
@UI.lineItem.position: 40
@UI.selectionField.position: 40
@UI.identification.position: 40
Document.OverallStatus,
/* Exposing value via associations */
@UI.lineItem: { value: '.CompanyName', position: 15 }
Document._BusinessPartner,
Document._Currency,
Document._BillingStatus,
Document._OverallStatus
}
- As described above for the interface view you have to replace the string ### with your group number (here 35)
- Activate the coding
- When checking the annotation @OData.publish: true you are notified that the OData service has not been activated yet. So far only the appropriate repository objects in the SAP backend have been generated.

Activate the OData service
- In your ABAP in Eclipse project press ALT+F8 and search for the transaction /IWFND/MAINT_SERVICE

- In the first screen click on Add Service

- Then you have to
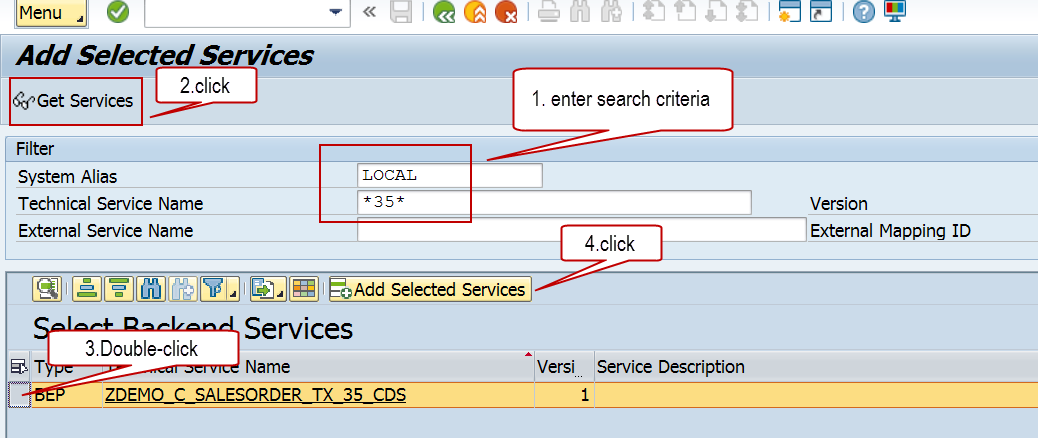
- Enter the following valuesSystem Alias: LOCAL
Technical Service Name: *##* (where ## denotes your group number, here 35) - Click on Get Services
- Double-Click on the line that contains the name of your service ZDEMO_C_SALESORDER_TX_#_CDS where # has to be replaced by your group number
- Click on Add Selected Service
- Enter the following valuesSystem Alias: LOCAL
- In the next screen simply click on Local Object and press Next.

- You will receive a success message that the metadata of your service has been loaded successfully.

- If you now navigate back to the tab in ABAP in Eclipse where you have edited the source code of the consumption view you will notice that the warning has vanished and that there is now a grey button beside the annoation OData.publish : true.

- if you hoover across the grey button a popup window shows up

- When you click on the link a new tab opens in the browser that tries to open the following linkhttp://vhcalnplci.dummy.nodomain:8000/sap/opu/odata/sap/ZDEMO_C_SALESORDER_TX_35_CDS/?sap-ds-debug=trueand you are asked to provide the credentials of your SAP user

- As a result the service document of your OData service will be rendered in your browser

Generate a SAP Fiori Elements Application
- Start your SAP Web IDE
- From the menu select File --> New --> Project from Template

- Select the New List Report Application template

- Enter the following valuesProject Name: SmartTXApp_35
Title: SAP Fiori Elements CUD App - Group 35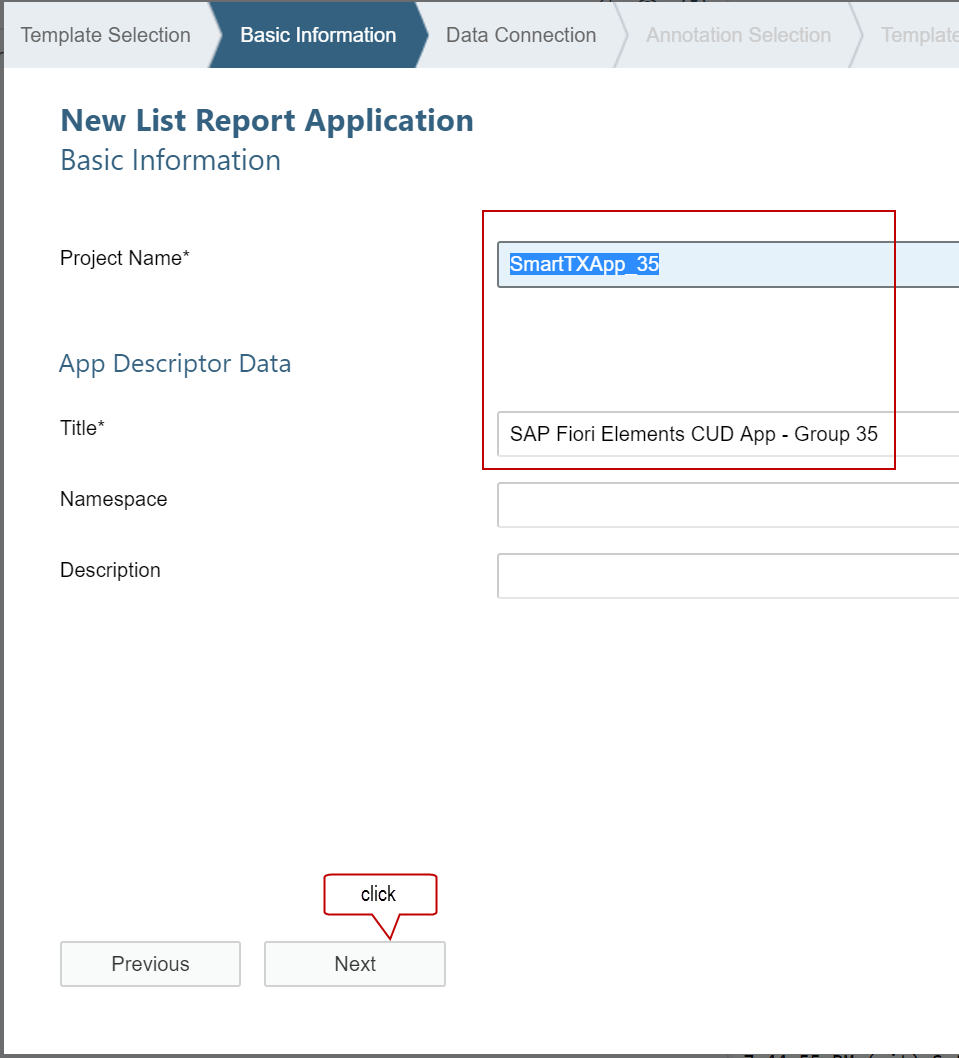
- Now you have to
- Select the backend system (here NPL)
- Enter your group number # in the search field for the service
- Select your service from the list
- Press Next

- The wizard will retrieve annotations from the $metadata document and the annoation file that has been generated based on the annoations in the consumption view.

- In a last step you have to select the entity set ZDEMO_C_SalesOrder_TX_# which is the same as the name of the consumption view.

- Press Finish
Test the application
- The generated app can be tested immediately by pressing the run button.

- In the following dialogue be sure to choose flpSandbox.html

- Click on the tile in the Sanbox FLP

- Finally your app starts. Based on the provided annoations you are able to create sales order header data by pressing the "+" sign.

- In the following screen you can enter data and use the search helps to retrieve data for the business partner and the status

- Having saved the data you can now retrieve a list (that contains just one entry) of sales order header data

Checking content of the table ZTAB_SO_#
In ABAP in Eclipse select the table definition and press F8.

Alternatively you can also run transaction SE16, the classical data browser in the SAPGUI to verify that the data really has been saved to the database ;-).

Add an action to your application
As described in the SAP Online Help it is possible to add so called quick actions to your application that can for example be used to change the status of a sales order to paid.
Extending Apps with Quick Actions
If you want to do this you can follow the steps described in the Online Help and use the following coding for the implementation that contains the string ### as a placeholder for your group number.
class ZCL_DEMO_A_SET_TO_PAID_### definition

  public

  inheriting from /BOBF/CL_LIB_A_SUPERCL_SIMPLE

  final

  create public .


public section.


  methods /BOBF/IF_FRW_ACTION~EXECUTE

    redefinition .

protected section.

private section.

ENDCLASS.


CLASS ZCL_DEMO_A_SET_TO_PAID_### IMPLEMENTATION.


  method /BOBF/IF_FRW_ACTION~EXECUTE.


  " Typed with node's combined table type

  DATA(lt_sales_order) = VALUE ztdemo_i_salesorder_tx_###( ).


  " READING BO data ----------------------------------------------


  " Retrieve the data of the requested node instance

  io_read->retrieve(

    EXPORTING

    iv_node         = is_ctx-node_key

    it_key          = it_key

    IMPORTING

    et_data         = lt_sales_order

  ).


  " WRITING BO data ---------------------------------------------


  LOOP AT lt_sales_order ASSIGNING FIELD-SYMBOL(<s_sales_order>).


  " Set the attribue billing_status to new value

  <s_sales_order>-billingstatus = 'P'.  " PAID


  " Set the attribue overall_status to new value

  IF

    <s_sales_order>-overallstatus = 'N' OR <s_sales_order>-overallstatus = ' '.

    <s_sales_order>-overallstatus  = 'P'.  " PAID

  ENDIF.


  " Update the changed data (billig_status) of the node instance

  io_modify->update(

    EXPORTING

    iv_node               = is_ctx-node_key

    iv_key                = <s_sales_order>-key

    iv_root_key           = <s_sales_order>-root_key

    is_data               = REF #( <s_sales_order>-node_data )

    it_changed_fields     = VALUE #(

      ( zif_demo_i_salesorder_tx_###_c=>sc_node_attribute-zdemo_i_salesorder_tx_###-billingstatus )

      ( zif_demo_i_salesorder_tx_###_c=>sc_node_attribute-zdemo_i_salesorder_tx_###-overallstatus )

    )

    ).

  ENDLOOP.


  endmethod.

ENDCLASS.- SAP Managed Tags:
- ABAP Development,
- OData,
- SAP Gateway
Labels:
18 Comments
You must be a registered user to add a comment. If you've already registered, sign in. Otherwise, register and sign in.
Labels in this area
-
ABAP CDS Views - CDC (Change Data Capture)
2 -
AI
1 -
Analyze Workload Data
1 -
BTP
1 -
Business and IT Integration
2 -
Business application stu
1 -
Business Technology Platform
1 -
Business Trends
1,658 -
Business Trends
93 -
CAP
1 -
cf
1 -
Cloud Foundry
1 -
Confluent
1 -
Customer COE Basics and Fundamentals
1 -
Customer COE Latest and Greatest
3 -
Customer Data Browser app
1 -
Data Analysis Tool
1 -
data migration
1 -
data transfer
1 -
Datasphere
2 -
Event Information
1,400 -
Event Information
66 -
Expert
1 -
Expert Insights
177 -
Expert Insights
299 -
General
1 -
Google cloud
1 -
Google Next'24
1 -
Kafka
1 -
Life at SAP
780 -
Life at SAP
13 -
Migrate your Data App
1 -
MTA
1 -
Network Performance Analysis
1 -
NodeJS
1 -
PDF
1 -
POC
1 -
Product Updates
4,577 -
Product Updates
344 -
Replication Flow
1 -
RisewithSAP
1 -
SAP BTP
1 -
SAP BTP Cloud Foundry
1 -
SAP Cloud ALM
1 -
SAP Cloud Application Programming Model
1 -
SAP Datasphere
2 -
SAP S4HANA Cloud
1 -
SAP S4HANA Migration Cockpit
1 -
Technology Updates
6,873 -
Technology Updates
422 -
Workload Fluctuations
1
Related Content
- ABAP Cloud Developer Trial 2022 Available Now in Technology Blogs by SAP
- SAP HANA Cloud Vector Engine: Quick FAQ Reference in Technology Blogs by SAP
- Consume Ariba APIs using Postman in Technology Blogs by SAP
- Custom data as table, CDS, Domain, Business object and all that jazz... in Technology Blogs by SAP
- Need Guidance to develop app at S/4 HANA Public Cloud in Technology Q&A
Top kudoed authors
| User | Count |
|---|---|
| 40 | |
| 25 | |
| 17 | |
| 13 | |
| 8 | |
| 7 | |
| 7 | |
| 7 | |
| 6 | |
| 6 |