
- SAP Community
- Products and Technology
- Human Capital Management
- HCM Blogs by Members
- Summer Is Winding Down But Enhancements Are Heatin...
Human Capital Management Blogs by Members
Gain valuable knowledge and tips on SAP SuccessFactors and human capital management from member blog posts. Share your HCM insights with a post of your own.
Turn on suggestions
Auto-suggest helps you quickly narrow down your search results by suggesting possible matches as you type.
Showing results for
paul_bracy
Explorer
Options
- Subscribe to RSS Feed
- Mark as New
- Mark as Read
- Bookmark
- Subscribe
- Printer Friendly Page
- Report Inappropriate Content
09-02-2017
12:46 AM
Overview
And just like that, Summer is over, Fall is on the horizon, and the quarter three release is starting to hit your staging and production environments. There is always a certain level of both excitement and trepidation when a release comes out. There is always great new features that both admins and users will find that will enhance their experience with LMS. However, there are always questions on how these changes will impact your current business process, if your admins or user population is ready for these changes, and if they'll be rolled out without technical issues. In this blog, we'll take a look at some of my favorite LMS enhancements and how they can be deployed to your population.
Notification Enhancements
The notification enhancements for quarter three are somewhat minor, especially for front-end users, but there were two that really popped out at me that will be very time saving for administrators.
The first is the new feature that allows admins to propagate the settings settings associated with the Learning Expiration APM threshold. The threshold controls, based on a user's due date for an item, when the system begins sending out notifications that the item is coming due, and at what interval it sends out reminders.
The issue that admins faced was that when a new item was created, that item would take a snapshot of the current settings on the Learning Expiration APM. Any changes to the settings on the APM would only be applied to items created after the APM was changed.
This was a pain point for many clients. If you have thousands of items in your system and your company policy on learning expiration notifications changes, you would then be forced to make the changes on each and every item - an effort that could take weeks for one person to complete.
Luckily, this new feature can push out the new settings to all your learning items with the push of a button. However, you need to take into consideration that there may be many items in your system that have their own expiration notification dates set on them. For example, you might have particularly important items that have a more advanced notification date and a higher reminder frequency. Propagating the new setting would override these and require you to go back and change their settings. If these make up a small population of your items, it may still be worth it to use the propagation.
To propagate the new settings for your Learning Expiration APM, go to the LMS admin portal, then to System Admin>Automatic Processes>Learning Expiration. Enter in the new settings you want for the learning expiration notification (threshold, reminder period, ect). Once done, click "Propagate Settings To All Active Items". All your items will now have the new settings.

The second feature that caught my eye was the "View Default" button on notification templates. As you may know, the LMS comes loaded with out-of-the-box notification templates. Some clients just put their company logo at the top of the templates and call it a day. Others, however, completely redo and customize their templates.
While the Notification Editor has made this process much easier, there are still some circumstances where your customized notification just isn't working correctly (especially with the more complicated notifications that use looping tags and roll-up messages). In cases like this, it might be beneficial to see again what the configuration was for the out-of-the-box notification. Before this feature, admins would lose insight to the initial configuration as soon as it was modified - unless they thought ahead and saved it to a word document. But now the original configuration is always available at admins fingertips if they need to review (or re-implement) the out-of-the-box notification.
To access the original configuration, log into the LMS admin portal, then go to your notification by navigating to System Admin>Configuration>Notification Templates. Then search for and select your notification. Go to "Messages" then click "View Default". The pop-up will then show the original configuration of the template.


Assessments: The Quiz and Exam Tool
Just a few years ago, if someone had asked me what the most difficult part of the system was, I would have quickly pointed to the Exam tool. It was a clunky, outdated tool that was difficult to administer. You would design what you thought was a well laid out question with text, images, tables, ect, only to see all of the content overlapping each other when it was deployed. It would take countless hours to test and retest, getting everything into it's perfect place.
SuccessFactors heard these complaints from clients and took steps to sunset the Exam tool and deploy what they are calling Assessments. Assessments combine the relatively recent Quiz tool, with the new and improved Exam feature. The Quiz tool was initially deployed to give admins a quick and easy way to make a no-frills assessment for students. What it lacked in functionality (inability to use images, pool questions, ect), it made up for with it's easy-to-use tool for admins. A quiz could put together in 15 minutes what would possibly take over an hour in the Exam tool.
While SuccessFactors continued to enhance the Quizzes (you can add images now!), it also began to essentially migrate the Exam feature to the Quiz tool to make Assessments. The expectation is that Quizzes will be used as quick, lightweight assessments of student learning, while exams will be a more formal assessment with stricter security features.
I've outlined before in a previous blog the process of making a quiz, so for now we'll just be looking at exams. To get started, log into the LMS admin admin portal, then go to Content>Assessments>Add New.

Select Add New Exams

Enter the Exam ID, Name, Locale and Domain, then click Create

You'll then be brought to a menu with the locales the exam is configured for - since we just created ours, we just have the English Locale. Clicking on "English" will bring you to the main menu of the exams, where questions can be created.

From here, you can begin creating new questions for the exam, or add existing ones. Questions you make here will be available for use across other exams by clicking the Questions button under "Add Existing...". Fields of Study can be added to the exam as well. If you're looking to randomize your exam with pools of questions, you'll need to add them as a Field of Study.

Once you click the question type you want, you'll enter basic information about the question.

Once you hit Create, you'll be able to add the text of the question, as well as links, images, ect.

Navigating to Menu>Settings will bring up the exam features that LMS admins are familiar with from the previous Exam tool.

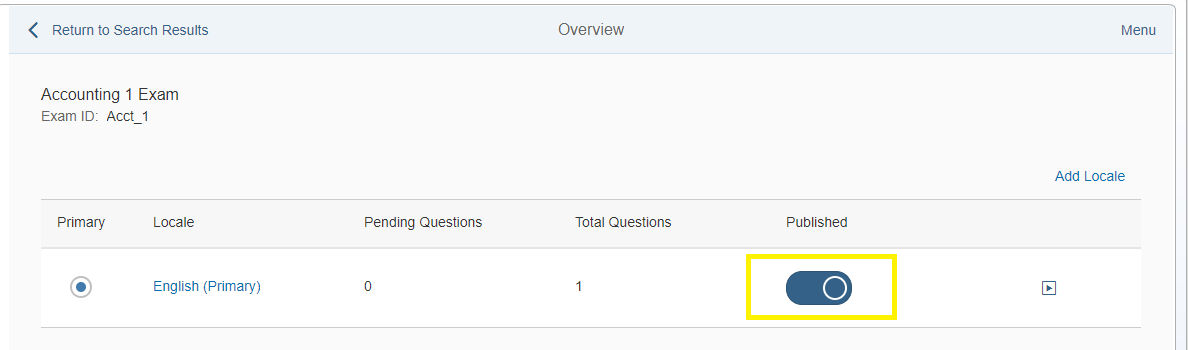
Once you've added all your questions and Fields of Study, and customized your settings, you are ready to publish your exam! Use the menu to go back to Exam overview, then flip the switch under Published. Your exam is now ready to be added to learning items.
I really want to hammer in how much exams have progressed in the last two years. Creating complex questions with ease was just not something that was possible. This is a clear example of SuccessFactors hearing a pain-point from customers and directly addressing their concerns, so major kudos to them.
Minor Enhancement - Attachment for User Record Learning
The notification updates and the Assessments tool were my two favorite of the "major enhancements". While most of the minor notification were nice updates to the system, the one that stood out to me as a potential major time savor to admins was the ability for users to attach documents to their learning history - but with some caveats...
First, the user must be recording the learning- they cannot add an attachment to something that is already in their history. Secondly, the record learning process must have some type of approval process attached to it - the assumption being that the student is proving with the attachment that they took the course. But once the student attaches the file, it is forever attached and accessible on the learning history record.
What I find great about this is that I know clients who have admins that spend several hours a week attaching documents to recorded completions because the documents need to be accessible to students on demand (mostly certifications of training they may need to possess to get onto regulated work sites). Potentially allowing students to attach the documents themselves would be a major time savor for admins, although the caveats mentioned above may still add a bit of a roadblock.
Thanks for reading and best of luck with your quarterly releases!
And just like that, Summer is over, Fall is on the horizon, and the quarter three release is starting to hit your staging and production environments. There is always a certain level of both excitement and trepidation when a release comes out. There is always great new features that both admins and users will find that will enhance their experience with LMS. However, there are always questions on how these changes will impact your current business process, if your admins or user population is ready for these changes, and if they'll be rolled out without technical issues. In this blog, we'll take a look at some of my favorite LMS enhancements and how they can be deployed to your population.
Notification Enhancements
The notification enhancements for quarter three are somewhat minor, especially for front-end users, but there were two that really popped out at me that will be very time saving for administrators.
The first is the new feature that allows admins to propagate the settings settings associated with the Learning Expiration APM threshold. The threshold controls, based on a user's due date for an item, when the system begins sending out notifications that the item is coming due, and at what interval it sends out reminders.
The issue that admins faced was that when a new item was created, that item would take a snapshot of the current settings on the Learning Expiration APM. Any changes to the settings on the APM would only be applied to items created after the APM was changed.
This was a pain point for many clients. If you have thousands of items in your system and your company policy on learning expiration notifications changes, you would then be forced to make the changes on each and every item - an effort that could take weeks for one person to complete.
Luckily, this new feature can push out the new settings to all your learning items with the push of a button. However, you need to take into consideration that there may be many items in your system that have their own expiration notification dates set on them. For example, you might have particularly important items that have a more advanced notification date and a higher reminder frequency. Propagating the new setting would override these and require you to go back and change their settings. If these make up a small population of your items, it may still be worth it to use the propagation.
To propagate the new settings for your Learning Expiration APM, go to the LMS admin portal, then to System Admin>Automatic Processes>Learning Expiration. Enter in the new settings you want for the learning expiration notification (threshold, reminder period, ect). Once done, click "Propagate Settings To All Active Items". All your items will now have the new settings.
The second feature that caught my eye was the "View Default" button on notification templates. As you may know, the LMS comes loaded with out-of-the-box notification templates. Some clients just put their company logo at the top of the templates and call it a day. Others, however, completely redo and customize their templates.
While the Notification Editor has made this process much easier, there are still some circumstances where your customized notification just isn't working correctly (especially with the more complicated notifications that use looping tags and roll-up messages). In cases like this, it might be beneficial to see again what the configuration was for the out-of-the-box notification. Before this feature, admins would lose insight to the initial configuration as soon as it was modified - unless they thought ahead and saved it to a word document. But now the original configuration is always available at admins fingertips if they need to review (or re-implement) the out-of-the-box notification.
To access the original configuration, log into the LMS admin portal, then go to your notification by navigating to System Admin>Configuration>Notification Templates. Then search for and select your notification. Go to "Messages" then click "View Default". The pop-up will then show the original configuration of the template.
Assessments: The Quiz and Exam Tool
Just a few years ago, if someone had asked me what the most difficult part of the system was, I would have quickly pointed to the Exam tool. It was a clunky, outdated tool that was difficult to administer. You would design what you thought was a well laid out question with text, images, tables, ect, only to see all of the content overlapping each other when it was deployed. It would take countless hours to test and retest, getting everything into it's perfect place.
SuccessFactors heard these complaints from clients and took steps to sunset the Exam tool and deploy what they are calling Assessments. Assessments combine the relatively recent Quiz tool, with the new and improved Exam feature. The Quiz tool was initially deployed to give admins a quick and easy way to make a no-frills assessment for students. What it lacked in functionality (inability to use images, pool questions, ect), it made up for with it's easy-to-use tool for admins. A quiz could put together in 15 minutes what would possibly take over an hour in the Exam tool.
While SuccessFactors continued to enhance the Quizzes (you can add images now!), it also began to essentially migrate the Exam feature to the Quiz tool to make Assessments. The expectation is that Quizzes will be used as quick, lightweight assessments of student learning, while exams will be a more formal assessment with stricter security features.
I've outlined before in a previous blog the process of making a quiz, so for now we'll just be looking at exams. To get started, log into the LMS admin admin portal, then go to Content>Assessments>Add New.
Select Add New Exams
Enter the Exam ID, Name, Locale and Domain, then click Create
You'll then be brought to a menu with the locales the exam is configured for - since we just created ours, we just have the English Locale. Clicking on "English" will bring you to the main menu of the exams, where questions can be created.
From here, you can begin creating new questions for the exam, or add existing ones. Questions you make here will be available for use across other exams by clicking the Questions button under "Add Existing...". Fields of Study can be added to the exam as well. If you're looking to randomize your exam with pools of questions, you'll need to add them as a Field of Study.
Once you click the question type you want, you'll enter basic information about the question.
Once you hit Create, you'll be able to add the text of the question, as well as links, images, ect.
Navigating to Menu>Settings will bring up the exam features that LMS admins are familiar with from the previous Exam tool.
Once you've added all your questions and Fields of Study, and customized your settings, you are ready to publish your exam! Use the menu to go back to Exam overview, then flip the switch under Published. Your exam is now ready to be added to learning items.
I really want to hammer in how much exams have progressed in the last two years. Creating complex questions with ease was just not something that was possible. This is a clear example of SuccessFactors hearing a pain-point from customers and directly addressing their concerns, so major kudos to them.
Minor Enhancement - Attachment for User Record Learning
The notification updates and the Assessments tool were my two favorite of the "major enhancements". While most of the minor notification were nice updates to the system, the one that stood out to me as a potential major time savor to admins was the ability for users to attach documents to their learning history - but with some caveats...
First, the user must be recording the learning- they cannot add an attachment to something that is already in their history. Secondly, the record learning process must have some type of approval process attached to it - the assumption being that the student is proving with the attachment that they took the course. But once the student attaches the file, it is forever attached and accessible on the learning history record.
What I find great about this is that I know clients who have admins that spend several hours a week attaching documents to recorded completions because the documents need to be accessible to students on demand (mostly certifications of training they may need to possess to get onto regulated work sites). Potentially allowing students to attach the documents themselves would be a major time savor for admins, although the caveats mentioned above may still add a bit of a roadblock.
Thanks for reading and best of luck with your quarterly releases!
- SAP Managed Tags:
- SAP SuccessFactors Learning
You must be a registered user to add a comment. If you've already registered, sign in. Otherwise, register and sign in.
Labels in this area
-
1H 2024 Product Release
5 -
2H 2023 Product Release
1 -
ACCRUAL TRANSFER
1 -
Advanced Workflow
1 -
Anonymization
1 -
BTP
1 -
Business Rules
1 -
Canvas Report
1 -
Career Development
1 -
Certificate-Based Authentication
1 -
Cloud Platform Integration
1 -
Compensation
1 -
Compensation Information Management
1 -
Compensation Management
1 -
Compliance
2 -
Content
1 -
Conversational AI
2 -
Custom Data Collection
1 -
custom portlet
1 -
Data & Analytics
1 -
Data Integration
1 -
Dayforce
1 -
deep link
1 -
deeplink
1 -
Delimiting Pay Components
1 -
Deprecation
1 -
Employee Central
1 -
Employee Central Global Benefits
1 -
Employee Central Payroll
1 -
employee profile
1 -
Employee Rehires
1 -
external terminal
1 -
external time events
1 -
Generative AI
2 -
Getting Started
1 -
Global Benefits
1 -
Guidelines
1 -
H2 2023
1 -
HR
2 -
HR Data Management
1 -
HR Transformation
1 -
ilx
1 -
Incentive Management Setup (Configuration)
1 -
Integration Center
2 -
Integration Suite
1 -
internal mobility
1 -
Introduction
1 -
learning
3 -
LMS
2 -
LXP
1 -
Massively MDF attachments download
1 -
Mentoring
1 -
Metadata Framework
1 -
Middleware Solutions
1 -
OCN
1 -
OData APIs
1 -
ONB USA Compliance
1 -
Onboarding
2 -
Opportunity Marketplace
1 -
Pay Component Management
1 -
Platform
1 -
portlet
1 -
POSTMAN
1 -
Predictive AI
2 -
Recruiting
1 -
recurring payments
1 -
Role Based Permissions (RBP)
2 -
SAP CPI (Cloud Platform Integration)
1 -
SAP HCM (Human Capital Management)
2 -
SAP HR Solutions
2 -
SAP Integrations
1 -
SAP release
1 -
SAP successfactors
5 -
SAP SuccessFactors Customer Community
1 -
SAP SuccessFactors OData API
1 -
SAP Workzone
1 -
SAP-PAYROLL
1 -
skills
1 -
Skills Management
1 -
sso deeplink
1 -
Stories in People Analytics
3 -
Story Report
1 -
SuccessFactors
2 -
SuccessFactors Employee central home page customization.
1 -
successfactors onboarding i9
1 -
Table Report
1 -
talent
1 -
Talent Intelligence Hub
2 -
talents
1 -
Tax
1 -
Tax Integration
1 -
Time Accounts
1 -
Workflows
1 -
XML Rules
1
Related Content
- First Half 2024 Release: What’s New for SAP SuccessFactors Work Zone? in Human Capital Management Blogs by SAP
- 1H 2024 - Release highlights of SuccessFactors Career Development Planning in Human Capital Management Blogs by Members
- 1H 2024 - Release highlights of SuccessFactors Succession Planning in Human Capital Management Blogs by Members
- First Half 2024 Release: What’s New in SAP SuccessFactors HCM in Human Capital Management Blogs by SAP
- 1H 2024 - Release highlights of SuccessFactors Calibration in Human Capital Management Blogs by Members
Top kudoed authors
| User | Count |
|---|---|
| 10 | |
| 6 | |
| 4 | |
| 4 | |
| 2 | |
| 2 | |
| 1 | |
| 1 | |
| 1 | |
| 1 |