
- SAP Community
- Products and Technology
- Technology
- Technology Blogs by SAP
- Running Web Applications with Apache on an SAP Clo...
Technology Blogs by SAP
Learn how to extend and personalize SAP applications. Follow the SAP technology blog for insights into SAP BTP, ABAP, SAP Analytics Cloud, SAP HANA, and more.
Turn on suggestions
Auto-suggest helps you quickly narrow down your search results by suggesting possible matches as you type.
Showing results for
Product and Topic Expert
Options
- Subscribe to RSS Feed
- Mark as New
- Mark as Read
- Bookmark
- Subscribe
- Printer Friendly Page
- Report Inappropriate Content
08-28-2017
1:39 PM
This tutorial describes how you can run a simple HelloWorld web application on an SAP Cloud Platform virtual machine using Apache.
Prerequisites
The
Steps
1. Create a virtual machine.
1.1 Open your console client and go to the tools folder of your SDK by executing the
1.2 Create your virtual machine:
After your virtual machine is created, look for the virtual machine key usually located in your SDK folder. Follow the instructions in step 2 to convert that autogenerated key from .key to .ppk format.
2. Connect to the virtual machine.
We will use both PuTTY and WinSCP for this tutorial, but you may also try it out using other SSH clients. In both cases, you need to have:
- PuTTYgen installed
- An open SSH tunnel to the virtual machine
For PuTTY, follow these steps:
For WinSCP, follow these steps:
The idea behind using the WinSCP client in this tutorial, is to allow you to transfer the
The .key file conversion together with the PuTTY and WinSCP login steps are also described in Setting up an SSH client to connect to HCP Virtual Machines.
3. Open an SSH tunnel to the virtual machine.
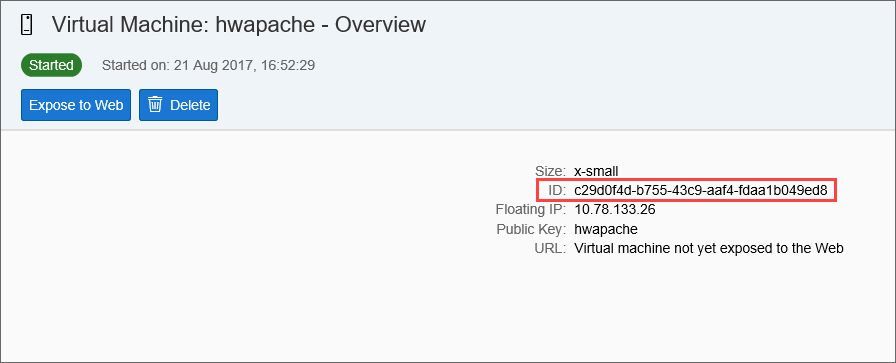
You can find the ID of your virtual machine in the SAP Cloud Platform cockpit:
Оr in the output of the
4. Upload the
After you have started a WinSCP session, find and open the local folder containing the .sh file. Then, drag and drop it, for example, in the root folder of the virtual machine.

5. Execute commands in PuTTY.
Note: First, make sure that you are in the right folder. Let's assume that the .sh file is transferred to the root folder of the virtual machine as mentioned in step 4. In this case, run the
Once you are in the correct folder, you are ready to execute the following two commands:
The first command gives you the right to run the script.
The second command executes the script.
Note: The
6. Register an access point for the virtual machine.
You can do that in two ways:
- Go to the overview page of the virtual machine in the cockpit and select Expose to Web.

- Run the following console client command:
Result: In either case, you should receive a URL like this one:
7. Open the URL of the virtual machine.
Open the URL in a browser of your choice. You should be able to see your HelloWorld web application displayed there.
I hope that this tutorial was helpful to you. If you run into some problems while going through the steps, don't hesitate to share your feedback!
Prerequisites
The
hello_world_apache.sh file, that we are going to use in this tutorial, contains the following code. Create a blank .txt file, transfer the code there, and save it as an .sh file with the exact same file name.#!/bin/bash
zypper -n ar -f $1 SLES
zypper --no-gpg-checks --non-interactive -n install apache2 openssl
#### Enable SSL
echo "Setup apache for SSL"
a2enmod ssl
a2enflag SSL
#### Generate ss cert for apache, you can tweak the attributes below
echo "Generate self-signed cert"
cat > /tmp/openssl.cnf <<EOF
[ req ]
default_bits = 2048
distinguished_name = req_distinguished_name
attributes = req_attributes
prompt = no
output_password =
[ req_distinguished_name ]
C = BG
ST = Test State or Province
L = Test Locality
O = Organization Name
OU = Organizational Unit Name
CN = Common Name
emailAddress = test@email.address
[ req_attributes ]
challengePassword =
EOF
openssl req -x509 -nodes -days 365 -newkey rsa:2048 -keyout /etc/apache2/ssl.key/server.key -out /etc/apache2/ssl.crt/server.crt -config /tmp/openssl.cnf
chmod 600 /etc/apache2/ssl.key/server.key /etc/apache2/ssl.crt/server.crt
rm /tmp/openssl.cnf
##### Generating default vhost for your site, worning dose not support SNI
echo "Generate vhost for your website"
cat > /etc/apache2/vhosts.d/openstack-ssl.conf <<EOF
<IfDefine SSL>
<IfDefine !NOSSL>
Listen 8041
<VirtualHost _default_:8041>
DocumentRoot "/srv/www/htdocs"
ErrorLog /var/log/apache2/error_log
TransferLog /var/log/apache2/access_log
SSLEngine on
SSLProtocol all -SSLv2 -SSLv3
SSLCertificateFile /etc/apache2/ssl.crt/server.crt
SSLCertificateKeyFile /etc/apache2/ssl.key/server.key
<FilesMatch "\.(cgi|shtml|phtml|php)$">
SSLOptions +StdEnvVars
</FilesMatch>
<Directory "/srv/www/cgi-bin">
SSLOptions +StdEnvVars
</Directory>
BrowserMatch "MSIE [2-5]" \
nokeepalive ssl-unclean-shutdown \
downgrade-1.0 force-response-1.0
CustomLog /var/log/apache2/ssl_request_log ssl_combined
</VirtualHost>
</IfDefine>
</IfDefine>
EOF
echo "Creating test page"
echo "Hello World" > /srv/www/htdocs/index.html
echo "Restart apache"
service apache2 restart
#systemctl reload apache2Steps
1. Create a virtual machine.
1.1 Open your console client and go to the tools folder of your SDK by executing the
cd <path to your SDK tools folder> command.1.2 Create your virtual machine:
neo create-vm --size x-small --name myvmname --account mysubaccountname --host hana.ondemand.com --user myemail@example.comAfter your virtual machine is created, look for the virtual machine key usually located in your SDK folder. Follow the instructions in step 2 to convert that autogenerated key from .key to .ppk format.
2. Connect to the virtual machine.
We will use both PuTTY and WinSCP for this tutorial, but you may also try it out using other SSH clients. In both cases, you need to have:
- PuTTYgen installed
- An open SSH tunnel to the virtual machine
For PuTTY, follow these steps:
- Convert the key using PuTTYgen.
- Load the autogenerated key (select Load or Conversations → Import key).
- Save the private key.
- In PuTTY, open the Connection → SSH → Auth tab and add the converted private key.
- Open the Session tab.
- Enter host name: root@localhost.
- Enter port: the tunnel port.
- Open the connection.
For WinSCP, follow these steps:
- Convert the key using PuTTYgen.
- Load the autogenerated key (select Load or Conversations → Import key).
- Save the private key.
- Open WinSCP.
- Enter host name: localhost.
- Enter port: the tunnel port.
- Enter username: root.
- Open Advanced settings and then open SSH → Authentication.
- Add the converted private key and click OK.
- Log in.
The idea behind using the WinSCP client in this tutorial, is to allow you to transfer the
hello_world_apache.sh script file from your local file system to the virtual machine.The .key file conversion together with the PuTTY and WinSCP login steps are also described in Setting up an SSH client to connect to HCP Virtual Machines.
3. Open an SSH tunnel to the virtual machine.
neo open-ssh-tunnel --port XXXXX --vm-id c29d0f4d-b755-43c9-aaf4-fdaa1b049ed8 --account mysubaccountname --host hana.ondemand.com --user myemail@example.comYou can find the ID of your virtual machine in the SAP Cloud Platform cockpit:
Оr in the output of the
list-vms command:neo list-vms --account mysubaccountname --host hana.ondemand.com --user myemail@example.com4. Upload the
hello_world_apache.sh file in the virtual machine.After you have started a WinSCP session, find and open the local folder containing the .sh file. Then, drag and drop it, for example, in the root folder of the virtual machine.
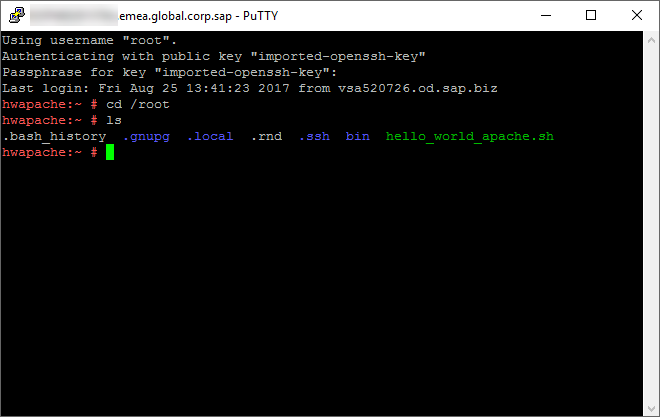
5. Execute commands in PuTTY.
Note: First, make sure that you are in the right folder. Let's assume that the .sh file is transferred to the root folder of the virtual machine as mentioned in step 4. In this case, run the
cd /root command in PuTTY to go to that folder. And if you want to double-check that the .sh file is there, run the ls command to list all available files in that folder.Once you are in the correct folder, you are ready to execute the following two commands:
The first command gives you the right to run the script.
chmod a+x hello_world_apache.shThe second command executes the script.
./hello_world_apache.sh https://slesrepo.hana.ondemand.com/repo/SUSE/Products/SLE-SERVER/12/x86_64/product/Note: The
hana.ondemand.com region host is valid for the Europe (Rot/Germany) region. If your virtual machine is hosted on another SAP Cloud Platform region host, choose one of the other available options at Regions and Hosts.6. Register an access point for the virtual machine.
You can do that in two ways:
- Go to the overview page of the virtual machine in the cockpit and select Expose to Web.
- Run the following console client command:
neo register-access-point --account mysubaccountname --user myemail@example.com --host hana.ondemand.com --name myvmnameResult: In either case, you should receive a URL like this one:
https://[myvmname][mysubaccountname].vms.hana.ondemand.com. This is what the URL of the virtual machine should look like.7. Open the URL of the virtual machine.
Open the URL in a browser of your choice. You should be able to see your HelloWorld web application displayed there.
I hope that this tutorial was helpful to you. If you run into some problems while going through the steps, don't hesitate to share your feedback!
- SAP Managed Tags:
- SAP Business Technology Platform
Labels:
You must be a registered user to add a comment. If you've already registered, sign in. Otherwise, register and sign in.
Labels in this area
-
ABAP CDS Views - CDC (Change Data Capture)
2 -
AI
1 -
Analyze Workload Data
1 -
BTP
1 -
Business and IT Integration
2 -
Business application stu
1 -
Business Technology Platform
1 -
Business Trends
1,658 -
Business Trends
91 -
CAP
1 -
cf
1 -
Cloud Foundry
1 -
Confluent
1 -
Customer COE Basics and Fundamentals
1 -
Customer COE Latest and Greatest
3 -
Customer Data Browser app
1 -
Data Analysis Tool
1 -
data migration
1 -
data transfer
1 -
Datasphere
2 -
Event Information
1,400 -
Event Information
66 -
Expert
1 -
Expert Insights
177 -
Expert Insights
293 -
General
1 -
Google cloud
1 -
Google Next'24
1 -
Kafka
1 -
Life at SAP
780 -
Life at SAP
12 -
Migrate your Data App
1 -
MTA
1 -
Network Performance Analysis
1 -
NodeJS
1 -
PDF
1 -
POC
1 -
Product Updates
4,577 -
Product Updates
340 -
Replication Flow
1 -
RisewithSAP
1 -
SAP BTP
1 -
SAP BTP Cloud Foundry
1 -
SAP Cloud ALM
1 -
SAP Cloud Application Programming Model
1 -
SAP Datasphere
2 -
SAP S4HANA Cloud
1 -
SAP S4HANA Migration Cockpit
1 -
Technology Updates
6,873 -
Technology Updates
417 -
Workload Fluctuations
1
Related Content
- Now available: starter kit for genAI on SAP BTP in Technology Blogs by SAP
- How to use AI services to translate Picklists in SAP SuccessFactors - An example in Technology Blogs by SAP
- IoT - Ultimate Data Cyber Security - with Enterprise Blockchain and SAP BTP 🚀 in Technology Blogs by Members
- SAP Signavio is the highest ranked Leader in the SPARK Matrix™ Digital Twin of an Organization (DTO) in Technology Blogs by SAP
- ABAP Cloud Developer Trial 2022 Available Now in Technology Blogs by SAP
Top kudoed authors
| User | Count |
|---|---|
| 34 | |
| 25 | |
| 12 | |
| 7 | |
| 7 | |
| 6 | |
| 6 | |
| 6 | |
| 5 | |
| 4 |