Operational Data Provisioning is implemented in a modeling environment used together with the search and provides a metadata view in which a Data Source can be given analytical properties in order to define an Operational Data Provider (ODP).
Operational Data Provisioning uses ODPs here to allow semantically related Data Sources to act as Info Providers, so that the data is available to the Analytic Engine in an Operational Analytics scenario.
ODP feature is delivered in GRC from 10.1 version. ODP enables operational analytics directly on GRC data and ODP models are bundled of selected fields related to an object.
Listed are the steps to enable operational DATA provider for analytical reporting on GRC 10.1.
Step 1 : Configuring ODP
Before you can use operation data provisioning, you must first configure the relevant settings. The use of SAP HANA or SAP NetWeaver Business Warehouse Accelerator (BWA) is optional. If you are using SAP HANA or BWA for operational data provisioning, you need to perform additional configuration steps.
To configure operational data provisioning on your system, perform the following steps:
Go to SPRO > SAP NetWeaver > Search and Operational Analytics > Common Settings for Operational Analytics and Embedded Search

- Assign the role SAP_ESH_LOCAL_ADMIN to the administrator.
- Activate the required Web dynpro services mentioned below:-

2) Go to
SPRO > SAP NetWeaver > Search and Operational Analytics > Operational Data Provisioning for Operational Analytics

- Go to > Basic Configuration for Operational Analytics,
Use the basic configuration report to specify the BW client and activate the required technical content.

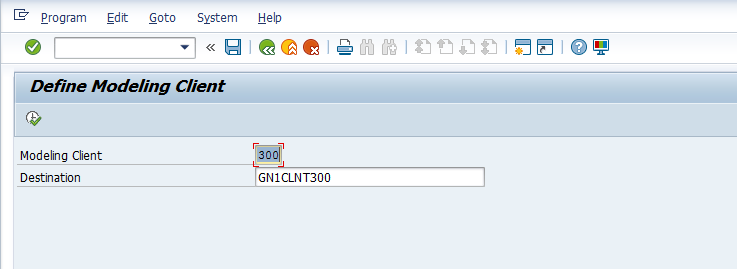
- Go to > Specifying a Modeling Client,
Specify the modeling client that you want to use as the client for ODP metadata access. Enter an RFC destination that points to this client.
Step 2 : Importing ODP Content
Once the ODP Configuration settings are done, we need to Import/Update the GRC pre-delivered content.
- Go to the Tr. SE38
- Run program ESH_IEF_IMP_OM_UPDATE_CONTENT to import content.

Step 3 : Activating and transporting ODP Content
- Transfer the ODP content:-
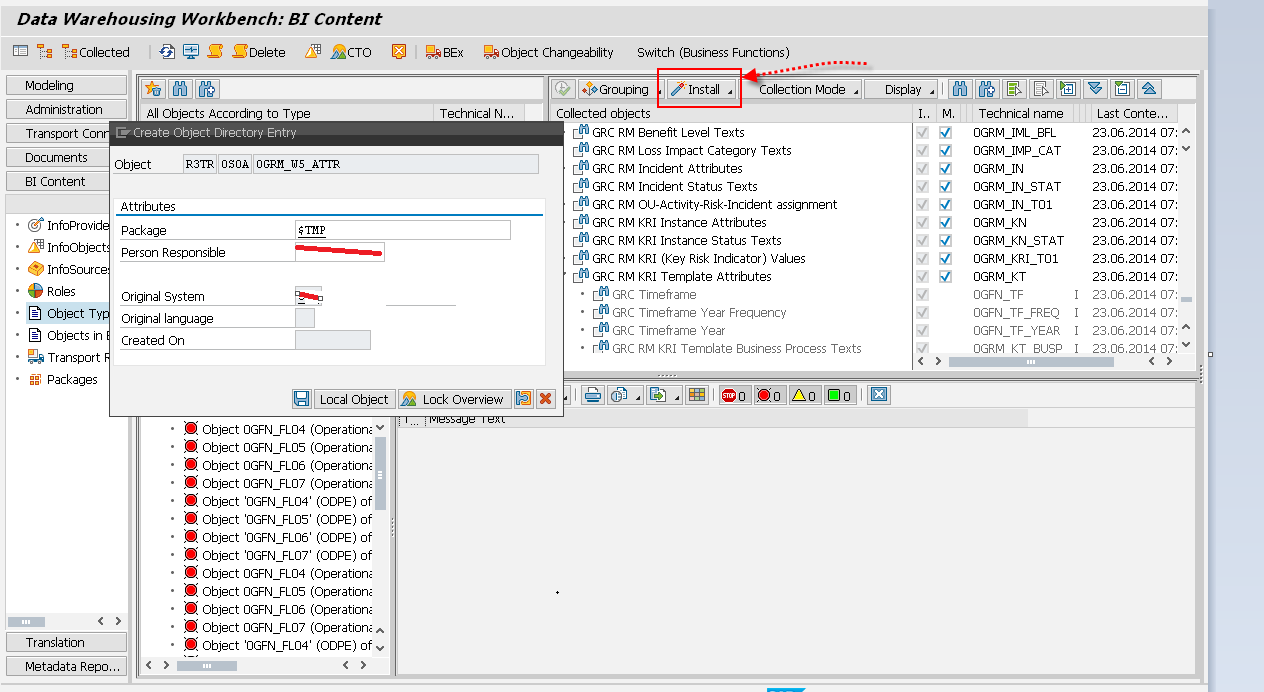
- Go to the Tr. RSOR
- Go to Folder BI content > Object types > More types > Operational Data Provider (ESH-Based)
- Double click on button “Select Objects”
- Select all objects starting with 0GFN*, 0GPC*, 0GRM* and then click on the button “Transfer Selections”.

2 After transfer, Activate:-
In the right screen collected objects, select all objects and click on “Install” to activate them.
Step 4 : View Activated Models
Go to Tr. Se38 and run the program RODPS_LOAD_ACTIVATION, all the models with Green and Yellow traffic lights means active successfully.

Step 5 : Set the time frame in BI extraction
Based on their own requirement user needs to maintain the timeframe information in transaction GRFN_BI_TF_CUST

Now once the ODP is enabled, we shall configure the Data-mart for the extraction timeframe.
GRC->General Settings->Reporting->Maintain Reporting Datamart.

Once ODP is enabled on BW or HANA system, we can use BI tools such as SAP Lumira to create several analytical reports on GRC 10.1.
