
- SAP Community
- Products and Technology
- Technology
- Technology Blogs by SAP
- Fiori elements – How to Develop an Object Page
Technology Blogs by SAP
Learn how to extend and personalize SAP applications. Follow the SAP technology blog for insights into SAP BTP, ABAP, SAP Analytics Cloud, SAP HANA, and more.
Turn on suggestions
Auto-suggest helps you quickly narrow down your search results by suggesting possible matches as you type.
Showing results for
Product and Topic Expert
Options
- Subscribe to RSS Feed
- Mark as New
- Mark as Read
- Bookmark
- Subscribe
- Printer Friendly Page
- Report Inappropriate Content
08-22-2017
6:11 AM
Latest Update October 2020: While the information in this blog is largely still correct, 3 years has passed since this was written and things have changed.
Firstly Object Pages have a lot more capability - please check the SAP Fiori elements feature map in the SAPUI5 SDK Documentation in Developing apps with SAP Fiori elements > Fiori elements feature map.
Secondly, rather than using the Web IDE and the Annotation Modeler you should instead look to the SAP Business Application Studio and specifically the Fiori Tools extension for building SAP Fiori elements apps more easily. You will find tutorials for these in the SAP Developer Tutorials.
Continuing my series on Fiori elements … you’ll find more blogs in the Fiori elements wiki.
Object Pages are a summary screen for a single something – a single Order, single Customer, single Invoice, etc. They are also used as the default way to display a single row of a list report, and can be called from Fiori Search or provided as the target of a hyperlink or button from other apps. In Fiori elements – How to Design an Object Page we took first steps into design. In this blog we see how we develop our own simple Object Page.
When you’ve worked out a design for your Object Page, and are ready to develop your own Object Page your starting point is the List Report Application template. In other words, start by developing your List Report first. Even if you aren’t intending to use the List Report directly, creating your List Report is the simplest and quickest way to start creating your Object Page. The default display of a List Report row is an Object Page. In this example I’ve created a simple Object Page for my Sales Order List Report.

Using a list report as a starting point will give you:
Tip: If you haven’t created a list report before you can reference my previous blog Fiori elements – How to a Develop a List Report or the tutorials in ABAP Programming Model for SAP Fiori.
Once you have your list report, you can start to add the annotations you need for the various sections of the Object Page, which we described in Fiori elements – How to Design an Object Page.
Typically you will want to do the following:
NOTE: Only a UI.HeaderInfo annotation is mandatory for an Object Page.
As usual you can create your annotations:
When following the ABAP Programming Model for SAP Fiori, the preferred option is to use the metadata extension, particularly if your CDS View was created explicitly to support your Object Page. This has the advantage of keeping most of the code for your app together, and managed by you as an ABAP Developer.
That said, using local annotations is a good way to learn and understand what annotations are needed, especially if you take advantage of the SAP Web IDE Annotation Modeler so we will use this approach in our examples, and I have also included the XML so you can see the full details of each annotation.
Once you understand how the annotations work you can later embed them in your CDS View metadata extension if you wish.
Let’s get to it!
The UI.HeaderInfo annotation lets you quickly add the main header details to your app.
The minimum Header for your Object Page is a title.
You can optionally add a description and a URL to a thumbnail image.
Here’s a simple Annotation Modeler example using a Sales Order ID as the title, and the company name of the Customer as a description.

And in the XML this looks like:
In our simple example this affects the the top of the Object Page as outlined below:

You can find more information on the Object Page Header in the Developer Guide for the SAPUI5 UI Development Toolkit for HTML5.
You can add further content by using the UI.HeaderFacets annotation. The main reason for using the HeaderFacets annotation is to highlight the most important information to business users, such as the status of the business object, or its total value, or the person responsible, or its progress against a target . For example you can display:
You can find more information on the Header Facets in the Developer Guide for the SAPUI5 UI Development Toolkit for HTML5.
In this example we show a simple progress indicator as a header facet. We saw how to create a DataPoint annotation in Fiori elements – Percentage Progress Indicators.

And in the XML this looks like:

In our simple example this adds a section just below the top of the Object Page as outlined below. Notice that a face lets us display graphical visualizations.

There are several annotations that you can use to describe the content of your Object Page sections. Here we will focus on the simplest annotations to get you started.
By convention the UI.Identification is used to describe the main data of the business object in question. Here’s a simple example:

And in the XML this looks like:

If the business object includes many other fields that need to be shown, UI.FieldGroup annotations can be used to create logically group these fields so that they can be assigned to body sections. If you have more than one FieldGroup add a Qualifier so you can distinguish between them. Here’s a simple example:

And in the XML this looks like:

In our simple example, these sections are placed in the body of our Object Page by facet annotations - which you will see shortly. Notice that visually the UI.Identification and UI.FieldGroup annotations look very similar.

You can include content from related business objects. Ideally you want those related business objects to be described in an associated entity within the same OData Service, as this makes it easy to reference to the related objects.
When there are multiple relationships to show, such as multiple Items of a Sales Order, a simple option is to use a UI.LineItem annotation of the related entity to show the relationships in a table, specifying the association as the path from the current business object to it’s the related entity. Here’s a simple example:

And in the XML this looks like:

In our simple example you see the list of Items at the bottom of our Object Page as outlined below. To do place this content again we need facets annotations.

There is no minimum for the Body layout. By default it is empty.
Creating a UI.Facets annotation is the starting point for adding sections to the Body.
All facet annotations have an ID and a Label. The Label will be shown to the business user, e.g. in the navigation area of the Object Page for sections, or as the header of a subsection.
Tip: Always use a formal i18n property reference for a facet Label. The label must be able to be translated (or it may show as “Unsupported”). If you are new to this, the Annotation Modeler helps you create and reuse i18n properties – just check the type “String (i18n)” is selected for the label.
Tip: The ID is an optional technical reference, however it’s a good idea to make a habit of always setting the ID and not changing it! Why? That way you are giving the facet a Stable ID. This enables your Fiori elements app to automatically take advantage of flexibility services such as the Adapt UI feature in SAP S/4HANA Cloud and SAP S/4HANA.
You can create as many sections as you need. To map your content type annotation to your section, the easiest option is to use a ReferenceFacet annotation. Here’s a simple example:

And in the XML this looks like:

By default, each section or “facet” is displayed vertically beneath the previous section. When using a device with large screen size you may want to display small sections instead as subsections that appear next to each other. You can do that by using a CollectionFacet. A CollectionFacet will display each subsection horizontally to the right of the previous subsection so long as there is sufficient room on the screen. The CollectionFacet is responsive so if there are too many subsections to display on one row, it automatically wraps around to a new row for the remaining sections.
Tip: If you want to know how the responsive design works, this is explained in the Fiori Design Guidelines for the Object Page floorplan.
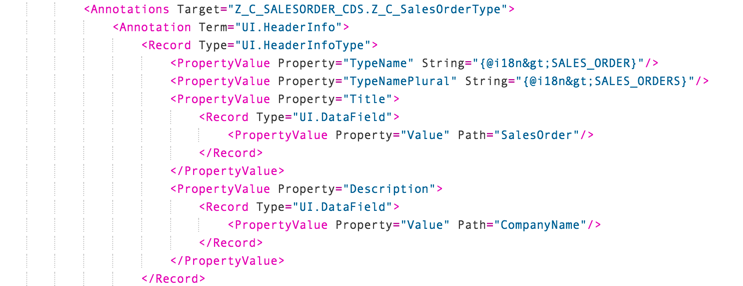
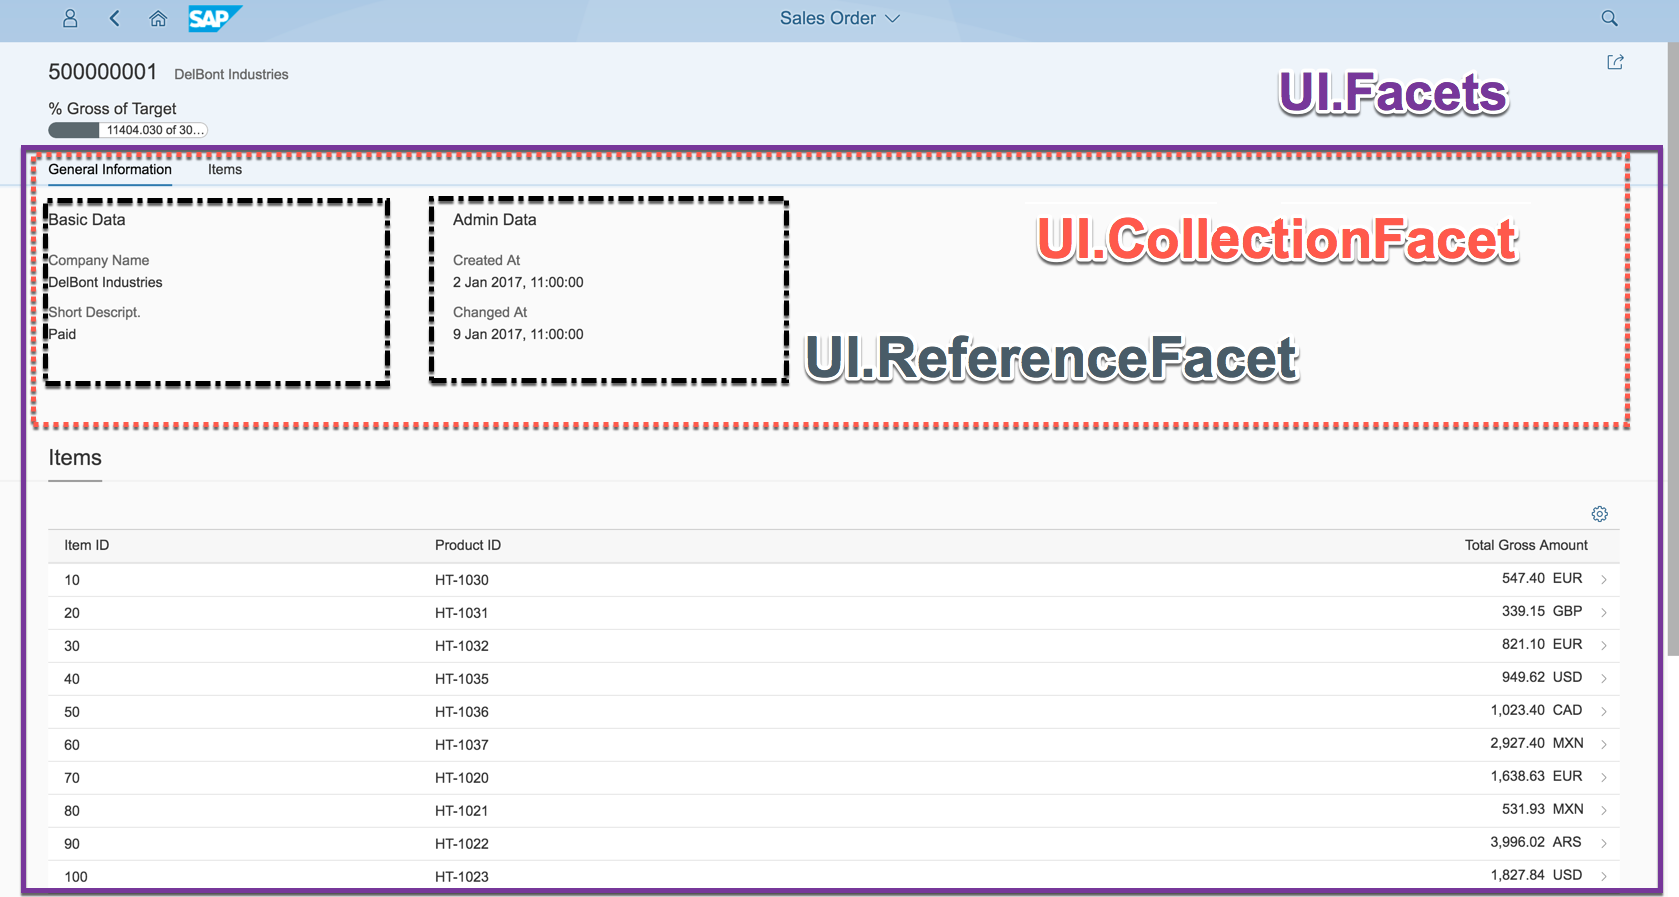
In this example the 2 main sections are General Information and Items. Their labels appear in the navigation bar in the Object Page itself. Within the General Information CollectionFacet are 2 subsections, Basic Data and Admin Data, their labels appear as the heading of the respective subsections.

In the XML it looks like this. Notice that all the labels refer to i18n properties:

In our simple example you can see how the facets annotations control the page.
Tip: You can similarly use a CollectionFacet within the HeaderFacet annotation.
You can find more information on the Sections (aka Facets) in the Developer Guide for the SAPUI5 UI Development Toolkit for HTML5.
Now just run your app!
If you are interested in Fiori elements you might also like to look at our videos on Youtube
Adding a Field Group to an Object Page with SAP Fiori Elements – shows how to do this in your CDS View
If you want to find out more on how to use the Annotation Modeler, you might like to look at some of our Annotation Modeler in SAP Web IDE videos on Youtube.
If you are going to SAP Teched 2017 and Interested in learning more about Fiori elements you might like to attend these sessions:
And you can find more information via Developing apps with SAP Fiori elements in the SAPUI5 SDK and ABAP Programming Model for Fiori in the SAP Help Portal.
Screenshots shown on:
Web IDE Version: 170720
SAPUI5 version 1.46.11
Brought to you by S/4HANA RIG
Firstly Object Pages have a lot more capability - please check the SAP Fiori elements feature map in the SAPUI5 SDK Documentation in Developing apps with SAP Fiori elements > Fiori elements feature map.

Secondly, rather than using the Web IDE and the Annotation Modeler you should instead look to the SAP Business Application Studio and specifically the Fiori Tools extension for building SAP Fiori elements apps more easily. You will find tutorials for these in the SAP Developer Tutorials.
Continuing my series on Fiori elements … you’ll find more blogs in the Fiori elements wiki.
Object Pages are a summary screen for a single something – a single Order, single Customer, single Invoice, etc. They are also used as the default way to display a single row of a list report, and can be called from Fiori Search or provided as the target of a hyperlink or button from other apps. In Fiori elements – How to Design an Object Page we took first steps into design. In this blog we see how we develop our own simple Object Page.
When you’ve worked out a design for your Object Page, and are ready to develop your own Object Page your starting point is the List Report Application template. In other words, start by developing your List Report first. Even if you aren’t intending to use the List Report directly, creating your List Report is the simplest and quickest way to start creating your Object Page. The default display of a List Report row is an Object Page. In this example I’ve created a simple Object Page for my Sales Order List Report.
Using a list report as a starting point will give you:
- A working Fiori elements app
- An Object Page entries in the App Descriptor, i.e. the manifest.json file
- Working references to your OData Service and its entities
- A basic UI.HeaderInfo annotation to get you started with your Object Page
- An easy way to test your Object Page – by selecting rows of a list report
Tip: If you haven’t created a list report before you can reference my previous blog Fiori elements – How to a Develop a List Report or the tutorials in ABAP Programming Model for SAP Fiori.
Once you have your list report, you can start to add the annotations you need for the various sections of the Object Page, which we described in Fiori elements – How to Design an Object Page.
Typically you will want to do the following:
- Assign your Header content using the UI.HeaderInfo
- Optionally assign additional Header content, such as microcharts, using UI.HeaderFacets annotation
- Create appropriate content type annotations to describe the contents of the sections of your Object Page body
- Control the overall layout of the Body sections using facet annotations to map the content of the sections, and determine where each section is placed
NOTE: Only a UI.HeaderInfo annotation is mandatory for an Object Page.
As usual you can create your annotations:
- Within your OData Service, e.g. as a metadata extension of a consumption CDS View as described in ABAP Programming Model for SAP Fiori
- Locally in your Fiori elements app
When following the ABAP Programming Model for SAP Fiori, the preferred option is to use the metadata extension, particularly if your CDS View was created explicitly to support your Object Page. This has the advantage of keeping most of the code for your app together, and managed by you as an ABAP Developer.
That said, using local annotations is a good way to learn and understand what annotations are needed, especially if you take advantage of the SAP Web IDE Annotation Modeler so we will use this approach in our examples, and I have also included the XML so you can see the full details of each annotation.
Once you understand how the annotations work you can later embed them in your CDS View metadata extension if you wish.
Let’s get to it!
Assigning basic Header content
The UI.HeaderInfo annotation lets you quickly add the main header details to your app.
The minimum Header for your Object Page is a title.
You can optionally add a description and a URL to a thumbnail image.
Here’s a simple Annotation Modeler example using a Sales Order ID as the title, and the company name of the Customer as a description.
And in the XML this looks like:
In our simple example this affects the the top of the Object Page as outlined below:
You can find more information on the Object Page Header in the Developer Guide for the SAPUI5 UI Development Toolkit for HTML5.
Adding more Header Content
You can add further content by using the UI.HeaderFacets annotation. The main reason for using the HeaderFacets annotation is to highlight the most important information to business users, such as the status of the business object, or its total value, or the person responsible, or its progress against a target . For example you can display:
- Microcharts
- Review rating indicators
- Progress indicators
- Contact
- And of course, simple text fields
You can find more information on the Header Facets in the Developer Guide for the SAPUI5 UI Development Toolkit for HTML5.
In this example we show a simple progress indicator as a header facet. We saw how to create a DataPoint annotation in Fiori elements – Percentage Progress Indicators.
And in the XML this looks like:
In our simple example this adds a section just below the top of the Object Page as outlined below. Notice that a face lets us display graphical visualizations.
Creating Content Annotations for Sections
There are several annotations that you can use to describe the content of your Object Page sections. Here we will focus on the simplest annotations to get you started.
By convention the UI.Identification is used to describe the main data of the business object in question. Here’s a simple example:
And in the XML this looks like:
If the business object includes many other fields that need to be shown, UI.FieldGroup annotations can be used to create logically group these fields so that they can be assigned to body sections. If you have more than one FieldGroup add a Qualifier so you can distinguish between them. Here’s a simple example:
And in the XML this looks like:
In our simple example, these sections are placed in the body of our Object Page by facet annotations - which you will see shortly. Notice that visually the UI.Identification and UI.FieldGroup annotations look very similar.
You can include content from related business objects. Ideally you want those related business objects to be described in an associated entity within the same OData Service, as this makes it easy to reference to the related objects.
When there are multiple relationships to show, such as multiple Items of a Sales Order, a simple option is to use a UI.LineItem annotation of the related entity to show the relationships in a table, specifying the association as the path from the current business object to it’s the related entity. Here’s a simple example:
And in the XML this looks like:
In our simple example you see the list of Items at the bottom of our Object Page as outlined below. To do place this content again we need facets annotations.
Controlling the Layout of the Body
There is no minimum for the Body layout. By default it is empty.
Creating a UI.Facets annotation is the starting point for adding sections to the Body.
All facet annotations have an ID and a Label. The Label will be shown to the business user, e.g. in the navigation area of the Object Page for sections, or as the header of a subsection.
Tip: Always use a formal i18n property reference for a facet Label. The label must be able to be translated (or it may show as “Unsupported”). If you are new to this, the Annotation Modeler helps you create and reuse i18n properties – just check the type “String (i18n)” is selected for the label.
Tip: The ID is an optional technical reference, however it’s a good idea to make a habit of always setting the ID and not changing it! Why? That way you are giving the facet a Stable ID. This enables your Fiori elements app to automatically take advantage of flexibility services such as the Adapt UI feature in SAP S/4HANA Cloud and SAP S/4HANA.
You can create as many sections as you need. To map your content type annotation to your section, the easiest option is to use a ReferenceFacet annotation. Here’s a simple example:
And in the XML this looks like:
By default, each section or “facet” is displayed vertically beneath the previous section. When using a device with large screen size you may want to display small sections instead as subsections that appear next to each other. You can do that by using a CollectionFacet. A CollectionFacet will display each subsection horizontally to the right of the previous subsection so long as there is sufficient room on the screen. The CollectionFacet is responsive so if there are too many subsections to display on one row, it automatically wraps around to a new row for the remaining sections.
Tip: If you want to know how the responsive design works, this is explained in the Fiori Design Guidelines for the Object Page floorplan.
In this example the 2 main sections are General Information and Items. Their labels appear in the navigation bar in the Object Page itself. Within the General Information CollectionFacet are 2 subsections, Basic Data and Admin Data, their labels appear as the heading of the respective subsections.
In the XML it looks like this. Notice that all the labels refer to i18n properties:
In our simple example you can see how the facets annotations control the page.
- The UI.Facets annotation controls the body of the page,
- ReferenceFacet annotations hold section contents.
- Note: The Items are in their own ReferenceFacet.
- CollectionFacet annotations groups reference facets into subsections.
Tip: You can similarly use a CollectionFacet within the HeaderFacet annotation.
You can find more information on the Sections (aka Facets) in the Developer Guide for the SAPUI5 UI Development Toolkit for HTML5.
Now just run your app!
Taking your Fiori elements app to the Next Level
If you are interested in Fiori elements you might also like to look at our videos on Youtube
Adding a Field Group to an Object Page with SAP Fiori Elements – shows how to do this in your CDS View
If you want to find out more on how to use the Annotation Modeler, you might like to look at some of our Annotation Modeler in SAP Web IDE videos on Youtube.
If you are going to SAP Teched 2017 and Interested in learning more about Fiori elements you might like to attend these sessions:
- DX201 What’s New with SAP Fiori Elements
- S4H276 Build a List Report SAP Fiori App: ABAP Programming Model for SAP S/4HANA
- S4H279 Build Transactional SAP Fiori App: ABAP Programming Model for SAP S/4 HANA
- DX264 Overview Page in SAP Fiori Elements
- DX266 SAP Fiori Elements – Analytical List Page
- DX360 Building High Quality SAPUI5 Apps
And you can find more information via Developing apps with SAP Fiori elements in the SAPUI5 SDK and ABAP Programming Model for Fiori in the SAP Help Portal.
Screenshots shown on:
Web IDE Version: 170720
SAPUI5 version 1.46.11
Brought to you by S/4HANA RIG
Labels:
38 Comments
You must be a registered user to add a comment. If you've already registered, sign in. Otherwise, register and sign in.
Labels in this area
-
ABAP CDS Views - CDC (Change Data Capture)
2 -
AI
1 -
Analyze Workload Data
1 -
BTP
1 -
Business and IT Integration
2 -
Business application stu
1 -
Business Technology Platform
1 -
Business Trends
1,658 -
Business Trends
91 -
CAP
1 -
cf
1 -
Cloud Foundry
1 -
Confluent
1 -
Customer COE Basics and Fundamentals
1 -
Customer COE Latest and Greatest
3 -
Customer Data Browser app
1 -
Data Analysis Tool
1 -
data migration
1 -
data transfer
1 -
Datasphere
2 -
Event Information
1,400 -
Event Information
66 -
Expert
1 -
Expert Insights
177 -
Expert Insights
297 -
General
1 -
Google cloud
1 -
Google Next'24
1 -
Kafka
1 -
Life at SAP
780 -
Life at SAP
13 -
Migrate your Data App
1 -
MTA
1 -
Network Performance Analysis
1 -
NodeJS
1 -
PDF
1 -
POC
1 -
Product Updates
4,577 -
Product Updates
343 -
Replication Flow
1 -
RisewithSAP
1 -
SAP BTP
1 -
SAP BTP Cloud Foundry
1 -
SAP Cloud ALM
1 -
SAP Cloud Application Programming Model
1 -
SAP Datasphere
2 -
SAP S4HANA Cloud
1 -
SAP S4HANA Migration Cockpit
1 -
Technology Updates
6,873 -
Technology Updates
420 -
Workload Fluctuations
1
Related Content
- GroupBy CDS annotation is not working in Technology Q&A
- ABAP Cloud Developer Trial 2022 Available Now in Technology Blogs by SAP
- Switch on gCTS (for existing packages) in Technology Blogs by SAP
- Fiori Elements App - With Intent Based Navigation doesn't get rendered in Technology Q&A
- Developer extendibility for custom table and publish oDATA in Technology Q&A
Top kudoed authors
| User | Count |
|---|---|
| 37 | |
| 25 | |
| 17 | |
| 13 | |
| 7 | |
| 7 | |
| 7 | |
| 6 | |
| 6 | |
| 6 |