
- SAP Community
- Products and Technology
- Technology
- Technology Blogs by SAP
- Part 10 – API Security Best Practices – Raise aler...
Technology Blogs by SAP
Learn how to extend and personalize SAP applications. Follow the SAP technology blog for insights into SAP BTP, ABAP, SAP Analytics Cloud, SAP HANA, and more.
Turn on suggestions
Auto-suggest helps you quickly narrow down your search results by suggesting possible matches as you type.
Showing results for
divyamary
Contributor
Options
- Subscribe to RSS Feed
- Mark as New
- Mark as Read
- Bookmark
- Subscribe
- Printer Friendly Page
- Report Inappropriate Content
08-21-2017
9:20 PM
SAP Cloud Platform, API Management offers many out of the box API Security best practices which can be customized based on your enterprise requirements. These API Security Best Practices includes security policies for Authentication and Authorization, Traffic Management and many more.
In the blog series Threat Protection against SQL Injection attacks and XML External Entity injection attacks, we have described the usage of Regular Expression Protection security policy from SAP Cloud Platform API Management to protect the API against commonly occurring cloud threats. In the blog Log all API interactions, we have described the usage of Message Logging Policy from SAP Cloud Platform to log API interactions into a Third party logging server like Loggly.
In this blog, we would cover the scenario of raising alerts whenever a code injection threat (SQL Threat/ XXE attack) is detected. This scenario can be easily modeled using the Message Logging Policy from SAP Cloud Platform API Management to log any security threats detected into a Loggly tenant and then using the raise alerts features from Loggly to send email notifications, whenever an cloud threat is detected.
In the blog we have used Loggly as the Third Party Logging server, alternatively other logging server like Splunk could be used.


In this section we would use Message Logging Policy to log detected threats into a Loggly server


The above snippet would log the api proxy name for which the threat was detected and also add tag Threat Detection to the log message. This tag would be used to create custom alerts on Loggly server in section Configuring Alerts on Loggly Server.


RaiseFault Policy allows to return custom error message to the client. The above policy snippet would return the error response with the HTTP status set to 403 and the reason phrase is set to Access denied.


With this we have successfully applied a Message Logging Policy to log the threats detected via Regular Threat detection to a Third Party logging server like Loggly and raise 403 access denied error.
In this section we would cover the steps to configure alerts on the Loggly server.


With this we have successfully created an Alert in Loggly tenant to send email notification whenever more than 10 log messages with tags Threat Detection is received in a given window of 1 hour.


In the blog series Threat Protection against SQL Injection attacks and XML External Entity injection attacks, we have described the usage of Regular Expression Protection security policy from SAP Cloud Platform API Management to protect the API against commonly occurring cloud threats. In the blog Log all API interactions, we have described the usage of Message Logging Policy from SAP Cloud Platform to log API interactions into a Third party logging server like Loggly.
In this blog, we would cover the scenario of raising alerts whenever a code injection threat (SQL Threat/ XXE attack) is detected. This scenario can be easily modeled using the Message Logging Policy from SAP Cloud Platform API Management to log any security threats detected into a Loggly tenant and then using the raise alerts features from Loggly to send email notifications, whenever an cloud threat is detected.
In the blog we have used Loggly as the Third Party Logging server, alternatively other logging server like Splunk could be used.
More best practices covered in API Security Best Practices blog series.Prerequisites
- SAP Cloud Platform API Management tenant.
- Loggly tenant.
Customer Token from Loggly tenant
- Sign in to your Loggly tenant.
- Navigate to the Source Setup and then click on the tab Customer Tokens to fetch your Loggly token. This token would have to be used in the Message Logging Policy later in the section Log Regular Protection Threats.
Launch API Portal
- Logon to your SAP Cloud Platform, API Management account (say https://account.hanatrial.ondemand.com/cockpit).
- Navigate to the Services tab, search for API Management service tile and click to open API Management service.
- Click on the link Access API Portal to open API Portal.
Log Regular Protection Threats
In this section we would use Message Logging Policy to log detected threats into a Loggly server
In this blog, we would be extending the Regular Expression Protection Policy used in XXE Threat Protection blog.- Navigate to the Define from the hamburger icon, then select the tab APIs. Select the API Proxy to which API Rate limiting was applied.
- Click on the Policies button of the selected API Proxy.
- Select PreFlow from the ProxyEndPoint and select checkForCodeInjection policy, then update the policy by setting the continueOnError flag to true.
- Click on the + button next to the Message Logging Policy available under the Extensions Policies segment to log the generated log message to a Third Party logging server.

- In the Create policy screen specify the policy name say logThreatsToLoggly and then click on the Add button.
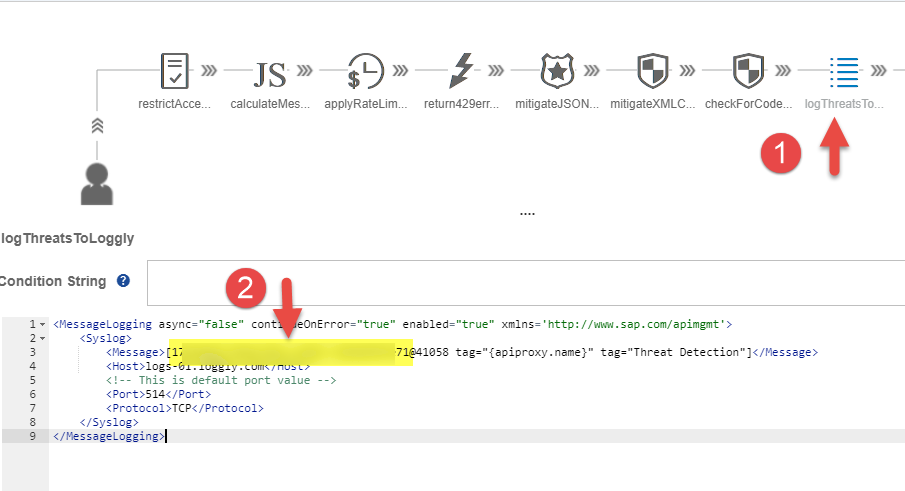
- Select the policy newly added logThreatsToLoggly policy then add the following policy snippet to log the generated log data into a Loggly tenant.
In this blog, we have used Loggly as the third party logging server, alternatively any other logging server like Splunk can also be used.
<MessageLogging async="false" continueOnError="true" enabled="true" xmlns='http://www.sap.com/apimgmt'>

	<Syslog>

		<Message>[YOUR_LOGGLY_TENANT_CUSTOMER_TOKEN@41058 tag="{apiproxy.name}" tag="Threat Detection"]</Message>

		<Host>logs-01.loggly.com</Host>

    	<!-- This is default port value -->

	    <Port>514</Port>

	    <Protocol>TCP</Protocol>

	</Syslog>

</MessageLogging>
The above snippet would log the api proxy name for which the threat was detected and also add tag Threat Detection to the log message. This tag would be used to create custom alerts on Loggly server in section Configuring Alerts on Loggly Server.
- Edit the policy snippet added to post log message to Loggly server to use your customer token configured in the Loggly tenant as explained in section Customer Token from Loggly tenant by replacing the text YOUR_LOGGLY_TENANT_CUSTOMER_TOKEN (highlighted in previous screenshot) with your Loggly customer token.
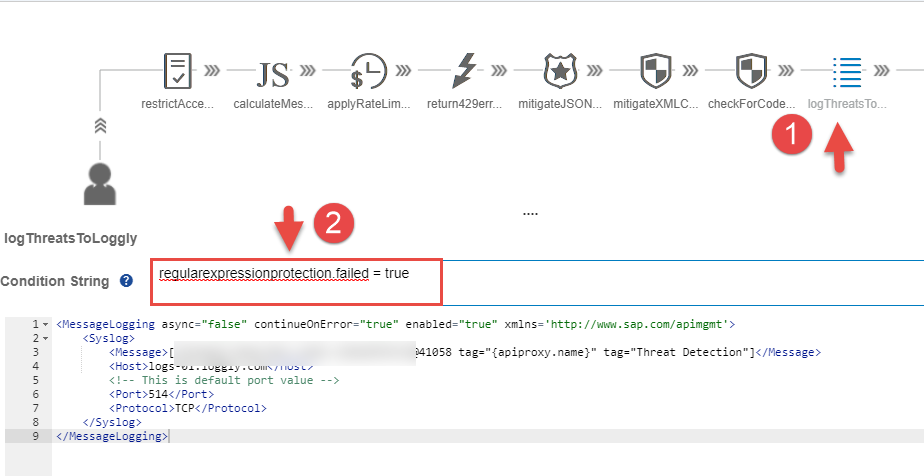
- In the Condition String specify the following condition to log messages only when a threat is detected (i.e the Regular Expression Policy failure cases)
regularexpressionprotection.failed = true- Click on the + button next to the Raise Fault Policy available under the Mediation Policies segment.
- In the Create policy screen specify the policy name say raiseAccessDeniedError and then click on the Add button.
- Select the newly created raiseAccessDeniedError policy and add the following policy snippet to return the error with status code 403 and Access denied error.
<RaiseFault async="true" continueOnError="false" enabled="true" xmlns="http://www.sap.com/apimgmt">

	<!-- Defines the response message returned to the requesting client -->

	<FaultResponse>

		<Set>

			<Payload contentType="text/plain">Your access is denied</Payload>

			<StatusCode>403</StatusCode>

			<ReasonPhrase>Access denied</ReasonPhrase>

		</Set>

	</FaultResponse>

	<IgnoreUnresolvedVariables>true</IgnoreUnresolvedVariables>

</RaiseFault>
RaiseFault Policy allows to return custom error message to the client. The above policy snippet would return the error response with the HTTP status set to 403 and the reason phrase is set to Access denied.
- In the Condition String specify the following condition to raise access denied error only when a threat is detected (i.e the Regular Expression Policy failure cases)
regularexpressionprotection.failed = true- Click on the Update button to save the Policy changes
- Click on the Save button to save the changes to API Proxy.
With this we have successfully applied a Message Logging Policy to log the threats detected via Regular Threat detection to a Third Party logging server like Loggly and raise 403 access denied error.
Configuring Alerts on Loggly Server
In this section we would cover the steps to configure alerts on the Loggly server.
- Sign in to your Loggly tenant.
- Navigate to the Search tab and then click on the tab + New
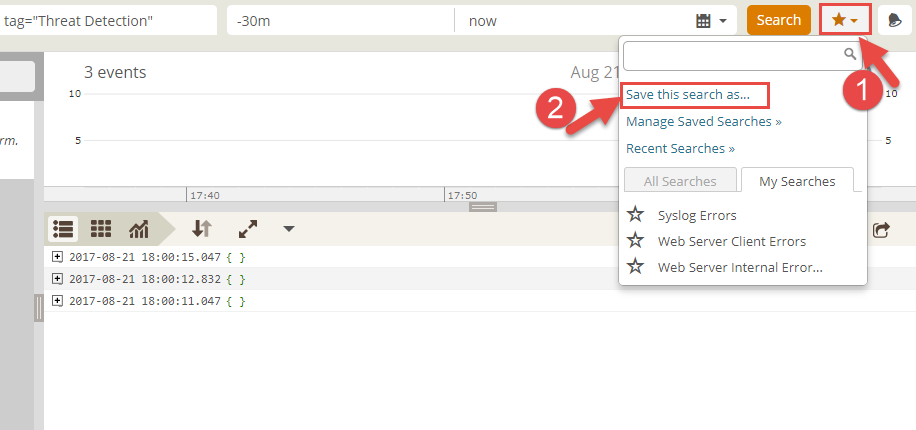
- Next to the text field All Sources, enter the text tag="Threat Detection", to create custom search to identify log messages with the tag Threat Detection. This tag is used in Message logging policy while logging detected threats. From the time window field, select last 30 minutes options
- Click on the Favorites ( * icons) to save the search field as custom search field and then select the option Save this search as.
- In Create Saved Search dialog, enter the name of custom search say Threat Detection and then select option Save then create alert.
- In the Add Alert dialog, enter the name and description of the alert say Cloud Threat Detection, specify the alert conditions, enter the email address to which the alert email notifications should be sent and then click on the Save button.
- The newly created alert would appear under the Alert tab
With this we have successfully created an Alert in Loggly tenant to send email notification whenever more than 10 log messages with tags Threat Detection is received in a given window of 1 hour.
Finally testing the flow
- Navigate to the Test tab from the hamburger icon
- From the APIs list search for the API Proxy that you would like to test say GatewayServiceRestrictedAccess and then click the API to test.
- Click on the Authentication: None link and select Basic Authentication to set the user credential to connect to the SAP Gateway ES4 system
- Enter your user credential to the SAP Gateway ES4 system and click on the OK button
- Click on the Url Params button. Enter $format as URL parameter name and drop table as the parameter value and then click on the Send button
- Since a SQL command drop table was passed in the query parameter, it would be detected by the Regular Expression Protection Policy and then an error would be returned.
- Click on the send button multiple times (more than 10 times) so that alert is raised and an email notification is sent to your configured email address.
Further Reads
- Previous part of the API security best practices blog series – Threat protection against XXE injecti...
- Rate limit concurrent connection to target
- Rate limit API call per developer
- API Security Best Practices
- For more blogs on SAP Cloud Platform API Management visit us at SAP Community
- SAP Managed Tags:
- API Management
1 Comment
You must be a registered user to add a comment. If you've already registered, sign in. Otherwise, register and sign in.
Labels in this area
-
ABAP CDS Views - CDC (Change Data Capture)
2 -
AI
1 -
Analyze Workload Data
1 -
BTP
1 -
Business and IT Integration
2 -
Business application stu
1 -
Business Technology Platform
1 -
Business Trends
1,661 -
Business Trends
88 -
CAP
1 -
cf
1 -
Cloud Foundry
1 -
Confluent
1 -
Customer COE Basics and Fundamentals
1 -
Customer COE Latest and Greatest
3 -
Customer Data Browser app
1 -
Data Analysis Tool
1 -
data migration
1 -
data transfer
1 -
Datasphere
2 -
Event Information
1,400 -
Event Information
65 -
Expert
1 -
Expert Insights
178 -
Expert Insights
280 -
General
1 -
Google cloud
1 -
Google Next'24
1 -
Kafka
1 -
Life at SAP
784 -
Life at SAP
11 -
Migrate your Data App
1 -
MTA
1 -
Network Performance Analysis
1 -
NodeJS
1 -
PDF
1 -
POC
1 -
Product Updates
4,577 -
Product Updates
330 -
Replication Flow
1 -
RisewithSAP
1 -
SAP BTP
1 -
SAP BTP Cloud Foundry
1 -
SAP Cloud ALM
1 -
SAP Cloud Application Programming Model
1 -
SAP Datasphere
2 -
SAP S4HANA Cloud
1 -
SAP S4HANA Migration Cockpit
1 -
Technology Updates
6,886 -
Technology Updates
408 -
Workload Fluctuations
1
Related Content
- 10+ ways to reshape your SAP landscape with SAP Business Technology Platform - Blog 7 in Technology Blogs by SAP
- Top Picks: Innovations Highlights from SAP Business Technology Platform (Q1/2024) in Technology Blogs by SAP
- explore the business continuity recovery sap solutions on AWS DRS in Technology Blogs by Members
- What you need to know about Finance in SAP S/4HANA Cloud, Public Edition in Technology Blogs by SAP
- SAP Datasphere - Space, Data Integration, and Data Modeling Best Practices in Technology Blogs by SAP
Top kudoed authors
| User | Count |
|---|---|
| 13 | |
| 11 | |
| 10 | |
| 9 | |
| 9 | |
| 7 | |
| 6 | |
| 5 | |
| 5 | |
| 5 |