
- SAP Community
- Products and Technology
- CRM and Customer Experience
- CRM and CX Blogs by SAP
- Enable Location-based Marketing with Geocoding by ...
CRM and CX Blogs by SAP
Stay up-to-date on the latest developments and product news about intelligent customer experience and CRM technologies through blog posts from SAP experts.
Turn on suggestions
Auto-suggest helps you quickly narrow down your search results by suggesting possible matches as you type.
Showing results for
former_member24
Active Participant
Options
- Subscribe to RSS Feed
- Mark as New
- Mark as Read
- Bookmark
- Subscribe
- Printer Friendly Page
- Report Inappropriate Content
08-18-2017
2:29 PM
Introduction
Welcome to the blog posts of the SAP CX Services Marketing Practice.
We are happy to share with you our experience around Marketing Business, Technology and Analytics.
You want to see more blogs from us? Click here.
Background
When working the location based data, you will sooner or later have to do some geocoding. Geocoding basically is the transformation of full addresses to geographical location data (latitude/longitude) and the other way around (reverse geocoding). Google Maps provides a service to easily transform addresses.
With the geographical data available, we can use the information in the segmentation to create location-based target groups.

In this Blog Post, we will build a simple scenario using Google Maps geocoding capabilities.

Note:
In this blog post, we only consider (reverse) geocoding for single addresses, not bulk or mass processing. With the tests conducted we have stayed within the limitations according to the Standard Usage Limits of the Google Maps Geocoding API.
Please review the Google Maps documentation before using the API.
Google Maps Geocoding API Usage Limits: https://developers.google.com/maps/documentation/geocoding/usage-limits
Configuration: Google Maps Geocoding API
When setting up the Google Application you have to create an API key to enable access to call the Google Maps Geocoding API.
Since the API key is provided with the request URL, it is recommended to restrict access to the API key usage.
Depending on where you SAP Cloud Platform Integration cluster is maintained, the IP-range applicable for your cluster is different. You can retrieve that information from the SAP Help documentation for Cloud Platform Integration:
SAP Cloud Platform Help: https://help.sap.com/viewer/product/CP/Cloud/en-US
SAP Cloud Platform > Product Overview > Accounts > Regions and Hosts

Google API Manager: https://console.developers.google.com/apis/credentials
Note:
Please make yourself familiar with the usage of the Google Maps API.
The service used in this blog post is not designed to respond in real time to user input.
Documentation: https://developers.google.com/maps/documentation/geocoding/intro?hl=en
Configuration: SAP Hybris Marketing Cloud
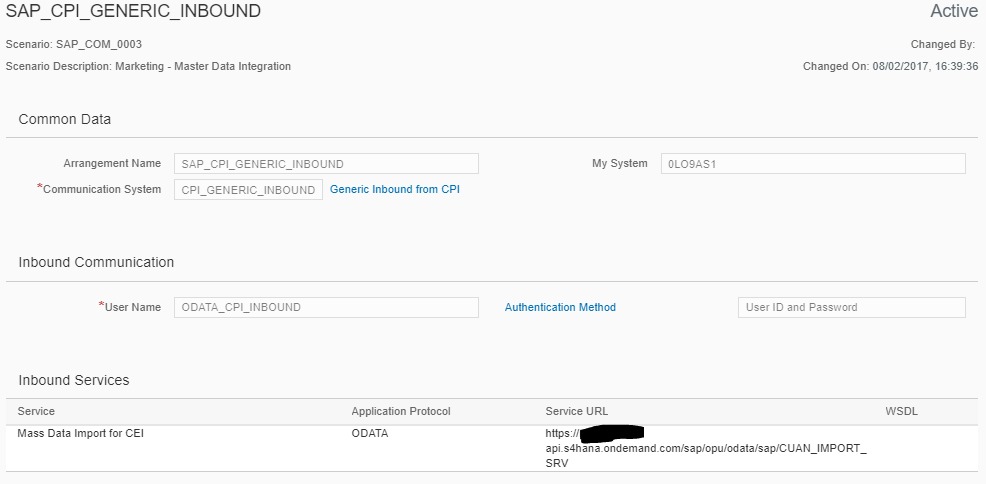
For this scenario, only inbound communication is configured.
Configure SAP Hybris Marketing Cloud Inbound Communication
For importing data using the OData Service for Master Data integration, configure an Inbound Communication Channel.
- Create a Communication System
- Define a name for the Communication System.
- Define the Authentication Method for Inbound Communication.
- Create a Communication Arrangement Inbound Scenario
- Select the Communication System created before
- Select the Scenario SAP_COM_0003
- Depending on the Authentication option you use, you need to create a Communication User and assign the user to the Communication Arrangement.
Inbound Communication Arrangement
Configuration: SAP Cloud Platform Integration IFlow
The depicted Iflow below provides information on the general approach on how to call the Google Maps Geocoding API, mapping of the target structure and creating an interaction contact in SAP Hybris Marketing Cloud.
The Iflow created here is just one of many approaches how to process geocoding with Google Maps.

Part 1: Geocoding
Now, let's review some of the mandatory steps to translate an address to GPS coordinates.
- Receive Message
From the sending system, we receive an XML formatted payload containing some customer information.
The location data is provided as address data. To relate the information to a location that can, for example, placed as a marker on a map, we need to get the geographical location data (Longitide/Latitude).
Inbound message Payload:
<root>

	<row>

		<Id>C-100</Id>

		<IdOrigin>SAP_FILE_IMPORT</IdOrigin>

		<Timestamp>20170729122215</Timestamp>

		<TitleDescription>Mr.</TitleDescription>

		<FirstName>Ron</FirstName>

		<LastName>Scuba</LastName>

		<Street>North Lower Wacker Drive</Street>

		<HouseNumber>20</HouseNumber>

		<City>Chicago</City>

		<Region>IL</Region>

		<Country>USA</Country>

		<EMailAddress>Ron.Scuba@abcd123.com</EMailAddress>

		<EMailOptIn>Y</EMailOptIn>

		<PhoneNumber>+1 555 123123123</PhoneNumber>

		<PhoneOptin>N</PhoneOptin>

		<DateOfBirth>19480902</DateOfBirth>

	</row>

</root>- Enrich Message in a separate branch
Since we are missing the longitude and latitude, the message must be enriched.
To do so, we simply create a second branch in which the GPS location is persisted in properties while keeping the original message payload in the first branch.
The address is then submitted to the Google Maps Geocoding API with the Google Maps API Key.
Google Maps provides parameters to filter, sort, and preselect the results to be retrieved.
- Call Google Maps Geocoding API
With the parameters available for retrieving the address data from Google Maps the query to be submitted to Google Maps is defined in the HTTP Communication Channel.
Query: address=<HouseNumber>+<Street>,+<City>,+<Region>,<Country>&key=<API key>
Google Maps provides you the option to retrieve the response as JSON or XML.
Google Maps Response (XML format):
<?xml version="1.0" encoding="UTF-8"?>

<GeocodeResponse>

    <status>OK</status>

    <result>

        <type>premise</type>

        <formatted_address>20 N Upper Wacker Dr, Chicago, IL 60606, USA</formatted_address>

        <address_component>

            ...

        </address_component>

        <geometry>

            <location>

                <lat>41.8825640</lat>

                <lng>-87.6374246</lng>

            </location>

            <location_type>ROOFTOP</location_type>

            <viewport>

                <southwest>

                    <lat>41.8812150</lat>

                    <lng>-87.6387735</lng>

                </southwest>

                <northeast>

                    <lat>41.8839130</lat>

                    <lng>-87.6360756</lng>

                </northeast>

            </viewport>

            <bounds>

                <southwest>

                    <lat>41.8820520</lat>

                    <lng>-87.6377680</lng>

                </southwest>

                <northeast>

                    <lat>41.8830760</lat>

                    <lng>-87.6370811</lng>

                </northeast>

            </bounds>

        </geometry>

        <place_id>ChIJEz3RjbgsDogR5z1PbIL8Ib0</place_id>

    </result>

</GeocodeResponse>- Merge Messages
Now, we have two messages that need to be merged to one.
Message 1: Original message payload we have received from the sender system
Message 2: Google Maps Geocoding API response
In the previous step, we have used a Parallel Multicast du create a second branch to get the address information from Google Maps. With all information needed available, we combine both messages using a combination of the Join and Gather Integration Pattern.
This will create a new Message combining both messages in one.
<?xml version="1.0" encoding="UTF-8"?>

<multimap:Messages xmlns:multimap="http://sap.com/xi/XI/SplitAndMerge">

<multimap:Message1>

...Original Sender Message Payload...

</multimap:Message1>

<multimap:Message2>

...Google Maps Response...

</multimap:Message2>

</multimap:Messages>- Message Mapping
The Message Mapping is an essential step to transform the multi-message we have created to the message that is expected by SAP Hybris Marketing Cloud.
Therefore we have to create a Multi-Message-Mapping where we have two source messages and one target message.
Still, after the mapping, the message structure is not correct. This is because we have multi-message in the mapping. A simple approach, using standard integration patterns, is just to define a Filter step to filter for the part of the message you need before sending the message to SAP Hybris Marketing Cloud.
Note:
When mapping the fields, make sure to use the correct context. You should make yourself familiar how queues and contexts work with the graphical mapping. (See the blogs posts referred below)
Yellow: Original Sender Message Payload (Source)
Green: Google Maps Geocoding API Response (Source)
Blue: SAP Hybris Marketing Interaction Contact (Target)

Two excellent posts decribing queues and context with Graphical Mapping:
- https://blogs.sap.com/2012/06/22/queues-contexts-concept-of-graphical-mapping-understand-it-to-turn-...
- https://blogs.sap.com/2005/06/09/introduction-to-queues-in-message-mapping/
- Create Contact in SAP Hybris Marketing Cloud
To verify that the message complies with the message structure expected by Marketing Cloud, we have added an XML Validator, what validated the message structure against the Schema XML added to the XML Validator integration pattern.
From here we simply need to configure the Receiver Communication Channel to submit the message to our receiving system.
You can review the contact created using the Inspect Contact app on Marketing Cloud.
On SAP Hybris Marketing Cloud we only used standard functionality and no customization is needed.

Part 2: Reverse Geocoding
The procedure for reverse geocoding is the same as for the geocoding example described above.
- Receive Message
From the sending system, we receive an XML formatted payload containing some customer information.
This time the location data is provided as GPS location (latitude/longitude) but we like to import a full address to Marketing Cloud.
In this example, we have used dummy data for explanation.
Inbound message Payload:
<root>

  <row>

    <Id>C-100</Id>

    <IdOrigin>SAP_FILE_IMPORT</IdOrigin>

    <Timestamp>20170729122215</Timestamp>

    <FirstName>Ron</FirstName>

    <LastName>Scuba</LastName>

    <TitleDescription>Mr.</TitleDescription>

    <EMailAddress>Ron.Scuba@abcd123.com</EMailAddress>

    <EMailOptIn>Y</EMailOptIn>

    <PhoneNumber>+1 619 62234267</PhoneNumber>

    <PhoneOptin>N</PhoneOptin>

    <DateOfBirth>19480902</DateOfBirth>

    <Latitude>41.88255</Latitude>

    <Longitude>-87.637167</Longitude>

  </row>

</root>- Enrich Message in a separate branch
Since we are missing full address data, the message must be enriched.
As before, we create a seperate branch to enricht the data.
The GPS location data is then submitted to the Google Maps Geocoding API with the Google Maps API Key.
- Call Google Maps Geocoding API
With the parameters available for retrieving the address data from Google Maps the query to be submitted to Google Maps is defined in the HTTP Communication Channel.
Here we used:
- "ROOFTOP" indicates that the returned result is a precise geocode for which we have location information accurate down to street address precision.
- street_address indicates a precise street address.
Query: latlng=<latitude>,<longitude>&location_type=ROOFTOP&result_type=street_address&key=<API key>
Google Maps Response (XML format):
<?xml version="1.0" encoding="UTF-8"?>

<GeocodeResponse>

    <status>OK</status>

    <result>

        <type>street_address</type>

        <formatted_address>20 N Lower Wacker Dr, Chicago, IL 60606, USA</formatted_address>

        <address_component>

            <long_name>20</long_name>

            <short_name>20</short_name>

            <type>street_number</type>

        </address_component>

        <address_component>

            <long_name>North Lower Wacker Drive</long_name>

            <short_name>N Lower Wacker Dr</short_name>

            <type>route</type>

        </address_component>

        <address_component>

            <long_name>Chicago Loop</long_name>

            <short_name>Chicago Loop</short_name>

            <type>neighborhood</type>

            <type>political</type>

        </address_component>

        <address_component>

            <long_name>Chicago</long_name>

            <short_name>Chicago</short_name>

            <type>locality</type>

            <type>political</type>

        </address_component>

        <address_component>

            <long_name>Cook County</long_name>

            <short_name>Cook County</short_name>

            <type>administrative_area_level_2</type>

            <type>political</type>

        </address_component>

        <address_component>

            <long_name>Illinois</long_name>

            <short_name>IL</short_name>

            <type>administrative_area_level_1</type>

            <type>political</type>

        </address_component>

        <address_component>

            <long_name>United States</long_name>

            <short_name>US</short_name>

            <type>country</type>

            <type>political</type>

        </address_component>

        <address_component>

            <long_name>60606</long_name>

            <short_name>60606</short_name>

            <type>postal_code</type>

        </address_component>

        <geometry>

            <location>

                <lat>41.8825731</lat>

                <lng>-87.6374299</lng>

            </location>

            <location_type>ROOFTOP</location_type>

            <viewport>

                <southwest>

                    <lat>41.8812241</lat>

                    <lng>-87.6387789</lng>

                </southwest>

                <northeast>

                    <lat>41.8839221</lat>

                    <lng>-87.6360809</lng>

                </northeast>

            </viewport>

        </geometry>

        <place_id>ChIJBRwtjLgsDogRPYuy9JcGjfw</place_id>

    </result>

</GeocodeResponse>- Merge Messages
Again, we have two messages that need to be merged to one.
Message 1: Original message payload we have received from the sender system
Message 2: Google Maps Geocoding API response.
- Message Mapping
The Message Mapping is very similar to the one from the geocoding example. Make sure you have added the correct XML Schema files.
Yellow: Original Sender Message Payload (Source)
Green: Google Maps Response (Source)
Blue: SAP Hybris Marketing Interaction Contact (Target)
- Create Contact in SAP Hybris Marketing Cloud
Configure the Receiver Communication Channel and submit the message to our receiving system.
You can review the contact created using the Inspect Contact app on Marketing Cloud.
On SAP Hybris Marketing Cloud we only used standard functionality and no customization is needed.
In the segmentation, we can display contacts with location information.

Summary
Depending on your use case, you might need to provide address data either as GPS location or full address information. The Google Maps Geocoding API provides an easy to use interface to do both geocoding and reverse geocoding.
With this, you should be able to configure a simple scenario with the Google Maps Geocoding API to create an Interaction Contact in Marketing Cloud. The setup on SAP Hybris Marketing requires you to do only a couple steps and can be done within minutes. The easy-to-use user interface on SAP Cloud Platform Integration enables quick onboarding where you can easily design and configure your IFlow to perform complex tasks.
You want to see more articles from SAP Services? Click on the banner below.
Your SAP CX Services – Marketing Practice team.

- SAP Managed Tags:
- SAP Integration Suite,
- Cloud Integration,
- SAP Marketing
Labels:
5 Comments
You must be a registered user to add a comment. If you've already registered, sign in. Otherwise, register and sign in.
Labels in this area
-
Business Trends
270 -
Business Trends
10 -
chitchat
1 -
customerexperience
1 -
Event Information
256 -
Event Information
17 -
Expert Insights
30 -
Expert Insights
48 -
Life at SAP
133 -
Life at SAP
1 -
Product Updates
666 -
Product Updates
24 -
SAP HANA Service
1 -
SAPHANACloud
1 -
SAPHANAService
1 -
Technology Updates
453 -
Technology Updates
15
Related Content
- SAP Hybris Marketing: Customer Data Upload in CRM and CX Questions
- SAP Commerce Cloud Q1 ‘24 Release Highlights in CRM and CX Blogs by SAP
- Maximize Results and Drive Sustainability in Fashion Retail with SAP and GK AIR Dynamic Pricing in CRM and CX Questions
- Is your organization ready for a marketing transformation? in CRM and CX Blogs by SAP
- SAP Marketing Cloud - Usage of BAdI: Create and Update Permissions for Additional Marketing Areas in CRM and CX Questions
Top kudoed authors
| User | Count |
|---|---|
| 4 | |
| 3 | |
| 2 | |
| 2 | |
| 2 | |
| 1 | |
| 1 | |
| 1 | |
| 1 | |
| 1 |