

- SAP Community
- Products and Technology
- Technology
- Technology Blogs by SAP
- SAP API Management - Rate Limiting API calls per a...
Technology Blogs by SAP
Learn how to extend and personalize SAP applications. Follow the SAP technology blog for insights into SAP BTP, ABAP, SAP Analytics Cloud, SAP HANA, and more.
Turn on suggestions
Auto-suggest helps you quickly narrow down your search results by suggesting possible matches as you type.
Showing results for
Product and Topic Expert
Options
- Subscribe to RSS Feed
- Mark as New
- Mark as Read
- Bookmark
- Subscribe
- Printer Friendly Page
- Report Inappropriate Content
08-11-2017
2:07 PM
SAP Cloud Platform, API Management offers many out of the box API Security best practices which can be customized based on your enterprise requirements. These API Security Best Practices includes security policies for Authentication and Authorization, Traffic Management and many more.
Rate limiting or Traffic Management is process of controlling the rate of traffic sent or received by an API endpoint. Rate limiting can have many flavors like limiting the calls based on number of hits to the APIs in a given time range, limit the calls for sudden spike in given time range, limit the calls for too many concurrent connections, limiting the calls for high amount of data, etc.. In SAP Cloud Platform, API Management we offer out of box security policies for all these use cases which are as follows:
In this blog, we will see how SAP API Management addresses the OWASP Access Control - API Rate limits topic through the Quota policy.
Indeed, API Rate limits will defend against denial of service or brute-force attacks. For that you use the Spike Arrest or Concurrent Rate Limit policies. But sometimes APIs are being misued by non-solicited requests, over a longer period of time. To avoid this, you can use mechanisms such as API Keys (see the Anti-Farming section of the OWASP Security Cheat Sheet) and the aforementioned Quota policy.
The Quota policy can limit the amount of API calls per application and on a wider time scale hance adressing the misuse of the service.
Note that the Blog Entry from Divya Mary covers the scenario in which you create a rate limit on API level, including sending back a 429 HTTP status code in case of violation. In our blog post the main focus is on rate limit per application, ie. API key.


With this we have activated an API Proxy which connects to the SAP Gateway OData API https://sapes4.sapdevcenter.com/sap/opu/odata/IWBEP/GWSAMPLE_BASIC/ and is accessible to any one on the public domain.

Before diving into the technical details, let's take a step back, and do some theory.
Once you have defined an API Proxy, you can publish it on the SAP API Management Developer Portal. This is done through the concept of "API Products", which is a bundle of APIs that you want to deliver to your developers. These API Products can be subscribed to on a self-service basis, in which case the developers gets an API Key for his application. This key needs to be sent for each API call the application makes.
Now by adding a "Verify API Key" policy to our API Provider, we will not only make sure the caller is a legitimate application, but we will also be able to enforce the quota for every application. This will be done in a second step through the Quota policy.
Herunder are the technical details on how to set this mechanism up.
In your previously created API Proxy, or in any other proxy you would like to implement the Quota feature, click on the Policies link.

Within the policy editor, click on Edit, and then add the Verify API Key policy to the ProxyEndpoint pre-flow (select it before adding the Verify API Key policy).
Name it "VerifyAPIKey", make sure to have the Incoming Request flow selected and click Add.

Click on the verifyAPIKey policy and modify its configuration, ie. the location from where the API key should be read. In our case we will read it from the query parameters.
Click on Update and Save.
In order to get an API Key, used to link an application to an API, we need to create an API Product, which will in turn be subscribed to by a developer in the Developer Portal. This is what we'll do in the next steps.
In the API Portal, click on the Develop button on the left side menu.
Click on the Products link and then on Create.
Name the API product as you want, and set the quota to 10 requests per 1 Minute.

Click on the APIS link and add the API we have modified above and click on OK.

Now click on Publish, and the API Product is available through the Developer Portal.
In the next step, we will creat an application that will use that API Product, by having a Developer subscribing to it, and getting an API Key.
As discussed above, before testing our API Proxy, we will need an API Key. This is done by the developer building an application, through the Developer Portal.
Open the Developer Portal by following the steps herunder
As an application Developer, you can now browse through the APIs. Click on the DemoProduct tile.

Now click on the Subscribe button and chose New Application.

Enter the details for your application, such as "MyApp"

You are taken back to the DemoProduct screen, but you want to see the API Key of your new appilcation. To do so, click on the Consume icon on the left side menu, and select the MyApp application.

You can now see the Application key, aka. API key you can use to call the APIs available in the API product of the application.

Before going any further, let's test our API Proxy with the key. Remember: we are verifying the API key coming in as query parameter. Hence we can use a simple browser to do the test. Obviouls, we could also use tools such as PostMan or cUrl but this is out of scope.
First, let's get the URL of our API Proxy.
Go back to your API Portal and select the GatewayServiceQuota proxy. From there, you can see the URL used to access it.

Click on the URL, which should open a browser.
You will get the following error message, since we are not yet passing an API Key parameter:
Now add that API Key as parameter to your API Proxy URL, and execute the request.
<Proxy_URL>?apikey=<API_Key>
Example:

Note that you will need to provide your credentials required by the Demo ES4 system when running the request for the first time.
Now it is time to define the rate limit per application, using the Quota policy.
Navigate back to your API Portal, locate the API Proxy you have been working on so far, and open the Policy Editor.
Switch to Edit mode, click on the PreFlow flow on the left, and add the quota policy to the incoming request.

Name the policy "enforceQuota" and click on Add.

The default counting behavior of the Quota policy is not bound to a specific application: any call is being counted, and when the quota is reached, the API proxy won't let any request go through anymore.
However, we want to have a rate limit (ie. counter) for every single application. This is done by configuring the Quota policy as follows:
Some explanations...
After having executed the VerifyAPIKey policy, we can access general flow variables within our API Proxy, that contain specific information about the application, it's developer, etc..

Also note that the Quota policy can "weigh" requests. In this way, you can specify that certain HTTP methods can account differently in the Quota. For instance POST and PU would count for 2, whereas GET for 1.
Note that the weight can be adapted to any use case, not only to match the HTTP method.
Now that all the pieces are in place, it is time to test our API Proxy. Just as you did before, open a browser and use the URL of your proxy, followed by the API Key of the application using the API Product.
With the setting above, you will be able to succesfully call your API 10 times in a minute, whereas the 11th call will result in the following error:
Note that this will result in a HTTP 500 error, which you may want to replace with a 429 error as explained in Divya's post or in my previous post.
Rate limiting or Traffic Management is process of controlling the rate of traffic sent or received by an API endpoint. Rate limiting can have many flavors like limiting the calls based on number of hits to the APIs in a given time range, limit the calls for sudden spike in given time range, limit the calls for too many concurrent connections, limiting the calls for high amount of data, etc.. In SAP Cloud Platform, API Management we offer out of box security policies for all these use cases which are as follows:
- Quota Policy enables rate limiting based on no of calls in a given time range
- Spike Arrest Policy enables rate limiting for a sudden spike in the calls
- Concurrent Rate Limit enables rate limiting on the number of concurrent connections to the target endpoint
In this blog, we will see how SAP API Management addresses the OWASP Access Control - API Rate limits topic through the Quota policy.
Indeed, API Rate limits will defend against denial of service or brute-force attacks. For that you use the Spike Arrest or Concurrent Rate Limit policies. But sometimes APIs are being misued by non-solicited requests, over a longer period of time. To avoid this, you can use mechanisms such as API Keys (see the Anti-Farming section of the OWASP Security Cheat Sheet) and the aforementioned Quota policy.
The Quota policy can limit the amount of API calls per application and on a wider time scale hance adressing the misuse of the service.
Note that the Blog Entry from Divya Mary covers the scenario in which you create a rate limit on API level, including sending back a 429 HTTP status code in case of violation. In our blog post the main focus is on rate limit per application, ie. API key.
More best practices are covered in API Security Best Practices blog series.Prerequisites
Launch API Portal
- Logon to your SAP Cloud Platform, API Management account (say https://account.hanatrial.ondemand.com/cockpit).
- Navigate to the Services tab, search for API Management service tile and click to open SAP API Management service.

- Click on the link Access API Portal to open API Portal.

Create an API Proxy
If you already have an API Proxy to which you would like to apply Rate limit, then you can refer to the section Update an API Proxy.- Navigate to the Define from the hamburger icon, then select the tab APIs and Click on the Create button
- Create a new API Proxy for any endpoint say GW Sample services
- URL: https://sapes4.sapdevcenter.com/sap/opu/odata/IWBEP/GWSAMPLE_BASIC/ (from the SAP Gateway ES4 system).
- Proxy name: GatewayServiceQuota
- Title: Gateway Demo Sample Service
- Base Path: /sap/opu/odata/IWBEP/GWSAMPLE_BASIC/
- Click on the Save and Deploy button to activate the API Proxy.
With this we have activated an API Proxy which connects to the SAP Gateway OData API https://sapes4.sapdevcenter.com/sap/opu/odata/IWBEP/GWSAMPLE_BASIC/ and is accessible to any one on the public domain.
Update an existing API Proxy
You may update any existing API proxy using the following steps, or simply continue working on the one created beforehand.- Navigate to the Develop menu from the hamburger icon, then select the tab APIs.
- Now chose the API Proxy to which API Rate Limiting per application should be applied.
Application-based quota enforcement
Before diving into the technical details, let's take a step back, and do some theory.
Once you have defined an API Proxy, you can publish it on the SAP API Management Developer Portal. This is done through the concept of "API Products", which is a bundle of APIs that you want to deliver to your developers. These API Products can be subscribed to on a self-service basis, in which case the developers gets an API Key for his application. This key needs to be sent for each API call the application makes.
Now by adding a "Verify API Key" policy to our API Provider, we will not only make sure the caller is a legitimate application, but we will also be able to enforce the quota for every application. This will be done in a second step through the Quota policy.
Herunder are the technical details on how to set this mechanism up.
Add the Verify API Key policy
In your previously created API Proxy, or in any other proxy you would like to implement the Quota feature, click on the Policies link.
Within the policy editor, click on Edit, and then add the Verify API Key policy to the ProxyEndpoint pre-flow (select it before adding the Verify API Key policy).
Name it "VerifyAPIKey", make sure to have the Incoming Request flow selected and click Add.
Click on the verifyAPIKey policy and modify its configuration, ie. the location from where the API key should be read. In our case we will read it from the query parameters.
 <!--Specify in the APIKey element where to look for the variable containing the api key-->

<VerifyAPIKey async='true' continueOnError='false' enabled='true'

xmlns='http://www.sap.com/apimgmt'>

	<APIKey ref='request.queryparam.apikey'/>

</VerifyAPIKey>
Click on Update and Save.
In order to get an API Key, used to link an application to an API, we need to create an API Product, which will in turn be subscribed to by a developer in the Developer Portal. This is what we'll do in the next steps.
Create an API Product
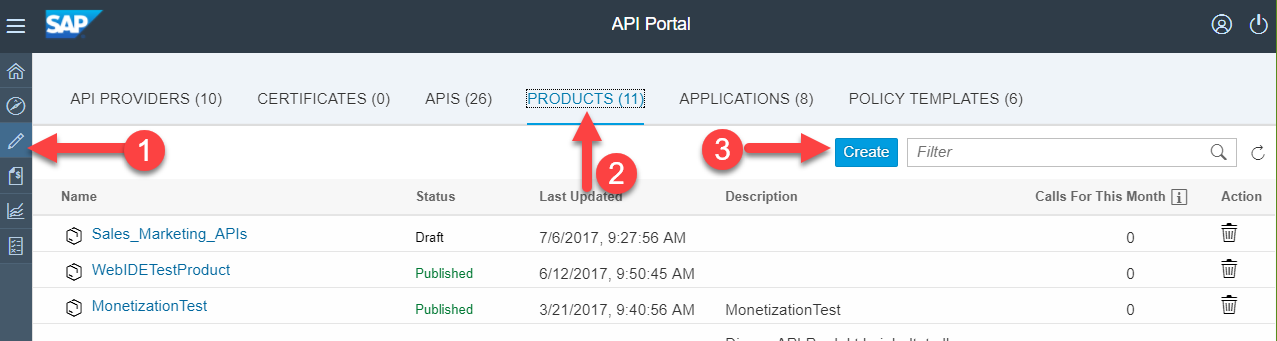
In the API Portal, click on the Develop button on the left side menu.
Click on the Products link and then on Create.
Name the API product as you want, and set the quota to 10 requests per 1 Minute.
Click on the APIS link and add the API we have modified above and click on OK.
Now click on Publish, and the API Product is available through the Developer Portal.
In the next step, we will creat an application that will use that API Product, by having a Developer subscribing to it, and getting an API Key.
Create an application in the SAP API Management Developer Portal
As discussed above, before testing our API Proxy, we will need an API Key. This is done by the developer building an application, through the Developer Portal.
Open the Developer Portal by following the steps herunder
- Logon to your SAP Cloud Platform, API Management account (say https://account.hanatrial.ondemand.com/cockpit).
- Navigate to the Services tab, search for API Management service tile and click to open SAP API Management service.

- Click on the link Access Developer Portal to open API Portal.

As an application Developer, you can now browse through the APIs. Click on the DemoProduct tile.
Now click on the Subscribe button and chose New Application.
Enter the details for your application, such as "MyApp"
You are taken back to the DemoProduct screen, but you want to see the API Key of your new appilcation. To do so, click on the Consume icon on the left side menu, and select the MyApp application.
You can now see the Application key, aka. API key you can use to call the APIs available in the API product of the application.
Test the API Proxy with your API Key
Before going any further, let's test our API Proxy with the key. Remember: we are verifying the API key coming in as query parameter. Hence we can use a simple browser to do the test. Obviouls, we could also use tools such as PostMan or cUrl but this is out of scope.
First, let's get the URL of our API Proxy.
Go back to your API Portal and select the GatewayServiceQuota proxy. From there, you can see the URL used to access it.
Click on the URL, which should open a browser.
You will get the following error message, since we are not yet passing an API Key parameter:
{"fault":{"faultstring":"Failed to resolve API Key variable request.queryparam.apikey","detail":{"errorcode":"steps.oauth.v2.FailedToResolveAPIKey"}}}Now add that API Key as parameter to your API Proxy URL, and execute the request.
<Proxy_URL>?apikey=<API_Key>
Example:
https://s12345trial-trial.apim1.hanatrial.ondemand.com/s12345trial/sap/opu/odata/IWBEP/GWSAMPLE_BASI...Note that you will need to provide your credentials required by the Demo ES4 system when running the request for the first time.
Add the Quota policy
Now it is time to define the rate limit per application, using the Quota policy.
Navigate back to your API Portal, locate the API Proxy you have been working on so far, and open the Policy Editor.
Switch to Edit mode, click on the PreFlow flow on the left, and add the quota policy to the incoming request.
Name the policy "enforceQuota" and click on Add.
The default counting behavior of the Quota policy is not bound to a specific application: any call is being counted, and when the quota is reached, the API proxy won't let any request go through anymore.
However, we want to have a rate limit (ie. counter) for every single application. This is done by configuring the Quota policy as follows:
<Quota async="false" continueOnError="false" enabled="true" type="calendar" xmlns="http://www.sap.com/apimgmt">

    <Identifier ref="verifyapikey.verifyAPIKey.client_id"/>

	<Allow countRef="verifyapikey.verifyAPIKey.apiproduct.developer.quota.limit"/>

 	<Interval ref="verifyapikey.verifyAPIKey.apiproduct.developer.quota.interval"/>

    <Distributed>true</Distributed>

 	<StartTime>2015-2-11 12:00:00</StartTime>

	<Synchronous>true</Synchronous>

 	<TimeUnit ref="verifyapikey.verifyAPIKey.apiproduct.developer.quota.timeunit"/>

</Quota>
Some explanations...
After having executed the VerifyAPIKey policy, we can access general flow variables within our API Proxy, that contain specific information about the application, it's developer, etc..
- Identifier identifies the name of the Quota used to count the api calls. Setting its to client_id makes it unique to the application, since we have a 1 to 1 relationship between application and api key (also called client_id).
- Allow sets the rate limit. In our case it is dynamic, retrieved from the API product through the variable apiproduct.developer.quota.limit. Note that we set a default of 2 through the "count" property.
- Interval sets the time interval in which the number of calls is counted . It is also dynamic, retrieved from the API product.
- TimeUnit defines the "time unit" such as minute, hour or day. This is also dynamically retrieved from the API product.
Also note that the Quota policy can "weigh" requests. In this way, you can specify that certain HTTP methods can account differently in the Quota. For instance POST and PU would count for 2, whereas GET for 1.
Note that the weight can be adapted to any use case, not only to match the HTTP method.
Final step: testing
Now that all the pieces are in place, it is time to test our API Proxy. Just as you did before, open a browser and use the URL of your proxy, followed by the API Key of the application using the API Product.
With the setting above, you will be able to succesfully call your API 10 times in a minute, whereas the 11th call will result in the following error:
{"fault":{"faultstring":"Rate limit quota violation. Quota limit exceeded. Identifier : Y7MhLl9NOo1iDsc2qKLCiyDu4f12345","detail":{"errorcode":"policies.ratelimit.QuotaViolation"}}}Note that this will result in a HTTP 500 error, which you may want to replace with a 429 error as explained in Divya's post or in my previous post.
Further Reads
- Creating your own error codes via SAP Cloud Platform API Management
- Restrict access to APIs based on IP Address
- For more blogs on SAP Cloud Platform API Management visit us at SCN
- SAP Managed Tags:
- API Management
Labels:
5 Comments
You must be a registered user to add a comment. If you've already registered, sign in. Otherwise, register and sign in.
Labels in this area
-
ABAP CDS Views - CDC (Change Data Capture)
2 -
AI
1 -
Analyze Workload Data
1 -
BTP
1 -
Business and IT Integration
2 -
Business application stu
1 -
Business Technology Platform
1 -
Business Trends
1,658 -
Business Trends
93 -
CAP
1 -
cf
1 -
Cloud Foundry
1 -
Confluent
1 -
Customer COE Basics and Fundamentals
1 -
Customer COE Latest and Greatest
3 -
Customer Data Browser app
1 -
Data Analysis Tool
1 -
data migration
1 -
data transfer
1 -
Datasphere
2 -
Event Information
1,400 -
Event Information
66 -
Expert
1 -
Expert Insights
177 -
Expert Insights
299 -
General
1 -
Google cloud
1 -
Google Next'24
1 -
Kafka
1 -
Life at SAP
780 -
Life at SAP
13 -
Migrate your Data App
1 -
MTA
1 -
Network Performance Analysis
1 -
NodeJS
1 -
PDF
1 -
POC
1 -
Product Updates
4,577 -
Product Updates
344 -
Replication Flow
1 -
RisewithSAP
1 -
SAP BTP
1 -
SAP BTP Cloud Foundry
1 -
SAP Cloud ALM
1 -
SAP Cloud Application Programming Model
1 -
SAP Datasphere
2 -
SAP S4HANA Cloud
1 -
SAP S4HANA Migration Cockpit
1 -
Technology Updates
6,873 -
Technology Updates
422 -
Workload Fluctuations
1
Related Content
- SAP Build Process Automation Pre-built content for Finance Use cases in Technology Blogs by SAP
- Consuming SAP with SAP Build Apps - Mobile Apps for iOS and Android in Technology Blogs by SAP
- Onboarding Users in SAP Quality Issue Resolution in Technology Blogs by SAP
- Improving Time Management in SAP S/4HANA Cloud: A GenAI Solution in Technology Blogs by SAP
- IoT - Ultimate Data Cyber Security - with Enterprise Blockchain and SAP BTP 🚀 in Technology Blogs by Members
Top kudoed authors
| User | Count |
|---|---|
| 40 | |
| 25 | |
| 17 | |
| 13 | |
| 7 | |
| 7 | |
| 7 | |
| 6 | |
| 6 | |
| 6 |