
- SAP Community
- Products and Technology
- Technology
- Technology Blogs by SAP
- Cloud Integration – How to Setup Secure Connection...
Technology Blogs by SAP
Learn how to extend and personalize SAP applications. Follow the SAP technology blog for insights into SAP BTP, ABAP, SAP Analytics Cloud, SAP HANA, and more.
Turn on suggestions
Auto-suggest helps you quickly narrow down your search results by suggesting possible matches as you type.
Showing results for
Advisor
Options
- Subscribe to RSS Feed
- Mark as New
- Mark as Read
- Bookmark
- Subscribe
- Printer Friendly Page
- Report Inappropriate Content
08-03-2017
8:32 AM
This blog describes how to setup secure connections to sftp servers in the cloud integration system. It gives a step by step description what needs to be configured where. Furthermore, test options are described for testing sftp connectivity.
A typical task in an integration project is to connect sftp servers to the SAP Cloud Integration Tenant, either for sending messages to or for polling messages from the sftp server. Before going into detailed configuration of the communication lets first have a short look at the basics.
The sftp server can act either as a sender or a receiver of messages. The setup and the detailed configuration procedure differ according to the communication direction that is being set up: whether the sftp server is supposed to provide messages to the integration platform or the other way round.
For more detailed information about sftp communication in CPI refer to SAP Documentation chapter 'How sftp works'.
The polling sftp scenario and which security artifacts are involved is described in SAP Documentation chapter 'Inbound sftp with Public Key Authentication'.

For secure SSH communication a known hosts file has to be deployed in the cloud integration tenant containing the public host key of the sftp server so that the sftp server will be trusted.
Furthermore, for public key authentication with the sftp server, a private key has to be maintained in the cloud integration tenant keystore. Also User/Password can be used instead, in this case user credentials have to be deployed in the cloud integration tenant. Recommended configuration option for secure communication is public key authentication.
If you want to configure the connection to an on-premise sftp server via Cloud Connector refer to the blog How to Connect to an on-premise sftp Server via Cloud Connector.
Host Key
For SSH based communication, the cloud integration tenant needs the host key of the sftp server, which has to be added to the known hosts file and deployed on the cloud integration tenant in the next step. The host key can either be downloaded from sftp server or has to be provided by the administrator of the sftp server.
You can download the host key with the SSH connection test as described in more detail below in the Connectivity Tests chapter using the Copy Host Key option.

In case you have access to the sftp server yourself, you’ll normally find the public key of the sftp server in the .ssh directory with the name id_rsa.pub.
User
To communicate with the sftp server you need an user account on that sftp server. Cloud integration needs the user name to connect to the sftp server. The user name has to be provided by the administrator of the sftp server. The corresponding user must have sufficient authorization to create/move/delete files on the sftp server.
For SSH based communication in the cloud integration tenant, the public host key of the sftp server provided in previous step is needed in the cloud integration tenant. Furthermore, for using public key authentication towards the sftp server, a private key pair with the alias id_rsa or id_dsa is required in the cloud integration tenant’s keystore. With the June-2020 update the key pair for the connection to the sftp server can be chosen by defining the respective key alias in the sftp adapter configuration.
You need to add the sftp host key you received in previous step to the known hosts file deployed in your cloud integration tenant. For this download the file from Manage Security Material view available in the Operations View in Web in section Manage Security. If no knwon_hosts file is deployed yet on the tenant you have to create it as described below.
Open the file with notepad or some other text editor and add the host key of the sftp server. If no known_hosts file was deployed create it.
The file needs to have the name known_hosts and shall contain the host keys for all connected sftp servers in a list. Each line contains the hostname, the applicable public key algorithm -"ssh-rsa" (for RSA key pairs) or "ssh-dss" (for DSA key pairs) and the public host key encoded using base64. See the following example:
ld2345.wdf.sap.corp ssh-rsa AAAAB3NzaC1yc2EAAAo.........2pOx2ADnZ1WwtjW48=
Deploy the known_hosts file in the Manage Security Material view available in the Operations View in Web via the Add -> Known Hosts (SSH) action. Browse the known_hosts file and deploy it.
As explained above, for public key authentication a private key pair needs to be maintained in the cloud integration tenant keystore. Before the June 2020 update, there were pre-defined aliases reserved for the communication with the sftp server: these are the aliases id_rsa, id_dsa or id_ecdsa.
With the June-2020 update any key pair can be chosen for the connection to the sftp server by defining the respective key alias in the sftp adapter configuration.
In Keystore Monitor available in the Operations View in Web in section Manage Security check, if there is already an entry with the alias id_rsa, id_dsa or id_ecdsa available. If so, you may use it and skip the next two steps, continue with download of the public key.
With the June-2020 update any key pair can be chosen. It is recommended to use a dedicated key pair for the communication to the sftp server(s), and you may now even use a different key pair for each sftp server. You should not use the same key pair for communication against sftp server(s) and other backends.
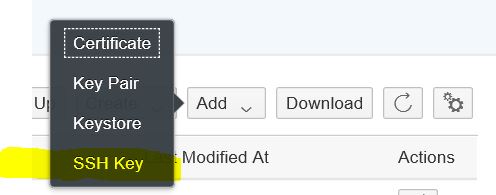
With the 02-September-2018 update, in the Keystore Monitor you can directly create SSH keys. There is no need anymore to use an external tool for this.
To create the SSH Key open the Keystore Monitor available in the Operations View in Web in section Manage Security. All certificates and private key pairs contained in the tenant keystore are shown. Choose Create -> SSH Key to create a key pair for the sftp connectivity.

In the creation dialog select and define the key specific values and define a validity period. Before the June 2020 update the alias is generated automatically based on the selected Key Type:
With the June-2020 update you can define the alias for the key pair used for the SSH communication. And with this change you can now have multiple SSH keys in your tenant.
Select Deploy to create the key. If a key with the respective alias already exists, an error message is given. In this case you may use the existing one for your scenario or use a different Key Type or rename the existing alias.
Upon Deploy the key pair is generated and the artifact is added to the list of keystore artifacts:
Instead of creating the SSH key in the keystore monitor, with the 12-May-2019 update you can also upload SSH keys to the keystore monitor. It is possible to upload SSH or putty keys.
To upload an SSH Key open the Keystore Monitor available in the Operations View in Web in section Manage Security. Choose Add -> SSH Key to upload a putty of SSH key for the sftp connectivity.
In the upload dialog select the putty or SSH key and specify the password for the key and define the key specific values and a validity period.
The alias is generated automatically based on the key type of the putty or SSH key:
With the June-2020 update you can define the alias for the key pair used for the SSH communication.
Select Add to create the key. If a key with the respective alias already exists, an error message is given. In this case you may use the existing one for your scenario or use a different Key Type or rename the existing alias.
Note:
More information about maintaining keys and certificates in Keystore Monitor, about migration of existing keystores into the new monitor and about existing naming conventions can be found in blog ‘How to use Keystore Monitor to maintain your keys and certificates’.
Authorization
To maintain keys and certificates in Keystore Monitor your user needs the Group Role AuthGroup.Admin or Single Roles IntegrationOperationServer.read, NodeManager.read and
NodeManager.deploysecuritycontent.
For public key authentication at the sftp server the public key of the cloud integration tenants private key is needed in the sftp server. For this, export the public key of the private key pair in the Keystore Monitor. You can export either the X.509 certificate or the public key in OpenSSH format; choose the format your sftp server supports.
This option is available as single line option, select Download Certificate or Download Public OpenSSH Key from the actions Button in the line of the private Key Pair to be used for the connection to the sftp server.

Download Public OpenSSH Key will create an <alias>.pub file in the download directory. The file contains the public key in openSSH format, which can be used to be put to the sftp server.
Download Certificate will create a file with the name <alias>.cer in the download directory. This X.509 certificate file can be imported to sftp server, if the sftp server supports the format.
If the sftp server needs SSH2 format according to RFC 4716 you need to download the OpenSSH key and transform it to an SSH2 public key with the ssh-keygen tool, which can for example be installed using cygwin on Windows machines. Use following command for the transformation:
$ ssh-keygen -e -f id_rsa.pub -m RFC4716 > id_rsa.pub_ssh2
Authorization
To download entries from Keystore Monitor your user needs the Group Role AuthGroup.IntegrationDeveloper or Single Roles IntegrationOperationServer.read and NodeManager.read.
For public key authentication, in the sftp server the public key of the cloud integration tenant’s private key needs to be imported. Provide the downloaded public key to the administrator of the sftp server, so that he can add it there. On an OpenSSH server it's done via adding it to the authorized_keys file in the .ssh directory.
With this last step the configuration of the communication to the sftp server using public key authentication is completed. You can now use public key authentication in sftp sender and receiver channels.
To test the connectivity, you can continue as described below in the Connectivity Test chapter or first create the integration flow with the sftp channel.
After the connectivity is setup, you can connect to an sftp server using the sftp sender or receiver adapter. Create an integration flow with an sftp sender or receiver channel and define the Connection Parameters accordingly:
After the deployment of the integration flow the access to the sftp server should work.
In case of errors you can use the connectivity tests for analysis, continue as described below.
After setting up the connection toward the sftp server, the connectivity test feature can be used to test the communication or even to download public keys.
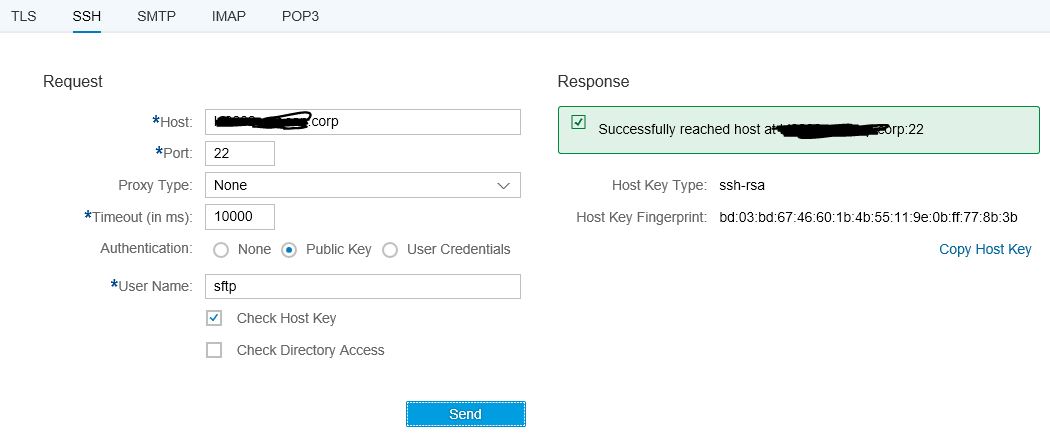
The Connectivity Test is available in Operations View in Web, in section Manage Security. Selecting the Connectivity Test tile from Overview Page will open the test tool offering tests for different protocols. To test the communication to the sftp server, the SSH option is to be selected.

To test the connection with host key and public key check, select Authentication option Public Key and enter the address of your sftp server, and the user name available in the sftp server and execute the test. The test will give a success message or an error with detailed error information.

Error: reject HostKey
If there is an error with the SSH connectivity (e.g. reject HostKey) it is possible to execute the test without the option Check Host Key. In this case the sftp host key is not checked, but it can be copied via Copy Host Key Button and added to the known hosts file as described in the above chapter. Make sure the fingerprint of the downloaded host key is checked with the administrator of the sftp server.

The public key authentication is checked via the authentication option Public Key. The authentication is done with the id_rsa/id_dsa key with the user entered in User Name.
Error: Auth fail
If there is an authentication error you get an Auth fail error. In this case either the id_rsa/id_dsa alias is not available in keystore, the public key was not added to the sftp server authorized keys correctly or the user is not valid.
The problem can also be that the connection timeout set is too low for specific slow sftp servers. In this case the timeout needs to be increase. This problem was seen from time to time in sftp communications.

If everything is setup correctly you will get a success message with Check Host Key using Public Key Authentication.
Setup Secure Connection to sftp Server
A typical task in an integration project is to connect sftp servers to the SAP Cloud Integration Tenant, either for sending messages to or for polling messages from the sftp server. Before going into detailed configuration of the communication lets first have a short look at the basics.
Basics of Secure sftp Communication
The sftp server can act either as a sender or a receiver of messages. The setup and the detailed configuration procedure differ according to the communication direction that is being set up: whether the sftp server is supposed to provide messages to the integration platform or the other way round.
For more detailed information about sftp communication in CPI refer to SAP Documentation chapter 'How sftp works'.
The polling sftp scenario and which security artifacts are involved is described in SAP Documentation chapter 'Inbound sftp with Public Key Authentication'.
For secure SSH communication a known hosts file has to be deployed in the cloud integration tenant containing the public host key of the sftp server so that the sftp server will be trusted.
Furthermore, for public key authentication with the sftp server, a private key has to be maintained in the cloud integration tenant keystore. Also User/Password can be used instead, in this case user credentials have to be deployed in the cloud integration tenant. Recommended configuration option for secure communication is public key authentication.
If you want to configure the connection to an on-premise sftp server via Cloud Connector refer to the blog How to Connect to an on-premise sftp Server via Cloud Connector.
Configure Connection in sftp Server and Cloud Integration Tenant
Retrieve User and Public Host Key from sftp Server
Host Key
For SSH based communication, the cloud integration tenant needs the host key of the sftp server, which has to be added to the known hosts file and deployed on the cloud integration tenant in the next step. The host key can either be downloaded from sftp server or has to be provided by the administrator of the sftp server.
You can download the host key with the SSH connection test as described in more detail below in the Connectivity Tests chapter using the Copy Host Key option.
In case you have access to the sftp server yourself, you’ll normally find the public key of the sftp server in the .ssh directory with the name id_rsa.pub.
User
To communicate with the sftp server you need an user account on that sftp server. Cloud integration needs the user name to connect to the sftp server. The user name has to be provided by the administrator of the sftp server. The corresponding user must have sufficient authorization to create/move/delete files on the sftp server.
Configurations in Cloud Integration Tenant
For SSH based communication in the cloud integration tenant, the public host key of the sftp server provided in previous step is needed in the cloud integration tenant. Furthermore, for using public key authentication towards the sftp server, a private key pair with the alias id_rsa or id_dsa is required in the cloud integration tenant’s keystore. With the June-2020 update the key pair for the connection to the sftp server can be chosen by defining the respective key alias in the sftp adapter configuration.
Maintain and Deploy Known Hosts File
You need to add the sftp host key you received in previous step to the known hosts file deployed in your cloud integration tenant. For this download the file from Manage Security Material view available in the Operations View in Web in section Manage Security. If no knwon_hosts file is deployed yet on the tenant you have to create it as described below.
Open the file with notepad or some other text editor and add the host key of the sftp server. If no known_hosts file was deployed create it.
The file needs to have the name known_hosts and shall contain the host keys for all connected sftp servers in a list. Each line contains the hostname, the applicable public key algorithm -"ssh-rsa" (for RSA key pairs) or "ssh-dss" (for DSA key pairs) and the public host key encoded using base64. See the following example:
ld2345.wdf.sap.corp ssh-rsa AAAAB3NzaC1yc2EAAAo.........2pOx2ADnZ1WwtjW48=
Deploy the known_hosts file in the Manage Security Material view available in the Operations View in Web via the Add -> Known Hosts (SSH) action. Browse the known_hosts file and deploy it.
Maintain Private Key in Keystore
As explained above, for public key authentication a private key pair needs to be maintained in the cloud integration tenant keystore. Before the June 2020 update, there were pre-defined aliases reserved for the communication with the sftp server: these are the aliases id_rsa, id_dsa or id_ecdsa.
With the June-2020 update any key pair can be chosen for the connection to the sftp server by defining the respective key alias in the sftp adapter configuration.
Check for id_rsa/id_dsa/id_ecdsa or any other key pair in Keystore
In Keystore Monitor available in the Operations View in Web in section Manage Security check, if there is already an entry with the alias id_rsa, id_dsa or id_ecdsa available. If so, you may use it and skip the next two steps, continue with download of the public key.
With the June-2020 update any key pair can be chosen. It is recommended to use a dedicated key pair for the communication to the sftp server(s), and you may now even use a different key pair for each sftp server. You should not use the same key pair for communication against sftp server(s) and other backends.
Create SSH Key in Keystore Monitor
With the 02-September-2018 update, in the Keystore Monitor you can directly create SSH keys. There is no need anymore to use an external tool for this.
To create the SSH Key open the Keystore Monitor available in the Operations View in Web in section Manage Security. All certificates and private key pairs contained in the tenant keystore are shown. Choose Create -> SSH Key to create a key pair for the sftp connectivity.
In the creation dialog select and define the key specific values and define a validity period. Before the June 2020 update the alias is generated automatically based on the selected Key Type:
- Key Type RSA -> generated alias: id_rsa
- Key Type DSA -> generated alias: id_dsa (because of security reasons not available anymore after the 14-04-2019 update)
- Key Type EC -> generated alias: id_ecdsa (new with the 14-04-2019 update)
With the June-2020 update you can define the alias for the key pair used for the SSH communication. And with this change you can now have multiple SSH keys in your tenant.
Select Deploy to create the key. If a key with the respective alias already exists, an error message is given. In this case you may use the existing one for your scenario or use a different Key Type or rename the existing alias.

Upon Deploy the key pair is generated and the artifact is added to the list of keystore artifacts:

Alternative option: Upload SSH key
Instead of creating the SSH key in the keystore monitor, with the 12-May-2019 update you can also upload SSH keys to the keystore monitor. It is possible to upload SSH or putty keys.
To upload an SSH Key open the Keystore Monitor available in the Operations View in Web in section Manage Security. Choose Add -> SSH Key to upload a putty of SSH key for the sftp connectivity.
In the upload dialog select the putty or SSH key and specify the password for the key and define the key specific values and a validity period.
The alias is generated automatically based on the key type of the putty or SSH key:
- Key Type RSA -> generated alias: id_rsa
- Key Type DSA -> generated alias: id_dsa
- Key Type EC -> generated alias: id_ecdsa
With the June-2020 update you can define the alias for the key pair used for the SSH communication.
Select Add to create the key. If a key with the respective alias already exists, an error message is given. In this case you may use the existing one for your scenario or use a different Key Type or rename the existing alias.

Note:
- You should not share a private SSH key. Each CPI tenant (e.g. test tenant and productive tenant) should have their own SSH key, the same applies to each natural person (e.g. developer, administrator or consultant) who needs access to the SFTP server. This way access to a specific SFTP mailbox can be granted and revoked to each system and each person separately.
- You should not use username/password authentication to SFTP servers. Once you have configured multiple systems to access a mailbox via username/password authentication, it becomes very hard to change this password again, because you must change it synchronously on the SFTP server and all involved systems, which are at least two (one writing to the mailbox and one reading from it). Furthermore, you may need to share this password with administrators and maybe even integration flow developers or external consultants involved in the set-up of the scenario. Once you have shared the password, you cannot make anyone to forget it again, so to remain secure, you would have to change it each time someone leaves the project, which is difficult and error-prone as stated above.
More information about maintaining keys and certificates in Keystore Monitor, about migration of existing keystores into the new monitor and about existing naming conventions can be found in blog ‘How to use Keystore Monitor to maintain your keys and certificates’.
Authorization
To maintain keys and certificates in Keystore Monitor your user needs the Group Role AuthGroup.Admin or Single Roles IntegrationOperationServer.read, NodeManager.read and
NodeManager.deploysecuritycontent.
Download Public Key from Keystore Monitor
For public key authentication at the sftp server the public key of the cloud integration tenants private key is needed in the sftp server. For this, export the public key of the private key pair in the Keystore Monitor. You can export either the X.509 certificate or the public key in OpenSSH format; choose the format your sftp server supports.
This option is available as single line option, select Download Certificate or Download Public OpenSSH Key from the actions Button in the line of the private Key Pair to be used for the connection to the sftp server.
Download Public OpenSSH Key will create an <alias>.pub file in the download directory. The file contains the public key in openSSH format, which can be used to be put to the sftp server.
Download Certificate will create a file with the name <alias>.cer in the download directory. This X.509 certificate file can be imported to sftp server, if the sftp server supports the format.
If the sftp server needs SSH2 format according to RFC 4716 you need to download the OpenSSH key and transform it to an SSH2 public key with the ssh-keygen tool, which can for example be installed using cygwin on Windows machines. Use following command for the transformation:
$ ssh-keygen -e -f id_rsa.pub -m RFC4716 > id_rsa.pub_ssh2
Authorization
To download entries from Keystore Monitor your user needs the Group Role AuthGroup.IntegrationDeveloper or Single Roles IntegrationOperationServer.read and NodeManager.read.
Import Public Key to sftp Server
For public key authentication, in the sftp server the public key of the cloud integration tenant’s private key needs to be imported. Provide the downloaded public key to the administrator of the sftp server, so that he can add it there. On an OpenSSH server it's done via adding it to the authorized_keys file in the .ssh directory.
With this last step the configuration of the communication to the sftp server using public key authentication is completed. You can now use public key authentication in sftp sender and receiver channels.
To test the connectivity, you can continue as described below in the Connectivity Test chapter or first create the integration flow with the sftp channel.
Setup SFTP Channel in the Integration Flow
After the connectivity is setup, you can connect to an sftp server using the sftp sender or receiver adapter. Create an integration flow with an sftp sender or receiver channel and define the Connection Parameters accordingly:

- In the Address field enter the host name of the sftp server.
- Define if the Proxy Type: On-Premise for connecting to an on-premise sftp server via cloud connector (see blog How to connect to an on-premise sftp server) or Internet if the sftp server is accessible from the internet.
- If On-Premise is selected you can configure the Location ID used for the cloud connector.
- Select the Authentication: Public Key, User Name/Password or Dual.
- For Authentication via Public Key you need to define the User Name set up in the sftp server and the Private Key Alias of the key pair you want to use for the connection. Note that the entry field for the Private Key Alias will only be available with a new version of the sftp adapter in June 2020.
- For Authentication via User Name and Password you need to define the Credential Alias, in which the user name and password are deployed.
- For Authentication with both, Public Key and User Name/Password, select Dual. In this case you need to define the Credential Alias, in which the user name and password are deployed and the Private Key Alias. Note that the Dual option will only be available with a new version of the sftp adapter in June 2020.
- The Timeout needs to be set high enough to ensure the sftp server is able to respond in this time.
- You can define the Maximum Reconnect Attempts and the Reconnect Delay.
- Select Automatically Disconnect if the connection shall be closed after the processing.
- For scenarios where messages are processed more often the connection should be kept open for better performance because additional time is required to establish the connection.
- If messages are only processed from time to time it is recommended to close the connection. This ensures there are not too many open connections in the sftp server. Besides, most sftp servers close an idle connection from their side after a certain period of time (i.e. the connection timeout of the sftp server).
- The general recommendation would be: if multiple messages are processed within the connection timeout of the sftp server the connection should be kept open.
After the deployment of the integration flow the access to the sftp server should work.
- In case of sftp sender the integration flow should start polling messages from the sftp server. Errors during poll would be shown in the Integration Content monitor.
- In case of the sftp receiver messages are written to the sftp server. Errors during writing to the sftp server are shown in the Message Processing monitor in the message processing log.
In case of errors you can use the connectivity tests for analysis, continue as described below.
Connectivity Test
After setting up the connection toward the sftp server, the connectivity test feature can be used to test the communication or even to download public keys.
SSH Connectivity Test
The Connectivity Test is available in Operations View in Web, in section Manage Security. Selecting the Connectivity Test tile from Overview Page will open the test tool offering tests for different protocols. To test the communication to the sftp server, the SSH option is to be selected.
To test the connection with host key and public key check, select Authentication option Public Key and enter the address of your sftp server, and the user name available in the sftp server and execute the test. The test will give a success message or an error with detailed error information.
Error: reject HostKey
If there is an error with the SSH connectivity (e.g. reject HostKey) it is possible to execute the test without the option Check Host Key. In this case the sftp host key is not checked, but it can be copied via Copy Host Key Button and added to the known hosts file as described in the above chapter. Make sure the fingerprint of the downloaded host key is checked with the administrator of the sftp server.
The public key authentication is checked via the authentication option Public Key. The authentication is done with the id_rsa/id_dsa key with the user entered in User Name.
Error: Auth fail
If there is an authentication error you get an Auth fail error. In this case either the id_rsa/id_dsa alias is not available in keystore, the public key was not added to the sftp server authorized keys correctly or the user is not valid.
The problem can also be that the connection timeout set is too low for specific slow sftp servers. In this case the timeout needs to be increase. This problem was seen from time to time in sftp communications.
If everything is setup correctly you will get a success message with Check Host Key using Public Key Authentication.
- SAP Managed Tags:
- SAP Integration Suite,
- Cloud Integration
Labels:
88 Comments
- « Previous
-
- 1
- 2
- Next »
You must be a registered user to add a comment. If you've already registered, sign in. Otherwise, register and sign in.
Labels in this area
-
ABAP CDS Views - CDC (Change Data Capture)
2 -
AI
1 -
Analyze Workload Data
1 -
BTP
1 -
Business and IT Integration
2 -
Business application stu
1 -
Business Technology Platform
1 -
Business Trends
1,658 -
Business Trends
91 -
CAP
1 -
cf
1 -
Cloud Foundry
1 -
Confluent
1 -
Customer COE Basics and Fundamentals
1 -
Customer COE Latest and Greatest
3 -
Customer Data Browser app
1 -
Data Analysis Tool
1 -
data migration
1 -
data transfer
1 -
Datasphere
2 -
Event Information
1,400 -
Event Information
66 -
Expert
1 -
Expert Insights
177 -
Expert Insights
295 -
General
1 -
Google cloud
1 -
Google Next'24
1 -
Kafka
1 -
Life at SAP
780 -
Life at SAP
13 -
Migrate your Data App
1 -
MTA
1 -
Network Performance Analysis
1 -
NodeJS
1 -
PDF
1 -
POC
1 -
Product Updates
4,577 -
Product Updates
341 -
Replication Flow
1 -
RisewithSAP
1 -
SAP BTP
1 -
SAP BTP Cloud Foundry
1 -
SAP Cloud ALM
1 -
SAP Cloud Application Programming Model
1 -
SAP Datasphere
2 -
SAP S4HANA Cloud
1 -
SAP S4HANA Migration Cockpit
1 -
Technology Updates
6,873 -
Technology Updates
419 -
Workload Fluctuations
1
Related Content
- Best practice to connect to multiple databases (Crystal Report) in Technology Q&A
- Consuming SAP with SAP Build Apps - Mobile Apps for iOS and Android in Technology Blogs by SAP
- Exploring Integration Options in SAP Datasphere with the focus on using SAP extractors - Part II in Technology Blogs by SAP
- FAQ for C4C Certificate Renewal in Technology Blogs by SAP
- IoT - Ultimate Data Cyber Security - with Enterprise Blockchain and SAP BTP 🚀 in Technology Blogs by Members
Top kudoed authors
| User | Count |
|---|---|
| 36 | |
| 25 | |
| 17 | |
| 13 | |
| 8 | |
| 7 | |
| 6 | |
| 6 | |
| 6 | |
| 6 |