
- SAP Community
- Products and Technology
- Technology
- Technology Blogs by SAP
- Step 8 with SAP Cloud SDK: Secure your Application...
Technology Blogs by SAP
Learn how to extend and personalize SAP applications. Follow the SAP technology blog for insights into SAP BTP, ABAP, SAP Analytics Cloud, SAP HANA, and more.
Turn on suggestions
Auto-suggest helps you quickly narrow down your search results by suggesting possible matches as you type.
Showing results for
Employee
Options
- Subscribe to RSS Feed
- Mark as New
- Mark as Read
- Bookmark
- Subscribe
- Printer Friendly Page
- Report Inappropriate Content
07-18-2017
1:09 PM
The following steps will explain how secure applications in SAP Cloud Platform, Neo which are built based on the SAP Cloud SDK.
Note: This post is part of a series. For a complete overview visit the SAP Cloud SDK Overview.
In the last tutorial you learned how to protect your application with authentication and authorization on SAP Cloud Platform, CloudFoundry. In this tutorial we will quickly show you what is required to cover the same aspects for a Neo-based application. As you will see, the Neo model on application security management is simpler compared to CloudFoundry. This stems from the fact, that on Neo the microservice-based approach is less established and requires therefore less configuration overhead. The tutorial covers the following aspects:
In fact, if you have used the archetype to generate your project for SAP Cloud Platform, Neo, the application is already enabled for authentication by default. To review the authentication go to your application/src/main/webapp/WEB-INF directory and look at the web.xml file.
There you can see that the archetype uses the FORM authentication method (which will use the SAML configuration). In addition you find the session configuration as well as the definition of one security role for Everyone. Per definition every authenticated user has the role "Everyone". The entire model is based on the Java EE standard which is documented, for example, here.
Introducing a new role is fairly simple. You can add into the web.xml something like the following to introduce the BusinessPartnerManager role.
Now the paths of the application can be protected and constrained to certain roles you define for me. For a more fine-grained access-control, please refer to the standard JavaEE documentation.
After you made all changes you are ready to deploy the application to Neo.
You can use the cockpit on SAP Cloud Platform to deploy or update your application as follows. Alternatively, use the deploy and start commands for Neo introduced in step 2 of this tutorial series.

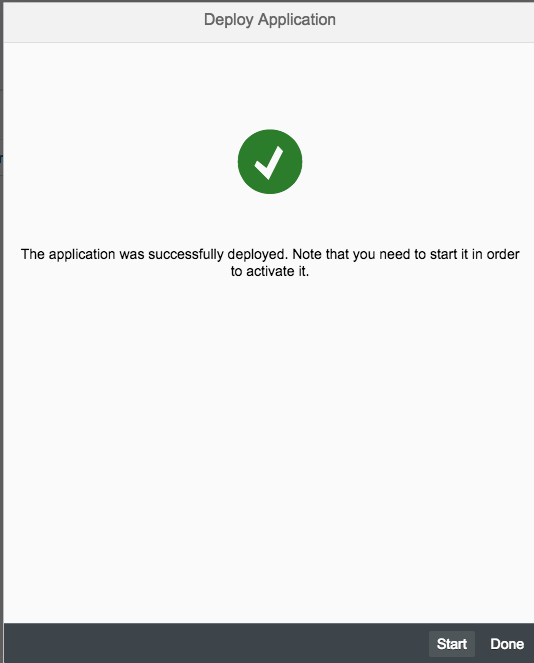
Go to your SCP account on hanatrial.ondemand.com and select Applications / Java Applications / Deploy Application. Select the recent build from your application/target directory:
Hit "Deploy" and wait for the assembly to be uploaded. Once uploaded click the start button so that the application is going to be started.
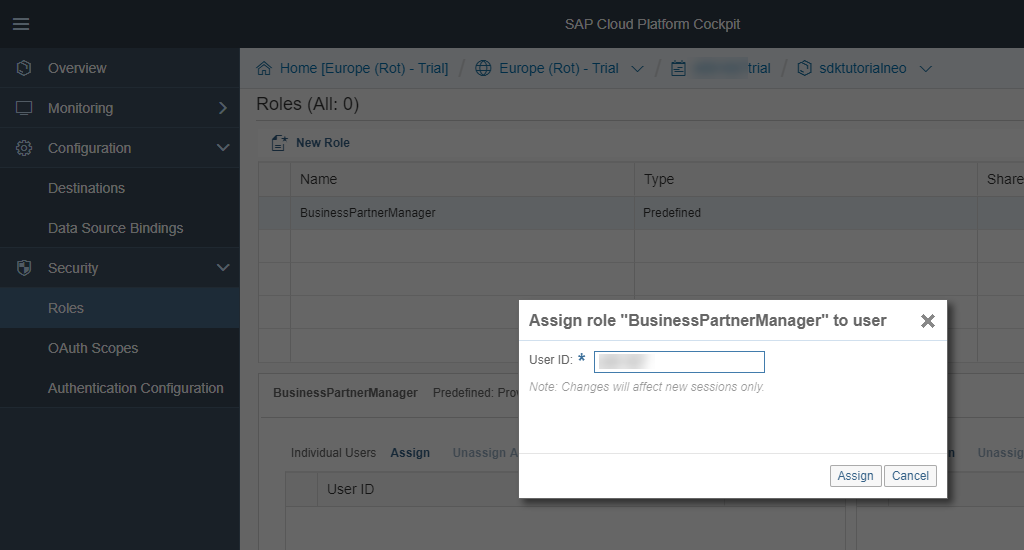
While the application is starting, select the application and go to the Security / Roles menu.

Click the Assign button and assign your user ID to the BusinessPartnerManager role.

Afterwards, go back to the application and select the URL to try it out yourself:


In order to assign roles to users of the local deployment you have to do the following.
First go in your project and open the neousers.json file, e.g., using:
Then add the roles to the respective users in the corresponding attribute:
After that, redeploy the application using
If you then go to http://localhost:8080/hello you should see the application in action behind a protected resource.
You may want to consider the following additional attributes in your web.xml to decrease the likelihood of XSS and similar attacks (e.g., stolen JSESSIONID).
That's it for today. Now you have learned the basics to protect your application on SAP Cloud Platform, Neo which are based on the SAP S/4HANA Cloud SDK. Stay tuned for upcoming blog posts about more advanced usages of the SAP Cloud SDK.
Note: This post is part of a series. For a complete overview visit the SAP Cloud SDK Overview.
Goal of this blog post
In the last tutorial you learned how to protect your application with authentication and authorization on SAP Cloud Platform, CloudFoundry. In this tutorial we will quickly show you what is required to cover the same aspects for a Neo-based application. As you will see, the Neo model on application security management is simpler compared to CloudFoundry. This stems from the fact, that on Neo the microservice-based approach is less established and requires therefore less configuration overhead. The tutorial covers the following aspects:
- Enhance your project with authentication and authorization metadata.
- Deploy the application with authentication information.
Prerequisites
- You did at least all steps until Step 3 with SAP Cloud SDK: HelloWorld on SCP CloudFoundry.
Enable authentication
In fact, if you have used the archetype to generate your project for SAP Cloud Platform, Neo, the application is already enabled for authentication by default. To review the authentication go to your application/src/main/webapp/WEB-INF directory and look at the web.xml file.
<login-config>

    <auth-method>FORM</auth-method>

</login-config>


<session-config>

    <session-timeout>20</session-timeout>

</session-config>


<security-role>

    <role-name>Everyone</role-name>

</security-role>


<security-constraint>

    <web-resource-collection>

        <web-resource-name>All SAP Cloud Platform users</web-resource-name>

        <url-pattern>/*</url-pattern>

    </web-resource-collection>

    <auth-constraint>

        <role-name>Everyone</role-name>

    </auth-constraint>

</security-constraint>
There you can see that the archetype uses the FORM authentication method (which will use the SAML configuration). In addition you find the session configuration as well as the definition of one security role for Everyone. Per definition every authenticated user has the role "Everyone". The entire model is based on the Java EE standard which is documented, for example, here.
Introduce a new role
Introducing a new role is fairly simple. You can add into the web.xml something like the following to introduce the BusinessPartnerManager role.
<security-role>

    <role-name>BusinessPartnerManager</role-name>

</security-role>
Now the paths of the application can be protected and constrained to certain roles you define for me. For a more fine-grained access-control, please refer to the standard JavaEE documentation.
Protecting resources with roles
<security-constraint>

    <web-resource-collection>

        <web-resource-name>Only for business partner managers</web-resource-name>

        <url-pattern>/hello</url-pattern>

    </web-resource-collection>

    <auth-constraint>

        <role-name>BusinessPartnerManager</role-name>

    </auth-constraint>

</security-constraint>
After you made all changes you are ready to deploy the application to Neo.
Deploying to SAP Cloud Platform, Neo
cd application

mvn clean install
You can use the cockpit on SAP Cloud Platform to deploy or update your application as follows. Alternatively, use the deploy and start commands for Neo introduced in step 2 of this tutorial series.
Go to your SCP account on hanatrial.ondemand.com and select Applications / Java Applications / Deploy Application. Select the recent build from your application/target directory:
Hit "Deploy" and wait for the assembly to be uploaded. Once uploaded click the start button so that the application is going to be started.
While the application is starting, select the application and go to the Security / Roles menu.
Click the Assign button and assign your user ID to the BusinessPartnerManager role.
Afterwards, go back to the application and select the URL to try it out yourself:
Local deployment
In order to assign roles to users of the local deployment you have to do the following.
First go in your project and open the neousers.json file, e.g., using:
cd application/localServerContent/config_master/com.sap.security.um.provider.neo.local/

open neousers.json
Then add the roles to the respective users in the corresponding attribute:
"Roles": [ "BusinessPartnerManager" ]After that, redeploy the application using
mvn scp:clean scp:push -pl application/If you then go to http://localhost:8080/hello you should see the application in action behind a protected resource.
Small tips and tricks
You may want to consider the following additional attributes in your web.xml to decrease the likelihood of XSS and similar attacks (e.g., stolen JSESSIONID).
<security-constraint>

    <web-resource-collection>

        <web-resource-name>Only for business partner managers</web-resource-name>

        <url-pattern>/hello</url-pattern>

    </web-resource-collection>

    <auth-constraint>

        <role-name>BusinessPartnerManager</role-name>

    </auth-constraint>

 	<user-data-constraint>

         <transport-guarantee>CONFIDENTIAL</transport-guarantee>

    </user-data-constraint>

</security-constraint>


<session-config>

	<session-timeout>20</session-timeout>

	<cookie-config>

		<secure>true</secure>

	</cookie-config>

</session-config>
That's it for today. Now you have learned the basics to protect your application on SAP Cloud Platform, Neo which are based on the SAP S/4HANA Cloud SDK. Stay tuned for upcoming blog posts about more advanced usages of the SAP Cloud SDK.
- SAP Managed Tags:
- SAP Cloud SDK,
- SAP S/4HANA,
- SAP S/4HANA Public Cloud
Labels:
1 Comment
You must be a registered user to add a comment. If you've already registered, sign in. Otherwise, register and sign in.
Labels in this area
-
ABAP CDS Views - CDC (Change Data Capture)
2 -
AI
1 -
Analyze Workload Data
1 -
BTP
1 -
Business and IT Integration
2 -
Business application stu
1 -
Business Technology Platform
1 -
Business Trends
1,658 -
Business Trends
93 -
CAP
1 -
cf
1 -
Cloud Foundry
1 -
Confluent
1 -
Customer COE Basics and Fundamentals
1 -
Customer COE Latest and Greatest
3 -
Customer Data Browser app
1 -
Data Analysis Tool
1 -
data migration
1 -
data transfer
1 -
Datasphere
2 -
Event Information
1,400 -
Event Information
66 -
Expert
1 -
Expert Insights
177 -
Expert Insights
299 -
General
1 -
Google cloud
1 -
Google Next'24
1 -
Kafka
1 -
Life at SAP
780 -
Life at SAP
13 -
Migrate your Data App
1 -
MTA
1 -
Network Performance Analysis
1 -
NodeJS
1 -
PDF
1 -
POC
1 -
Product Updates
4,577 -
Product Updates
344 -
Replication Flow
1 -
RisewithSAP
1 -
SAP BTP
1 -
SAP BTP Cloud Foundry
1 -
SAP Cloud ALM
1 -
SAP Cloud Application Programming Model
1 -
SAP Datasphere
2 -
SAP S4HANA Cloud
1 -
SAP S4HANA Migration Cockpit
1 -
Technology Updates
6,873 -
Technology Updates
422 -
Workload Fluctuations
1
Related Content
- SAP Build Process Automation Pre-built content for Finance Use cases in Technology Blogs by SAP
- Consuming SAP with SAP Build Apps - Mobile Apps for iOS and Android in Technology Blogs by SAP
- Onboarding Users in SAP Quality Issue Resolution in Technology Blogs by SAP
- How to use AI services to translate Picklists in SAP SuccessFactors - An example in Technology Blogs by SAP
- IoT - Ultimate Data Cyber Security - with Enterprise Blockchain and SAP BTP 🚀 in Technology Blogs by Members
Top kudoed authors
| User | Count |
|---|---|
| 40 | |
| 25 | |
| 17 | |
| 13 | |
| 8 | |
| 7 | |
| 7 | |
| 7 | |
| 6 | |
| 6 |