
- SAP Community
- Products and Technology
- Technology
- Technology Blogs by SAP
- Part 2: How to use SAP Cloud Platform Connectivity...
Technology Blogs by SAP
Learn how to extend and personalize SAP applications. Follow the SAP technology blog for insights into SAP BTP, ABAP, SAP Analytics Cloud, SAP HANA, and more.
Turn on suggestions
Auto-suggest helps you quickly narrow down your search results by suggesting possible matches as you type.
Showing results for
Advisor
Options
- Subscribe to RSS Feed
- Mark as New
- Mark as Read
- Bookmark
- Subscribe
- Printer Friendly Page
- Report Inappropriate Content
07-13-2017
6:08 PM
*********** Updates ************
Last update on 09.08.2017
See details at the end of the blog
**********************************
In the first part of the blog, I've described how to establish a secure tunnel between the SAP Cloud Platform Trial (Cloud Foundry environment) and the Cloud Connector. In addition to that we have configured an Access Control so that we can now access and consume securely data from an on-premise system.
In the second part I will explain how to configure SAP Cloud Platform Connectivity so that a web application can consume the odata service of the existing on-premise system.
Note: many configuration steps of this blog will be done via the SAP Cloud Platform cockpit. Be aware that you can do exactly the same thing via the Command Line Interface of Cloud Foundry. More details about the CLI can be found here.
First let's take a moment to see how it works for basic authentication:
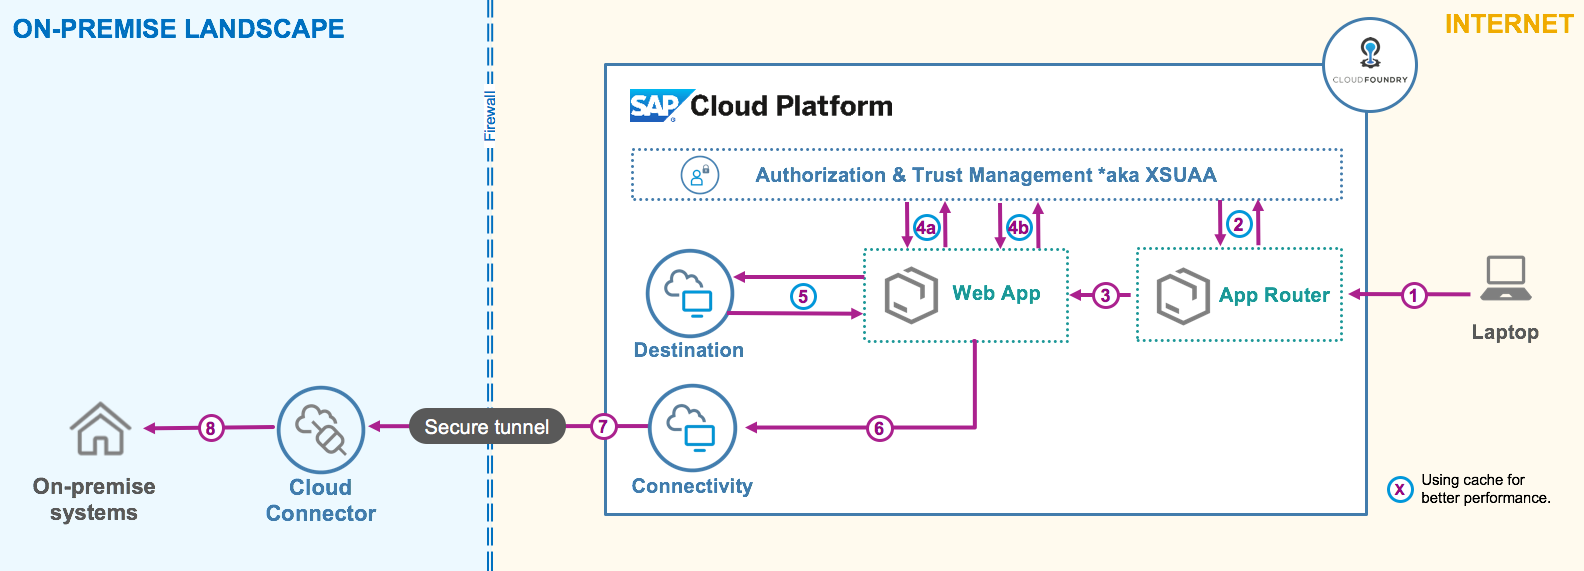
1. User calls the webApp through the AppRouter, which provides a central point of entry to business applications.
2. The request is redirected to XSUAA and the user needs to login. Then a JWT1 (JSON Web Token) is created and sent to AppRouter. JWT1 is then cached by the AppRouter.
3. AppRouter forwards the request to the relevant Web-app URL which is defined as destination, it also passes the JWT1 token with credentials.
4a. The WebApp requests a JWT2 to access the destination instance. JWT2 should be cached for better performance.
4b. In parallel the WebApp requests a JWT3 to access the connectivity instance. JWT3 should be cached for better performance.
5. The WebApp requests destination configuration by sending JWT2.
6. The WebApp sends request to the connectivity instance with JWT3 and the Authorization header.
7. SAP Cloud Platform Connectivity forwards request to the Cloud Connector.
8. Cloud Connector sends request to the on-premise system.
Now that you know how it works, let see what are the steps needed to configure such a scenario:
Then let's do it together and start with the destination...
The destination service, which is available (beta) since October 2017, allows you to store securely settings such as your credentials, the protocol, the URL of the on-premise system, and the proxy type. Destinations are defined on the Subaccount level and you can integrate them in your application on the space level. You can find more details in the official documentation: https://help.sap.com/viewer/cca91383641e40ffbe03bdc78f00f681/Cloud/en-US/7e306250e08340f89d6c103e288...
To create a destination, go the SAP Cloud Platform cockpit and navigate to your Subaccount. Then go to "Destinations (beta)" under "Connectivity" and create a new destination.

Configure now your destination so that you can consume the data from the virtual host previously defined in the Cloud Connector.

Note: if you are using the app available in the sharepoint, be sure to use the same name of the destination or change it in the webApp directly.
Now that we have the destination defined, we can create a destination instance in the space. Go to the section "Services Marketplace" under the "Services" tab and click on the Destination tile.

Then click on the "Instances" section and create a new instance.

Keep "lite" as plan and click "Next". Then skip the next 2 wizard options (Parameters, Application assignment) and add an instance name (e.g. "destination-demo-lite"). There are different ways to bind the application to the destination service. We will do it later on by adding the name of the destination instance in the manifest of the application. During the deployment of the app, the binding will be then added automatically.

SAP Cloud Platform Connectivity provides a standard HTTP proxy for on-premise connectivity to be accessible by any application. Proxy host and port are available in the credentials of the bound connectivity service via the environment variable “VCAP_SERVICES”. More details on how to interpret VCAP_SERVICES can found in the official CF documentation.
In order to consume the data coming from the on-premise in the application via the HTTP proxy, we need to create an SAP Cloud Platform Connectivity instance and bind it to the application. When a binding is created the application gets connectivity credentials in its environment variables. More details about it here.
Ok, let's create an connectivity instance as we did for the destination instance! Go to the "Services Marketplace" under the "Services" tab and click on the Connectivity tile.

Then click on the "Instances" section and create a new instance.

Keep "lite" as plan and click "Next". Then skip the next 2 wizard options (Parameters, Application assignment) and add an instance name (e.g. "connectivity-demo-lite"). Like the others instances, the binding will be done by adding the instance in the manifest of the application later on.

This central identity management service for the Cloud Foundry environment manages application authorizations and the trust to identity providers.
By calling the application, the user will be redirected to the XSUAA and will be prompt to give his credentials. It will then achieve certain checks like verifying the OAuth client, client's scopes, user's scopes (Scopes are permissions to access one or more resources). Assuming everything is fine, the user will be authenticated and the XSUAA will redirect the browser to the application.
In a second step the application will take the client Id and the client secret and will talk directly with the XSUAA to get an access token. Then the application will sent both tokens as HTTP header so that it can consume the backend system via the SAP Cloud Platform Connectivity.
The next step is then to create an instance for the XSUAA. We open the SAP Cloud Platform cockpit and go to the "Services Marketplace" under the "Services" tab and click on the XSUAA tile.

Then click on the "Instances" section and create a new instance.

In the wizard we keep "application" as service plan and click "Next". Then we add the following parameters in the editor and then click on "Next".

In the last step of the wizard, we can add an instance name (e.g. "xsuaa-demo"). The same name will be added in the manifest of the application later on.

Note: As mentioned before, we will bind the instance at the end, once we have deployed the application.
For this demo I have preconfigured a standard application router. Is it really needed? No but it makes my life easier and it's a kind of best practise in the Cloud Foundry world. So in our scenario the application router is the component that acts as our oAuth Client. Concretely that means that by calling the application router in the browser, the end-user will be redirected to the XSUAA in order to login.
Note: probably you want to try it by yourself and you need maybe a standard application router. No problem, SAP provides an NPM registry under the following URL: https://npm.sap.com/
Use the following command to configure the NPM registry for your user
Use the install command to download the approuter and its dependencies
Now let configure the manifest file of the application router before we deploy it.
Here is the code of our application router manifest:
In order to deploy the application router, we go to the "Applications" section in the SAP Cloud Platform cockpit. There we can click on "Deploy Application" and add the archive file and the manifest.

As we have defined the XSUAA service in the manifest, the binding will be done automatically. You can verifying it by clicking on the application router name and then on the "Service Bindings" section.

The web application consists of 2 groups:
The manifest file of the application should also be configured:
Here is the code of the manifest:
Note: by changing the name of the application, a change needs to be done in the file application.properties. You can find it here: /src/main/webapp/security/xs-security.json.
Before deploying the web application, let take time to see where the magic happens. The most important file is the connectivity servlet, which is responsible to propagate the user JWT token via headers.
For more details, you can can download the full code at the bottom of the page.
In order to deploy the web application, we go again to the "Applications" section in the SAP Cloud Platform cockpit. And again we click on "Deploy Application" and add the archive file and the manifest.

To verify that the manifest has taken care of the binding, we can check the "Service Bindings" section of the web application if the services have been added.

That's all! Now we can call the application in the browser. In order to get the URL, we go to the "applications" tab and click on the "approuter-demo". Here we can find the URL of the application router.

The route to the web application has been configured in the /approuter/xs-app.json file of the application router, so that we need to add "/app/" at the end of the URL.
Click on the link "Go to App" to called the URL: https://approuter-demo.cfapps.eu10.hana.ondemand.com/app/
Note: by calling this URL, the destination "dest-to-app" defined in the manifest of the appRouter" will be called. Here again a copy of the manifest.
By opening this URL in the browser, the user will be redirected to the XSUAA in order to login.

After the login, the XSUAA redirects the user to the web application, which called the odata services of the on-premise system via the Cloud Connector. Here is then the result.

You want to try it by your own or you want to see the code in details. No problem, you can download the code here. Some improvements need to be done for sure (for example the way to save the backend credentials 😉 So at least I hope it helps you to better understand how to use the the SAP Cloud Platform Connectivity in the Cloud Foundry environment.
In the next part of this blog serie, I will explain how to replace basic authentication with principal propagation.
Stay tuned and send me your feedback.
Matthieu
Here again the repository with the code.
For principal propagation related questions, please have a look at the 3rd part of the blog series.
*********** Updates ************
10.11.2017: Due to new buildpack, the manifest file of the web application has been updated.
27.11.2017: Extract the SAPUI5 Library of the webApp + Adding a destination for SAPUI5 in the manifest of AppRouter.
15.12.2017: Adding the steps for using the SAP Cloud Platform Destination Service.
09.01.2017: Small improvements in the blog for a better understanding, for example adding the p-user to the hostname in the manifest.
01.03.2018: Hint that you should not use any underscore in the hostname of the appRouter or the application.
09.08.2018: Added the link of the 3rd part of the blog series explaining how to use principal propagation.
**********************************
Last update on 09.08.2017
See details at the end of the blog
**********************************
In the first part of the blog, I've described how to establish a secure tunnel between the SAP Cloud Platform Trial (Cloud Foundry environment) and the Cloud Connector. In addition to that we have configured an Access Control so that we can now access and consume securely data from an on-premise system.
In the second part I will explain how to configure SAP Cloud Platform Connectivity so that a web application can consume the odata service of the existing on-premise system.
Note: many configuration steps of this blog will be done via the SAP Cloud Platform cockpit. Be aware that you can do exactly the same thing via the Command Line Interface of Cloud Foundry. More details about the CLI can be found here.
First let's take a moment to see how it works for basic authentication:
1. User calls the webApp through the AppRouter, which provides a central point of entry to business applications.
2. The request is redirected to XSUAA and the user needs to login. Then a JWT1 (JSON Web Token) is created and sent to AppRouter. JWT1 is then cached by the AppRouter.
3. AppRouter forwards the request to the relevant Web-app URL which is defined as destination, it also passes the JWT1 token with credentials.
4a. The WebApp requests a JWT2 to access the destination instance. JWT2 should be cached for better performance.
4b. In parallel the WebApp requests a JWT3 to access the connectivity instance. JWT3 should be cached for better performance.
5. The WebApp requests destination configuration by sending JWT2.
6. The WebApp sends request to the connectivity instance with JWT3 and the Authorization header.
7. SAP Cloud Platform Connectivity forwards request to the Cloud Connector.
8. Cloud Connector sends request to the on-premise system.
Now that you know how it works, let see what are the steps needed to configure such a scenario:
- Creation of the destination and the destination instance
- Creation of the connectivity instance
- Creation of the XSUAA instance
- Configuration and deployment of the AppRouter
- Configuration and deployment of the WebApp
Then let's do it together and start with the destination...
1. Creation of the destination and the destination instance
The destination service, which is available (beta) since October 2017, allows you to store securely settings such as your credentials, the protocol, the URL of the on-premise system, and the proxy type. Destinations are defined on the Subaccount level and you can integrate them in your application on the space level. You can find more details in the official documentation: https://help.sap.com/viewer/cca91383641e40ffbe03bdc78f00f681/Cloud/en-US/7e306250e08340f89d6c103e288...
To create a destination, go the SAP Cloud Platform cockpit and navigate to your Subaccount. Then go to "Destinations (beta)" under "Connectivity" and create a new destination.
Configure now your destination so that you can consume the data from the virtual host previously defined in the Cloud Connector.
Note: if you are using the app available in the sharepoint, be sure to use the same name of the destination or change it in the webApp directly.
Now that we have the destination defined, we can create a destination instance in the space. Go to the section "Services Marketplace" under the "Services" tab and click on the Destination tile.
Then click on the "Instances" section and create a new instance.
Keep "lite" as plan and click "Next". Then skip the next 2 wizard options (Parameters, Application assignment) and add an instance name (e.g. "destination-demo-lite"). There are different ways to bind the application to the destination service. We will do it later on by adding the name of the destination instance in the manifest of the application. During the deployment of the app, the binding will be then added automatically.
2. Creation of the connectivity instance
SAP Cloud Platform Connectivity provides a standard HTTP proxy for on-premise connectivity to be accessible by any application. Proxy host and port are available in the credentials of the bound connectivity service via the environment variable “VCAP_SERVICES”. More details on how to interpret VCAP_SERVICES can found in the official CF documentation.
In order to consume the data coming from the on-premise in the application via the HTTP proxy, we need to create an SAP Cloud Platform Connectivity instance and bind it to the application. When a binding is created the application gets connectivity credentials in its environment variables. More details about it here.
Ok, let's create an connectivity instance as we did for the destination instance! Go to the "Services Marketplace" under the "Services" tab and click on the Connectivity tile.
Then click on the "Instances" section and create a new instance.
Keep "lite" as plan and click "Next". Then skip the next 2 wizard options (Parameters, Application assignment) and add an instance name (e.g. "connectivity-demo-lite"). Like the others instances, the binding will be done by adding the instance in the manifest of the application later on.
3. Creation of the Authorization & Trust Management instance (aka. XSUAA)
This central identity management service for the Cloud Foundry environment manages application authorizations and the trust to identity providers.
By calling the application, the user will be redirected to the XSUAA and will be prompt to give his credentials. It will then achieve certain checks like verifying the OAuth client, client's scopes, user's scopes (Scopes are permissions to access one or more resources). Assuming everything is fine, the user will be authenticated and the XSUAA will redirect the browser to the application.
In a second step the application will take the client Id and the client secret and will talk directly with the XSUAA to get an access token. Then the application will sent both tokens as HTTP header so that it can consume the backend system via the SAP Cloud Platform Connectivity.
The next step is then to create an instance for the XSUAA. We open the SAP Cloud Platform cockpit and go to the "Services Marketplace" under the "Services" tab and click on the XSUAA tile.
Then click on the "Instances" section and create a new instance.
In the wizard we keep "application" as service plan and click "Next". Then we add the following parameters in the editor and then click on "Next".
{

        "xsappname" : "connectivity-app-demo",

        "tenant-mode": "dedicated"

}
In the last step of the wizard, we can add an instance name (e.g. "xsuaa-demo"). The same name will be added in the manifest of the application later on.
Note: As mentioned before, we will bind the instance at the end, once we have deployed the application.
4. Configuration and deployment of the application router
For this demo I have preconfigured a standard application router. Is it really needed? No but it makes my life easier and it's a kind of best practise in the Cloud Foundry world. So in our scenario the application router is the component that acts as our oAuth Client. Concretely that means that by calling the application router in the browser, the end-user will be redirected to the XSUAA in order to login.
Note: probably you want to try it by yourself and you need maybe a standard application router. No problem, SAP provides an NPM registry under the following URL: https://npm.sap.com/
Use the following command to configure the NPM registry for your user
npm config set @sap:registry https://npm.sap.com/Use the install command to download the approuter and its dependencies
npm install @sap/approuterNow let configure the manifest file of the application router before we deploy it.
- Name of the application router
- Hostname of the application router:
- Be aware that it should be unique, then you can for example add you trial-user to the name. In my case it would be "approuter-demo-p193274639trial").
- Do not use any underscore in the hostname. It may contain only the ASCII letters 'a' through 'z', the digits '0' through '9', and the minus sign.
- URL of the web application (based on the app name that will be defined in the application's manifest). Don't forget to update the url with your hostname (appname+trial-user-name)
- Name of the XSUAA instance (the name has been previously defined in the SAP Cloud Platform cockpit by creating the XSUAA instance)
Here is the code of our application router manifest:
---

applications:


- name: approuter-demo

  host: approuter-demo-p193274639trial

  buildpack: nodejs_buildpack

  memory: 128M

  path: ./

  env:

    NODE_TLS_REJECT_UNAUTHORIZED: 0

    destinations: >

      [


           {"name":"dest-to-app", "url" :"https://connectivity-app-demo-p193274639trial.cfapps.eu10.hana.ondemand.com", "forwardAuthToken": true },

           {"name":"ui5", "url":"https://sapui5.hana.ondemand.com/1.42.6/resources/"}

      ]

  services:

    - xsuaa-demo
In order to deploy the application router, we go to the "Applications" section in the SAP Cloud Platform cockpit. There we can click on "Deploy Application" and add the archive file and the manifest.
As we have defined the XSUAA service in the manifest, the binding will be done automatically. You can verifying it by clicking on the application router name and then on the "Service Bindings" section.
5. Configuration and deployment of the web application
The web application consists of 2 groups:
- JAVA logic to handle the JWT token and create a request via the HTTP Proxy of the SAP Cloud Platform Connectivity
- UI5 Frontend to display the result of the request in a table (Products and prices)
The manifest file of the application should also be configured:
- Name of the application
- Hostname of the application:
- Again here the hostname should be unique. So add you trial-user to the name. In my case it would be "connectivity-app-demo-p193274639trial"
- Do not use any underscore in the hostname. It may contain only the ASCII letters 'a' through 'z', the digits '0' through '9', and the minus sign.
- Name of the XSUAA instance defined previously
- Name of the Connectivity instance defined previously
- Name of the Destination instance defined previously
Here is the code of the manifest:
---

applications:


- name: connectivity-app-demo

  host: connectivity-app-demo-p193274639trial

  buildpack: java_buildpack

  memory: 512M

  instances: 1

  path: target/connectivity.war

  env:

        # Accept any OAuth client of any identity zone

        SAP_JWT_TRUST_ACL: '[{"clientid":"*","identityzone":"*"}]'

       # Useful on a dev environment

       SKIP_SSL_VALIDATION: false

       xsuaa_connectivity_instance_name: "xsuaa-demo"

       xsuaa_destination_instance_name: "xsuaa-demo"

      JAVA_OPTS: '-Xss349k'

      services:

      - xsuaa-demo

      - connectivity-lite

      - destination-lite
Note: by changing the name of the application, a change needs to be done in the file application.properties. You can find it here: /src/main/webapp/security/xs-security.json.
# parameters of the app

xs.appname=connectivity-app-demo
Before deploying the web application, let take time to see where the magic happens. The most important file is the connectivity servlet, which is responsible to propagate the user JWT token via headers.
// get value of  "onpremise_proxy_host" and "onpremise_proxy_port"

 ...


// set up the on-premise HTTP Proxy

URL url = new URL("http://virtualhost:1234");

Proxy proxy = new Proxy(Proxy.Type.HTTP, new InetSocketAddress(connProxyHost, connProxyPort));

urlConnection = (HttpURLConnection) url.openConnection(proxy);


// insert the necessary headers in the request

urlConnection.setRequestProperty("SAP-Connectivity-Authentication", "Bearer " + jwtToken1);

urlConnection.setRequestProperty("Proxy-Authorization", "Bearer " + jwtToken2);


// Optionally, if configured, add the SCC location ID

urlConnection.setRequestProperty("SAP-Connectivity-SCC-Location_ID", "New York");
For more details, you can can download the full code at the bottom of the page.
In order to deploy the web application, we go again to the "Applications" section in the SAP Cloud Platform cockpit. And again we click on "Deploy Application" and add the archive file and the manifest.
To verify that the manifest has taken care of the binding, we can check the "Service Bindings" section of the web application if the services have been added.
That's all! Now we can call the application in the browser. In order to get the URL, we go to the "applications" tab and click on the "approuter-demo". Here we can find the URL of the application router.
The route to the web application has been configured in the /approuter/xs-app.json file of the application router, so that we need to add "/app/" at the end of the URL.
{

        "welcomeFile": "index.html",

        "routes": [{

                "source": "/app",

                "target": "/",

                "destination": "dest-to-app"

                  }

        ]

}
Click on the link "Go to App" to called the URL: https://approuter-demo.cfapps.eu10.hana.ondemand.com/app/
Note: by calling this URL, the destination "dest-to-app" defined in the manifest of the appRouter" will be called. Here again a copy of the manifest.
---

...

    destinations: >

      [


           {"name":"dest-to-app", "url" :"https://connectivity-app-demo-p193274639trial.cfapps.eu10.hana.ondemand.com", "forwardAuthToken": true },

           {"name":"ui5", "url":"https://sapui5.hana.ondemand.com/1.42.6/resources/"}

      ]

 ...
By opening this URL in the browser, the user will be redirected to the XSUAA in order to login.
After the login, the XSUAA redirects the user to the web application, which called the odata services of the on-premise system via the Cloud Connector. Here is then the result.
You want to try it by your own or you want to see the code in details. No problem, you can download the code here. Some improvements need to be done for sure (for example the way to save the backend credentials 😉 So at least I hope it helps you to better understand how to use the the SAP Cloud Platform Connectivity in the Cloud Foundry environment.
In the next part of this blog serie, I will explain how to replace basic authentication with principal propagation.
Stay tuned and send me your feedback.
Matthieu
Here again the repository with the code.
For principal propagation related questions, please have a look at the 3rd part of the blog series.
*********** Updates ************
10.11.2017: Due to new buildpack, the manifest file of the web application has been updated.
27.11.2017: Extract the SAPUI5 Library of the webApp + Adding a destination for SAPUI5 in the manifest of AppRouter.
15.12.2017: Adding the steps for using the SAP Cloud Platform Destination Service.
09.01.2017: Small improvements in the blog for a better understanding, for example adding the p-user to the hostname in the manifest.
01.03.2018: Hint that you should not use any underscore in the hostname of the appRouter or the application.
09.08.2018: Added the link of the 3rd part of the blog series explaining how to use principal propagation.
**********************************
- SAP Managed Tags:
- SAP BTP, Cloud Foundry runtime and environment,
- SAP Connectivity service
Labels:
93 Comments
- « Previous
-
- 1
- 2
- Next »
You must be a registered user to add a comment. If you've already registered, sign in. Otherwise, register and sign in.
Labels in this area
-
ABAP CDS Views - CDC (Change Data Capture)
2 -
AI
1 -
Analyze Workload Data
1 -
BTP
1 -
Business and IT Integration
2 -
Business application stu
1 -
Business Technology Platform
1 -
Business Trends
1,661 -
Business Trends
88 -
CAP
1 -
cf
1 -
Cloud Foundry
1 -
Confluent
1 -
Customer COE Basics and Fundamentals
1 -
Customer COE Latest and Greatest
3 -
Customer Data Browser app
1 -
Data Analysis Tool
1 -
data migration
1 -
data transfer
1 -
Datasphere
2 -
Event Information
1,400 -
Event Information
64 -
Expert
1 -
Expert Insights
178 -
Expert Insights
281 -
General
1 -
Google cloud
1 -
Google Next'24
1 -
Kafka
1 -
Life at SAP
784 -
Life at SAP
11 -
Migrate your Data App
1 -
MTA
1 -
Network Performance Analysis
1 -
NodeJS
1 -
PDF
1 -
POC
1 -
Product Updates
4,577 -
Product Updates
330 -
Replication Flow
1 -
RisewithSAP
1 -
SAP BTP
1 -
SAP BTP Cloud Foundry
1 -
SAP Cloud ALM
1 -
SAP Cloud Application Programming Model
1 -
SAP Datasphere
2 -
SAP S4HANA Cloud
1 -
SAP S4HANA Migration Cockpit
1 -
Technology Updates
6,886 -
Technology Updates
408 -
Workload Fluctuations
1
Related Content
- Consuming SAP with SAP Build Apps - Connectivity options for low-code development - part 2 in Technology Blogs by SAP
- explore the business continuity recovery sap solutions on AWS DRS in Technology Blogs by Members
- Consuming CAPM Application's OData service into SAP Fiori Application in Business Application Studio in Technology Blogs by Members
- Access Request Completion on Wrong System in Technology Q&A
- CAP LLM Plugin – Empowering Developers for rapid Gen AI-CAP App Development in Technology Blogs by SAP
Top kudoed authors
| User | Count |
|---|---|
| 13 | |
| 10 | |
| 10 | |
| 8 | |
| 7 | |
| 6 | |
| 5 | |
| 5 | |
| 5 | |
| 4 |