
- SAP Community
- Products and Technology
- Technology
- Technology Blogs by SAP
- Part 1: How to use SAP Cloud Platform Connectivity...
Technology Blogs by SAP
Learn how to extend and personalize SAP applications. Follow the SAP technology blog for insights into SAP BTP, ABAP, SAP Analytics Cloud, SAP HANA, and more.
Turn on suggestions
Auto-suggest helps you quickly narrow down your search results by suggesting possible matches as you type.
Showing results for
Advisor
Options
- Subscribe to RSS Feed
- Mark as New
- Mark as Read
- Bookmark
- Subscribe
- Printer Friendly Page
- Report Inappropriate Content
07-09-2017
1:39 PM
*********** Updates ************
Last update on 11.12.2017
See details at the end of the blog
**********************************
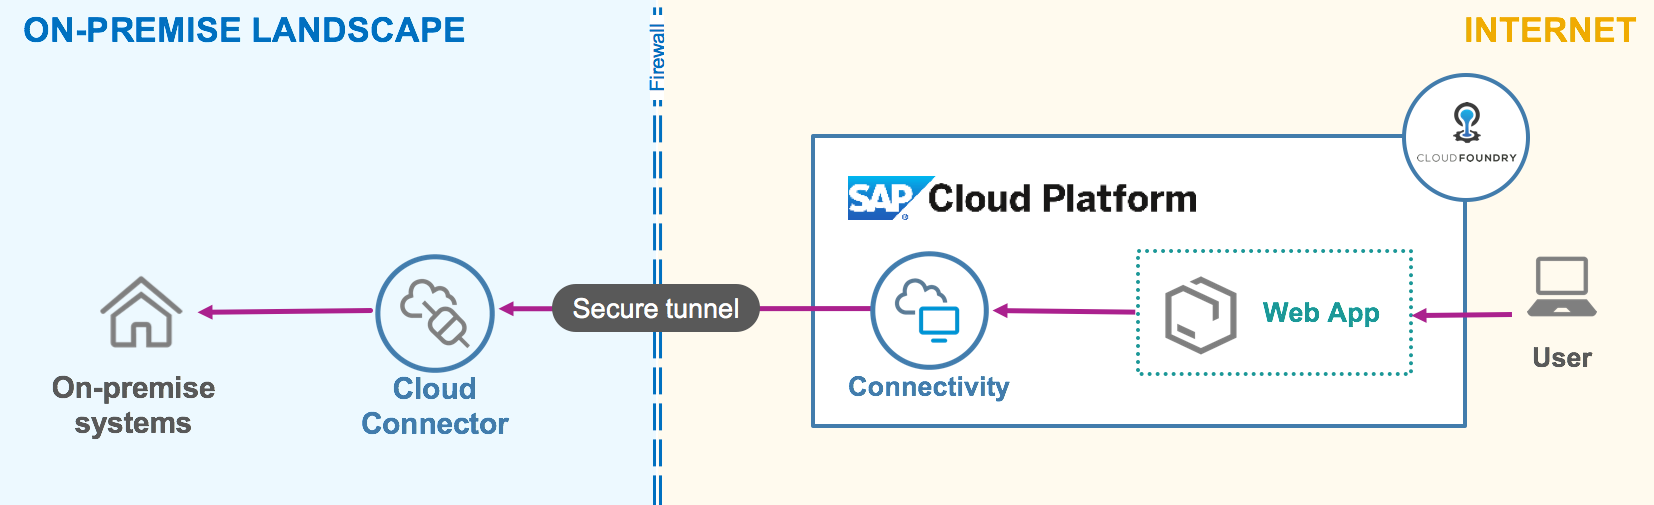
As mentioned in my last blog about the release 2.10. of the Cloud Connector, I would like to take more time to explain in details how to configure the SAP Cloud Platform Connectivity and the Cloud Connector so that you can consume data coming from an on-premise system in a Cloud Foundry based application.
As I want to focus more on the connectivity part, I will keep the application very simple. So the Fiori-based web application will just show a table with products and prices coming from an on-premise backend service. Here a visual overview of what I want to achieve:
This blog will be structured as follow:
Part 1: Initial setup of SAP Cloud Platform Account and Cloud Connector.
Part 2: Configuration of SAP Cloud Platform Connectivity and deployment of the web application.
Part 3: Update of the configuration to enable principal propagation instead of basic authentication.
To demonstrate it, I will use the following setup:
Before configuring anything, we need a SAP Cloud Platform Trial subaccount for the Cloud Foundry environment.
Note: If you created already a Cloud Foundry Trial account in the past, please verify that the global account is not a standalone (account created before Mai 2017) as we have at the moment a small bug with standalone accounts. We are working on it and I will update the blog as soon as this is perfectly working. In the meantime, I would suggest you to create a new Trial Account if you want to test it now.

So let's go to https://account.hanatrial.ondemand.com/ and register for a trial account.
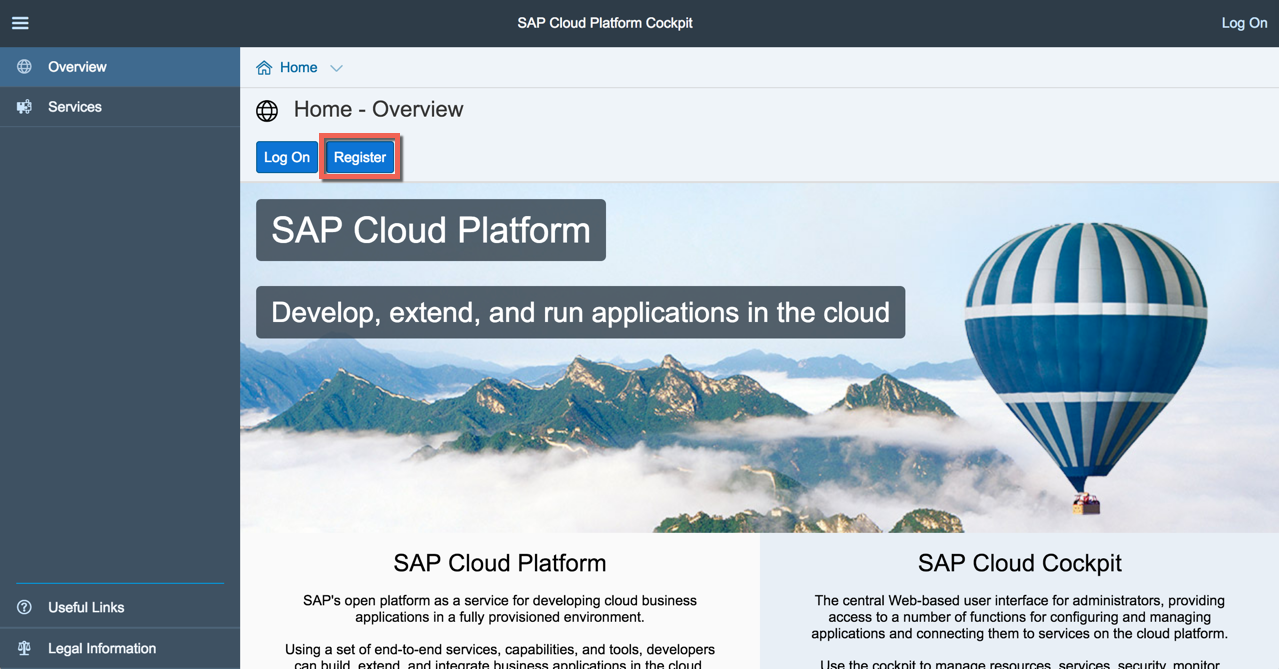
After the registration a P-user has been created for me: P1942746397. Now I can login and start the Cloud Foundry Trial by clicking in the breadcrumb on "Home" and then on the button "Start Cloud Foundry Trial.

Select your region and initialize your trial subaccount. An organization and a space will be also automatically created.

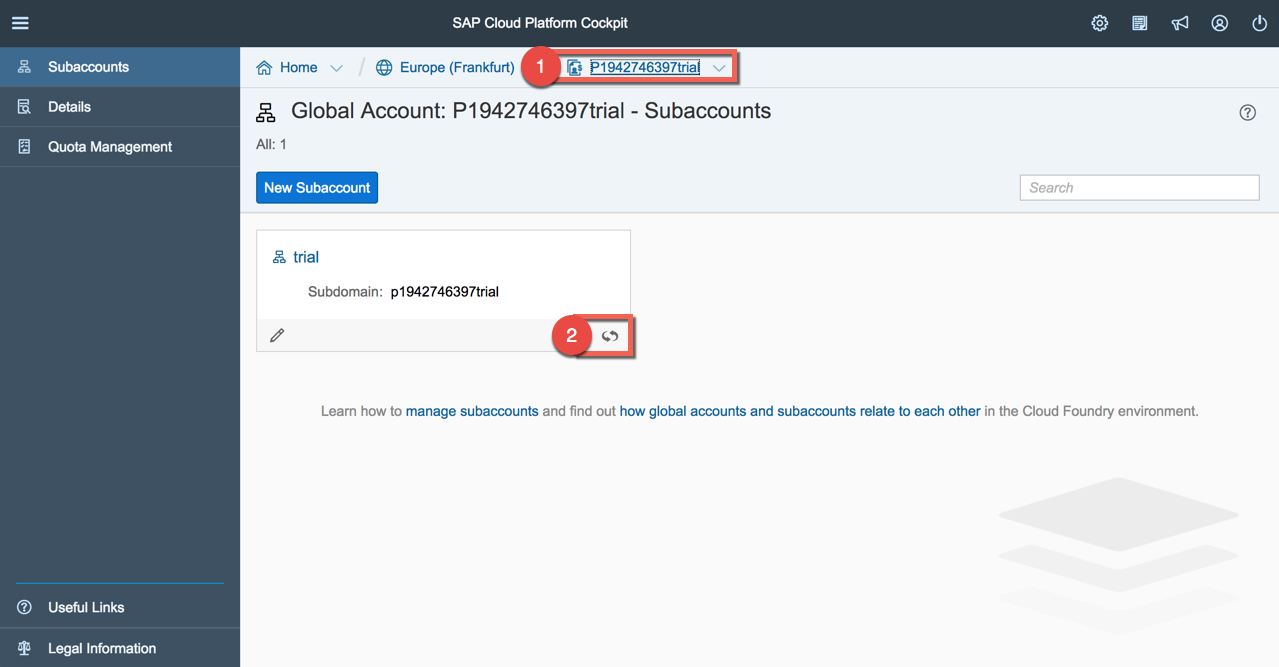
In order to establish later on the trust between the SAP Cloud Platform Trial subaccount and the Cloud Connector, we will need the ID of the subaccount. You can find it by clicking on the global account in the breadcrumb and then on the "show more" icon of the subaccount tile.

Now let's go to the Cloud Connector and configure it. You can use the same Cloud Connector for the NEO and the Cloud Foundry environments. So if you have already one installed, just make sure that you have at least the version 2.10.0.1 and you are good to go. You can verify the version in the top right corner under Administrator / About.

More information about upgrade can be found here.
If you prefer to test with another Cloud Connector or if you don't have one in place, you can download it from here and install it as described in the official documentation. Once it's done, go the the admin UI of the Cloud Connector (https://localhost:8443/), change your password and add your new created Cloud Foundry Trial. Click in the button "Add Subaccount" and insert the details as described below.

Let me emphasize 3 small Cloud Foundry specifications compared to the usual configuration:
Note 1: the configuration for the SAP internal landscape is slightly different. Please drop me an email to get the details.
Note 2: The first time you will map a subaccount to your Cloud Connector, you can see on the right side the settings for the proxy. Don't forget to add your proxy host and your proxy port if you are behind the proxy. If you forget it, you can configure it later on by going to Configuration > CLOUD > HTTPS Proxy.
Note 3: I didn't add any location ID. This is an optional field as I'm connecting only this Cloud Connector to this account. Be aware that the location ID is mandatory as soon as you are using multiple Cloud Connectors. See this blog for more information about it.
Once you clicked on "save", you should see your Subaccount listed to the "Subaccount Dashboard". Navigate to the detail page to verify that the connection has been activated.

If every works fine, you should see on the top the following notification in green:

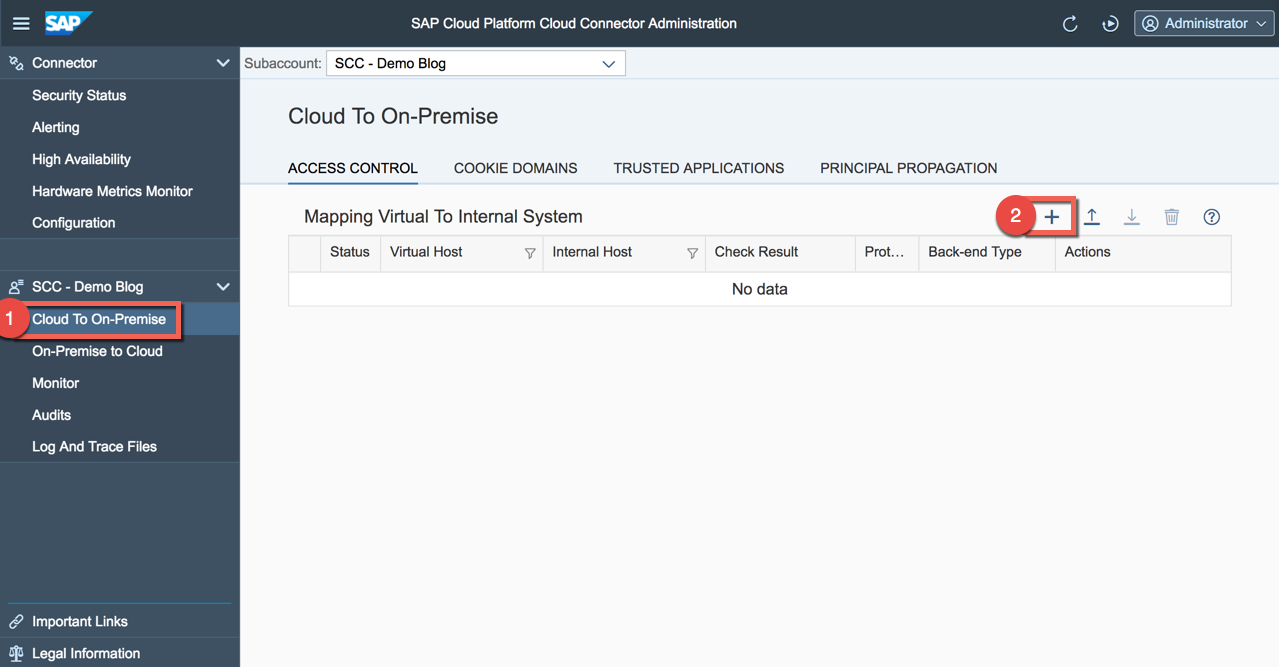
The notification mentions that "no active resources available". Let's do it and add our odata service of the on-premise backend system (Fiori Reference applications). Click on the tab "Cloud To On-Premise and create an "Access Control" by clicking on the "Add" icon.
Check the official documentation for more details on access control.
Here is my configuration for example:

Important for us are the Virtual Host and the Virtual Port which will be needed later on in the SAP Cloud Platform.
I have also added the needed resources to consume the odata service. Here an overview about the final configuration of the access control:

That's all! Now we have everything in place to continue in the cloud. In the following part of the blog, I will explain how to setup the SAP Cloud Platform Connectivity and consume the data provided by the Cloud Connector in the Fiori application.
I will publish the second part of the blog very soon. In meantime, just try to create your Cloud Foundry Trial Account, upgrade/install your Cloud Connector and connect both together.
*********** Updates ************
09.01.2017: Small improvements in the blog for a better understanding.
09.08.2018: Added the link of the 3rd part of the blog series explaining how to use principal propagation.
11.12.2018: Security Administrators (without being a Global Account Member) can now establish the connection between the Cloud Connector and the SAP Cloud Platform. See Prerequisites section here.
**********************************
Feedbacks are of course welcome!
Matthieu
Last update on 11.12.2017
See details at the end of the blog
**********************************
As mentioned in my last blog about the release 2.10. of the Cloud Connector, I would like to take more time to explain in details how to configure the SAP Cloud Platform Connectivity and the Cloud Connector so that you can consume data coming from an on-premise system in a Cloud Foundry based application.
As I want to focus more on the connectivity part, I will keep the application very simple. So the Fiori-based web application will just show a table with products and prices coming from an on-premise backend service. Here a visual overview of what I want to achieve:
This blog will be structured as follow:
Part 1: Initial setup of SAP Cloud Platform Account and Cloud Connector.
Part 2: Configuration of SAP Cloud Platform Connectivity and deployment of the web application.
Part 3: Update of the configuration to enable principal propagation instead of basic authentication.
To demonstrate it, I will use the following setup:
- SAP Backend system with Fiori Reference applications installed. Odata services have been prepared and configured so that I can add them as resource in the Cloud Connector.
- Cloud Connector v.2.10.0.1. - portable version (of course, it could be a productive version).
- SAP Cloud Platform Trial account (Cloud Foundry environment).
Initial setup of SAP Cloud Platform subaccount
Before configuring anything, we need a SAP Cloud Platform Trial subaccount for the Cloud Foundry environment.
Note: If you created already a Cloud Foundry Trial account in the past, please verify that the global account is not a standalone (account created before Mai 2017) as we have at the moment a small bug with standalone accounts. We are working on it and I will update the blog as soon as this is perfectly working. In the meantime, I would suggest you to create a new Trial Account if you want to test it now.
So let's go to https://account.hanatrial.ondemand.com/ and register for a trial account.
After the registration a P-user has been created for me: P1942746397. Now I can login and start the Cloud Foundry Trial by clicking in the breadcrumb on "Home" and then on the button "Start Cloud Foundry Trial.
Select your region and initialize your trial subaccount. An organization and a space will be also automatically created.
In order to establish later on the trust between the SAP Cloud Platform Trial subaccount and the Cloud Connector, we will need the ID of the subaccount. You can find it by clicking on the global account in the breadcrumb and then on the "show more" icon of the subaccount tile.
Initial setup of Cloud Connector
Now let's go to the Cloud Connector and configure it. You can use the same Cloud Connector for the NEO and the Cloud Foundry environments. So if you have already one installed, just make sure that you have at least the version 2.10.0.1 and you are good to go. You can verify the version in the top right corner under Administrator / About.
More information about upgrade can be found here.
If you prefer to test with another Cloud Connector or if you don't have one in place, you can download it from here and install it as described in the official documentation. Once it's done, go the the admin UI of the Cloud Connector (https://localhost:8443/), change your password and add your new created Cloud Foundry Trial. Click in the button "Add Subaccount" and insert the details as described below.
Let me emphasize 3 small Cloud Foundry specifications compared to the usual configuration:
- The region is not "hanatrial.ondemand.com" like expected but it should be "cf.eu10.hana.ondemand.com" or "cf.us10.hana.ondemand.com" based on the region you have selected during the creation of your Trial account.
- By selecting Cloud Foundry region host, the label "Subaccount User" would automatically change to "Login E-Mail". Please use here your email address instead of your P-user.
- Please be aware that the user that establishes the trust between the Cloud Connector and the SAP Cloud Platform must be a Global Account member (See Add Global Account Members) or a Security Administrator (See Security Administrators in Your Subaccount). In the trial account, you're per default member of the Global Account, so you don't need to change anything.
Note 1: the configuration for the SAP internal landscape is slightly different. Please drop me an email to get the details.
Note 2: The first time you will map a subaccount to your Cloud Connector, you can see on the right side the settings for the proxy. Don't forget to add your proxy host and your proxy port if you are behind the proxy. If you forget it, you can configure it later on by going to Configuration > CLOUD > HTTPS Proxy.
Note 3: I didn't add any location ID. This is an optional field as I'm connecting only this Cloud Connector to this account. Be aware that the location ID is mandatory as soon as you are using multiple Cloud Connectors. See this blog for more information about it.
Once you clicked on "save", you should see your Subaccount listed to the "Subaccount Dashboard". Navigate to the detail page to verify that the connection has been activated.
If every works fine, you should see on the top the following notification in green:
The notification mentions that "no active resources available". Let's do it and add our odata service of the on-premise backend system (Fiori Reference applications). Click on the tab "Cloud To On-Premise and create an "Access Control" by clicking on the "Add" icon.
Check the official documentation for more details on access control.
Here is my configuration for example:
Important for us are the Virtual Host and the Virtual Port which will be needed later on in the SAP Cloud Platform.
I have also added the needed resources to consume the odata service. Here an overview about the final configuration of the access control:
That's all! Now we have everything in place to continue in the cloud. In the following part of the blog, I will explain how to setup the SAP Cloud Platform Connectivity and consume the data provided by the Cloud Connector in the Fiori application.
I will publish the second part of the blog very soon. In meantime, just try to create your Cloud Foundry Trial Account, upgrade/install your Cloud Connector and connect both together.
*********** Updates ************
09.01.2017: Small improvements in the blog for a better understanding.
09.08.2018: Added the link of the 3rd part of the blog series explaining how to use principal propagation.
11.12.2018: Security Administrators (without being a Global Account Member) can now establish the connection between the Cloud Connector and the SAP Cloud Platform. See Prerequisites section here.
**********************************
Feedbacks are of course welcome!
Matthieu
56 Comments
- « Previous
-
- 1
- 2
- Next »
You must be a registered user to add a comment. If you've already registered, sign in. Otherwise, register and sign in.
Labels in this area
-
ABAP CDS Views - CDC (Change Data Capture)
2 -
AI
1 -
Analyze Workload Data
1 -
BTP
1 -
Business and IT Integration
2 -
Business application stu
1 -
Business Technology Platform
1 -
Business Trends
1,661 -
Business Trends
87 -
CAP
1 -
cf
1 -
Cloud Foundry
1 -
Confluent
1 -
Customer COE Basics and Fundamentals
1 -
Customer COE Latest and Greatest
3 -
Customer Data Browser app
1 -
Data Analysis Tool
1 -
data migration
1 -
data transfer
1 -
Datasphere
2 -
Event Information
1,400 -
Event Information
64 -
Expert
1 -
Expert Insights
178 -
Expert Insights
273 -
General
1 -
Google cloud
1 -
Google Next'24
1 -
Kafka
1 -
Life at SAP
784 -
Life at SAP
11 -
Migrate your Data App
1 -
MTA
1 -
Network Performance Analysis
1 -
NodeJS
1 -
PDF
1 -
POC
1 -
Product Updates
4,577 -
Product Updates
324 -
Replication Flow
1 -
RisewithSAP
1 -
SAP BTP
1 -
SAP BTP Cloud Foundry
1 -
SAP Cloud ALM
1 -
SAP Cloud Application Programming Model
1 -
SAP Datasphere
2 -
SAP S4HANA Cloud
1 -
SAP S4HANA Migration Cockpit
1 -
Technology Updates
6,886 -
Technology Updates
402 -
Workload Fluctuations
1
Related Content
- Consuming SAP with SAP Build Apps - Connectivity options for low-code development - part 2 in Technology Blogs by SAP
- explore the business continuity recovery sap solutions on AWS DRS in Technology Blogs by Members
- Consuming CAPM Application's OData service into SAP Fiori Application in Business Application Studio in Technology Blogs by Members
- Access Request Completion on Wrong System in Technology Q&A
- CAP LLM Plugin – Empowering Developers for rapid Gen AI-CAP App Development in Technology Blogs by SAP
Top kudoed authors
| User | Count |
|---|---|
| 12 | |
| 9 | |
| 7 | |
| 7 | |
| 7 | |
| 6 | |
| 6 | |
| 6 | |
| 6 | |
| 4 |