
- SAP Community
- Products and Technology
- Technology
- Technology Blogs by SAP
- How to Install SAP Identity Management 8.0 with So...
Technology Blogs by SAP
Learn how to extend and personalize SAP applications. Follow the SAP technology blog for insights into SAP BTP, ABAP, SAP Analytics Cloud, SAP HANA, and more.
Turn on suggestions
Auto-suggest helps you quickly narrow down your search results by suggesting possible matches as you type.
Showing results for
Product and Topic Expert
Options
- Subscribe to RSS Feed
- Mark as New
- Mark as Read
- Bookmark
- Subscribe
- Printer Friendly Page
- Report Inappropriate Content
07-05-2017
9:26 AM
You want to get rid of the error-prone manual installation and update steps – processes that can take up days.
You want to use a tool that automates your SAP Identity Management 8.0 installation and update.
You want to use modern-looking UIs that guide you through the installation and update for less than an hour.
Well, this is a reality now. As of version 8.0 SP04 and higher, you can install SAP Identity Management (IdM) using the Software Provisioning Manager 1.0 installation tool. Once you install your IdM system, you can use the same tool to update it to a higher SP level or to apply patches.
If you want to try it, this blog post is the right place to start with.
We will focus on the installation option only. You will learn how to install your IdM system as a standard system (with all instances on one host) on Windows. For more information about a distributed system installation over several hosts, see: How to Install SAP Identity Management 8.0 as a Distributed System with Software Provisioning Manage...
Before you start, you need to have the following prerequisites fulfilled:
We recommend that you always download the latest patch level of SAP Identity Management components from the SAP Software Download Center as an alternative to downloading the complete installation media. Note that, if you choose to download the complete SAP Identity Management media, the media is delivered with each support package stack of SAP Identity Management 8.0 release. As result of this, you always download patch 00 of the respective SP.
Next Steps:
You want to use a tool that automates your SAP Identity Management 8.0 installation and update.
You want to use modern-looking UIs that guide you through the installation and update for less than an hour.
Well, this is a reality now. As of version 8.0 SP04 and higher, you can install SAP Identity Management (IdM) using the Software Provisioning Manager 1.0 installation tool. Once you install your IdM system, you can use the same tool to update it to a higher SP level or to apply patches.
If you want to try it, this blog post is the right place to start with.
We will focus on the installation option only. You will learn how to install your IdM system as a standard system (with all instances on one host) on Windows. For more information about a distributed system installation over several hosts, see: How to Install SAP Identity Management 8.0 as a Distributed System with Software Provisioning Manage...
Before you start, you need to have the following prerequisites fulfilled:
- The database server is installed, in this case, Microsoft SQL Server 2012
- The JDBC driver is downloaded, in this case, sqljdbc4.
- A supported SAP NetWeaver version is installed, in this case, SAP NetWeaver 7.40 SP02
- The prerequisites for the IdM components deployed on SAP NetWeaver AS Java are fulfilled. That is, IdM User Interface for HTML5 requires SAPUI5 library, etc. See: Prerequisites and Dependencies Between Deployable Components.
- The SAPCAR archiving tool is available on the installation host. You can download the latest version of SAPCAR from: https://launchpad.support.sap.com/#/softwarecenter -> SUPPORT PACKAGES & PATCHES -> By Alphabetical Index (A-Z) -> S -> SAPCAR
- The Software Provisioning Manager Archive is downloaded and unpacked to a local directory using the following command: <Path to SAPCAR>\sapcar.exe -xvf <Path to Download Directory>\SWPM10SP<Support_Package_Number>_<Version_Number>.SAR <Path to Unpack Directory> See: Downloading and Extracting the Software Provisioning Manager Archive
- The latest patch level of SAP Identity Management installation archives and the specifically required installation archives are downloaded. See: Downloading Specific Installation Archives (Archive-Based Installation).
We recommend that you always download the latest patch level of SAP Identity Management components from the SAP Software Download Center as an alternative to downloading the complete installation media. Note that, if you choose to download the complete SAP Identity Management media, the media is delivered with each support package stack of SAP Identity Management 8.0 release. As result of this, you always download patch 00 of the respective SP.
- Log on to the installation host using an account with the required user authorization to run the Software Provisioning Manager. See: Required User Authorization for Running Software Provisioning Manager on Windows
- Start the Software Provisioning Manager by executing sapinst.exe from the directory to which you unpacked the file SWPM10SP<Support_Package_Number>_<Version_Number>.SAR. By default, the SL Common GUI uses the default browser defined for the host where you run the installer. We recommend using Google Chrome.
- Choose SAP Identity Management 8.0 -> Installation -> Standard System -> SAP Identity Management Standard System and then choose Next.

- To run the installation in a typical mode, choose Typical and then choose Next.

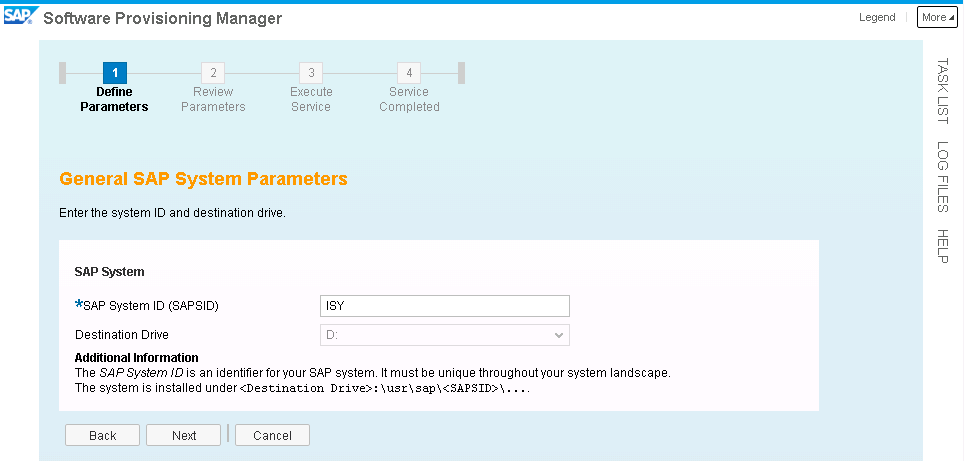
- Enter SAP System ID and then choose Next.
- Enter the master password, confirm it and then choose Next.

- In the Package Path field, browse for the path to the following installation archives (SAPEXE<Version>.SAR, SAPHOSTAGENT<Version>.SAR and SAPJVM8_<Version>.SAR). Every time you provide a path to an installation archive, you need to choose Next to make the archive available. Once the thee installation archives are available, choose Next.

- In the Database Type field, select the database type for your IdM installation and choose Next.

- Enter the database host and port of the server where the IdM database is to run and choose Next.

- Enter the credentials for the IdM database and choose Next.

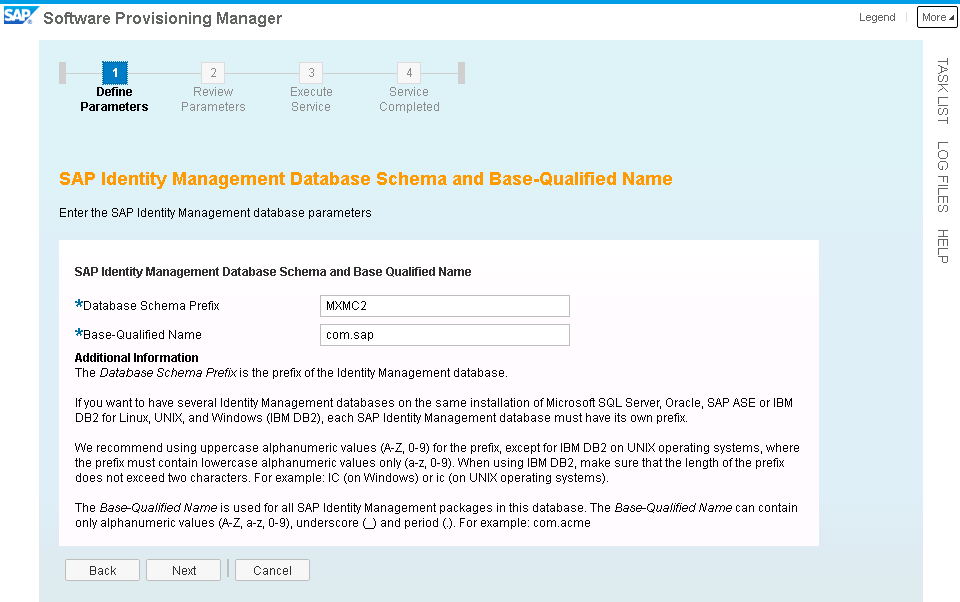
- Enter the prefix of the IdM database and the base-qualified name that is used for IdM packages in this database. Choose Next.
- Enter the passwords for the IdM database users. By default, the master password (in step 6) that is used for all the created users, is populated for the database users. If you want, you can provide different passwords for the different database users. In addition, enter the name of the developer administrator user. Note that this user must either exist in the UME or be added to the UME before you can log on to the Identity Management Developer Studio. Choose Next.

- Enter the IdM instance number and choose Next. This instance number is assigned to the SAP Identity Management Dispatcher instance. If you do not enter a specific value, the instance number is set automatically to the next free and valid instance number that has not yet been assigned to the SAP system to be installed or to SAP systems that already exist on the installation host.

- Browse for the JDBC driver path and enter the JDBC driver class name. Choose Next.

- Enter the SAP SID of the SAP NetWeaver Java system to be used for IdM components that you want to install. Choose Next.

- Enter your SAP NetWeaver release version and Support Package. Choose Next.

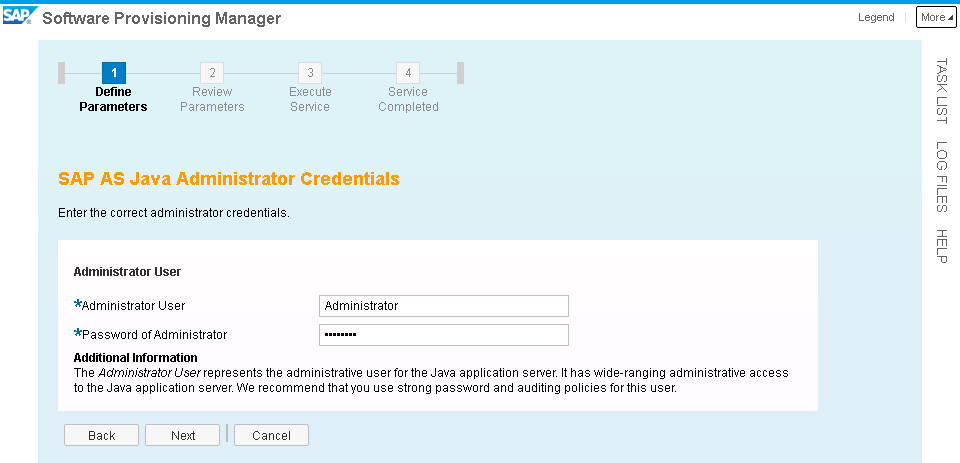
- Enter the credentials of the administrator of the AS Java.
- Select the additional IdM components that you want to install or deploy. Choose Next.

- If you want to install VDS, select this option and choose Next.

- Enter the IdM instance number and choose Next. This instance number is assigned to the Virtual Directory Server instance. If you do not enter a specific value, the instance number is set automatically to the next free and valid instance number.

- In the Package Path field, browse for the path to the IdM installation archives. You can either specify the path to each archive separately, or provide the path to a download basket with all downloaded archives. Choose Next.

- In the “Parameter Summary” dialog, you can select a parameter that you want to change and then choose Revise or choose Next to start the installation.
- The installation of your SAP Identity Management standard system completed successfully.

Next Steps:
- Install SAP Identity Management developer studio. See: Installing the Identity Management Developer Studio
- Proceed with the initial configuration of all installed IdM components. See Post-Installation Checklist and all referenced information.
- SAP Managed Tags:
- SAP Identity Management,
- software logistics toolset
22 Comments
You must be a registered user to add a comment. If you've already registered, sign in. Otherwise, register and sign in.
Labels in this area
-
ABAP CDS Views - CDC (Change Data Capture)
2 -
AI
1 -
Analyze Workload Data
1 -
BTP
1 -
Business and IT Integration
2 -
Business application stu
1 -
Business Technology Platform
1 -
Business Trends
1,661 -
Business Trends
87 -
CAP
1 -
cf
1 -
Cloud Foundry
1 -
Confluent
1 -
Customer COE Basics and Fundamentals
1 -
Customer COE Latest and Greatest
3 -
Customer Data Browser app
1 -
Data Analysis Tool
1 -
data migration
1 -
data transfer
1 -
Datasphere
2 -
Event Information
1,400 -
Event Information
64 -
Expert
1 -
Expert Insights
178 -
Expert Insights
273 -
General
1 -
Google cloud
1 -
Google Next'24
1 -
Kafka
1 -
Life at SAP
784 -
Life at SAP
11 -
Migrate your Data App
1 -
MTA
1 -
Network Performance Analysis
1 -
NodeJS
1 -
PDF
1 -
POC
1 -
Product Updates
4,577 -
Product Updates
325 -
Replication Flow
1 -
RisewithSAP
1 -
SAP BTP
1 -
SAP BTP Cloud Foundry
1 -
SAP Cloud ALM
1 -
SAP Cloud Application Programming Model
1 -
SAP Datasphere
2 -
SAP S4HANA Cloud
1 -
SAP S4HANA Migration Cockpit
1 -
Technology Updates
6,886 -
Technology Updates
403 -
Workload Fluctuations
1
Related Content
- Empowering Retail Business with a Seamless Data Migration to SAP S/4HANA in Technology Blogs by Members
- 10+ ways to reshape your SAP landscape with SAP Business Technology Platform - Blog 7 in Technology Blogs by SAP
- Top Picks: Innovations Highlights from SAP Business Technology Platform (Q1/2024) in Technology Blogs by SAP
- SAP Enable Now setup in Technology Blogs by Members
- It has never been easier to print from SAP with Microsoft Universal Print in Technology Blogs by Members
Top kudoed authors
| User | Count |
|---|---|
| 12 | |
| 10 | |
| 9 | |
| 7 | |
| 7 | |
| 7 | |
| 6 | |
| 6 | |
| 5 | |
| 4 |