
- SAP Community
- Products and Technology
- Technology
- Technology Blogs by SAP
- 3 Ways to Add an SAP Screen Personas Flavor to the...
Technology Blogs by SAP
Learn how to extend and personalize SAP applications. Follow the SAP technology blog for insights into SAP BTP, ABAP, SAP Analytics Cloud, SAP HANA, and more.
Turn on suggestions
Auto-suggest helps you quickly narrow down your search results by suggesting possible matches as you type.
Showing results for
Employee
Options
- Subscribe to RSS Feed
- Mark as New
- Mark as Read
- Bookmark
- Subscribe
- Printer Friendly Page
- Report Inappropriate Content
07-05-2017
7:38 AM
Why do it?
For an organization that already uses the SAP Fiori Launchpad on the SAP Cloud Platform Portal in order to have a single entry point for SAP Fiori apps and for portal content, being able to launch an SAP Screen Personas flavor from this same launchpad allows the user retain that sole entry point.
Which option is best?
The answer to this will depend on the landscape of the organization. In brief:
For an organization that has the backend system (in which the flavor exists) connected to the SAP Cloud Platform (via the SAP Cloud Connector), then option 1 may be best. One benefit of this option is that the flavor opens in the same window as the launchpad and retains the launchpad toolbar/header.
However, for an organization that has not yet connected the backend system to the SAP Cloud Platform, then option 2 may be best. This option is great because it doesn't require the backend system to be connected to the SAP Cloud Platform because the tile directly launches the URL to the flavor. One drawback, however, is that flavor open in new window.
Similar to option2, option 3 directly launches the flavor URL and doesn't that the backend system be connected to the SAP Cloud Platform. However, this option enables the flavor to launch inside of the same window, with one line of code.
By the way, it's possible to launch a flavor from outside of the SAP Fiori Launchpad, but still within the SAP Cloud Platform Portal. See the article Integrating SAP Screen Personas into the SAP Cloud Platform Portal.
How to do it?
Go to Option 1 or Option 2 or Option 3.
Option 1: Connected backend system
- In the "Content Management" tab, under the "Apps" section, click the "New" button.

- In the "Properties" tab, enter the information as below:
General
App Title
A title for the app. This will also be the title on the tile itself.
App Subtitle
Optional.
Intent Navigation
Semantic Object
E.g., "createSaleOrder".
Action
E.g., "Display".
App Resource Details
App Type
SAP GUI.
Transaction Code
T-code for the flavor.
System Alias
The alias that was set for the backend system.
Attributes
Keywords
Keywords to easily find the app in the app catalog.
Screen Personas
The flavor ID. E.g.,


- Switch to the "Catalogs" tab and then click the "Assign more catalogs" button.

- Select the catalog(s) to which the tile is to be added and the click the "Ok" button.

- Switch to the "Groups" tab.

- Click the "Assign more groups" button.

- Select the group to which the tile is to be added and then click the "Ok" button.

- Switch to the "Visualization" tab.

- Enter the information as below and then click the "Save" button:
Tile Properties
Tile Type
Static App Launcher
Title
Copied over from the "Properties" tab.
Subtitle
Copied over from the "Properties" tab.
Icon
Select an icon that is relevant to the transaction.
Supported Devices
(devices)
Select "Desktop" and deselect "Tablet" and "Smartphone"

- That's it! You can view the tile by preview the SAP Fiori Launchpad or by publishing and then opening the launchpad.

Option 2: No connected backend system
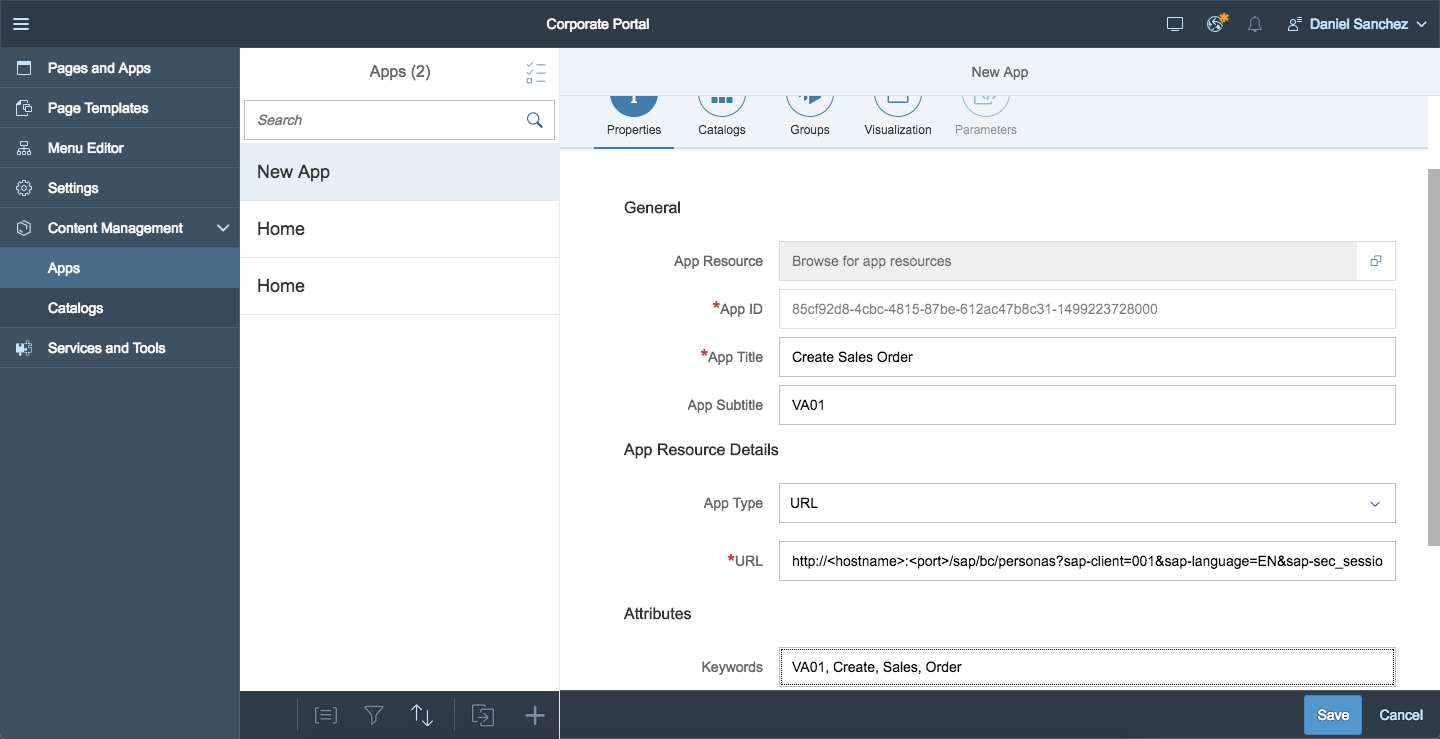
- In the "Content Management" tab, under the "Apps" section, click the "New" button.
- In the "Properties" tab, enter the information as below:
General
App Title
A title for the app. This will also be the title on the tile itself.
App Subtitle
E.g., the t-code. Optional.
App Resource Details
App Type
URL
URL
The URL to the flavor.
Attributes
Keywords
Keywords to easily find the app in the app catalog.
- Switch to the "Catalogs" tab and then click the "Assign more catalogs" button.
- Select the catalog(s) to which the tile is to be added and the click the "Ok" button.
- Switch to the "Groups" tab.
- Click the "Assign more groups" button.
- Select the group to which the tile is to be added and then click the "Ok" button.
- Switch to the "Visualization" tab.
- Enter the information as below and then click the "Save" button:
Tile Properties
Tile Type
Static App Launcher
Title
Copied over from the "Properties" tab.
Subtitle
Copied over from the "Properties" tab.
Icon
Select an icon that is relevant to the transaction.
Supported Devices
(devices)
Select "Desktop" and deselect "Tablet" and "Smartphone"
- That's it! You can view the tile by preview the SAP Fiori Launchpad or by publishing and then opening the launchpad.
Option 3 - No connected backend system, but opens in same window.
- In the "Pages and Apps" tab, click the "Add new page or app" button.

- Click the "Page" button.

- Enter a name for the page; select the "Header Only" template; and then click the "Next" button.

- Assign a catalog and then click the "Finish" button.

- Click the "Add widgets" button.
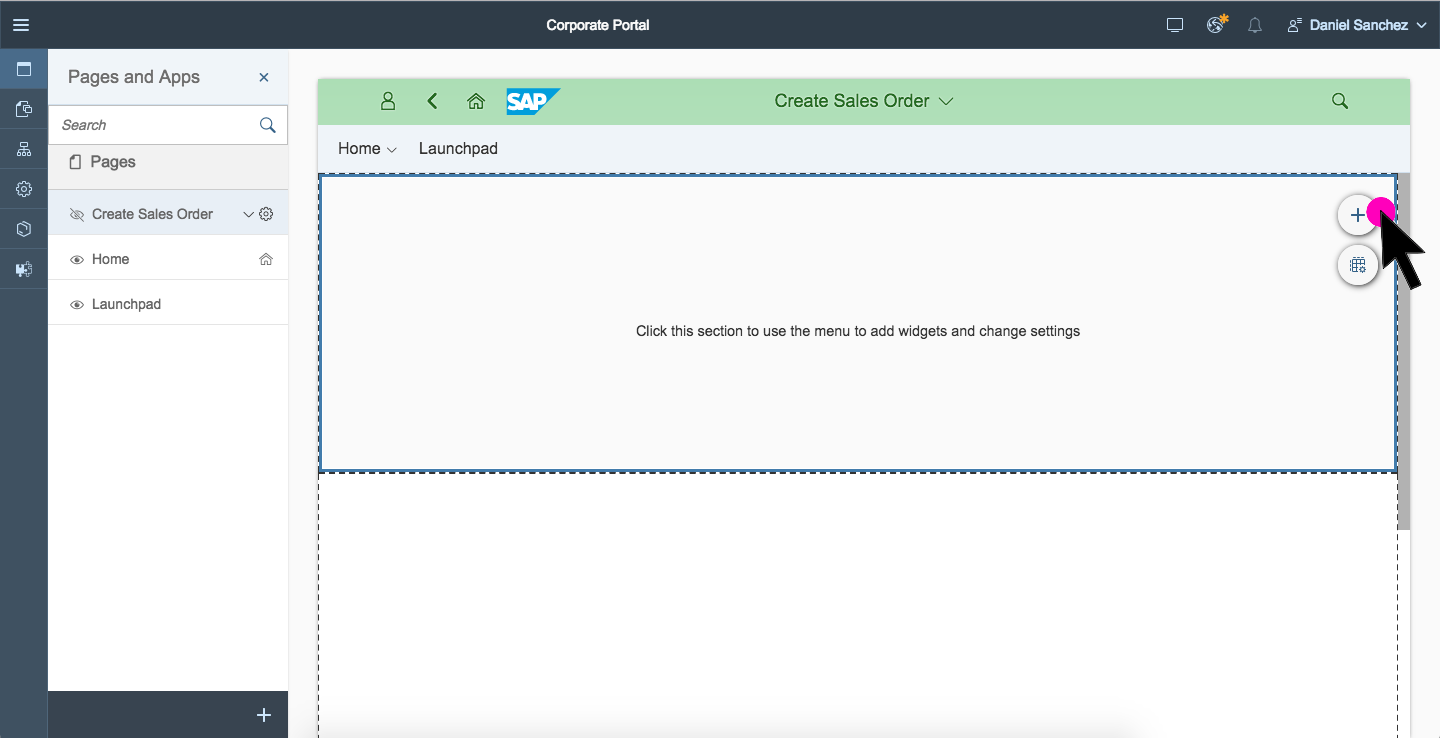
- Scroll down to the section "Standard Widgets: Advanced" and then click the widget "HTML Widget".

- Click on the widget.

- Click the settings button.

- Select "HTML Code" as the HTML source.

- Insert the code below. For "src", enter the URL of the flavor. Also, for "height", set this so that iframe is tall enough for the flavor. Lastly, click the "Save" button.
<iframe src="<flavorURL>" style="width: 100%; height:600px;"></iframe>

- Select on the page for the launchpad into which the tile will be added.

- Select the group into which the tile will be added.

- Select the "Apps" tab.

- Click the "Edit" button.

- Click the "Assign more apps to group" button.

- Select the page that was created above and then click the "OK" button.

- Click the "Save" button.
- In the "Content Management" tab, select the app that was added above and then click the "Edit" button.

- Select the "Visualization" tile.

- Enter the information as below and then click the "Save" button:
Tile Properties
Tile Type
Static App Launcher
Title
Copied over from the "Properties" tab.
Subtitle
Copied over from the "Properties" tab.
Icon
Select an icon that is relevant to the transaction.
Supported Devices
(devices)
Select "Desktop" and deselect "Tablet" and "Smartphone"

- That's it! You can view the tile by preview the SAP Fiori Launchpad or by publishing and then opening the launchpad.
About the Author
daniel.sanchez4 is a UX strategy and technologies consultant in SAP's Digital Business Services organization. His focus is all things user experience; everything from leading Design Thinking workshops and UX design efforts to technical implementation. See more articles.
- SAP Managed Tags:
- SAP Cloud Portal service,
- SAP Screen Personas,
- SAP Fiori Launchpad,
- SAP Business Technology Platform
4 Comments
You must be a registered user to add a comment. If you've already registered, sign in. Otherwise, register and sign in.
Labels in this area
-
ABAP CDS Views - CDC (Change Data Capture)
2 -
AI
1 -
Analyze Workload Data
1 -
BTP
1 -
Business and IT Integration
2 -
Business application stu
1 -
Business Technology Platform
1 -
Business Trends
1,658 -
Business Trends
91 -
CAP
1 -
cf
1 -
Cloud Foundry
1 -
Confluent
1 -
Customer COE Basics and Fundamentals
1 -
Customer COE Latest and Greatest
3 -
Customer Data Browser app
1 -
Data Analysis Tool
1 -
data migration
1 -
data transfer
1 -
Datasphere
2 -
Event Information
1,400 -
Event Information
66 -
Expert
1 -
Expert Insights
177 -
Expert Insights
293 -
General
1 -
Google cloud
1 -
Google Next'24
1 -
Kafka
1 -
Life at SAP
780 -
Life at SAP
13 -
Migrate your Data App
1 -
MTA
1 -
Network Performance Analysis
1 -
NodeJS
1 -
PDF
1 -
POC
1 -
Product Updates
4,577 -
Product Updates
340 -
Replication Flow
1 -
RisewithSAP
1 -
SAP BTP
1 -
SAP BTP Cloud Foundry
1 -
SAP Cloud ALM
1 -
SAP Cloud Application Programming Model
1 -
SAP Datasphere
2 -
SAP S4HANA Cloud
1 -
SAP S4HANA Migration Cockpit
1 -
Technology Updates
6,873 -
Technology Updates
419 -
Workload Fluctuations
1
Related Content
- ABAP Cloud Developer Trial 2022 Available Now in Technology Blogs by SAP
- Consuming CAPM Application's OData service into SAP Fiori Application in Business Application Studio in Technology Blogs by Members
- Trustable AI thanks to - SAP AI Core & SAP HANA Cloud & SAP S/4HANA & Enterprise Blockchain 🚀 in Technology Blogs by Members
- Workload Analysis for HANA Platform Series - 1. Define and Understand the Workload Pattern in Technology Blogs by SAP
- Deliver Real-World Results with SAP Business AI: Q4 2023 & Q1 2024 Release Highlights in Technology Blogs by SAP
Top kudoed authors
| User | Count |
|---|---|
| 35 | |
| 25 | |
| 13 | |
| 7 | |
| 7 | |
| 6 | |
| 6 | |
| 6 | |
| 5 | |
| 4 |