
- SAP Community
- Products and Technology
- Technology
- Technology Blogs by SAP
- How to deploy Vora 1.4 Patch 1 on a Kerberized Had...
Technology Blogs by SAP
Learn how to extend and personalize SAP applications. Follow the SAP technology blog for insights into SAP BTP, ABAP, SAP Analytics Cloud, SAP HANA, and more.
Turn on suggestions
Auto-suggest helps you quickly narrow down your search results by suggesting possible matches as you type.
Showing results for
former_member25
Active Participant
Options
- Subscribe to RSS Feed
- Mark as New
- Mark as Read
- Bookmark
- Subscribe
- Printer Friendly Page
- Report Inappropriate Content
06-28-2017
11:13 PM
How to deploy Vora 1.4 Patch 1 on a Kerberized Hadoop cluster
This guide is for reference only and has been derived from the official Vora 1.4 Administration and Installation guide which is always the most current and up-to-date document on how to install and configure Vora.
This guide assumes that:
- The Hadoop cluster is managed by either Ambari Hortonworks 2.5.X or Cloudera Manager 5.8 or greater
- The Hadoop services have already been enabled for MIT Kerberos or Kerberos on Active Directory
- The cluster meets minimum specification criteria for Vora as documented in the Product Availability Matrix (PAM)
If you encounter any issues we encourage you to see the Installation and Troubleshooting guides at https://help.sap.com/viewer/p/SAP_VORA
Installation
The steps below document how to install Vora on a cluster that has already been Kerberized. If Vora is already installed you may proceed to the "Configuration" section of this guide
Step 0: Download the Vora installer to Ambari/Cloudera manager host
Vora can be downloaded from http://support.sap.com and can be extracted using the command
tar -xvf VORA04P_1-70002662.TGZ /<Vora_root_install_dir>/
Step 1: Distribute Vora's RPM files to Hadoop nodes
By default the Vora installer will attempt to distribute the Vora RPM files via HDFS. However, if the Hadoop cluster has already been enabled for Kerberos the alternative SSH-mode must be used to distribute the files instead.
Modify the following file with a list of hostnames that will be running Vora services
<Vora_root_install_dir>/config/hosts.txt
Run the installer with the following argument and follow the on-screen prompts:
<Vora_root_install_dir>/install.sh --use-ssh
For a complete list of available arguments see 2.6.1.9 of the Vora 1.4 administration and installation guide.
The installer will afterwards attempt to restart the Ambari Server or Cloudera Manager.
Step 2: Distribute Vora to worker nodes using the cluster manager
In Cloudera
- Activate and distribute the parcel to all Vora hosts
- Add the service "Vora Manager"
- Ensure that the Vora Manager Worker and Gateway nodes are enabled on all Vora hosts
- It is optional but not required to have more that one Vora Manager Master
- Define the parameters as mentioned below
In Ambari
- Add the service Vora Manager
- Followed the on-screen wizard
- Ensure that the Vora Manager Worker and Gateway nodes are enabled on all Vora hosts
- It is optional but not required to have more that one Vora Manager Master
- Set the following parameters,
- Define the parameters as mentioned below (For details on all other parameters refer to the Vora Install guide)
vora_default_java_home = </path/to/javaJDK/directory>

vora_default_spark_home = </path/to/spark-client/>

vora_discovery_bind_interface = <Default network interface>
... then proceed to start all Vora Manager services on all hosts.
Configuration
Step 0: Generate Vora service and client principals
It is not required but typical that all Vora service principals and the single client principal to be named vora
In this guide we assume the client principal and service principal are both named vora and have respective keytab files named vora.client.keytab and vora.service.keytab
- Generate a Vora service principal and keytab file for each host that will run Vora services. All Vora service keytab filenames must be identical
- Generate only a single unique Vora client principal and keytab file, regardless of number of hosts
- For each Vora service principal host, upload that host's corresponding keytab file to /etc/security/keytabs/
- Copy the vora.client.keytab file to all host's directory /etc/security/keytabs/
Step 1: Create jaas.conf file
On each Vora host, create the file /etc/vora/jaas.conf with the following contents. Take note to substitute <REALM> with your corresponding Kerberos realm name
vora {


 com.sun.security.auth.module.Krb5LoginModule required


 useKeyTab=true


 keyTab="/etc/security/keytabs/vora.client.keytab"


 storeKey=true


 useTicketCache=false


 principal="vora@<REALM>"


 doNotPrompt=true;


};
Notes:
- The jaas.conf file must be created on all Vora hosts
- The jaas.conf file must be accessible/readable by the OS-user vora
Step 2: Enable Authentication for Default HDFS
Using Amabri or Cloudera cluster manager set the following HDFS service parameters for core-site.xml
vora.security.kerberos.hdfs.principal = vora

vora.security.kerberos.hdfs.keytab.path = /etc/security/keytabs/vora.client.keytab
Step 3: Configure Kerberos settings in spark-env.sh
Using Amabri or Cloudera cluster manager modify spark-env.sh to include the following environment variable definition:
In Cloudera this setting is defined under the Spark configuration section -> Spark Service Advanced Configuration Snippet (Safety Valve) for spark-conf/spark-env.sh
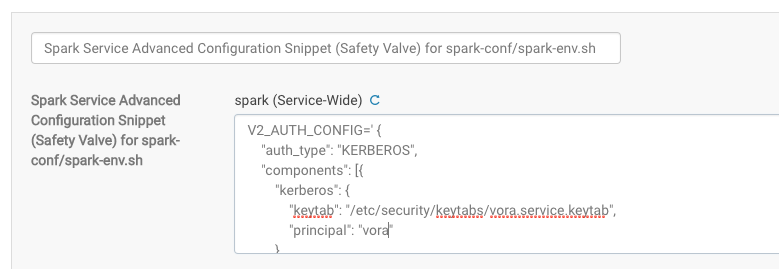
In Ambari this setting is defined under Spark configuration -> Advanced spark-env

V2_AUTH_CONFIG='{

   "auth_type": "KERBEROS",

   "components": [{

          "kerberos": {

             "keytab": "/etc/security/keytabs/vora.service.keytab",

             "principal": "vora"

         },

           "name": "CAUTH_SERVER"

  }, {

         "kerberos": {

             "keytab": "/etc/security/keytabs/vora.service.keytab",

             "principal": "vora"

         },

          "name": "CAUTH_CLIENT"

   }, {

          "kerberos": {

             "keytab": "/etc/security/keytabs/vora.client.keytab",

             "principal": "vora"

          },

          "name": "JAUTH_CLIENT"

    }]

}'

export V2_AUTH_CONFIG
Step 4: Configure Kerberos settings in spark-defaults.conf
Using Amabri or Cloudera cluster manager add the following parameters to spark-defaults.conf.
In Cloudera these parameters must be defined in Spark Client Advanced Configuration Snippet (Safety Valve) for spark-conf/spark-defaults.conf

In Ambari each parameter gets its own field:
spark.v2server.principal=vora


spark.jdbcvora.authenticate=KERBEROS


spark.executorEnv.V2_AUTH_CONFIG={'auth_type': 'KERBEROS', 'components': [{'kerberos': {'keytab': '/etc/security/keytabs/vora.service.keytab','principal': 'vora'}, 'name': 'CAUTH_SERVER'}, {'kerberos': {'keytab': '/etc/security/keytabs/vora.service.keytab','principal': 'vora'}, 'name': 'CAUTH_CLIENT'}, {'kerberos': {'keytab': '/etc/security/keytabs/vora.client.keytab','principal': 'vora'}, 'name': 'JAUTH_CLIENT'}]}


spark.driver.extraJavaOptions=-Djava.security.auth.login.config=/etc/vora/jaas.conf
spark.executor.extraJavaOptions=-Djava.security.auth.login.config=/etc/vora/jaas.conf
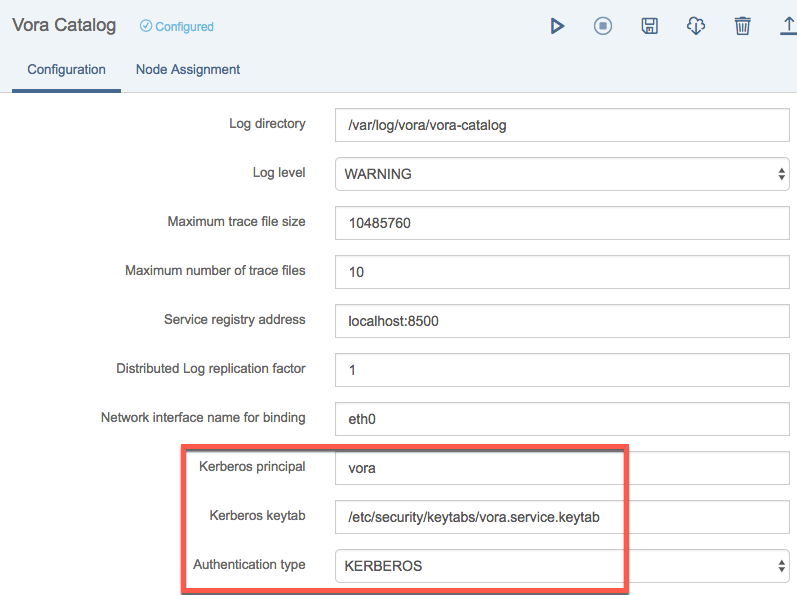
Step 5: Enable Kerberos authentication between Vora components
In Vora-Manager UI, configure Vora Tools to have the following settings:
- Set Kerberos principal to the client principal (e.g. vora)
- Set Kerberos principal of Hive Thrift Server 2 to the service principal (e.g. vora)
- Set Kerberos keytab to the client keytab /etc/security/keytabs/vora.client.keytab
- Set authentication type to KERBEROS
In Vora-Manager UI, configure Vora Thriftserver to have the following settings:
Set the extra arguments field to have the following string (copy/paste the whole block):
--hiveconf spark.jdbcvora.authenticate=KERBEROS

--hiveconf hive.server2.enable.doAs=false

--hiveconf hive.server2.authentication=KERBEROS

--hiveconf hive.server2.authentication.kerberos.principal=vora/_HOST@AD.HADOOP

--hiveconf hive.server2.authentication.kerberos.keytab=/etc/security/keytabs/vora.service.keytab

--principal vora

--keytab /etc/security/keytabs/vora.client.keytab
Notes:
- The _HOST syntax is intentionally hardcoded, this will automatically get the FQDN regardless of where the thriftserver is hosted
- The hive.server2 parameters are documented in Vora installer guide section 4.1.11
- The use of --hiveconf arguments is an alternative way of defining the hive.server2 parameters which are normally defined in the /etc/vora/hive-site.xml file. In other words, if hiveconf arguments are not defined directly in Vora-Manager then they must be defined /etc/vora/hive-site.xml on the host where Vora Thriftserver will be running. Otherwise an error will occur during the startup of Thriftserver.

Finally, for all services except...
- Vora Tools
- Vora Thriftserver
... perform the following configuration steps:
- Set the Kerberos principal to be your service principal name (e.g. vora)
- Set keytab path to /etc/security/keytabs/vora.service.keytab
- Set authentication type to KERBEROS
Step 6: Start all Vora services
Start Vora services using the "Start all" button in the upper-left corner of Vora Manager UI. This may take a few minutes.

Step 7: Validate the cluster
Use the hdfs dfs -put command to upload a test.csv file into /user/vora in HDFS with the following contents:
1.1,2,Hello

2,3.4,World
Then either directly via spark-shell or using Vora Tools SQL editor check that all three SQL statements execute successfully:
CREATE TABLE helloWorld(a1 double, a2 int, a3 string)
USING com.sap.spark.engines.relational
OPTIONS (files "/user/vora/test.csv");
SHOW TABLES USING com.sap.spark.engines.relational;
SELECT * FROM helloWorld;
- SAP Managed Tags:
- SAP Vora
3 Comments
You must be a registered user to add a comment. If you've already registered, sign in. Otherwise, register and sign in.
Labels in this area
-
ABAP CDS Views - CDC (Change Data Capture)
2 -
AI
1 -
Analyze Workload Data
1 -
BTP
1 -
Business and IT Integration
2 -
Business application stu
1 -
Business Technology Platform
1 -
Business Trends
1,658 -
Business Trends
93 -
CAP
1 -
cf
1 -
Cloud Foundry
1 -
Confluent
1 -
Customer COE Basics and Fundamentals
1 -
Customer COE Latest and Greatest
3 -
Customer Data Browser app
1 -
Data Analysis Tool
1 -
data migration
1 -
data transfer
1 -
Datasphere
2 -
Event Information
1,400 -
Event Information
66 -
Expert
1 -
Expert Insights
177 -
Expert Insights
299 -
General
1 -
Google cloud
1 -
Google Next'24
1 -
Kafka
1 -
Life at SAP
780 -
Life at SAP
13 -
Migrate your Data App
1 -
MTA
1 -
Network Performance Analysis
1 -
NodeJS
1 -
PDF
1 -
POC
1 -
Product Updates
4,577 -
Product Updates
344 -
Replication Flow
1 -
RisewithSAP
1 -
SAP BTP
1 -
SAP BTP Cloud Foundry
1 -
SAP Cloud ALM
1 -
SAP Cloud Application Programming Model
1 -
SAP Datasphere
2 -
SAP S4HANA Cloud
1 -
SAP S4HANA Migration Cockpit
1 -
Technology Updates
6,873 -
Technology Updates
423 -
Workload Fluctuations
1
Related Content
- Principal propagation in a multi-cloud solution between Microsoft Azure and SAP, Part VII: Invoke RFCs and BAPIs with Kerberos delegation from Microsoft Power Platform in Technology Blogs by Members
- Data Architecture with SAP – Data Lake in Technology Blogs by Members
- SAP & Dell Technologies - Transforming Data at the Edge, Cloud & Core in Technology Blogs by Members
- SQL Query Push Down to external Source in Technology Q&A
- sap hana spark controller deploy in Technology Q&A
Top kudoed authors
| User | Count |
|---|---|
| 40 | |
| 25 | |
| 17 | |
| 13 | |
| 8 | |
| 7 | |
| 7 | |
| 7 | |
| 6 | |
| 6 |