
- SAP Community
- Products and Technology
- Technology
- Technology Blogs by SAP
- Extension of runtime capabilities using Blueprint ...
Technology Blogs by SAP
Learn how to extend and personalize SAP applications. Follow the SAP technology blog for insights into SAP BTP, ABAP, SAP Analytics Cloud, SAP HANA, and more.
Turn on suggestions
Auto-suggest helps you quickly narrow down your search results by suggesting possible matches as you type.
Showing results for
former_member46
Explorer
Options
- Subscribe to RSS Feed
- Mark as New
- Mark as Read
- Bookmark
- Subscribe
- Printer Friendly Page
- Report Inappropriate Content
06-23-2017
11:11 AM
Introduction
In this post, I will show you how to extend the capabilities of a runtime component using Blueprint metadata. This latest roll out in Cloud Platform integration SDK that allows the developers to inject custom code/classes into an adapter.
I assume that you are familiar with creating custom adapters in Cloud Platform Integration SDK. When you create, a custom adapter you will create a UI and these UI values are passed to the runtime component (adapter) as an URI. However, there can be use cases where you want to control these UI values and pass object references to the URI at runtime. SAP’s Cloud Platform Integration SDK now supports this functionality.
I would like to cite a use case by building a simple adapter and explain the implementation of Blueprint metadata. Let us construct an adapter, which prefixes a greeting message “Hello” with a name. Here the value to the Name parameter is provided in the adapter configuration UI. In addition to this, I wish to decorate the message by enclosing it with additional parameters in the header and footer … I call it Prettify J
SAP being empathetic towards its users provides UI options to decorate the message as shown here - this interests me!

Now when I provide the following values in the adapter configuration UI:
Name: Acme
Head: **********
Append: ####
Tail: **********
I get the following result:
**********
#### Hello Acme ####
**********
Now you can notice in the result the decorators and the greeting have encapsulated the Name.
Now to the Hands-on
Here I am going to discuss the details of creating an Eclipse project. First you need to build a runtime component. For more details on the component design refer http://camel.apache.org/creating-a-new-camel-component.html . You might have come across many ways to create a runtime component, but the simplest way is to use the maven archtype. Once you create the camel component using the archtype, your project structure should look like below. Notice that the names of the classes are picked from your project creation dialog box.

Note:
Notice that the consumer and test classes are deleted because we are going to create only a receiver.
Let’s Prettify!
Let me guide you through “Development of Advanced Generation Injection”. Well, in simple terms follow the steps here to introduce custom code into an adapter and deploy them during runtime:
Step 1 - Modifying the greetEndpoint class
In this class, the UI values are based on the customer requirements are defined. Here in this use case we add Name, and other decorative values.
 | a. Add String uriParm name with getter and setter b. Important: Modify createConsumer() method to throw UnsupportedFormatException. c. Add map param decoratorParam with getter and setter |
Step 2 - Modifying the greetProdcuer class
In this class our logic of greeting a message using the name and the decorative inputs are found.
 | In this class, you add the logic. As per the use case here, I added head, append and tail information from the map and constructed the UI. |
As an additional step, you can write a Junit test for your component using the camel test frame work. We are not covering that here. Now, build the component project (maven) and you should be able to get a *.jar file generated in the target folder.
Step 3 - Create custom adapter using the greet component
We need to wrap around the component in a new adapter project.
- Open Eclipse and select File > New > Other.
- In the Select a wizard, expand SAP Cloud Platform Integration and select Adapter Project.
- Choose Next.
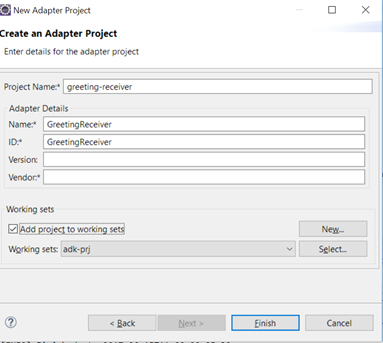
- Provide the required details and choose Finish.
- Now you must place the generated camel component jar from the ‘target’ folder to the ‘component’ folder.

- Right click on the greeting-receiver project and select Generate Metadata > Component Metadata.
Verifying the Metadata
- Make sure only one Variant tag is created for you. If not, there are chances that you may not have deleted the consumer implementation and not throwing UnSupportedOperationException.
- Check there are two UI attribute references “name” and “firstUriPart”
Editing the metadata
You must notice our uiParma value of greetEndpoint is converted to an attribute metadata. Now we need to add decorative parameters manually.
- Rename firstUriPart to head
- Add two more attributes that are append and tail
- Place above created attributes next to the head
- The final metadata must be like this
head<?xml version="1.0" encoding="UTF-8" standalone="yes"?> <ComponentMetadata ComponentId="ctype::Adapter/cname::GreetingReceiver/vendor::sap/version::1.0.0" ComponentName="GreetingReceiver" UIElementType="Adapter" IsExtension="false" IsFinal="true" IsPreserves="true" IsDefaultGenerator="true" ComponentDisplayName="GreetingReceiver" xmlns:gen="http://www.sap.hci.adk.com/gen" xmlns:bp="http://www.adk.gen/xmlns/blueprint"> <Variant VariantName="Greet Component Receiver" VariantId="ctype::AdapterVariant/cname::GreetingReceiver/vendor::sap/tp::greet/mp::greet/direction::Receiver" IsRequestResponse="true" MetadataVersion="2.0" gen:RuntimeComponentBaseUri="greet" AttachmentBehavior="Preserve"> <InputContent Cardinality="1" Scope="outsidepool" MessageCardinality="1" isStreaming="false"> <Content> <ContentType>Any</ContentType> <Schema xsi:type="xs:string" xmlns:xs="http://www.w3.org/2001/XMLSchema" xmlns:xsi="http://www.w3.org/2001/XMLSchema-instance"></Schema> </Content> </InputContent> <OutputContent Cardinality="1" Scope="outsidepool" MessageCardinality="1" isStreaming="false"> <Content> <ContentType>Any</ContentType> <Schema xsi:type="xs:string" xmlns:xs="http://www.w3.org/2001/XMLSchema" xmlns:xsi="http://www.w3.org/2001/XMLSchema-instance"></Schema> </Content> </OutputContent> <Tab id="connection"> <GuiLabels guid="63acce24-526d-41ab-861b-9efe17634e6a"> <Label language="EN">Decorator Params</Label> <Label language="DE">Decorator Params</Label> </GuiLabels> <AttributeGroup id="defaultUriParameter"> <Name xsi:type="xs:string" xmlns:xs="http://www.w3.org/2001/XMLSchema" xmlns:xsi="http://www.w3.org/2001/XMLSchema-instance">URI Setting</Name> <GuiLabels guid="aaa855ba-3973-460c-bbea-e7fe5b169d87"> <Label language="EN">URI Setting</Label> <Label language="DE">URI Setting</Label> </GuiLabels> <AttributeReference> <ReferenceName>head</ReferenceName> <description>Configure Head</description> </AttributeReference> <AttributeReference> <ReferenceName>append</ReferenceName> <description>Configure Appender</description> </AttributeReference> <AttributeReference> <ReferenceName>tail</ReferenceName> <description>Configure Tail</description> </AttributeReference> </AttributeGroup> <AttributeGroup id="greetEndpoint"> <Name xsi:type="xs:string" xmlns:xs="http://www.w3.org/2001/XMLSchema" xmlns:xsi="http://www.w3.org/2001/XMLSchema-instance">Greet Endpoint</Name> <GuiLabels guid="97be709d-90c9-4468-9277-b16a39737653"> <Label language="EN">Greet Endpoint</Label> <Label language="DE">Greet Endpoint</Label> </GuiLabels> <AttributeReference> <ReferenceName>name</ReferenceName> <description>Configure Name</description> </AttributeReference> </AttributeGroup> </Tab> </Variant> <AttributeMetadata> <Name>head</Name> <Usage>false</Usage> <DataType>xsd:string</DataType> <Default></Default> <Length></Length> <isparameterized>true</isparameterized> <GuiLabels guid="4eb8910b-f1bc-4398-a9d5-7812740f7520"> <Label language="EN">Head</Label> <Label language="DE">Head</Label> </GuiLabels> </AttributeMetadata> <AttributeMetadata> <Name>append</Name> <Usage>false</Usage> <DataType>xsd:string</DataType> <Default></Default> <Length></Length> <isparameterized>true</isparameterized> <GuiLabels guid="4eb8910b-f1bc-4398-a9d5-7812740f7520"> <Label language="EN">Append</Label> <Label language="DE">Append</Label> </GuiLabels> </AttributeMetadata> <AttributeMetadata> <Name>tail</Name> <Usage>false</Usage> <DataType>xsd:string</DataType> <Default></Default> <Length></Length> <isparameterized>true</isparameterized> <GuiLabels guid="4eb8910b-f1bc-4398-a9d5-7812740f7520"> <Label language="EN">Tail</Label> <Label language="DE">Tail</Label> </GuiLabels> </AttributeMetadata> <AttributeMetadata> <Name>name</Name> <Usage>false</Usage> <DataType>xsd:string</DataType> <Default></Default> <Length></Length> <isparameterized>true</isparameterized> <GuiLabels guid="b9b9e415-3496-4db9-b96c-c0b5f1be6315"> <Label language="EN">Name</Label> <Label language="DE">Name</Label> </GuiLabels> </AttributeMetadata> </ComponentMetadata> |
Note: Depending on the name you chose for the adapter, the metadata.xml may contain different ComponentId nad VariantID. In that case, you can simply replace the section starting from element <Tab id="Connection> till the end i.e. </ComponentMetadata>.
Step 4 - Add additional configuration (bpMetadata) file to construct/use the Decorator map bean
The intent to write this blog was to highlight the use of this advanced feature of ADK frame work. In this step, I shall discuss how to configure custom code using Blueprint Metadata (bpMetadata).
For information, see https://help.sap.com/viewer/368c481cd6954bdfa5d0435479fd4eaf/Cloud/en-US/ab38cc8da12446c190f7384480b...
As you know, the camel component (greet-component) works with a String name and a map. Hence, we need to construct a map and pass it as URI value to this component.
- To create a blueprint metadata, right click on the greeting-receiver project and select Generate Metadata > Blueprint Metadata.

- Notice the blueprint metadata i.e.xml file created in the metadata folder. This file is like CMD but it contains blueprint like structure.
In this file, you can find few default beans and references that are already created for re-use, you can except more information on these in upcoming blogs. You can also create your own beans (offered from camel) or references if needed. The camelContext attribute allows you to route the parameters passed to your component.
<bp:camelContext streamCache="true">
<bp:route>
<bp:to uri="greet:foo?name=$.cmd.attribute(name)&decoratorParams=#uiDecoratorParams" />
</bp:route>
</bp:camelContext>
- Make a reference to xml from metadata.xml – You need to inform your main metadata about this bpMetadata. This tells the framework that I wish to use my own logic for blueprint generation.
Add following tags in the metadata.xml
<ReferencedComponents>
<ReferencedComponent>ctype::ExtensionVariant/cname::GreetingReceiver/vendor::sap/tp::greet/mp::greet/direction::Receiver</ReferencedComponent>
</ReferencedComponents>
The value ‘ctype::ExtensionVariant …’ is copied from the bpMetadata.xml. Please note this is variant specific. For multiple variants, you need to fetch appropriate URL and update the metada.xml in the matching variant. In our use case both places are “Receiver” variants.
- Update the bpMetadata.xml to construct a map bean and URI

You must notice that we are constructing a Hashmap bean and passing this to our ‘greet’ component as uri param. Make sure the uri keys (name and decoratorParams) are the same as provided in greetEndpoint class.
Note
$.cmd.attribute(head) – This string pattern tells that the frame work should resolve UI value associated with attribute reference‘head’. This must be same as given in the metadata.xml.
<bp:to uri> - we are constructing our uri value here. We want to pass two things; name and map of decorator params. The separation is done using &
- Build the adapter (optionally execute checks before build). Hopefully you should not come across any errors J.
- Deploy the adapter project.
- Validate the deployment. You shouldn’t get any deployment error.
Consuming adapter in the integration flow
After deploying the adapter on a tenant system, we are going to consume it in an integration flow. In my use case I would construct an integration flow using the following components:
- Timer
- Content Modifier
- Request Reply
- One receiver channel configured with “GreetingReceiver” adapter
- The other receiver channel configured with “Mail” receiver adapter
- Now you add an integration flow in your tenant.
- Remove the sender channel and add the components shown in the image
- In the GreetingReceiver adapter, provide the Decorator Params.
- You must configure the connection setting in the Mail receiver adapter and provide all mandatory details.
- Save the settings and deploy the integration flow.
- You would receive an email with the following content:
**********
#### Hello Acme ####
**********
Conclusion
In this blog, I showed you how we can consume some of the advanced feature of SAP Cloud Platform Integration SDK.
- SAP Managed Tags:
- Cloud Integration
2 Comments
You must be a registered user to add a comment. If you've already registered, sign in. Otherwise, register and sign in.
Labels in this area
-
ABAP CDS Views - CDC (Change Data Capture)
2 -
AI
1 -
Analyze Workload Data
1 -
BTP
1 -
Business and IT Integration
2 -
Business application stu
1 -
Business Technology Platform
1 -
Business Trends
1,658 -
Business Trends
91 -
CAP
1 -
cf
1 -
Cloud Foundry
1 -
Confluent
1 -
Customer COE Basics and Fundamentals
1 -
Customer COE Latest and Greatest
3 -
Customer Data Browser app
1 -
Data Analysis Tool
1 -
data migration
1 -
data transfer
1 -
Datasphere
2 -
Event Information
1,400 -
Event Information
66 -
Expert
1 -
Expert Insights
177 -
Expert Insights
296 -
General
1 -
Google cloud
1 -
Google Next'24
1 -
Kafka
1 -
Life at SAP
780 -
Life at SAP
13 -
Migrate your Data App
1 -
MTA
1 -
Network Performance Analysis
1 -
NodeJS
1 -
PDF
1 -
POC
1 -
Product Updates
4,577 -
Product Updates
342 -
Replication Flow
1 -
RisewithSAP
1 -
SAP BTP
1 -
SAP BTP Cloud Foundry
1 -
SAP Cloud ALM
1 -
SAP Cloud Application Programming Model
1 -
SAP Datasphere
2 -
SAP S4HANA Cloud
1 -
SAP S4HANA Migration Cockpit
1 -
Technology Updates
6,873 -
Technology Updates
420 -
Workload Fluctuations
1
Related Content
- Exploring Integration Options in SAP Datasphere with the focus on using SAP extractors - Part II in Technology Blogs by SAP
- How to use AI services to translate Picklists in SAP SuccessFactors - An example in Technology Blogs by SAP
- IoT - Ultimate Data Cyber Security - with Enterprise Blockchain and SAP BTP 🚀 in Technology Blogs by Members
- SAP Signavio is the highest ranked Leader in the SPARK Matrix™ Digital Twin of an Organization (DTO) in Technology Blogs by SAP
- Hack2Build on Business AI – Highlighted Use Cases in Technology Blogs by SAP
Top kudoed authors
| User | Count |
|---|---|
| 36 | |
| 25 | |
| 17 | |
| 13 | |
| 8 | |
| 7 | |
| 7 | |
| 6 | |
| 6 | |
| 6 |