
- SAP Community
- Products and Technology
- Technology
- Technology Blogs by SAP
- How to Guide - Principal Propagation in an HTTPS S...
Technology Blogs by SAP
Learn how to extend and personalize SAP applications. Follow the SAP technology blog for insights into SAP BTP, ABAP, SAP Analytics Cloud, SAP HANA, and more.
Turn on suggestions
Auto-suggest helps you quickly narrow down your search results by suggesting possible matches as you type.
Showing results for
former_member25
Explorer
Options
- Subscribe to RSS Feed
- Mark as New
- Mark as Read
- Bookmark
- Subscribe
- Printer Friendly Page
- Report Inappropriate Content
06-22-2017
11:23 AM
How to Guide
Principal Propagation in an HTTPS Scenario
Resources used to showcase Principal Propagation
The key elements used are the following:
| SAP Cloud Platform instance | https://account.hana.ondemand.com/cockpit |
| Public Key Infrastructure (PKI) It will be required to sign the certificates | Since one of the certificates that will be required needs special properties we will have to use a third-party tool called XCA to generate and sign certificates. http://xca.sourceforge.net/ |
| An ABAP service to call on the Backend | PING is a service that is pretty standard and that will be perfect for most of our tests. |
General overview
The following process chart describes the different tasks we need to go through to implement principal propagation.

It doesn’t matter where you start but I suggest it is best to start with the setup of the Cloud Connector. The role of the Cloud Connector is like that of glue. It brings and binds various systems together. Therefore, getting this out of the way might pave the way for an easier implementation.
Configuration of the SAP Cloud Connector
The assumption is of course that you have a working installation. To learn how to set up an SAP Cloud Connector, read this blog: https://www.sap.com/developer/tutorials/hcp-cloud-connector-setup.html
Quick notes to speed up the initial configuration
- Initial User & Password: Administrator & manage
- Configure the connection to your front end server (FES).


Configure the Access Control
This step defines which backend resources will be exposed through the SCC.

Press the “+” button to start the Access control wizard.

We have an embedded backend & gateway system so we can choose an ABAP system in the dropdown.

And we will use “HTTPS” as the protocol.

Enter a name you prefer to use externally as well as the port you wish to use. For ease, we have used the same name and port number both internally and externally.

For the principal type choose “X.509 Certificate”.

A description is optional and we have simply left it empty.
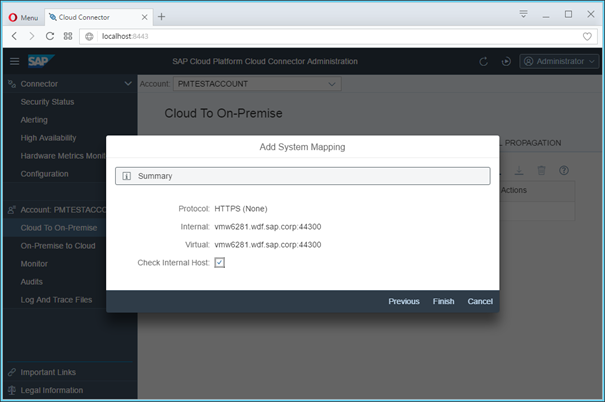
As a result, you should see a summary of your settings. Here you can press finish to complete the process.
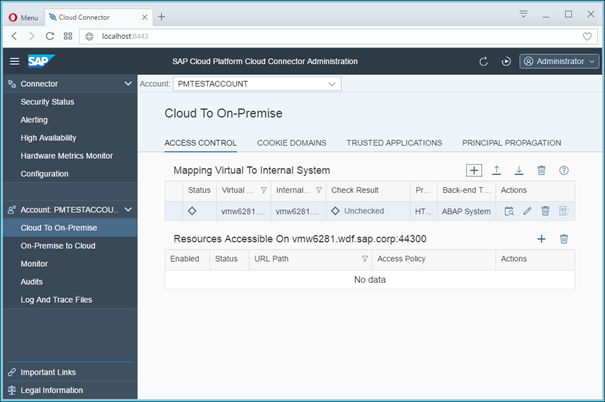
Now that you have defined a system, it is necessary to also define which resources are available within this system.

Click on the “+” button on the “Resources Accessible On…” line.

In the following window, add /sap/ as the URL path and choose the radio button for “Path and all sub-paths”. Make sure the “Enabled” checkbox is ticked.

If you now click on the “Check availability…” icon under the “Actions” column in the “Mapping to virtual systems”, you should get a Green square in the Status column.
Synchronize the IdP for Principal Propagation

Having created a mapping to a system successfully, when you click on the Principal Propagation tab, you will notice it to be devoid of any content. This is a security feature. The cloud connector is delivered without trusting any IdP by default.

Press the synchronise button to populate a list of IdP’s and then remember to mark the one(s) you wish to work with as trusted.
Additional note from 05 2018:
On top of the default configuration, you will need to explicitly trust extra entries in that table. For an hana trial account the entry related to sapmobile:hcpms needs also to be trusted. For an hana account (productive account) the entry related to hanamobileprod:mobilejava needs to be trusted. The names are different but the service behind is the same.
Such a problem can be seen from the log of the SAP Cloud Connector. The entries would look like this:
2018-05-16 15:17:46,186 +0200#DEBUG#com.sap.core.connectivity.tunnel.client.

sso.SSOClientProcessor#tunnel-client-45-2#0xef82b372#SSO token validation

failed.

com.sap.core.connectivity.tunnel.client.sso.InvalidSSOTokenException:

The account/application/type services/dispatcher/JAVA is not trusted for

principal propagation!
Configuring the certificates on the SAP Cloud Connector
NOTE: Please take some time to review the section below before starting on the config steps themselves. It will save a lot of time in troubleshooting at a later stage if these steps are executed precisely and you also know the reasoning behind each of these steps.
The configuration in the cloud connector relevant to Principal Propagation relies on three different configuration elements: System Certificate, CA Certificate and, finally, the principal propagation itself. For our convenience, we will also include the UI Certificate. It won't represent any overhead since the UI and System Certificate can be the same. And, having the UI cert properly configured will remove the error message or warning (Untrusted Connection warning thrown in most browsers) we would get when accessing the Cloud Connector.
In a nutshell, the configuration of each certificate is done in three steps.

- We generate a certificate signing request.
- We use the PKI to sign the certificate
- Finally, we upload the signed certificate in the appropriate place of the Cloud Connector.
UI Certificate
In the context of the SAP Cloud Connector (SCC), we first create the UI Certificate. This certificate should match the full qualified domain name of the server hosting SCC. In our implementation, we use the following values for the certificate signing request (CSR):
| CN= | vmw6281.wdf.sap.corp |
| OU= | PM |
| O= | SAP |
| C= | DE |
Once the CSR generated we can sign the certificate. Technically, this is not a requirement. The process can work, wholly supported by self-signed certificates. However, using a signed certificate helps simplify the configuration process and is closer to what one may experience in the real world, so we decided to sign our certificates. In our case, we used XCA (an opensource, BSD licensed tool), but these steps can just as easily (if you are command line proficient) be executed using keytool which is supplied with every JAVA SDK. The signing process using XCA is covered on a separate jam page "Using XCA to create and sign certificates".
Then we can upload the signed CSR which is now called certificate and stored in a DER format.
System certificate
Once the UI Certificate configured, the system certificate can just reuse it in a single click.
CA certificate
Last but not least, we need to generate a certificate for the CA. This certificate will be used to sign the short-lived certificate that will be passed to the backend to authenticate the logged in user. The important detail is that this specific certificate needs a very specific property to be able to do its job: KEYCERTSIGN!


Once the signed certificate is available, it can be imported using the “Import” wizard.

Principal Propagation
Under Principal Propagation generate a sample certificate (the first icon in the row). One of the roles of the SCC in the context of Principal propagation is to generate short-lived certificates based on some identity information retrieved from the logged in user.
We will use the generated sample certificate later in our configuration to build our rule in the CERTRULE transaction.

This screen describes the pieces of information that will be used to build the short-lived certificates. In the screenshot above the name is the only info that is passed.

Press Save to store the information and you should see the finished Principal Propagation configuration as shown above.
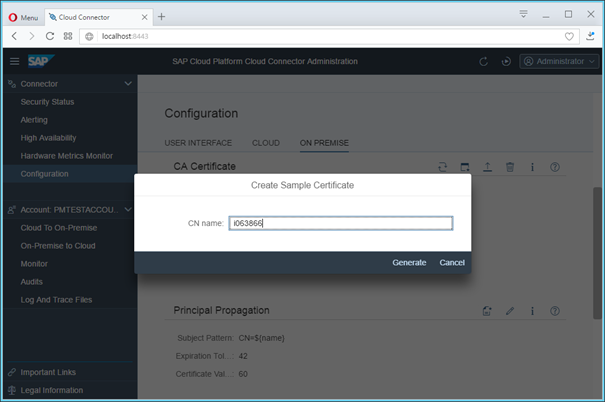
Now create dummy certificate that will be used as a reference for all the certificates that will be issued by the SCC.
NOTE: Depending on which browser you are using, it may take some time before the sample certificate is downloaded. The information / message window may fade away, but do verify that your certificate got generated and downloaded.
Configure the SAP Gateway
NOTE: In our case, the SAP backend and the SAP Frontend Server (FES) where the Gateway is deployed are all on the same instance. Although we try to make the distinction, we also may use the terms Gateway, FES and Backend over each other.
On the SAP backend, only few transactions will be required: RZ10, STRUST, CERTRULE (or EXTID_DN), SICF and SMICM.
Accessing a service through HTTP
The first step is probably to connect to one of the Gateway service from your browser and see whether you are requested for credentials or certificates. The PING service could be a good candidate since it is a standard service but you might need to activate it.
To check and test the service go to transaction SICF and drill down the structure to the following: „SAP „BC „PING

Right click on the ping and select "Test Service". Your browser will open and navigate to a similar URL to this one: http://vmw6281.wdf.sap.corp:50000/sap/bc/ping.
This test will let you know whether you can reach the service using HTTP.
Then you can slightly modify the URL to see how it would work with HTTPS using the following URL: https://vmw6281.wdf.sap.corp:44300/sap/bc/ping
NOTE: If you don't know, which port to use, you can check it from the third icon in transaction SMICM called "Service"

Enabling Certificate Based Login
In order to have the Gateway request a certificate rather than prompt for a username and a password, certain profile parameters need to be maintained. This configuration is done using the transaction RZ10.

Choose the instance profile (could also be the DEFAULT profile) and mark the Extended maintenance radio button and then press the Change button.

The screenshot above shows the instance profile for our backend.
Pressing the new parameter button will allow you to insert a new parameter into the profile by presenting the screen below.

Here we need to maintain the 4 profile parameters listed below.
| 1 (don't use true as is is displayed on the screenshot) This parameter allows the GW to map, based on a rules defined in CERTRULE, the identity contained in an identity certificate received during the authentication with an internal user. If set to 0, this mapping need to be maintained manually through EXTID_DN. |
| 1 This parameter instructs the GW to request a certificate from clients trying to access any resource in the GW. It is a key parameter to configure certificate base authentication on the GW. |
| Value corresponding to the Issuer of the SAP Cloud Connector System Certificate This parameter contributes to the establishment of a trust between the SAP Cloud Connector and the SAP Gateway System. |
| Value corresponding to the subject of the SAP Cloud Connector System Certificate This parameter contributes to the establishment of a trust between the SAP Cloud Connector and the SAP Gateway System. |
 |
Make sure you press the Copy button for each parameter you create. The result is a profile that looks like the screenshot below.

Once you have a working solution, you may want to experiment with changing the various values, especially in the “trust_client_with_issuer” & “trust_client_with_subject” fields. For the sake of ease, we have simply used a wildcard.

Additional note from 05 2018:
What if a trust had to be configured with more than one system? The issuer and subject parameter we have just mentioned can only reference a single system.
In the SAP note 2052899, SAP introduce a new parameter that can be included in the profile multiple times and that replaces the actual two parameters: icm/trusted_reverse_proxy_0.
If multiple system had to be trusted we would just add multiple times the same parameter using an incremented index at the end...
In our context the following parameter and its value would be the following:
icm/trusted_reverse_proxy_0 SUBJECT="CN=vmw6281.wdf.sap.corp, OU=PM, O=SAP, C=DE", ISSUER="CN=priv.root.ca, OU=PM, O=SAP, C=DE"
Pay attention to the proper usage of quotes in the value.
Now that the system requests a certificate as its primary login mechanism, we need to complement this configuration by configuring a rule that helps identify the individual user being authenticated.
This is achieved using the transaction CERTRULE.

Running the transaction gives you a screen like the screenshot above.

If the buttons are transparent as shown above, you will have to enter change mode by pressing the “glasses&pencil” icon.

Press the “Import Certificate” button to choose your template certificate. Here is where we will use the sample certificate generated in the Cloud Connector’s Principal propagation tab.

Once you have chosen the certificate to import, press the rule button to create a rule. Do not worry about the traffic lights in the right-hand pane. They will turn green when you save the rule, if the user exists.

When creating the rule, in our case, we wish to use the Subject and the attribute, Common Name (CN). If you have used additional attributes when creating your certificate (for example, O or OU), these can be used by pressing the ‘Generate’ icon in the Subject Filter line. We have not done so.
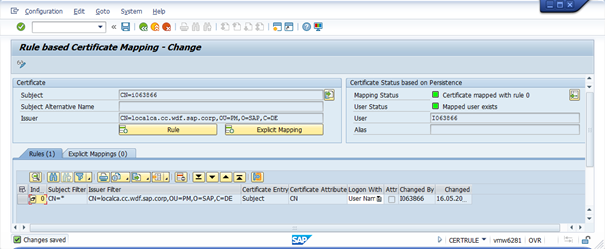
Press the Save icon on the top ribbon to save the rule. Notice that the traffic lights are now green.
Additional note from 05 2018:
If the user id used to log into your application is different from the user id used to represent the same user in the SAP System you might need to consider performing the mapping based on the Alias rather than the based on the User Name (table field in white in the screenshot above).
In the scenario above the value of the common name is picked up from the certificate and considered as equivalent to the user id that would be used to log into the SAP System. If this doesn't work, the value used can maybe be mapped to the Alias instead. Check the user alias in SU01 under the "Logon Data" tab to see if this would make more sense. If it does you can update the rule's "Logon With" property in CERTRULE to reflect this.
Additional note from 05 2018:
In old system, the CERTRULE transaction might not be supported yet. And in some cases it is not possible to establish automatically a mapping between an identity inside and outside the SAP System. In that case, we should consider performing a mapping manually through the EXTID_DN transaction.
Configuring the backend for Principal Propagation
In transaction STRUST, the issuer of the certificate we used in the previous section needs to be added to the Certificate list of the SSL server Standard.

Additional note from 05 2018:
This is the issuer of the System Certificate of the SAP Cloud Connector that is required here!
Configuration of the SAP Cloud Platform
The steps required to configure the SCP are perhaps the easiest of the lot. Here we will simply create a destination using the details from the virtual system we created in our SAP Cloud connector.
It is worth mentioning that in this case, we have reused the default IdP namely, the SAP ID service (accounts.sap.com) as our IdP. In upcoming blogs we will look at how to use a custom tenant in the IAS as well as ADFS as custom IdP’s.
Create a destination

Create a new destination by pressing the ‘New Destination’ button.

In the following screen maintain the details.

WebIDEUsage: odata_abap, odata_gen, ui5_execute_abap, dev_abap
Once you have saved the destination, pressing the check connection button provides a simple verification of the settings. This check is limited to connectivity.
Congratulations! You have now set up principal propagation using the HTTPS scenario.
Troubleshooting
For any problem related to this implementation I would suggest to have a look at the following blog and this wiki page.
- SAP Managed Tags:
- SAP Business Application Studio,
- SAP Fiori,
- SAP Fiori Cloud,
- SAP Mobile Services,
- OData,
- SAPUI5
34 Comments
You must be a registered user to add a comment. If you've already registered, sign in. Otherwise, register and sign in.
Labels in this area
-
ABAP CDS Views - CDC (Change Data Capture)
2 -
AI
1 -
Analyze Workload Data
1 -
BTP
1 -
Business and IT Integration
2 -
Business application stu
1 -
Business Technology Platform
1 -
Business Trends
1,661 -
Business Trends
88 -
CAP
1 -
cf
1 -
Cloud Foundry
1 -
Confluent
1 -
Customer COE Basics and Fundamentals
1 -
Customer COE Latest and Greatest
3 -
Customer Data Browser app
1 -
Data Analysis Tool
1 -
data migration
1 -
data transfer
1 -
Datasphere
2 -
Event Information
1,400 -
Event Information
65 -
Expert
1 -
Expert Insights
178 -
Expert Insights
280 -
General
1 -
Google cloud
1 -
Google Next'24
1 -
Kafka
1 -
Life at SAP
784 -
Life at SAP
11 -
Migrate your Data App
1 -
MTA
1 -
Network Performance Analysis
1 -
NodeJS
1 -
PDF
1 -
POC
1 -
Product Updates
4,577 -
Product Updates
330 -
Replication Flow
1 -
RisewithSAP
1 -
SAP BTP
1 -
SAP BTP Cloud Foundry
1 -
SAP Cloud ALM
1 -
SAP Cloud Application Programming Model
1 -
SAP Datasphere
2 -
SAP S4HANA Cloud
1 -
SAP S4HANA Migration Cockpit
1 -
Technology Updates
6,886 -
Technology Updates
408 -
Workload Fluctuations
1
Related Content
- Single Sign On to SAP Cloud Integration (CPI runtime) from an external Identity Provider in Technology Blogs by SAP
- SAP Datasphere - Space, Data Integration, and Data Modeling Best Practices in Technology Blogs by SAP
- Integrating with SAP Datasphere Consumption APIs using SAML Bearer Assertion in Technology Blogs by SAP
- cloud connector in Technology Q&A
- Managing Recurring Pay Components in SuccessFactors Using Batch Upsert in Technology Blogs by Members
Top kudoed authors
| User | Count |
|---|---|
| 13 | |
| 10 | |
| 10 | |
| 9 | |
| 7 | |
| 6 | |
| 5 | |
| 5 | |
| 5 | |
| 4 |