
- SAP Community
- Products and Technology
- Technology
- Technology Blogs by SAP
- Cloud Integration - How to Setup Secure Outbound H...
Technology Blogs by SAP
Learn how to extend and personalize SAP applications. Follow the SAP technology blog for insights into SAP BTP, ABAP, SAP Analytics Cloud, SAP HANA, and more.
Turn on suggestions
Auto-suggest helps you quickly narrow down your search results by suggesting possible matches as you type.
Showing results for
Advisor
Options
- Subscribe to RSS Feed
- Mark as New
- Mark as Read
- Bookmark
- Subscribe
- Printer Friendly Page
- Report Inappropriate Content
06-19-2017
7:21 AM
This blog describes how to setup secure outbound connections with client certificates using the keystore monitor (available with 24-June-2017 release (2.29*)) for maintaining the keys and certificates in the cloud integration system. It gives a step by step description what needs to be configured where. Furthermore, test options are described for testing outbound connectivity.
A typical task in an integration project is to connect remote systems to the SAP Cloud Integration Tenant. Before going into detailed configuration of the outbound communication lets first have a short look at the basics.
The remote system can act either as a sender or a receiver of messages. The setup and the detailed configuration procedure differ according to the communication direction that is being set up: whether a remote system is supposed to send a message to the integration platform or the other way round.

For more detailed information about the different authentication and authorization options refer to the SAP Cloud Platform Integration Documentation, section ‘Connecting a Customer System to Cloud Integration’.
As Secure inbound communication does not need a keystore we focus only on the outbound communication in this blog. Inbound Communication is described in blog 'How to setup secure HTTP Inbound Communication'.
For HTTPS based outbound communication with client certificate authentication, keys and certificates have to be maintained in the receiver system and in the cloud integration tenant keystore.
For HTTPS based communication the receiver system needs to have a private key and its certificate chain, which typically consists of the server certificate and the intermediate certificate. The intermediate certificate is signed by a CA’s root certificate. The integration tenant trusts the backend server if the CA’s root certificate is available in its keystore.
For the configuration as a first step this root certificate needs to be downloaded from receiver system or provided by the receiver system administrator to add it to the cloud integration tenant in the next step.
For HTTPS based communication in the cloud integration tenant, the root certificate of the receiver system provided in previous step is needed in the cloud integration tenant’s keystore. Furthermore, for using client certificate authentication, a signed key pair including complete certificate chain is required in the cloud integration tenant’s keystore.
To maintain certificates and keys in the keystore open the Keystore Monitor available in the Operations View in Web in section Manage Security. All certificates and private key pairs contained in the tenant keystore are shown.

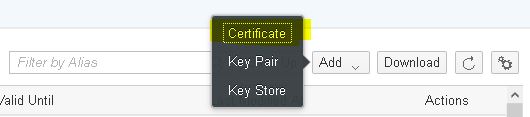
To add the root certificate of the receiver backend, select the option Add -> Certificate from the action buttons on top of the table:
Define an Alias and select the *.cer file containing the root certificate of the receiver system:

Select Deploy to add the certificate to the keystore.
As all newly provisioned cloud integration tenants already have a private key pair pre-delivered by SAP, which you can use this for your communications. But, if required, you can also create your own private key pairs in the cloud integration tenant. To create a new private key pair in the Keystore Monitor select the option Create -> Key Pair from the action buttons on top of the table:

In the creation dialog enter the Alias you want to use, select and define the key specific values and define a validity period. Select Deploy to create the key. If a key with the defined alias already exists, an error message is given. In this case you have to use a different Alias.

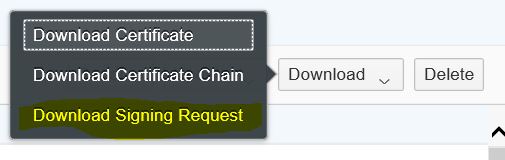
To be able to use this new key pair for a secure outbound connection you need to get this key pair signed by a Certification Authority supported by the receiver system. To do this, select the link for the key pair you want to use to get the details screen for the key pair. In the details screen use the option Download -> Download Signing Request to download the signing request. The download creates a file with the name <alias>.csr. This file can be send to a CA for signing the key.
Once you received the signing response from the CA, you can upload this using the option Update -> Signing Response in the details screen for the key pair. Select the file containing the signing response and select Update. The signature details are shown in the details of the key pair when you navigate through the certificate chain.


Now the key pair can be used for connecting to the receiver backend with client certificates.
For more details also refer to the SAP Cloud Platform Integration Documentation in chapter ‘Creating X.509 keys’.
As the current version of the Keystore Monitor is not able to create signing requests, the signed private key including certificate chain has to be maintained in an external keystore maintenance tool, for example the Keystore Explorer.
As all newly provisioned cloud integration tenants already have a private key pair pre-delivered by SAP, which you can use this for your communications. But, if required, you can also create your own private key pairs for the cloud integration tenant using an external tool, for example the keystore explorer. Use the external tool to create a new key pair, create the signing request, send it to an CA and import the signing response. Make sure you use an alias name in the customer namespace - do not use the prefix sap.
This is described in detail in SAP Cloud Platform Integration Documentation in chapter ‘Creating X.509 keys’.
Afterwards import the keystore in Keystore Monitor. To import the created keystore file, open the Keystore Monitor available in the Operations View in Web in section Manage Security.
Upload the keystore via Add -> Keystore button on the top of the monitor.

Browse the *.jks file and enter the password you gave in previous step when creating the keystore. The private key pair contained in the keystore file will be added to the existing entries for owner Tenant Administrator with the aliases used in Keystore Explorer.
More information about maintaining keys and certificates in Keystore Monitor, about migration of existing keystores into the new monitor and about existing naming conventions can be found in blog ‘How to use Keystore Monitor to maintain your keys and certificates’.
Authorization
To maintain keys and certificates in Keystore Monitor your user needs the Group Role AuthGroup.Admin or Single Roles IntegrationOperationServer.read, NodeManager.read and
NodeManager.deploysecuritycontent.
For client certificate based authentication at the receiver system the root certificate and the client certificate of the cloud integration tenants private key are needed in the receiver system. For this, export the certificate and the root certificate of the private key pair in the Keystore Monitor. These options are available as single line options.
To download the public certificate select Download Certificate from the actions button in the line of the private Key Pair:

Download Certificate for a Key Pair will create a file with the name <alias>.cer in the download directory. The file contains the public certificate for the private key.
To download the root certificate select Download Root Certificate from the actions button in the line of the private Key Pair:

Download Root Certificate for a Key Pair will create a file with the name <alias>_rootCA.cer in the download directory. The file contains the root certificate for the private key.
Both certificates need to be imported into the receiver system in the next step.
For client certificate based authentication at the receiver system the root certificate and the client certificate of the cloud integration tenants private key are needed in the receiver system. For this, export the certificate chain of the private key pair in the Keystore Monitor. This option is available as single line option, select Download from the actions Button in the line of the private Key Pair.

Download for a Key Pair will create a file with the name <alias>.p7b in the download directory. The file contains the whole certificate chain assigned to the private key. The certificate chain file can, for example, be opened with the Certificates Snap-in of Microsoft Management Console (Certmgr.msc), which is usually available on Windows systems.
Open the downloaded <alias>.p7b file with the Certificates Snap-in on your system and open the tab Certificate Path. There, the whole certificate chain can be seen.

The entry on the top is the root certificate. Open the root certificate via double click. This will open the root certificate. In the tab Details export the root certificate into a file via Copy to File. In the Certificate Export Wizard export the root certificate as DER encoded binary X.509 file. Use any arbitrary file name to save the certificate as *.cer file.


The same way you exported the root certificate, also export the client certificate, which is the one at the bottom of the certificate chain.
Both certificates need to be imported into the receiver system in the next step.
Authorization
To download entries from Keystore Monitor your user needs the Group Role AuthGroup.IntegrationDeveloper or Single Roles IntegrationOperationServer.read and NodeManager.read.
For outbound communication using client certificate authentication, in the receiver system the root certificate and the client certificate of the cloud integration tenant’s private key are to be imported into the backend.
For this, import the root certificate retrieved in previous step into the trust store of the receiver system. In addition, you normally need to import the client certificate into a user to certificate mapping in the receiver backend.
With this last step the configuration of the outbound communication using client certificates is completed. To test the connectivity, continue as described below.
Beside the recommended and most used configuration option to have the whole certificate chain including the root CA certificate assigned to the server’s private key available in the server keystore and only the root certificate in the client’s trust store, there are other configuration options possible with which the client can establish a trust relation to the server:
Similar options are possible when the server has to trust the client certificate in the client certificate authentication use case.
After setting up the connection toward the backend system, the connectivity test feature can be used to test the communication or even to download server certificates.
The Connectivity Test is available in Operations View in Web, in section Manage Security Material. Selecting the Connectivity Test tile from Overview Page will open the test tool offering tests for different protocols. To test the HTTPS based outbound communication the TLS option is to be selected.

Enter the address of your cloud backend (Tests to On-Premise backends via cloud Connector cannot be done) as used in the outbound channel and execute the test. The test will give a success message or an error with detailed error information.

If there is an error with the SSL connectivity it is possible to execute the test without the option to Validate Server Certificate. In this case the server certificate is not checked, but can be downloaded via Download Button and added to the keystore in Keystore Monitor as described in the above chapter.

Client Certificate based authentication can be checked via option Authenticate with Client Certificate. It is possible to enter a specific alias contained in the keystore or to leave the field empty, in this case the first alias fitting to the server request will be used.

Setup Secure Outbound HTTP Connection using Keystore Monitor
A typical task in an integration project is to connect remote systems to the SAP Cloud Integration Tenant. Before going into detailed configuration of the outbound communication lets first have a short look at the basics.
Basics of Secure System Configuration
The remote system can act either as a sender or a receiver of messages. The setup and the detailed configuration procedure differ according to the communication direction that is being set up: whether a remote system is supposed to send a message to the integration platform or the other way round.
For more detailed information about the different authentication and authorization options refer to the SAP Cloud Platform Integration Documentation, section ‘Connecting a Customer System to Cloud Integration’.
As Secure inbound communication does not need a keystore we focus only on the outbound communication in this blog. Inbound Communication is described in blog 'How to setup secure HTTP Inbound Communication'.
Secure Outbound Communication
For HTTPS based outbound communication with client certificate authentication, keys and certificates have to be maintained in the receiver system and in the cloud integration tenant keystore.
Configure Connection in Receiver and Cloud Integration Tenant
Download Root Certificate from Receiver System
For HTTPS based communication the receiver system needs to have a private key and its certificate chain, which typically consists of the server certificate and the intermediate certificate. The intermediate certificate is signed by a CA’s root certificate. The integration tenant trusts the backend server if the CA’s root certificate is available in its keystore.
For the configuration as a first step this root certificate needs to be downloaded from receiver system or provided by the receiver system administrator to add it to the cloud integration tenant in the next step.
Configurations in Cloud Integration Tenant
For HTTPS based communication in the cloud integration tenant, the root certificate of the receiver system provided in previous step is needed in the cloud integration tenant’s keystore. Furthermore, for using client certificate authentication, a signed key pair including complete certificate chain is required in the cloud integration tenant’s keystore.
Add Root Certificate of the Receiver Backend
To maintain certificates and keys in the keystore open the Keystore Monitor available in the Operations View in Web in section Manage Security. All certificates and private key pairs contained in the tenant keystore are shown.
To add the root certificate of the receiver backend, select the option Add -> Certificate from the action buttons on top of the table:
Define an Alias and select the *.cer file containing the root certificate of the receiver system:
Select Deploy to add the certificate to the keystore.
Maintain Signed Key in the Cloud Platform Integration Tenant (Option to be used with 28-October-2018 release)
As all newly provisioned cloud integration tenants already have a private key pair pre-delivered by SAP, which you can use this for your communications. But, if required, you can also create your own private key pairs in the cloud integration tenant. To create a new private key pair in the Keystore Monitor select the option Create -> Key Pair from the action buttons on top of the table:
In the creation dialog enter the Alias you want to use, select and define the key specific values and define a validity period. Select Deploy to create the key. If a key with the defined alias already exists, an error message is given. In this case you have to use a different Alias.
To be able to use this new key pair for a secure outbound connection you need to get this key pair signed by a Certification Authority supported by the receiver system. To do this, select the link for the key pair you want to use to get the details screen for the key pair. In the details screen use the option Download -> Download Signing Request to download the signing request. The download creates a file with the name <alias>.csr. This file can be send to a CA for signing the key.
Once you received the signing response from the CA, you can upload this using the option Update -> Signing Response in the details screen for the key pair. Select the file containing the signing response and select Update. The signature details are shown in the details of the key pair when you navigate through the certificate chain.
Now the key pair can be used for connecting to the receiver backend with client certificates.
For more details also refer to the SAP Cloud Platform Integration Documentation in chapter ‘Creating X.509 keys’.
Maintain Keystore in Keystore Explorer (Option to be used until 28-October-2018 release)
As the current version of the Keystore Monitor is not able to create signing requests, the signed private key including certificate chain has to be maintained in an external keystore maintenance tool, for example the Keystore Explorer.
As all newly provisioned cloud integration tenants already have a private key pair pre-delivered by SAP, which you can use this for your communications. But, if required, you can also create your own private key pairs for the cloud integration tenant using an external tool, for example the keystore explorer. Use the external tool to create a new key pair, create the signing request, send it to an CA and import the signing response. Make sure you use an alias name in the customer namespace - do not use the prefix sap.
This is described in detail in SAP Cloud Platform Integration Documentation in chapter ‘Creating X.509 keys’.
Afterwards import the keystore in Keystore Monitor. To import the created keystore file, open the Keystore Monitor available in the Operations View in Web in section Manage Security.
Upload the keystore via Add -> Keystore button on the top of the monitor.
Browse the *.jks file and enter the password you gave in previous step when creating the keystore. The private key pair contained in the keystore file will be added to the existing entries for owner Tenant Administrator with the aliases used in Keystore Explorer.
More information about maintaining keys and certificates in Keystore Monitor, about migration of existing keystores into the new monitor and about existing naming conventions can be found in blog ‘How to use Keystore Monitor to maintain your keys and certificates’.
Authorization
To maintain keys and certificates in Keystore Monitor your user needs the Group Role AuthGroup.Admin or Single Roles IntegrationOperationServer.read, NodeManager.read and
NodeManager.deploysecuritycontent.
Download Certificate and Root Certificate from Keystore Monitor (Option to be used with 28-October-2018 release)
For client certificate based authentication at the receiver system the root certificate and the client certificate of the cloud integration tenants private key are needed in the receiver system. For this, export the certificate and the root certificate of the private key pair in the Keystore Monitor. These options are available as single line options.
To download the public certificate select Download Certificate from the actions button in the line of the private Key Pair:
Download Certificate for a Key Pair will create a file with the name <alias>.cer in the download directory. The file contains the public certificate for the private key.
To download the root certificate select Download Root Certificate from the actions button in the line of the private Key Pair:
Download Root Certificate for a Key Pair will create a file with the name <alias>_rootCA.cer in the download directory. The file contains the root certificate for the private key.
Both certificates need to be imported into the receiver system in the next step.
Download Certificate Chain from Keystore Monitor (Option to be used until 28-October-2018 release)
For client certificate based authentication at the receiver system the root certificate and the client certificate of the cloud integration tenants private key are needed in the receiver system. For this, export the certificate chain of the private key pair in the Keystore Monitor. This option is available as single line option, select Download from the actions Button in the line of the private Key Pair.
Download for a Key Pair will create a file with the name <alias>.p7b in the download directory. The file contains the whole certificate chain assigned to the private key. The certificate chain file can, for example, be opened with the Certificates Snap-in of Microsoft Management Console (Certmgr.msc), which is usually available on Windows systems.
Open the downloaded <alias>.p7b file with the Certificates Snap-in on your system and open the tab Certificate Path. There, the whole certificate chain can be seen.
The entry on the top is the root certificate. Open the root certificate via double click. This will open the root certificate. In the tab Details export the root certificate into a file via Copy to File. In the Certificate Export Wizard export the root certificate as DER encoded binary X.509 file. Use any arbitrary file name to save the certificate as *.cer file.
The same way you exported the root certificate, also export the client certificate, which is the one at the bottom of the certificate chain.
Both certificates need to be imported into the receiver system in the next step.
Authorization
To download entries from Keystore Monitor your user needs the Group Role AuthGroup.IntegrationDeveloper or Single Roles IntegrationOperationServer.read and NodeManager.read.
Import Certificates to Receiver System
For outbound communication using client certificate authentication, in the receiver system the root certificate and the client certificate of the cloud integration tenant’s private key are to be imported into the backend.
For this, import the root certificate retrieved in previous step into the trust store of the receiver system. In addition, you normally need to import the client certificate into a user to certificate mapping in the receiver backend.
With this last step the configuration of the outbound communication using client certificates is completed. To test the connectivity, continue as described below.
Alternative configuration options
Beside the recommended and most used configuration option to have the whole certificate chain including the root CA certificate assigned to the server’s private key available in the server keystore and only the root certificate in the client’s trust store, there are other configuration options possible with which the client can establish a trust relation to the server:
- If the server keystore contains only the server certificate including intermediate certificate, the client keystore needs to contain only the root certificate in its keystore.
- If the server keystore contains only the server certificate without the certificate chain the client keystore needs to contain the intermediate and root certificate.
- If the server uses a self-signed key (if the receiver accepts it) the client keystore needs to contain this certificate.
Similar options are possible when the server has to trust the client certificate in the client certificate authentication use case.
Connectivity Test
After setting up the connection toward the backend system, the connectivity test feature can be used to test the communication or even to download server certificates.
TLS Connectivity Test
The Connectivity Test is available in Operations View in Web, in section Manage Security Material. Selecting the Connectivity Test tile from Overview Page will open the test tool offering tests for different protocols. To test the HTTPS based outbound communication the TLS option is to be selected.
Enter the address of your cloud backend (Tests to On-Premise backends via cloud Connector cannot be done) as used in the outbound channel and execute the test. The test will give a success message or an error with detailed error information.
If there is an error with the SSL connectivity it is possible to execute the test without the option to Validate Server Certificate. In this case the server certificate is not checked, but can be downloaded via Download Button and added to the keystore in Keystore Monitor as described in the above chapter.
Client Certificate based authentication can be checked via option Authenticate with Client Certificate. It is possible to enter a specific alias contained in the keystore or to leave the field empty, in this case the first alias fitting to the server request will be used.
- SAP Managed Tags:
- SAP Integration Suite,
- Cloud Integration
Labels:
23 Comments
You must be a registered user to add a comment. If you've already registered, sign in. Otherwise, register and sign in.
Labels in this area
-
ABAP CDS Views - CDC (Change Data Capture)
2 -
AI
1 -
Analyze Workload Data
1 -
BTP
1 -
Business and IT Integration
2 -
Business application stu
1 -
Business Technology Platform
1 -
Business Trends
1,661 -
Business Trends
85 -
CAP
1 -
cf
1 -
Cloud Foundry
1 -
Confluent
1 -
Customer COE Basics and Fundamentals
1 -
Customer COE Latest and Greatest
3 -
Customer Data Browser app
1 -
Data Analysis Tool
1 -
data migration
1 -
data transfer
1 -
Datasphere
2 -
Event Information
1,400 -
Event Information
64 -
Expert
1 -
Expert Insights
178 -
Expert Insights
269 -
General
1 -
Google cloud
1 -
Google Next'24
1 -
Kafka
1 -
Life at SAP
784 -
Life at SAP
10 -
Migrate your Data App
1 -
MTA
1 -
Network Performance Analysis
1 -
NodeJS
1 -
PDF
1 -
POC
1 -
Product Updates
4,578 -
Product Updates
317 -
Replication Flow
1 -
RisewithSAP
1 -
SAP BTP
1 -
SAP BTP Cloud Foundry
1 -
SAP Cloud ALM
1 -
SAP Cloud Application Programming Model
1 -
SAP Datasphere
2 -
SAP S4HANA Cloud
1 -
SAP S4HANA Migration Cockpit
1 -
Technology Updates
6,886 -
Technology Updates
388 -
Workload Fluctuations
1
Related Content
- Cloud Integration: Manually Sign / Verify XML payload based on XML Signature Standard in Technology Blogs by SAP
- Harnessing the Power of SAP HANA Cloud Vector Engine for Context-Aware LLM Architecture in Technology Blogs by SAP
- Single Sign On to SAP Cloud Integration (CPI runtime) from an external Identity Provider in Technology Blogs by SAP
- AutoGen with SAP AI Core in Technology Blogs by SAP
- 10+ ways to reshape your SAP landscape with SAP BTP - Blog 3 Interview in Technology Blogs by SAP
Top kudoed authors
| User | Count |
|---|---|
| 15 | |
| 12 | |
| 11 | |
| 9 | |
| 9 | |
| 9 | |
| 9 | |
| 9 | |
| 8 | |
| 8 |