
- SAP Community
- Products and Technology
- Technology
- Technology Blogs by SAP
- Adding security, traffic management and caching po...
Technology Blogs by SAP
Learn how to extend and personalize SAP applications. Follow the SAP technology blog for insights into SAP BTP, ABAP, SAP Analytics Cloud, SAP HANA, and more.
Turn on suggestions
Auto-suggest helps you quickly narrow down your search results by suggesting possible matches as you type.
Showing results for
Advisor
Options
- Subscribe to RSS Feed
- Mark as New
- Mark as Read
- Bookmark
- Subscribe
- Printer Friendly Page
- Report Inappropriate Content
06-19-2017
7:21 AM
This blog is Part5 of the 5-part blog-series. In this blog, we will introduce policies and will be able to manage Interfaces which are exposed from SAP Process Orchestration (SAP PO) through SAP Cloud Platform, API Management.
To know more on policies, refer https://blogs.sap.com/2016/03/17/sap-api-management-understanding-policy-flow/
Let’s Manage our SOAP Interface created as a part of Part3 of 5-part blog-series
Now I want to prevent unauthorized access to SOAP interface which is exposed as open API.
Navigate to API Portal from your Hana trial account and Navigate to Develop
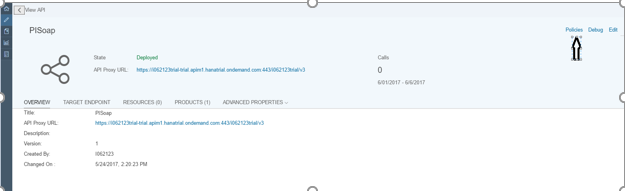
Open “PISoap” which we have created or any of the APIs under APIs tab

Navigate to Policy Editor by Clicking on Policies
Click on Edit, select preflow and click on Add button towards right side to Add Verify API Key Policy

Verify API Key should be added and in script area let’s get the value of API Key from Header

Then update the policy by clicking Update.
Also, Save the API proxy.
Navigate to Product and create a product to consume API Proxy

Under APIs click on Add, select “PISoap” and click ok

Publish this Product
Consuming the API and Validating
To consume the API via product, we need to know login to the developer portal. Once logged in, we will find the newly published API Product here.
Navigate to Hanatrial cockpit and open Developer Portal
Published product from API Portal will be available

Open the Product and click on Subscribe it for New Application
Give Name and other details and Save it.
Once created successfully, you will get an appkey and secret for that application

Copy Application Key and Save it in a notepad
Testing the API using Verify API Key Policy
Add the appkey (which was retrieved while creating application) as the Header and click Send to get the result

Let’s Manage our Odata Interface created as a part of Part2 of the 5-part blog-series
In this section, we will see how to improve Odata interface’s performance through reduced latency and network traffic by applying ResponseCache policy.
Response Cache policy caches data from a backend resource, reducing the number of requests to the resource. As apps make requests to the same URI, you can use this policy to return cached responses instead of forwarding those requests to the backend server.
The Response Cache policy type is unique in that it must be attached to both the request and response flow in an API proxy
Open API Portal from your Hana trial account and click on Odata API already created.
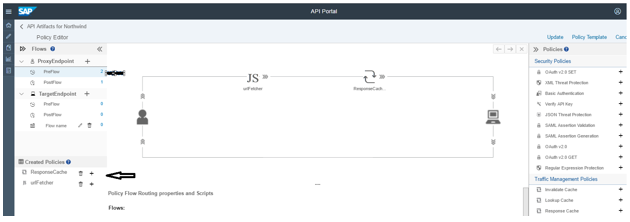
 Navigate to Policy Editor and click on edit. Add Response Cache from right side to Post flow of proxy end point.

Same Response Cache we need to add it to Pre-Flow of proxy end point
Let’s cache complete response what we get after firing the GET call.
So, we need a Java script policy which will get the URL and a condition that if it’s a “GET” call then only cache it.
Let’s Apply JavaScript policy
Click on Java Script and add it.

Click on script and add a script and the name should be same as whatever is called in JS in above screen shot

Click on Response Cache (preflow and postflow) and give the condition

Let’s Validate OData interface’s performance
Navigate to test console and click on Send. You will get a response in status bar.

Since second time when we hit the proxy endpoint call to backend is not made instead, data is fetched from cache and hence reduction in time.
Let’s Manage our REST Interface created as a part of Part4 of the 5-part blog-series
In this section, we will see how to limits the number inbound requests. Though, this policy can be attached at the proxy endpoint or the target endpoint. At the proxy endpoint, this policy limits inbound requests. When you attach this policy at the Target Endpoint, it limits request forwarded to the backend service.
Spike arrests are not implemented as counts. Rather, they are implemented as a rate limit which is based on the time. The last matching message was processed. If you specify 6 messages per minute, it means that requests can only be submitted at the rate of one per 10 sec intervals. A second request within 10 seconds on the same API Management server will be rejected.
Let see with an example, How it Works!
Open API Portal and Navigate to REST interface which we created as a part of Part4 5-part blog-series
Navigate to Policy Editor and Apply Spike Arrest policy.
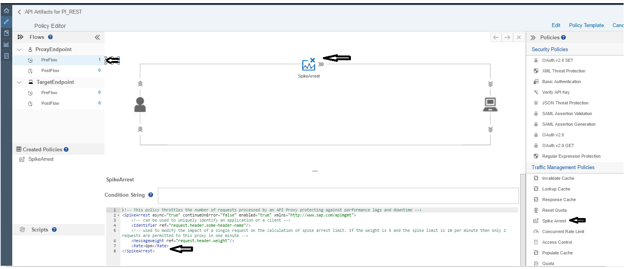
Update and Save it.
Now let’s Send a request and Validate it!
Since we have given 6 requests/min that means 1 req/10 seconds and if we try for second request in that 10 second it will fail.
To know more on policies, refer https://blogs.sap.com/2016/03/17/sap-api-management-understanding-policy-flow/
Let’s Manage our SOAP Interface created as a part of Part3 of 5-part blog-series
Now I want to prevent unauthorized access to SOAP interface which is exposed as open API.
Navigate to API Portal from your Hana trial account and Navigate to Develop
Open “PISoap” which we have created or any of the APIs under APIs tab
Navigate to Policy Editor by Clicking on Policies
Click on Edit, select preflow and click on Add button towards right side to Add Verify API Key Policy
Verify API Key should be added and in script area let’s get the value of API Key from Header
Then update the policy by clicking Update.
- The APIKey ref is the key which is used while consuming this API.
- Since, the key is saved as request header, so the while consuming, this key is to be passed as request header.
- Refer here for more details
Also, Save the API proxy.
Navigate to Product and create a product to consume API Proxy
Under APIs click on Add, select “PISoap” and click ok
Publish this Product
Consuming the API and Validating
To consume the API via product, we need to know login to the developer portal. Once logged in, we will find the newly published API Product here.
Navigate to Hanatrial cockpit and open Developer Portal
Published product from API Portal will be available
Open the Product and click on Subscribe it for New Application
Give Name and other details and Save it.
Once created successfully, you will get an appkey and secret for that application
Copy Application Key and Save it in a notepad
Testing the API using Verify API Key Policy
- To test the API, we will be using the SAP API Management’s Test Console. Refer here for more details.
- Add the proper URl and Authentication (if any) in the Test Console.
Add the appkey (which was retrieved while creating application) as the Header and click Send to get the result
Let’s Manage our Odata Interface created as a part of Part2 of the 5-part blog-series
In this section, we will see how to improve Odata interface’s performance through reduced latency and network traffic by applying ResponseCache policy.
Response Cache policy caches data from a backend resource, reducing the number of requests to the resource. As apps make requests to the same URI, you can use this policy to return cached responses instead of forwarding those requests to the backend server.
The Response Cache policy type is unique in that it must be attached to both the request and response flow in an API proxy
Open API Portal from your Hana trial account and click on Odata API already created.
Navigate to Policy Editor and click on edit. Add Response Cache from right side to Post flow of proxy end point.Same Response Cache we need to add it to Pre-Flow of proxy end point
Let’s cache complete response what we get after firing the GET call.
So, we need a Java script policy which will get the URL and a condition that if it’s a “GET” call then only cache it.
Let’s Apply JavaScript policy
Click on Java Script and add it.
Click on script and add a script and the name should be same as whatever is called in JS in above screen shot
Click on Response Cache (preflow and postflow) and give the condition
Let’s Validate OData interface’s performance
Navigate to test console and click on Send. You will get a response in status bar.
Since second time when we hit the proxy endpoint call to backend is not made instead, data is fetched from cache and hence reduction in time.
Let’s Manage our REST Interface created as a part of Part4 of the 5-part blog-series
In this section, we will see how to limits the number inbound requests. Though, this policy can be attached at the proxy endpoint or the target endpoint. At the proxy endpoint, this policy limits inbound requests. When you attach this policy at the Target Endpoint, it limits request forwarded to the backend service.
Spike arrests are not implemented as counts. Rather, they are implemented as a rate limit which is based on the time. The last matching message was processed. If you specify 6 messages per minute, it means that requests can only be submitted at the rate of one per 10 sec intervals. A second request within 10 seconds on the same API Management server will be rejected.
Let see with an example, How it Works!
Open API Portal and Navigate to REST interface which we created as a part of Part4 5-part blog-series
Navigate to Policy Editor and Apply Spike Arrest policy.
Update and Save it.
Now let’s Send a request and Validate it!
Since we have given 6 requests/min that means 1 req/10 seconds and if we try for second request in that 10 second it will fail.
- SAP Managed Tags:
- API Management,
- SAP Process Orchestration
You must be a registered user to add a comment. If you've already registered, sign in. Otherwise, register and sign in.
Labels in this area
-
ABAP CDS Views - CDC (Change Data Capture)
2 -
AI
1 -
Analyze Workload Data
1 -
BTP
1 -
Business and IT Integration
2 -
Business application stu
1 -
Business Technology Platform
1 -
Business Trends
1,658 -
Business Trends
93 -
CAP
1 -
cf
1 -
Cloud Foundry
1 -
Confluent
1 -
Customer COE Basics and Fundamentals
1 -
Customer COE Latest and Greatest
3 -
Customer Data Browser app
1 -
Data Analysis Tool
1 -
data migration
1 -
data transfer
1 -
Datasphere
2 -
Event Information
1,400 -
Event Information
66 -
Expert
1 -
Expert Insights
177 -
Expert Insights
299 -
General
1 -
Google cloud
1 -
Google Next'24
1 -
Kafka
1 -
Life at SAP
780 -
Life at SAP
13 -
Migrate your Data App
1 -
MTA
1 -
Network Performance Analysis
1 -
NodeJS
1 -
PDF
1 -
POC
1 -
Product Updates
4,577 -
Product Updates
345 -
Replication Flow
1 -
RisewithSAP
1 -
SAP BTP
1 -
SAP BTP Cloud Foundry
1 -
SAP Cloud ALM
1 -
SAP Cloud Application Programming Model
1 -
SAP Datasphere
2 -
SAP S4HANA Cloud
1 -
SAP S4HANA Migration Cockpit
1 -
Technology Updates
6,873 -
Technology Updates
427 -
Workload Fluctuations
1
Related Content
- Supporting Multiple API Gateways with SAP API Management – using Azure API Management as example in Technology Blogs by SAP
- Empowering Retail Business with a Seamless Data Migration to SAP S/4HANA in Technology Blogs by Members
- 10+ ways to reshape your SAP landscape with SAP Business Technology Platform - Blog 5 in Technology Blogs by SAP
- SAP PI/PO migration? Why you should move to the Cloud with SAP Integration Suite! in Technology Blogs by SAP
- SAP Cloud Integration - Trading Partner Management - OData to EDI Interface (ProcessDirect) in Technology Blogs by Members
Top kudoed authors
| User | Count |
|---|---|
| 40 | |
| 25 | |
| 17 | |
| 14 | |
| 8 | |
| 7 | |
| 7 | |
| 7 | |
| 6 | |
| 6 |