Recently had to work in a Internet of Thing related project where sensor data was retreived from the machine and placed into CSV format in a specific directory inside the network. For time, resources and security reasons decided to use the Internet of Things service in SAP Cloud Platform in order to receive the data from the sensors stored in the different files, and sent using Python triggered by a small .bat script.
I think doing this was quite easy and many IoT projects start by reading information from csv's or flat files, so by doing the steps in this blog you might accelerate the process of gathering and uploading information into the platform for a later use with any other service within.
So the first step is to enable the IoT Service in the platform and define the Message type, device type and device inside the service, all the information regarding this process can be found here:
https://blogs.sap.com/2015/10/12/hands-on-video-tutorials-for-internet-of-things-iot-services/
In my case I have defined 1 device type, which are tied to a device and message type (with just 3 fields) for which I'll be using the Oauth authentication. The oath string can be retrieved from the IoT Service.


Once done that, we can start focusing in our python script where we are going to be using "csv" and "requests" library. Python installer can be found in
https://www.python.org/downloads/, for this scenario I'm using version 3 of python.

Locate the directory where Python is installed (in my case C:\Program Files (x86)\Python36-32). Python works using different libraries that we can install using Windows console. That will be the case for requests library, which we will install by using the following command in CMD. So once in the directory, right click in the window while holding shift key, and select 'open command window here' option and run the following command:

We don't need to install 'csv' library, as it is a standard library installed when we install python.
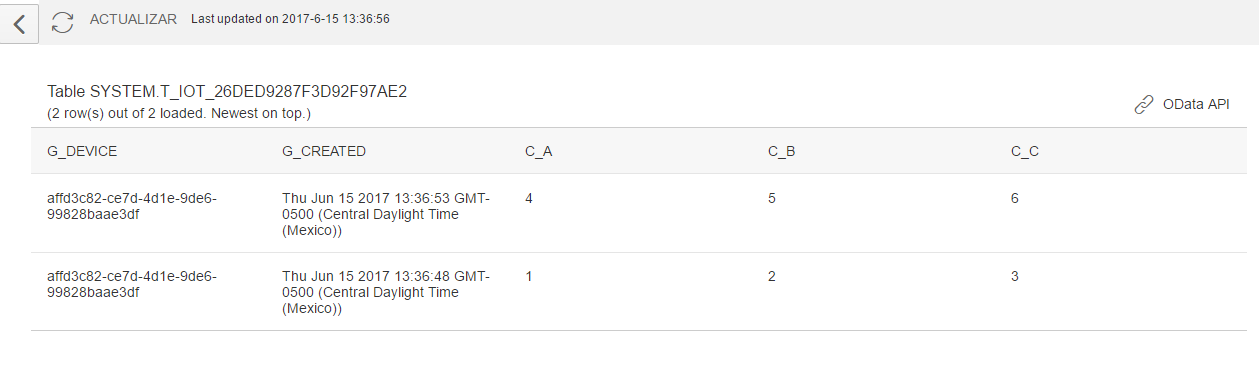
For the csv file defined, we have a really simple template with just 3 columns (that match the IoT service message type) and 2 lines of rows (for blog purposes, in the Project we had more than 50 columns and reading info every second)

Now we are ready to code, and for this scenario I used the following code:
import csv


import requests #importing the needed libraries


url = "https://iotmmsi848070trial.hanatrial.ondemand.com/com.sap.iotservices.mms/v1/api/http/data/affd3c82-ce7d-4d1e-9de6-99828baae3df" #defining the service URL obtained from the IoT Service cockpit


with open('test.csv', 'r') as f: #opening and defining the directory where the file is (in this case the document is named test.csv

reader = csv.reader(f)#opening the CSV file

next(reader) #skipping the header line

for row in reader: #iterating for all the rows in the document

valores = [] #initiallizing the array where we'll store the columns values

for col in row: #iterating all the columns of the actual row

valores.append(col) #inserting each value into the array

for index in range(len(valores)): #Printing the values into console to validate the data visually

print(valores[index])

var1 = valores[0] #assigning the array values to a variable

var2 = valores[1] #assigning the array values to a variable

var3 = valores[2] #assigning the array values to a variable

payload = "{\"mode\":\"sync\",\"messageType\":\"26ded9287f3d92f97ae2\",\"messages\":[{\"A\":" + var1 + ",\"B\":" + var2 + ",\"C\":" + var3 + "}]}" #Building payload message

headers = { #creating the header of message

'authorization': "Bearer 6a40329d3a5ac3245aee82cd14ea9ee", #USE THE OAUTH KEY HERE OBTAINED FROM THE DEVICE COCKPIT (changed the value for this blog)

'content-type': "application/json;charset=utf-8",

'cache-control': "no-cache"

}

response = requests.request("POST", url, data=payload, headers=headers) #obtaining the response from the service

print(response.text + " " + response.status_code) #printing the response status

print("mensaje enviado") #printing the end message of the program
Finally we save this document as we want, with .py extension (in my case blog.py) and we place the csv file in the directory that we set in line 6 of our program.
To run this script, using windows console, go to the directory of the py file and use the following command:
- python <yourdocumentname>.py (in my case python blog.py)
You should receive a 200 status response, and we can verify by checking the message table in the IoT service Cockpit.

This was a really simple scenario, as more functions can be added to create a more powerful logic. In the project we added functionality to handle errors, and send emails to alert in case of a problem.
Hope this helps you with your project.
Happy coding.
