
- SAP Community
- Products and Technology
- Technology
- Technology Blogs by SAP
- How to config and consume Push Notification from S...
Technology Blogs by SAP
Learn how to extend and personalize SAP applications. Follow the SAP technology blog for insights into SAP BTP, ABAP, SAP Analytics Cloud, SAP HANA, and more.
Turn on suggestions
Auto-suggest helps you quickly narrow down your search results by suggesting possible matches as you type.
Showing results for
serenayan
Discoverer
Options
- Subscribe to RSS Feed
- Mark as New
- Mark as Read
- Bookmark
- Subscribe
- Printer Friendly Page
- Report Inappropriate Content
06-09-2017
9:15 AM
SAP HANA Cloud Platform, Mobile Service for Development and Operations
Table of Contents
5 RESTNOTIFICATION API DETAILS
5.1 Notification Scenarios with restnotification API
5.1.1 Application
5.1.2 User and Devices
5.1.3 Registration ID
5.1.4 Users per Application
5.1.5 Registration List
5.2 Payload Handling with restnotification API
5.2.1 APNS Push Notification Payload Handling
5.2.2 GCM Push Notification Payload Handling
5.2.3 WNS Push Notification Payload Handling
5.3 Status Codes
5.3.1 Status Code 0
5.3.2 Status Code 1
5.3.3 Status Code 2
5.3.4 Status Code 3
6 FIORI LAUNCHPAD NOTIFICATION SUPPORT
6.1 Push to Capability
6.1.1 Create Application Connection with Capability Handling
6.1.2 Device-type ( form factor) support
6.2 Supported Capability Modes
6.2.1 Wildcard (*)
6.2.2 Match Capability Name only
6.3 Enhanced Badge Handling
7 ACTIONABLE PUSH
8 PUSH DESK
8.1.1 Step-by-step procedure
9 HELPFUL LINKS
5 RESTNOTIFICATION API DETAILS
5.1 Notification Scenarios with restnotification API
The Push API 'restnotification' provides a mechanism to send push notification to an application that is registered with the server. Other push interfaces using HTTP headers or URL parameters required that you send messages only to a registration ID. In addition to registration ID, the restnotification interface also sends the message to a specific user or to all users of a specific application or a list of registration IDs. The messages are queued in the server and sent out asynchronously
Notifications can be sent in the following categories:
- Notification to devices that are registered to an application.
- Notification to all the devices registered to a particular user.
- Notification to a device by using an application registration ID.
- Notification to all users of an application.
- Notification to a list of registrations.
5.1.1 Application
This section describes how send push notification to devices that are registered to an application.
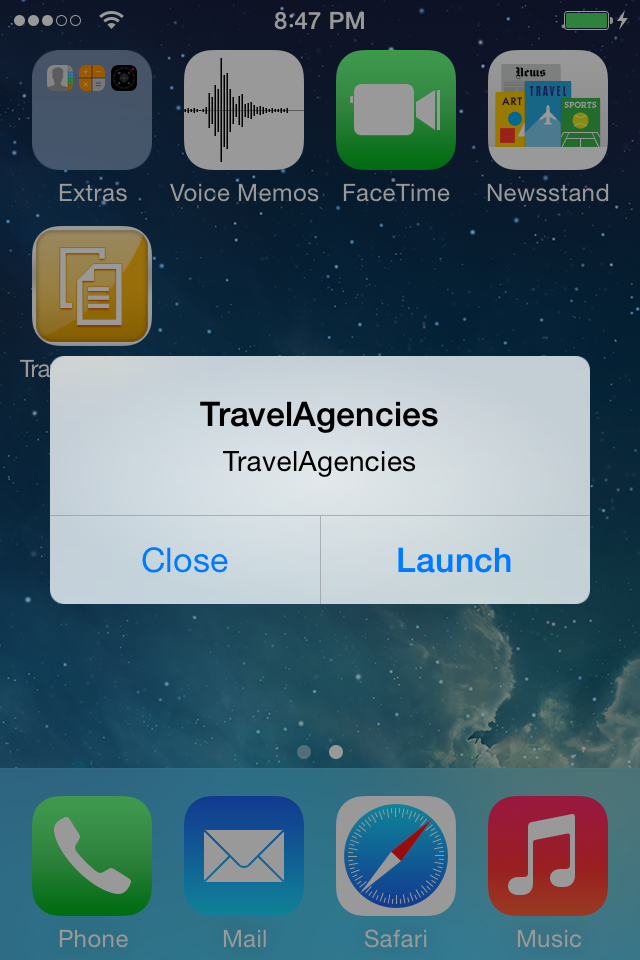
- Open Firefox REST client and enter the URL for the mobile platform notification endpoint. The notification endpoint has the following syntax:
http:// <HMC base URL>/restnotification/application/<ApplicationID>/
if it is SMP3 server, please add SMP3 Server URL and Port instead of HMC base URL. Same for the below sections which mentioned "HMC base URL" - Set the method to POST.
- Set the Content-type to application/json.
- Add the following payload:
{

"alert": "TravelAgencies",

"data": "Notification to all devices registered to application",

"sound": "default"

}
The request should look like this:

- Select the SEND button.You may get a prompt to authenticate.If so, enter the credentials for the user with notification role.
- Once authenticated, the request should be posted and a successful response should return a status of "201 Created".

If you app is open, you should receive a notification alert with data from both the X-SMP-APNS-ALERT and X-SMP-APNS-DATA headers. If your app is closed, you should get the data within the X-SMP-APNS-ALERT only. In either case, the default notification sound should also be heard.

- Open Firefox REST client and enter the URL for the mobile platform notification endpoint. The notification endpoint has the following syntax:
5.1.2 User and Devices
This section describes how send push notification to all the devices registered to a particular user.
- Open Firefox REST client and enter the URL for the mobile platform notification endpoint. The notification endpoint has the following syntax:
http[s]:// <HMC base URL>/ restnotification/application/flight/user/<username> - Set the method to POST.
- Set the Content-type to application/json.
- Add the following payload:
{

"alert": "TravelAgencies",

"data": "Notification to all devices registered to a user",

"sound": "default"

}
The request should look like this:

- Select the SEND button.
- You may get a prompt to authenticate. If so, enter the credentials for the user with notification role.
- Once authenticated, the request should be posted and a successful response should return a status of "201 Created".
- If you app is open, you should receive a notification alert with data from both the X-SMP-APNS-ALERT and X-SMP-APNS-DATA headers. If your app is closed, you should get the data within the X-SMP-APNS-ALERT only. In either case, the default notification sound should also be heard.

5.1.3 Registration ID
This section describes how send push notification to a device by using an application registration ID.
- Open Firefox REST client and enter the URL for the mobile platform notification endpoint. The notification endpoint has the following syntax:
http[s]:// <HMC base URL>/restnotification/registration/ <registration ID> - Set the method to POST.
- Set the Content-type to application/json.
- Add the following payload:
{

"alert": "TravelAgencies",

"data": "Notification based on application registration ID",

"sound": "default"

}
The request should look like this:

- Select the SEND button.
- You may get a prompt to authenticate. If so, enter the credentials for the user with notification role.Once authenticated, the request should be posted and a successful response should return a status of "201 Created".
- If you app is open, you should receive a notification alert with data from both the X-SMP-APNS-ALERT and X-SMP-APNS-DATA headers. If your app is closed, you should get the data within the X-SMP-APNS-ALERT only. In either case, the default notification sound should also be heard.
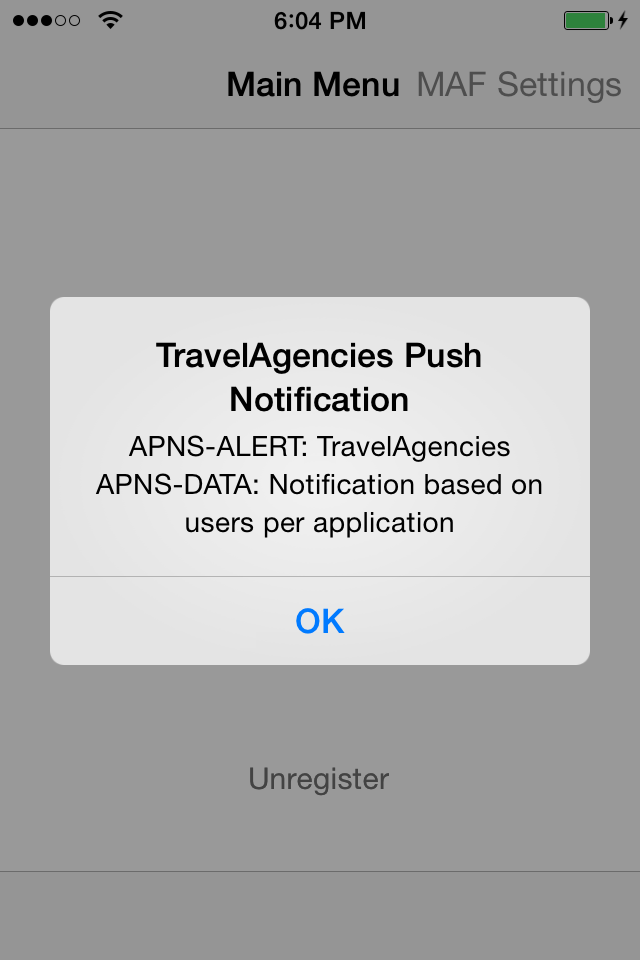
5.1.4 Users per Application
This section describes how send push notification to all the users of an application.
- Open Firefox REST client and enter the URL for the mobile platform notification endpoint. The notification endpoint has the following syntax:
http[s]:// <HMC base URL>/restnotification/application/flight/user - Set the method to POST.
- Set the Content-type to application/json.
- Add the following payload:
{

    "notification": {

        "alert": "TravelAgencies",

        "data": "Notification based on users per application",

        "sound": "default"

    },

    "users": [

        "SMP3DEMO"

    ]

}
The request should look like this:

- Select the SEND button.
- You may get a prompt to authenticate. If so, enter the credentials for the user with notification role.
- Once authenticated, the request should be posted and a successful response should return a status of "201 Created".
- If you app is open, you should receive a notification alert with data from both the X-SMP-APNS-ALERT and X-SMP-APNS-DATA headers. If your app is closed, you should get the data within the X-SMP-APNS-ALERT only. In either case, the default notification sound also be heard.
5.1.5 Registration List
This section describes how send push notification to a list of registrations.
- Open Firefox REST client and enter the URL for the mobile platform notification endpoint. The notification endpoint has the following syntax:
http[s]:// <HMC base URL>/restnotification/registration - Set the method to POST.
- Set the Content-type to application/json.
- Add the following payload:
{

    "notification": {

        "alert": "TravelAgencies",

        "data": "Notification to list of registrations",

        "sound": "default"

    },

    "registrations": [

        "0ca01d28-8f48-4c38-8764-c6b72d40d434"

    ]

}
The request should look like this:

- Select the SEND button.
- You may get a prompt to authenticate. If so, enter the credentials for the user with notification role.
- Once authenticated, the request should be posted and a successful response should return a status of "201 Created".
- If you app is open, you should receive a notification alert with data from both the X-SMP-APNS-ALERT and X-SMP-APNS-DATA headers. If your app is closed, you should get the data within the X-SMP-APNS-ALERT only. In either case, the default notification sound should also be heard.

5.2 Payload Handling with restnotification API
The notification message sent to the mobile service for dev & ops , using the restnotification API is forwarded to the notification provider server, which ultimately sends it to the device. The notification message to the mobile serive has multiple elements in the json payload as listed below:
- data
- alert
- sound
- badge
- customParameters
The structure of this json payload is different in comparison with the payload structures offered by the native platforms such as APNS, GCM and WNS. The values of the different elements in the incoming payload are mapped by the mobile service to the corresponding payload elements specified by the native notification providers before being forwarded it to them. When sending push notifications , JSON payload handling is transparent to the client since it affects only the communication between the mobile service platform and the notification provider servers. Use these notification elements to send GCM push requests to the mobile platform:
The following sections describe how to map the incoming values for a payload to the corresponding the native platform values.
5.2.1 APNS Push Notification Payload Handling
- Mapping of payload element : data
The value for data must be of type string. It is mapped as shown in the following example.
Sample notification payload sent to mobile service for dev & ops:
{

	    "data": "{\"acme1\":\"bar\", \"acme2\": [\"bang\", \"whiz\"]}"

}
Corresponding JSON payload forwarded by the mobile service to APNS:
{

		"data": "{\"acme1\":\"bar\", \"acme2\": [\"bang\", \"whiz\"]}"

}
- Mapping of payload element : alert
The mobile service for dev & ops maps alert to aps.alert value of APNS payload format. The value of alert can be either a string or JSON object converted to string.If alert value is a string, then it is set as value of aps.alert. If the value is a JSON object converted to string, then it is parsed and converted to a JSON object. All keys supported for aps as specified by APNS payload format are supported, such as body, title-loc-key, title-loc-args, action-loc-key, loc-args, launch-image. The key body has a higher priority than alter_body. If body is included, then alter_body is ignored. If only alter_body is included, it is used.
Sample notification payload sent to mobile service for dev & ops:
{

"alert": "{\"alert_body\":\"ignoreThis\",\"body\":\"Yourvacation request has been approved.\",\"action-loc-key\": \"VIEW\",\"loc-key\" : \"GAME_PLAY_REQUEST_FORMAT\", \"loc-args\" : [ \"Jenna\",\"Frank\"], \"launch-image\": \"push_icon.png\",\"title\" : \"GameRequest\",\"title-loc-key\" :\"titleLocKeyVal\", \"title-loc-args\": [\"foo\",\"bar\"]}"

}
Corresponding JSON payload forwarded by the mobile service to APNS:
{

 	"aps":    {

     	 "alert":       {

      		   "body": "Your vacation request has been approved.",

       		  "title": "Game Request",

        		 "launch-image": "push_icon.png",

        		 "loc-args":    [

            		"Jenna",

	    		 "Frank"

			],

        		 "title-loc-args":      [

           			 "foo",

           			 "bar"

         			],

         		"action-loc-key": "VIEW",

                          "loc-key": "GAME_PLAY_REQUEST_FORMAT",

        		 "title-loc-key": "titleLocKeyVal"

      }

}
- Mapping of payload element : sound
The mobile service for dev & ops maps sound value to aps.sound specified in APNS payload format. The value must be a String.
Sample notification payload sent to mobile service for dev & ops:
{

  "sound": "chime.aiff"

}
Corresponding JSON payload forwarded by the mobile service to APNS:
{

  "aps":  {

      "sound": "chime.aiff

  	}

}
- Mapping of payload element : badge
The mobile service for dev & ops maps it to APNs's aps.badge. The value must be a non negative number.
Sample notification payload sent to mobile service for dev & ops:
{

  "badge": 1

}
Corresponding JSON payload forwarded by the mobile service to APNS:
{

  "aps":    {

      "badge": 1

  }

}
- Mapping of payload element : customParameters
The mobile service payload ‘customParameters’ has three child elements, apns.category, apns.contentavailable and apns.customValues. Below is the mapping of each of them to the corresponding APNS custom value.
apns.category
"apns.category" as child from "customParameters" is mapped toAPNS's aps.category. The value must be String.
Sample notification payload sent to mobile service for dev & ops:
{

 "alert": "New vacation request",

 "customParameters":

{

   "apns.category": "NEW_MESSAGE_CATEGORY"

 }

}
Corresponding JSON payload forwarded by the mobile service to APNS:
{

  "aps": {

   "category": "NEW_MESSAGE_CATEGORY",

   "alert": "New vacation request"

  }

}
apns.contentAvailable
- "apns.contentAvailable" as child from "customParameters" is mapped to APNS's aps.contentAvailable. The value must be either 0 or 1.
Sample notification payload sent to mobile service for dev & ops:
{

  "customParameters": {

    "apns.contentAvailable": true

  }

}
Corresponding JSON payload forwarded to APNS:
{"aps": {"content-available": 1}}
apns.customValues
- "apns.customValues” as child from "customParameters" is mapped to APNS's custom values. The value must be a JSON Object converted to String.
Sample notification payload sent to mobile service for dev & ops:
{

 "alert": "New vacation request",

 "customParameters": {

      "apns.customValues": "{\"acme1\":\"bar\", \"acme2\" : [\"bang\", \"whiz\" ]}"

 }

}
Corresponding JSON payload forwarded by the mobile service to APNS:
{

   "aps": {"alert": "New vacation request"},

   "acme2":    [

      "bang",

      "whiz"

   ],

   "acme1": "bar"

}
5.2.2 GCM Push Notification Payload Handling
This describes payload handling for several special notification elements, and provides examples.
alert
Since a GCM message does not contain an element that corresponds to the mobile platform "alert" element, the value supplied with this field is rendered under the GCM element "data". If the GCM JSON payload feature is inactive, the value is still rendered as the URL parameter "data.alert", but is transparent to the client. Keep in mind that "alert" does not equal the GCM message "title" element, which enables backward compatibility for clients who expect the alert to be part of the "data" payload.
badge
The mobile platform notification element "badge" also has no corresponding GCM message element, and is rendered under the "data" element.
data
The mobile platform notification element "data" supports these content types:
String - a normal string of characters
Serialized JSON - a serialized JSON object
Previous versions of the mobile platform notification handler always sent the value as a string in the URL parameter "data.data". Now the notification handler tries to deserialize a JSON object structure from the parameter's content, and, if it succeeds, the JSON object structure renders under the GCM message element "data". To remain backward compatible, the value from "data" is also rendered under the GCM message element "data" using the key "data". This way the receiving client then can process the message as needed by accessing the deserialized JSON object, or accessing the serialized JSON string or plain text string. See the example below, which shows how the message is sent to GCM, and how the payload might be passed forward to the client.
customParameters
The mobile platform notification element "customParameters" also allows you to specify values for "alert", "badge" and "data", which, if set, take priority over their corresponding notification element fields. Aside from this, the values are handled accordingly, and as described above, except the data element, which is additionally rendered under the GCM message element "data" and the key "cdata" as well. This approach provides backward compatibility, but reduces the maximum supported payload size, since information is duplicated.
Example Requests
The following examples show requests using the data and customParameters elements.
data element
Example request using the data element:
{

   "alert": "Update Available",

   "badge": 1,

   "data": "{\"version\":\"1.13\",\"size\":\"14MB\",\"details\":{}}"

}
The resulting GCM message payload:
{

  "to": "GCMTOKEN-1234567",

  "data": {

   "version": "1.13",

   "details": {

    "size": "14MB"

   },

   "data": "{\"version\":\"1.13\",\"details\":{\"size\":\"14MB\"}}",

   "badge": "1",

   "alert": "Update Available"

  }

}
customParameters element
Example request using the customParameters element:
{

   "customParameters": {

     "gcm.alert": "Update Available",

     "gcm.badge": 1,

     "gcm.data": "{\"version\":\"1.13\",\"size\":\"14MB\",\"details\":{}}"

   }

}
The resulting GCM message payload:
{

  "to": "GCMTOKEN-1234567",

  "data": {

   "version": "1.13",

   "details": {

    "size": "14MB"

   },

   "data": "{\"version\":\"1.13\",\"details\":{\"size\":\"14MB\"}}",

   "cdata": "{\"version\":\"1.13\",\"details\":{\"size\":\"14MB\"}}",

   "badge": "1",

   "alert": "Update Available"

  }

}
The above examples show how "data" information is duplicated to remain backward compatible with older client applications, which expect data to be sent as string values under certain key names (such as "data", or "cdata"). The examples also show the proper GCM approach for sending a JSON payload, which is to deserialize the given "data" value into a JSON object structure.
- priority - allows the definition of a priority that is forwarded to the respective notification type handler. In case of GCM, the values "normal", which is the default if the field is left blank, and "high" are valid values.
- gcmNotification - holds GCM-specific notification elements. Unless specified, the data type for each element is "string". These are optional.
- collapseKey
- delayWhileIdle - holds a Boolean value
- timeToLive - holds a long value (TTL in milliseconds)
- restrictedPackageName
- title - if set, this field takes priority over the "alert" field of the notification element
- body
- icon
- sound - if set, this field takes priority over the "sound" field of the notification element
- tag
- color
- clickAction
- bodyLocKey
- bodyLocArgs - must hold a serialized JSON list of values
- titleLocKey
- titleLocArgs - must hold a serialized JSON list of values
For more detailed descriptions of the GCM specific fields, see GCM Connection Server Reference > HTTP Protocol, Downstream HTTP messages (JSON): https://developers.google.com/cloud-messaging/http-server-ref#send-downstream
If the JSON payload handling for GCM custom values feature is inactive, the old GCM notification handling behavior is applied, meaning that the above-mentioned notification elements are not part of the push message sent to GCM, and the message sent to GCM remains in plain-text format, instead of JSON format. Through the feature flag, the mobile platform GCM notification handler stays backward compatible, offering the possibility of including the (old) notification payload via headers and URL parameters.
The following example shows a complete push request to the mobile platform, using every element available:
{

   "alert": "Updates Available",

   "badge": 1,

   "data": "{'version':'1.13','size':'14MB'}",

   "priority": "high",

   "sound": "DefaultNotificationSound",

   "gcmNotification": {

     "title": "The Title For The App",

     "icon": "TheIcon",

     "body": "The Notification Body",

     "sound": "OverrideSound",

     "color": "Blue",

     "tag": "TheTag",

     "collapseKey": "TheCollapseKey",

     "delayWhileIdle": true,

     "timeToLive": 10,

     "restrictedPackageName": "com.sap.test",

     "clickAction": "TheClickAction",

     "bodyLocKey": "message",

     "bodyLocArgs": "[\"msg1\",\"msg2\"]",

     "titleLocKey": "titleMessage",

     "titleLocArgs": "[\"tmsg1\",\"tmsg2\"]"

    },

   "customParameters": {

     "gcm.badge": 2

   }

 }
Notification Element Validation
In earlier versions, only very basic notification element validation was applied, verifying only that at least one of the following elements "alert", "badge" or "data" contained information.
This behavior has been changed to accommodate the "send-to-sync" functionality of GCM, and to provide more granular methods of validating notification payload that is tailored to a specific notification type. See Send-to-Sync, below.
The input validation is still performed synchronously, meaning a notification with invalid values is not accepted, and results in an immediate error response being returned. Summary of the latest changes to the mobile platform GCM notification handler:
- timeToLive - validation ensures that the value of the field is in the range of 0 to 2419200.
- priority - validation ensures that the field contains either the value "normal" or "high", or no value at all, for which GCM assumes the default value of "normal".
- bodyLocArgs - validation ensures that the value of this field is a proper serialized JSON list containing only string values by trying to deserialize the JSON string into a Java list of string objects.
- titleLocArgs - validation ensures that the value of this field is a proper serialized JSON list containing only string values by trying to deserialize the JSON string into a Java list of string objects.
- maximum payload size - according to GCM documentation, the maximum payload size of the "data" element cannot exceed 4KB. This validation step takes all notification elements into account that are rendered later under the GCM "data" element, and estimates the total payload size. To maintain backward compatibility with older mobile platform message formats, the maximum allowed payload size is actually only about one third of the 4KB. SeeSpecial Notification Elements, below.
If any validation step fails because an invalid value was sent, the returned HTTP status is 400. The push response provides detailed information, such as the push status, which is "3" denoting an input validation error; and the push status message, which indicates the element that has failed, and why.
Example response:
HTTP/1.1 400 Bad Request

X-SMP-LOG-CORRELATION-ID: b1922884-4612-47a5-8654-fc01792d0bf4

Content-Type: application/JSON

{

  "status": {

    "value":"GCM notification validation error: invalid time_to_live value: 2419201",

    "code":3

  }

}
These new validation steps also apply if the feature mentioned in JSON Payload Support for GCM Push Notifications is inactive.
Send-to-Sync
By introducing more granular validation functionality, the mobile platform GCM notification handler now supports GCM's "send-to-sync" functionality, which means the smallest possible payload can now be sent to GCM.
For more information see Cloud Messaging > GCM Connection Server > HTTP Connection Server, Send-to-sync: https://developers.google.com/cloud-messaging/http#send-to-sync
Example of a send-to-sync request payload:
{}
The message sent to GCM is empty, except for the receiver's registration_id / GCM token, in a format similar to:
{ "to" : "bk3RNwTe3H0:CI2k_HHwgIpoDKCIZvvDMExUdFQ3P1..." }
Resend Messages
If processing on the GCM side fails, you can automatically resend messages. Resend is scheduled when the GCM response contains an error code (currently only HTTP 400 error response codes), and includes the "Retry-After" HTTP header.
If these conditions occur, the original message persists in the database, and is picked up by the push dispatcher, which runs periodically. The previously extracted value from the "Retry-After" header is honored accordingly. Configure the maximum number of retries using the parameter "push.config.async_queue_max_retries". The default value is 3.
The current implementation sends only HTTP 400 error response codes. This does not comply with the Google developer's documentation, which proposes using the "Retry-After" mechanism for 5 or 200+ error response codes. To comply, you must provision the 400 error code to handle the Resend mechanism for GCM Push API feature.
Logging and Customer Events
SAP HANA Cloud Platform, mobile service for development and operations make an event log entry for every GCM error code returned from the GCM server. For details about the expected errors that can be returned by GCM, see GCM Connection Server Reference > HTTP Protocol, Downstream message error response codes: https://developers.google.com/cloud-messaging/http-server-ref#error-codes
Validation errors lead to a customer event log entry detailing the element for which validation failed, and why.
5.2.3 WNS Push Notification Payload Handling
This section provides examples of JSON payload handling for WNS custom values.
wnsNotification
The wnsNotification entity provides payload handling for Windows. wnsNotification is validated with a higher priority than global configured properties (such as Data, Sound, Alert). The root element of the new entity, and all its direct subelements are optional.
badge
The badge element represents a certain WNS push schema (wns/badge).
Element handling:
- Overrides the global badge configuration, whether it is a number or a string.
- The badge is sent as a separate request to the device.
- If a number, 0 clears the badge; values from 1-99 are shown as given; and any value greater than 99 are shown as 99+.
- If a string, the badge is shown as a predefined Windows glyph.
See also: https://msdn.microsoft.com/en-us/library/windows/apps/br212849.aspx
rawData
The rawData element represents a certain WNS push schema (wns/raw).
Element handling:
- Overrides the global data configuration. Any string can be configured as rawData, and sent to the device.
version
The version element sets the version property at the notification requests (tile, toast and badge).
Element handling:
- Any string configured as version is sent to the device. The default is '1.0'.
lang
The lang element sets the lang property for the notification requests (tile, and toast).
Element handling:
- defines the language property of the content.
schema
The schema element defines which notification schemas should be sent.
Element handling:
- A list containing up to four elements.
- Restricted to one of 'BADGE', 'TILE', 'TOAST' or 'RAW'.
- The default sends all (in case content exists).
tileTemplate
The tileTemplate element sets the template property for tile schema at the binding attribute. Windows provides a selection of several predefined templates, which affect the final layout of the displayed notification at the device. The elements that can be selected depend on the device operating system version.
Element handling:
- Any string.
- Default value depends on the push content:
- Text only: TileSquareText04
- One picture and text: TileSquarePeekImageAndText04
- Few pictures and text: TileWidePeekImageCollection04
- One picture only: TileWideImage
- Few pictures only: TileWideImageCollection
See also: https://msdn.microsoft.com/en-us/library/windows/apps/windows.ui.notifications.tiletemplatetype.aspx
toastTemplate
The toastTemplate element sets the template property for toast schema at the binding attribute. Windows provides a selection of several predefined templates, which affect the final layout of the displayed notification at the device. The elements that can be selected depend on the device operating system version.
Element handling:
- Any string.
- Default value depends on the push content:
- Text only: ToastText01
- One picture and text: ToastImageAndText04
- Few pictures and text: ToastImageAndText04
- One picture only: ToastImageAndText04
- Few pictures only: ToastImageAndText04
See also: https://msdn.microsoft.com/en-us/library/windows/apps/windows.ui.notifications.toasttemplatetype.asp...
message
The message element defines the text attribute for tile and toast notifications.
Element handling:
- No, one, or more messages can be added.
- Any string.
baseUri
The baseUri element defines the baseUri property at the binding attribute for tile and toast. This property defines a central base URL which is used for all images.
Element handling:
- any string.
audio
The audio element defines the audio attribute for toast notifications.
Element handling:
- overrides the global sound configuration.
Properties:
- loop: [Boolean, optional] - defines whether the sound should be played in a loop.
o silent: [Boolean, optional] - defines whether the sound should be muted. If true, no sound is sent.
o src: [String, required] - defines the source of the sound file.
image
The image element defines the image attribute for tile and toast notifications.
Element handling:
- no, one, or more images can be added.
Properties:
- alt: [String, optional] - defines an alternative text if the image cannot be loaded.
- addImageQuery: [Boolean, optional] - allows Windows to add a query to the image src, the default is false.
- src: [String, required] - defines the source of the image.
commands
The commands element defines the commands attribute for toast notifications. Commands correspond to available actions that the user can take.
Element handling:
- no, one, or more commands can be added.
Properties:
- scenario [String,optional] - defines the scenario (alarm or incomingCall, the default is alarm).
- Aggregations: command:
- id [String, optional] - specifies one command from the system-defined command list. (such as snooze, or dismiss).
- arguments [String, optional] - an argument string that can be passed to the associated app to provide specifics about the action that it should execute in response to the user action.
The following example shows payload handing using JSON.
{    "wnsNotification": {

          "badge": "attention",

          "rawData": "WnsRawData",

          "version": "1.0",

          "baseUri": "http://foo.bar/base",

          "lang": "en-US",

          "schema": ["BADGE", "TILE", "TOAST", "RAW"],

          "tileTemplate": "TileWidePeekImageCollection04",

          "toastTemplate": "ToastImageAndText04",

          "message": ["message one", "message two", "message three"],

          "audio": {

               "loop": false,

               "silent": false,

               "src": "/foo/bar"

          },

          "image": [{

               "alt": "alternative text",

               "addImageQuery": true,

               "src": "/foo/de"

          }, {

               "alt": "alternative text2",

               "addImageQuery": false,

               "src": "/foo/de"

          }, {

              "src": "/foo/de"

          }],

          "commands": {

               "scenario": "alarm",

               "command": [{

                    "id": "snooze",

                    "arguments": "some arguments"

               }, {

                    "id": "dismiss"

               }]

          }

     }

}
5.3 Status Codes
When SMP/HCPms processes a push request sent to a service under the service paths /restnotification/ and /Notification/ a status (json) element is included in the response for each device that the notification was sent to, or should have been sent to in case of an error.
In case of a push to application or push to users request a result element holds separate status elements for each device registration of the application / of each user, that was included in the push notification processing.
Below is an example of such a result element including the status element (taken from a push to application response)
{

    "status": {

        "value": "OK",

        "code": 0

    },

    "registrationId": "3288e641-7f01-4cde-9788-b19ce5c0ec2c",

    "notificationId": "ee38dcdd-85fd-4844-9e21-43b3f42e7e14"

}
It can be seen that a registration Id is mapped to a status element giving information how the notification was processed for this specific device.
The status element consists of two fields called value and code. Code is a numeric error code, where value is a free text string including some more details about the error that might have occurred.
Any code other than 0 is considered an error. Since the text in the value field is not too detailed further actions in regards to trouble shooting need to be followed. For example query the notification details using the notification Id, if given, or taking a look in the customer event logs.
5.3.1 Status Code 0
Status code 0 denotes success. Below is an example response:
{

  "status": {

        "value": "OK",

        "code": 0

    },

    "notificationId": null,

    "results": [{

        "status": {

            "value": "OK",

            "code": 0

        },

        "registrationId": "cd875ab0-ddc0-4c0e-bff6-932361a8ccdb",

        "notificationId": "386b0f31-66c7-4bfe-b0d5-10a5cdf339a3"

    }]

}
5.3.2 Status Code 1
Status Code 1 denotes an Incomplete push request.
This only ever occurs in a push to users scenario, if no user names are given in the push payload. Currently this error code is never returned, but instead an HTTP status 400(Bad Request).
5.3.3 Status Code 2
Status Code 1 denotes a missing or unknown push target.
This error code is returned in the following scenarios(descending in order of probability):
- The device the push is sent to is not enabled for push. This could mean that the device still needs to register for push, or the register for push request was faulty. One prominent reason is that the header X-HTTP-METHOD: MERGE was not included in the register for push request.
Another likely one being the usage of an unsupported device type, or a missing device type definition in the request. Please see [1] for a list of supported device types and a list of device types that, when used, might lead to this issue. - In case of a push to device, where the given registration Id (an application connection id) is not found.
- A push to devices request was sent, but no device registrations were given in the push payload
- A push request was sent, but did not include a valid target (no application Id in case of a push to application, no APPCID in case of a push to device, etc.)
- A push request was sent for a device registration with an unsupported notification type. The notification type is automatically chosen when a new device is on-boarded. The given device type determines the notification type, which makes this error reason the most unlikely, but possible. Please see [1] for a list of supported device types and a list of device types that, when used, might lead to this issue.
{

    "status": {

        "value": "Can not find notification type for registration ID: 'ccc01464-a5b5-4a48-103-40aa38d7734f1'",

        "code": 2

    },

    "notificationId": null

}
5.3.4 Status Code 3
Status Code 1 denotes a Notification validation error.
This error is returned if the submitted push request was syntactically incorrect, or if no or an invalid push configuration was found for the application the device, that is currently processed, is registered to.
Result of a push to GCM device request with an invalid value for the "time_to_live" payload parameter:
{

    "status": {

        "value": "GCM notification validation error: invalid time_to_live value: -1",

        "code": 3

    },

    "notificationId": null

}
6 Fiori Launchpad Notification Support
6.1 Push to Capability
The push-to capability scenario is a push notification variation. This scenario enables enables a back-end to trigger push notifications to applications that have certain capabilities rather than to individual applications.
Applications provide capability information, such as 'purchaseOrder-display', when they register an application connection. Developers configure application connections to handle capabilities using the REST API Devices send capability type information during registration or update. SAP HANA Cloud Platform, mobile service for development and operations maintains the mapping between capabilities and applications. The platform then uses the capability information to push notifications to the device.
Application capabilities are part of the central application connection configuration. Similar to how the administrator controls some device capabilities from the server through feature policies, users control some application capabilities from the device. Device capabilities are controlled by the application and sent to the server. The capabilities are exchanged between the mobile app as part of the registration and settings exchange.
Through that mechanism, the mobile app can also override default capabilities. This gives users more control, enabling them to turn off certain capabilities for a mobile app instance, which translates into turning off native push notifications for a certain action into a particular application. Push can still be offered, but at the capability level, rather than individual application level.
6.1.1 Create Application Connection with Capability Handling
During registration, the device sends its form factor (such as smartphone or tablet), and the client can send a certain capability name [such as purchaseOrder-display, or a wildcard (*) in case the device has all the capabilities]. When the device user adds or removes a capability, the application connection is updated. The link below describes the details on how to create and update capabilities.
https://help.hana.ondemand.com/hana_cloud_platform_mobile_services/frameset.htm?5adee78ec04e4139b328...
6.1.2 Device-type ( form factor) support
Devices send device type information to the server during registration. Device types are categorized into groups using the form factor property. The client can use any non-empty string for the device type (case insensitive), such as SmartPhone, phone, Watch, desktop, and so forth.
6.2 Supported Capability Modes
6.2.1 Wildcard (*)
A wildcard indicates that the device has all capabilities. When someone sends a notification to a certain capability name, then the device form factor must match.
For example, Jean registers a device with a wildcard capability capabilityName: * and form factor: tablet, and Jake registers with capabilityName: * and form factor: phone. When the notification capability: 'purchaseOrder-display' and form factor: phone is pushed to both users, only Jake gets the notification. Jean does not get the notification, because the form factor does not match.
POST URL:
http://smpqa-win12-01.oak.sap.corp:8080/restnotification/capability/purchaseOrder-display
Payload:

 {

   "notification": {

     "data": "{\"NotificationId\":\"005056AB5B8D1ED4B99CC017A78D2429\",\"Text\": \"You have a new purchase order for approval\",\"NavigationTargetObject\":\"purchaseOrder\",\"NavigationTargetAction\": \"display\",\"NavigationTargetParam\":[{\"Key\": \"ID\",\"Value\":\"4711\"}],\"Actions\":[{\"ActionId\": \"approve\",\"ActionText\":\"Approve\",\"BulkActionText\":\"Approve all\",\"Nature\":\"POSITIVE\"},{\"ActionId\": \"reject\",\"ActionText\":\"Reject\",\"BulkActionText\":\"Reject all\",\"Nature\":\"NEGATIVE\"}],\"NotificationTypeId\":\"purchaseOrder\"}",

     "alert": "You have a new purchase order for approval",

     "customParameters": {

       "apns.category": "action"

     }

   },

   "users": [{

     "badge": 3,

     "formFactor": ["tablet"],

     "user": "jean"

   }, {

     "badge": 3,

     "formFactor": ["phone"],

     "user": "jake"

   }

   ]

}
6.2.2 Match Capability Name only
A specific capability name indicates that the notification must match the capability, and that the form factor is ignored.
For example, Yijie registers a device with a specific capability name capability: 'purchaseOrder-display' and form factor: phone. When a notification is pushed to capability: 'purchaseOrder-display' and formFactor: tablet, Yijie receives the notification because the capability matches. The form factor formFactor: tablet is ignored.
You can use CapabilityName either as a wildcard (*), or as specific strings, but not as a string + wildcard (*), such as purchase*. For example, if you set CapabilityName=purchase* using the REST client, and then send a notification to purchaseOrder-display, the device does not get the notification.
6.3 Enhanced Badge Handling
Enhanced badge handling is supported as part of capabilities. The mobile app handles multiple different capabilities, and the sum of all individual badge values is sent to the device.
There is not always a one-to-one relationship between the capability that is pushed to, and the badge number for, the relevant mobile app. A single mobile app could handle multiple different capabilities. However, this information is only known by SAP HANA Cloud Platform, mobile service for development and operations, and not by the back end. Consequently, the back end cannot deliver the accurate badge number for a random mobile application; it can only deliver badge numbers per capability. Typically, the API sends only a single badge number, which is too restrictive for this scenario, and may result in inaccurate badge numbers showing up on a user's device.
A single push is still targeted toward a particular capability, but the capability-based push API has been enhanced so that the back end can send the badge number per capability. SAP HANA Cloud Platform, mobile service for development and operations calculates the actual badge number for an application based on its registered capabilities, and sends the sum of all individual badge values to the device.
POST URL:
https://<hmc base URL>/restnotification/capability/capability2
Payload:

    {

    "notification": {

        "data": "...",

        "alert": "You have a new purchase order for approval",

        "customParameters": {

            "apns.category": "action"

        }

    },

    "users": [

        {

            "badge": 3,

            "formFactor": [

                "tablet"

            ],

            "user": "jean"

        },

        {

            "badges": {

                "capability1": 2,

                "capability2": 4,

                "capability3": 8

            },

            "formFactor": [

                "phone"

            ],

            "user": "jake"

        }

    ]

}
The badge property can either be a plain number, which is sent as-is to the native push service (the default implementation); or alternatively, the badges property can contain a map of capability/badge pairs (the enhanced implementation). The actual badge value is then determined based on the target application's registered capabilities.
In the example above, the push is delivered to the mobile apps that "jake" has installed, which have registered for "capability2". Assuming"jake" has one app with the wildcard capability, and one app with "capability2"' and"capability3"'; the badge count for the app with wildcard capability is 14, the badge count for the other app is 12.
The API enables a badge to be reset without sending an actual notification, and allows the notification data and alert to be empty. If capability context is not provided, the API supports the wildcard "*" as a capability in the URL. In other words, a push to/restnotification/capability/* must be delivered to all apps for a user that has registered with any capability (or the wildcard capability), and all other matching rules must be obeyed, for example, the form factor must still match.
7 Actionable Push
Starting with iOS 8, Apple supports actionable push notifications. The push API offered with SAP HANA Cloud Platform, mobile service for development and operations has been enhanced to support this feature. Using the API, the back end provides the capability for back ends to send the push 'category' through the platform to the device. This change applies to iOS only; for Android actionable push is fully controlled on the device by the app.
8 Push Desk
For native and hybrid applications (only) , Administrators can send push notifications to all users of a push-enabled application, or a subgroup of recipients (such as all iOS devices in a particular time zone). This is useful to broadcast important information, such as a maintenance window or a new feature or promotion. The Push Desk notification tool enables you to create a filtered list of recipients and compose the message. Requires the Notification User role to send notifications. Without the role you can still access the Push Desk tool and filter recipients, but you cannot send notifications.
This feature uses the existing push notification mechanism, but enables the administrator to create messages to send to recipients. The feature requires the user to have the Notification User role to send push notifications (if you do not see the Send button, the role needs to be added to the profile). Built in security ensures that you must wait a minute between sending notifications, to prevent spamming users.
8.1.1 Step-by-step procedure
- In Mobile Service for Development and Operations cockpit, access the Push Desk. You can select the application first, and then access Push Desk, or you can access Push Desk directly.
- Select Applications; select an application; and select settings button -> Push. Use this option to include the application ID as part of the filter criteria.
- Note that the Push option only appears for push-enabled applications, or applications with SAP's default push configuration enabled.
- Select Push Desk.
- Under Message, type the message to send to application users that meet your search criteria.
For example, See the new version of our widget!. - Click Filter to enter filter criteria to refine the list of recipients, and then click OK. The table below lists the available filter criteria.

- Under Device List, the list of available devices that meet the search criteria appears.
The Number of Devices field indicates how many device applications met the search criteria.
Scroll down to see all device applications in the list.

- Click Send, and OK to confirm. Once the notification is sent, you are prevented from sending another notification for 60 seconds. During this time, the Send button is grayed out, and the feature is suspended.After the notification is sent, the Sending Message Results window appears, showing each registration ID and its status. Check the server log to find out more information about any failed notifications.
9 Helpful Links
- Official Developer guide SAP HANA Cloud Platform, mobile service for development and operations:
https://help.hana.ondemand.com/hana_cloud_platform_mobile_services/frameset.htm?9252ba82338947fc9bd6... - Official Administrator guide SAP HANA Cloud Platform, mobile service for development and operations:
https://help.hana.ondemand.com/hana_cloud_platform_mobile_services/frameset.htm?82864e6309d84aed9566... - Kapsel Application SCN blog:
https://blogs.sap.com/2016/10/30/getting-started-kapsel-part-4-pushsp13/
Refer the first part of How to enable Push Notifications:
How to config and consume Push Notification from SAP Mobile Services (Part1)
- SAP Managed Tags:
- SAP Mobile Services,
- Android,
- SAP Mobile Platform
2 Comments
You must be a registered user to add a comment. If you've already registered, sign in. Otherwise, register and sign in.
Labels in this area
-
ABAP CDS Views - CDC (Change Data Capture)
2 -
AI
1 -
Analyze Workload Data
1 -
BTP
1 -
Business and IT Integration
2 -
Business application stu
1 -
Business Technology Platform
1 -
Business Trends
1,658 -
Business Trends
91 -
CAP
1 -
cf
1 -
Cloud Foundry
1 -
Confluent
1 -
Customer COE Basics and Fundamentals
1 -
Customer COE Latest and Greatest
3 -
Customer Data Browser app
1 -
Data Analysis Tool
1 -
data migration
1 -
data transfer
1 -
Datasphere
2 -
Event Information
1,400 -
Event Information
66 -
Expert
1 -
Expert Insights
177 -
Expert Insights
293 -
General
1 -
Google cloud
1 -
Google Next'24
1 -
Kafka
1 -
Life at SAP
780 -
Life at SAP
13 -
Migrate your Data App
1 -
MTA
1 -
Network Performance Analysis
1 -
NodeJS
1 -
PDF
1 -
POC
1 -
Product Updates
4,577 -
Product Updates
340 -
Replication Flow
1 -
RisewithSAP
1 -
SAP BTP
1 -
SAP BTP Cloud Foundry
1 -
SAP Cloud ALM
1 -
SAP Cloud Application Programming Model
1 -
SAP Datasphere
2 -
SAP S4HANA Cloud
1 -
SAP S4HANA Migration Cockpit
1 -
Technology Updates
6,873 -
Technology Updates
419 -
Workload Fluctuations
1
Related Content
- Developing & Deploying the UI5 App to Cloud Foundry and Accessing from App-router End-to-End Steps in Technology Blogs by Members
- Services not visible in BAS S/4 Hana Public Cloud. in Technology Q&A
- Accelerate Business Process Development with SAP Build Process Automation Pre-Built Content in Technology Blogs by SAP
- SAP Document and Reporting Compliance - 'Colombia' - Contingency Process in Technology Blogs by SAP
- Consuming SAP with SAP Build Apps - Connectivity options for low-code development - part 2 in Technology Blogs by SAP
Top kudoed authors
| User | Count |
|---|---|
| 35 | |
| 25 | |
| 14 | |
| 7 | |
| 7 | |
| 6 | |
| 6 | |
| 5 | |
| 4 | |
| 4 |