
- SAP Community
- Products and Technology
- Financial Management
- Financial Management Blogs by Members
- How to connect BOC to on-premise HANA Systems via ...
Financial Management Blogs by Members
Dive into a treasure trove of SAP financial management wisdom shared by a vibrant community of bloggers. Submit a blog post of your own to share knowledge.
Turn on suggestions
Auto-suggest helps you quickly narrow down your search results by suggesting possible matches as you type.
Showing results for
former_member20
Participant
Options
- Subscribe to RSS Feed
- Mark as New
- Mark as Read
- Bookmark
- Subscribe
- Printer Friendly Page
- Report Inappropriate Content
06-08-2017
8:26 PM
Business Object Cloud allow user to add and get data from On-premise HANA,Apache reverse proxy configuration is required to get data from hana.
Prerequisites,

Conditions need to fulfilled
* Ensure that the InA package (/sap/bc/ina/service/v2) or a higher-level package is configured
* Ensure that sap.bc.ina.service.v2.userRole::INA_USER role is assigned to all users who will use the live connection
What is reverse Proxy server ?
A reverse proxy server is a simple HTTP server that receives HTTP requests from the Web browser, and based on the URL that the browser requests, forwards the request to the appropriate server for processing. This gets around the browser’s security restrictions, as the browser believes it is only talking to a single host: the reverse proxy. The reverse proxy server then handles the forwarding and dispatching to the multiple servers behind it.
Steps to install Apache reverse proxy
Step.1 Download the latest version of Apache HTTP Server, Go to https://httpd.apache.org/, click Download in the lastest stable release of Apache

Step.2 Now taken to the download page. As we are going to install Apache on Windows "select file for Microsoft windows"

Step.3 Now download ApacheHaus.

Step.4 Download the Apache 2.4 x64 bit version.(if your windows is 64 bit version)

Step.1 Extract the downloaded zip file to a directory of your choice.In this example, we are extracting the files into C:\apps\Apache24

Step.2 Install Visual C++ 2015 Redistributable Package, which can be downloaded at https://www.microsoft.com/en-us/download/details.aspx?id=49984
Step.3 Open <ApacheDirectory>\conf\httpd.conf with a text editor

Step.4 Replace “Define SRVROOT "/Apache24"” with Define SRVROOT "<ApacheDirectory>" and save the file (if you extract the apache file in C:\apps\Apache24)

Step.5 Make a backup of a file httpd-ahssl.conf from folder C:\apps\Apache24\conf\extra and rename it as httpd-sapssl.conf


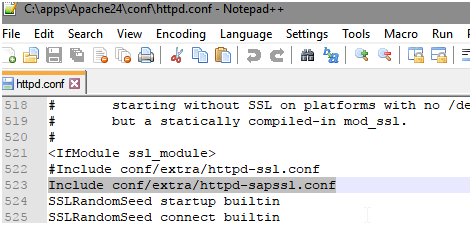
Step.6 Refer newly created conf file (httpd-sapssl.conf)in httpd.conf file by changing following lines in http.conf.conf file
Include conf/extra/httpd-ssl.conf
into
Include conf/extra/httpd-sapssl.conf
Step.7 Comment out this line to keep the HTTPS port only by adding a “#” to the beginning of the
Listen80 into #Listen80

Step.8 start Apache HTTP Server by opening a Command Prompt window, going to
C:\apps\Apache24\bin (or your<ApacheDirectory>\bin),
and issuing the command “httpd”.

Step.9 open your browser and issue https://localhost/ Ignore any warning if browser issued

Step.10 if you see the below message in your Browser ,then your apache is up and running without any errors

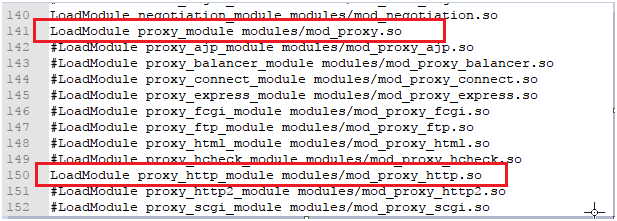
Step.11 Open C:\apps\Apache24\conf\httpd.conf using text editor and uncomment the following line if it is commented out and save the file
LoadModule proxy_module modules/mod_proxy.so
LoadModule proxy_http_module modules/mod_proxy_http.so
Step.12 Now configure the proxy rules. Open C:\apps\Apache24\extra\httpd-
sapssl.conf with a text editor and find the section <VirtualHost _default_:443>.
And add the following line
SSLProxyEngine on
SSLProxyVerify none
SSLProxyCheckPeerCN off
SSLProxyCheckPeerName off
SSLProxyCheckPeerExpire off

Step 13 Now configure the proxy rules. Open C:\apps\Apache24\extra\httpd-
sapssl.conf with a text editor, and find the section <VirtualHost _default_:443>.
And add the following line
ProxyPass / https://<your BOC url>/
ProxyPassReverse / https://<your BOC url>/
<Location /sap/>
ProxyPassReverse /sap/
</Location>

A simple BOC url looks like
<YourCustomDomain>.<region>.sapbusinessobjects.cloud
Step.14 Make sure you configure the Server Name in httpd-sapssl.conf under
<VirtualHost _default_:443> section

I.e ServerName is Host name of the server where your apache installed
ServerName <host name of apache server>:443
Example : vann1234.global.com:433
Now add the following line in httpd-sapssl.conf file
ProxyPreserveHost on
RequestHeader append X-Custom-Host <your BOC url>

Step.15 Start your Apache HTTP Server , and launch a web browser. Go to
https://<Fully_Qualified_Domain_Name_Reverse_Proxy>/sap/fpa/ui/index.html?tenant=<Your_Tenant_Number>.
Example :
https://vann1234.global.com/sap/fpa/ui/index.html?tenant=013
Now You should be automatically redirected to the user logon page.

Logon to the SAP Business Objects Cloud system, and verify everything works properly. If so, you have successfully setup reverse proxy for SAP Business Objects Cloud.
Step.16 Now edit httpd-sapssl.conf file using a text editor and add the following rules
ProxyPass /<hana path>/ https://<your hana host>:<your hana XS port>:<your hana XS port>/
ProxyPassReverse /<hana path>/ https://<your hana host>:<your hana XS port>/

Step.17 Restart apache server and issue the following URL
https://<your_reverse_proxy_host_name>/sap/bc/ina/service/v2/GetServerInfo.
For example
https://vann1234.global.com//sap/bc/ina/service/v2/GetServerInfo
When prompted, enter the HANA system’s user credential that has the INA_USER role assigned.
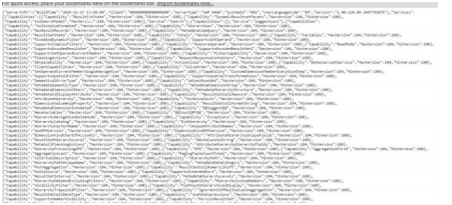
When u get the response in browser, We have now successfully setup Apache HTTP Server to act as a reverse proxy for the on-premise HANA system, and verified that HANA system’s InA service is running properly.
Step.18 Logon to the SAP BusinessObjects Cloud system via the reverse proxy
URL:https://<Fully_Qualified_Domain_Name_Reverse_Proxy>
In this example https://vann1234.global.com
It will redirect to BOC link

Login to BOC with credential
Step.19 Go to the Connection page by clicking on the main menu ->Connection.
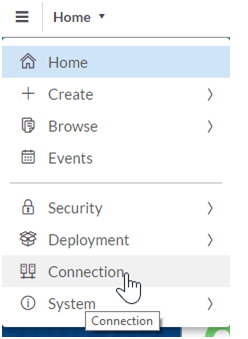
Step.20 Click on + on the top-right corner, and click on Live Data Connection -> SAP HANA to create a new connection definition.

Step.21 a pop will open

Name: <HANA_SYS_NAME>
Description:Any description

Connection Type: Path
System Type: HANA

User Name:<HANA_INA_USER>
Password: <HANA_INA_USER_PWD>
<HANA_PATH> is the path defined earlier in the reverse proxy for HANA. In this example,

Save the changes Now The newly-created remote HANA system definition is now part of the remote systems list.
Now BOC can be accessed from
https://<Fully_qualified_domain_name_of_reverse_proxy_server>
in this example
https://vann1234.global.com
Prerequisites,
- Business Object Cloud,( Typical BOC URL uses the following format: <YourCustomDomain>.<region>.sapbusinessobjects.cloud )
- SAP HANA SPS10, revision 102.2 or above
- Apache HTTP Server 2.4.20 or above
- SAP HANA Info Access Service (InA) v2
- SAP HANA Info Access and appropriate role (INA_USER) and privileges to access the HANA views
Above diagram illustrate the working principle of Appache reverse proxy
Conditions need to fulfilled
* Ensure that the InA package (/sap/bc/ina/service/v2) or a higher-level package is configured
* Ensure that sap.bc.ina.service.v2.userRole::INA_USER role is assigned to all users who will use the live connection
What is reverse Proxy server ?
A reverse proxy server is a simple HTTP server that receives HTTP requests from the Web browser, and based on the URL that the browser requests, forwards the request to the appropriate server for processing. This gets around the browser’s security restrictions, as the browser believes it is only talking to a single host: the reverse proxy. The reverse proxy server then handles the forwarding and dispatching to the multiple servers behind it.
Steps to install Apache reverse proxy
Step.1 Download the latest version of Apache HTTP Server, Go to https://httpd.apache.org/, click Download in the lastest stable release of Apache
Step.2 Now taken to the download page. As we are going to install Apache on Windows "select file for Microsoft windows"
Step.3 Now download ApacheHaus.
Step.4 Download the Apache 2.4 x64 bit version.(if your windows is 64 bit version)
Installation steps of Apache http server
Step.1 Extract the downloaded zip file to a directory of your choice.In this example, we are extracting the files into C:\apps\Apache24
Step.2 Install Visual C++ 2015 Redistributable Package, which can be downloaded at https://www.microsoft.com/en-us/download/details.aspx?id=49984
Step.3 Open <ApacheDirectory>\conf\httpd.conf with a text editor
Step.4 Replace “Define SRVROOT "/Apache24"” with Define SRVROOT "<ApacheDirectory>" and save the file (if you extract the apache file in C:\apps\Apache24)
Step.5 Make a backup of a file httpd-ahssl.conf from folder C:\apps\Apache24\conf\extra and rename it as httpd-sapssl.conf
Step.6 Refer newly created conf file (httpd-sapssl.conf)in httpd.conf file by changing following lines in http.conf.conf file
Include conf/extra/httpd-ssl.conf
into
Include conf/extra/httpd-sapssl.conf
Step.7 Comment out this line to keep the HTTPS port only by adding a “#” to the beginning of the
Listen80 into #Listen80
Step.8 start Apache HTTP Server by opening a Command Prompt window, going to
C:\apps\Apache24\bin (or your<ApacheDirectory>\bin),
and issuing the command “httpd”.
Step.9 open your browser and issue https://localhost/ Ignore any warning if browser issued
Step.10 if you see the below message in your Browser ,then your apache is up and running without any errors
Step.11 Open C:\apps\Apache24\conf\httpd.conf using text editor and uncomment the following line if it is commented out and save the file
LoadModule proxy_module modules/mod_proxy.so
LoadModule proxy_http_module modules/mod_proxy_http.so
Step.12 Now configure the proxy rules. Open C:\apps\Apache24\extra\httpd-
sapssl.conf with a text editor and find the section <VirtualHost _default_:443>.
And add the following line
SSLProxyEngine on
SSLProxyVerify none
SSLProxyCheckPeerCN off
SSLProxyCheckPeerName off
SSLProxyCheckPeerExpire off
Step 13 Now configure the proxy rules. Open C:\apps\Apache24\extra\httpd-
sapssl.conf with a text editor, and find the section <VirtualHost _default_:443>.
And add the following line
ProxyPass / https://<your BOC url>/
ProxyPassReverse / https://<your BOC url>/
<Location /sap/>
ProxyPassReverse /sap/
</Location>
A simple BOC url looks like
<YourCustomDomain>.<region>.sapbusinessobjects.cloud
Step.14 Make sure you configure the Server Name in httpd-sapssl.conf under
<VirtualHost _default_:443> section
I.e ServerName is Host name of the server where your apache installed
ServerName <host name of apache server>:443
Example : vann1234.global.com:433
Now add the following line in httpd-sapssl.conf file
ProxyPreserveHost on
RequestHeader append X-Custom-Host <your BOC url>
Step.15 Start your Apache HTTP Server , and launch a web browser. Go to
https://<Fully_Qualified_Domain_Name_Reverse_Proxy>/sap/fpa/ui/index.html?tenant=<Your_Tenant_Number>.
Example :
https://vann1234.global.com/sap/fpa/ui/index.html?tenant=013
Now You should be automatically redirected to the user logon page.
Logon to the SAP Business Objects Cloud system, and verify everything works properly. If so, you have successfully setup reverse proxy for SAP Business Objects Cloud.
Setup Apache Server to Act as a Reverse Proxy for HANA(On-premises)
Step.16 Now edit httpd-sapssl.conf file using a text editor and add the following rules
ProxyPass /<hana path>/ https://<your hana host>:<your hana XS port>:<your hana XS port>/
ProxyPassReverse /<hana path>/ https://<your hana host>:<your hana XS port>/
Step.17 Restart apache server and issue the following URL
https://<your_reverse_proxy_host_name>/sap/bc/ina/service/v2/GetServerInfo.
For example
https://vann1234.global.com//sap/bc/ina/service/v2/GetServerInfo
When prompted, enter the HANA system’s user credential that has the INA_USER role assigned.
When u get the response in browser, We have now successfully setup Apache HTTP Server to act as a reverse proxy for the on-premise HANA system, and verified that HANA system’s InA service is running properly.
Create Remote HANA System Definition on the SAP BusinessObjects Cloud System
Step.18 Logon to the SAP BusinessObjects Cloud system via the reverse proxy
URL:https://<Fully_Qualified_Domain_Name_Reverse_Proxy>
In this example https://vann1234.global.com
It will redirect to BOC link
Login to BOC with credential
Step.19 Go to the Connection page by clicking on the main menu ->Connection.
Step.20 Click on + on the top-right corner, and click on Live Data Connection -> SAP HANA to create a new connection definition.
Step.21 a pop will open
Name: <HANA_SYS_NAME>
Description:Any description
Connection Type: Path
System Type: HANA
User Name:<HANA_INA_USER>
Password: <HANA_INA_USER_PWD>
<HANA_PATH> is the path defined earlier in the reverse proxy for HANA. In this example,
Save the changes Now The newly-created remote HANA system definition is now part of the remote systems list.
Now BOC can be accessed from
https://<Fully_qualified_domain_name_of_reverse_proxy_server>
in this example
https://vann1234.global.com
- SAP Managed Tags:
- SAP Access Control for SAP S/4HANA
1 Comment
You must be a registered user to add a comment. If you've already registered, sign in. Otherwise, register and sign in.
Labels in this area
-
Assign Missing Authorization Objects
1 -
Bank Reconciliation Accounts
1 -
CLM
1 -
FIN-CS
1 -
Finance
2 -
GRIR
1 -
Group Reporting
1 -
Invoice Printing Lock
2 -
Mapping of Catalog & Group
1 -
Mapping with User Profile
1 -
matching concept and accounting treatment
1 -
Oil & Gas
1 -
Payment Batch Configurations
1 -
Public Cloud
1 -
Revenue Recognition
1 -
review booklet
1 -
SAP BRIM
1 -
SAP CI
1 -
SAP RAR
1 -
SAP S4HANA Cloud
1 -
SAP S4HANA Cloud for Finance
1 -
SAP Treasury Hedge Accounting
1 -
Z Catalog
1 -
Z Group
1
Related Content
- Payment Batch Configurations SAP BCM - S4HANA in Financial Management Blogs by Members
- SAP ECC Conversion to S/4HANA - Focus in CO-PA Costing-Based to Margin Analysis in Financial Management Blogs by SAP
- Security Safeguards for SAP Cloud Services: Addressing the Threats to Cloud Computing in Financial Management Blogs by SAP
- GRC Tuesdays: SAP Financial Compliance Management – Technical Setup and Business Configuration Tutorials in Financial Management Blogs by SAP
- Active Defense & Deception : 2023 in Financial Management Blogs by SAP