

- SAP Community
- Products and Technology
- CRM and Customer Experience
- CRM and CX Blogs by SAP
- Custom GAF (Guided Activity Floorplan) for C4C Uti...
CRM and CX Blogs by SAP
Stay up-to-date on the latest developments and product news about intelligent customer experience and CRM technologies through blog posts from SAP experts.
Turn on suggestions
Auto-suggest helps you quickly narrow down your search results by suggesting possible matches as you type.
Showing results for
former_member26
Explorer
Options
- Subscribe to RSS Feed
- Mark as New
- Mark as Read
- Bookmark
- Subscribe
- Printer Friendly Page
- Report Inappropriate Content
06-06-2017
7:17 AM
Any coding or configuration examples provided in this document are only examples and are NOT intended for use in a productive system. The example is only done to better explain and visualize the topic.
The objective of this blog is to show an example of how easily a Custom GAF can be created for Utilities Specific Process.
GAF (Guided Activity Floorplan) in C4C is the best way of representing a business process in guided manner. C4C SDK studio allows the creation of Custom GAF which can extend the capabilities standard process. C4C Utilities has it’s own reusable set of steps as Embedded Components (ECs) to make enhancement easier.
In this blog, we will create a Custom GAF (Guided Activity Floorplan) for Move In process (Utilities Move In Process) by making use of C4C SDK. For this we will be making use of all the standard steps of Utilities Move In Process with added custom step to enable Ticket creation with selected customer & Premise for Move In (You have to Save transaction at the end of Move In Process for ticket to get persisted).
Below will be our targeted GAF with the additional step called Ticket.

Overview of entire custom development scope : -
Provide required information for the creation of Solution.

Now Let's Create a Custom GAF where we can add reusable steps and custom steps.
To the newly created solution add new Item Guided Activity Floorplan (GAF).

Select the Utilities Action BO as the Business Object.

Open the GAF for Edit by selecting “Open in UI Designer” option.

3.1 Change the Floor plan title – The text provided will be appear as the GAF title.

3.2 Add additional steps - As by default there will be 3 steps, add additional steps using Navigation Items - Move in Process requires 4 steps in standard along with that we need one additional step for adding Custom EC. So add 2 more steps.

3.3 Configure each step - Properties like Title & Name. Name provided here is very important as this will be used for navigating between steps. Title provided at each step level will be that Step's header.

3.4 Add an Inport for pass data into GAF - Add an Inport to the GAF which will have PremiseID as a parameter, this is how we can default a premise ID from where GAF is triggered. If your requirement is to default Customer, then you can have 2 parameters one for Premise ID and one for Customer.
One can pass any number of parameters which can be used to default the values.

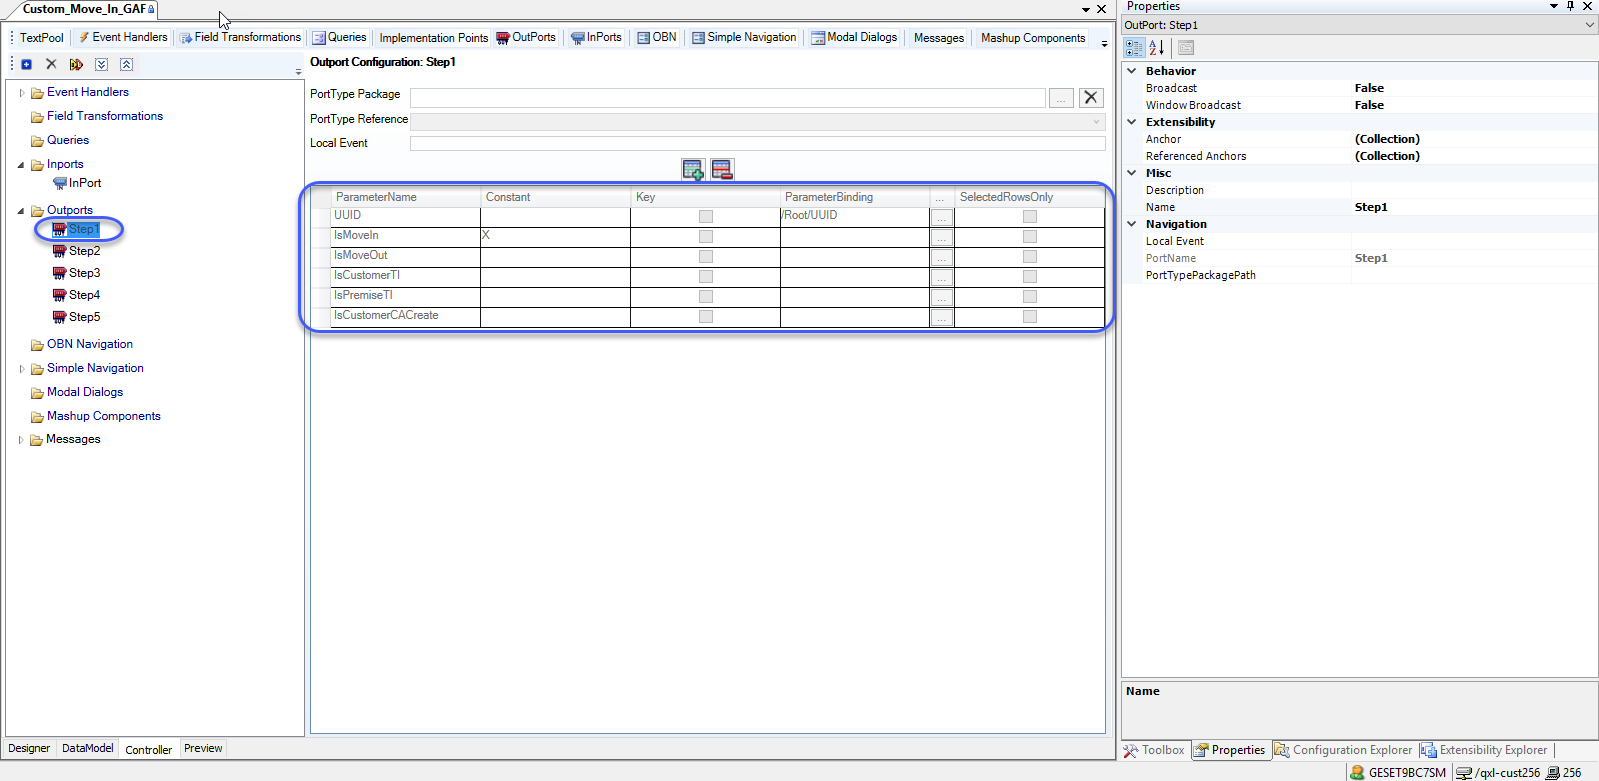
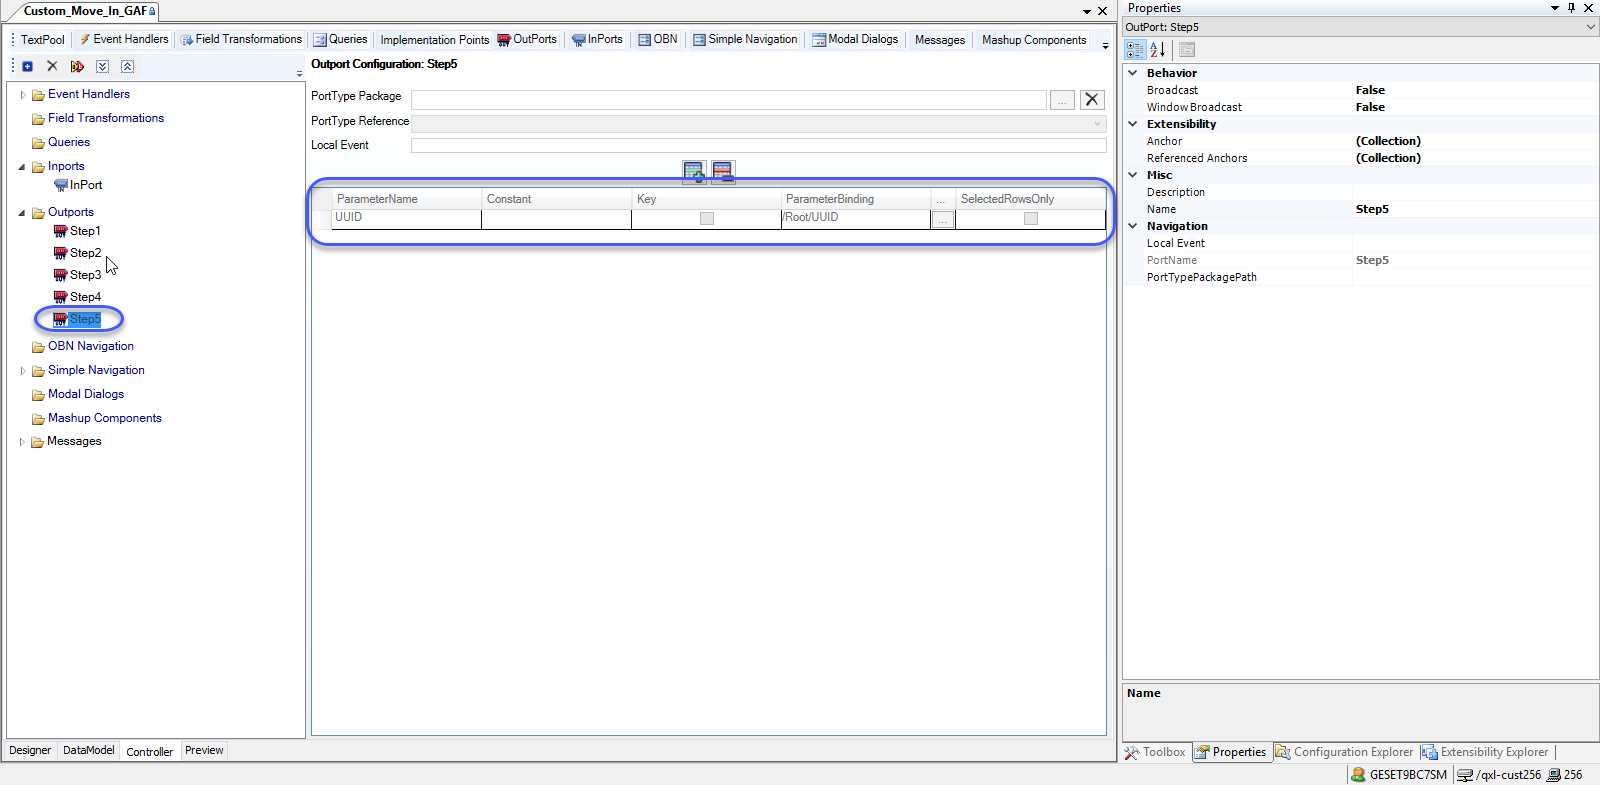
3.5 Add Outports to GAF for pass data into Each Step – Outport is the way how a GAF can trigger a data transfer to embedded EC, so in our scenario as there are 5 ECs to which we must pass the data - add 5 separate outports. This will also enable GAF to have control over navigating to each step separately.
Refer the standard GAF “/BYD_COD/IndustrySolution/Utilities/UI/Extensibility/COD_UTILITIES_MOVE_IN_GAF.GAF.uicomponent” for Parameters.
3.5.1 Outport for Step1 (Premise & Customer selection step)
3.5.2 Outport for Step2 (Ticket creation step)

3.5.3 Outport for Step3 (Services selection step)

3.5.4 Outport for Step4(Contract Account & Payment related step)

3.5.5 Outport for Step5 (Move In Review)
3.6 Define Following Events for mentioned purpose -
3.6.1 EV_Cancel – This event will cancel the move in process by closing the GAF, this event must be set as “OnClick” event for “Cancel” Button, also “OnManualClose” in GAF floor plan.
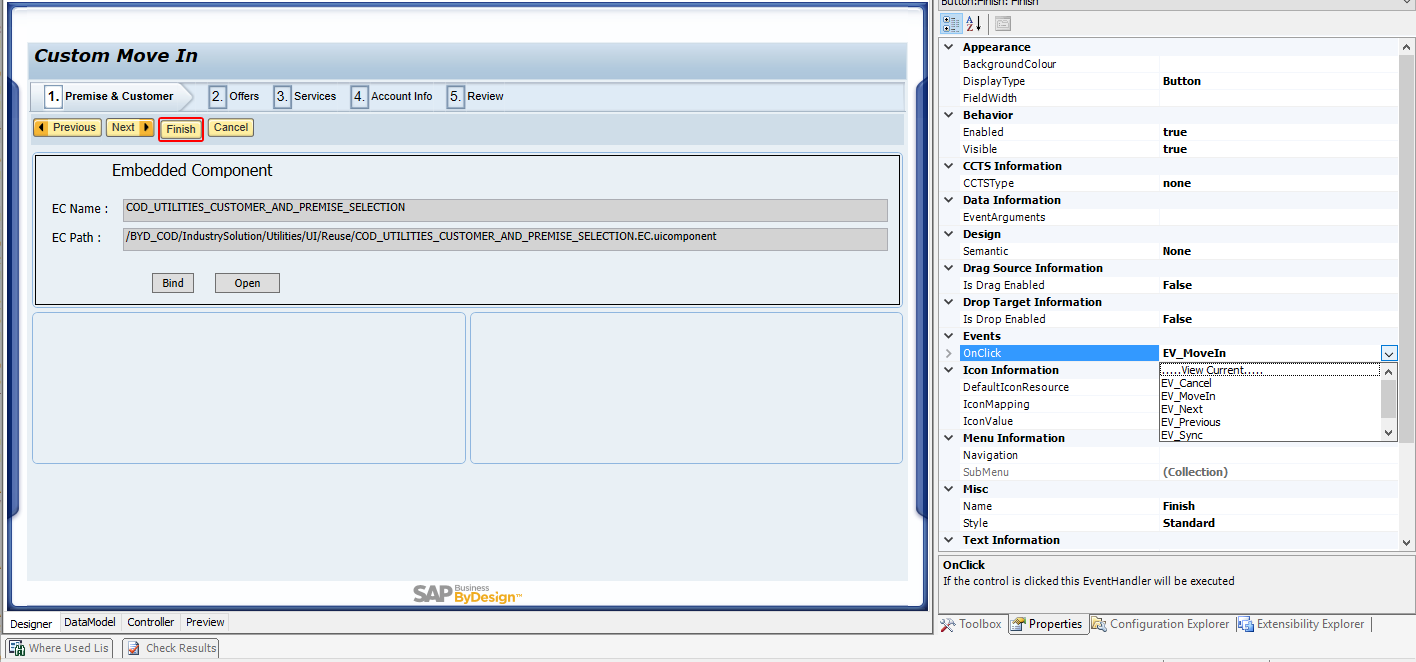
3.6.2 EV_MoveIn – This event will be configured as “OnClick” for “Finish” button in GAF. In this event call the Custom Action which will be created for Move In process & Ticket Creation.
3.6.3 EV_Next – Forward navigation on Next Button Add a condition operation which will check the value of “/Root/UIState/ViewSwitchSelectedItem” which will allow set the same field for navigation.
Add Condition operation so that forward navigation happens by setting next value to the following data field “/Root/UIState/ViewSwitchSelectedItem”.

Setting the ViewSwitchSelectedItem as next Step "Name" property from navigation items.

3.6.4 EV_Previous – Backward navigation on Previous Button, add a condition operation which will check the value of “/Root/UIState/ViewSwitchSelectedItem” which will allow set the same field for navigation.
Add Condition operation so that backward navigation happens by setting previous value to the following “/Root/UIState/ViewSwitchSelectedItem”.

Setting the ViewSwitchSelectedItem as Previous Step "Name" property from navigation items.

3.6.5 EV_Sync – This will be first event which get called for this Custom GAF, for this to happen we must configure this event as a “OnFire” of already added inport. In this event we will first create a new instance of Utilities Action BO to Set a fresh Move In Context, to the same instance of Utilities Action BO we will be setting values which we got as a part of inport, in the current example we will be setting Premise ID.
Event Operations to be configured

Setting EV_Sync as OnFire event of the inport.

We have to implement the Custom Action for Move In Process & Ticket creation.
4.1 Extend the BO Utilities Action BO

Enhance the BO with below changes
4.2 Implement the Move In Action - We can make use of Move In service exposed in ERP ISU or a custom ERP implementation.

4.3 Implement the Ticket Creation Action - This action when called will create a Ticket for the current customer against Premise decided to Move In (User has to make sure he/she has to Save after the GAF Process.

4.4 Associate the Custom Action on to the UI - Bind both CustomMoveIn & CreateTicket actions as respective operations of EV_MoveIn event.

Associate the EV_MoveIn as "OnClick" event for Finish button.
By making use of new item window create a new EC where Customer offer can be displayed.

Add the existing reusable steps to GAF. All the reusable steps are part of following folder “/BYD_COD/IndustrySolution/Utilities/UI/Reuse”, by referring the standard Move In GAF “/BYD_COD/IndustrySolution/Utilities/UI/Extensibility/COD_UTILITIES_MOVE_IN_GAF.GAF.uicomponent”
We can drag and drop the reusable Embedded Component (EC) to each GAF step

By adding a button to an EC and setting "Navigation" property you an achieve a simple navigation to the newly added GAF. By embedding this EC you can Launch the above custom GAF from any UI floor plans like Premise or Customer.


Additional Step called Ticket

The objective of this blog is to show an example of how easily a Custom GAF can be created for Utilities Specific Process.
GAF (Guided Activity Floorplan) in C4C is the best way of representing a business process in guided manner. C4C SDK studio allows the creation of Custom GAF which can extend the capabilities standard process. C4C Utilities has it’s own reusable set of steps as Embedded Components (ECs) to make enhancement easier.
In this blog, we will create a Custom GAF (Guided Activity Floorplan) for Move In process (Utilities Move In Process) by making use of C4C SDK. For this we will be making use of all the standard steps of Utilities Move In Process with added custom step to enable Ticket creation with selected customer & Premise for Move In (You have to Save transaction at the end of Move In Process for ticket to get persisted).
Below will be our targeted GAF with the additional step called Ticket.
Overview of entire custom development scope : -
- Create a solution in PDI
- Create a Custom GAF
- Configure newly added GAF
- Create a Custom EC for Ticket Creation
- Implement Custom Action for Move In
- Add the Existing Reusable Embedded Components (EC) as Steps to the Newly Added GAF along with Custom Embedded Component (EC).
- Embed the Custom GAF to Premise TI
1. Creating a solution in PDI
Provide required information for the creation of Solution.
2. Create Custom GAF(Guided Activity Floorplan)
Now Let's Create a Custom GAF where we can add reusable steps and custom steps.
To the newly created solution add new Item Guided Activity Floorplan (GAF).
Select the Utilities Action BO as the Business Object.
3. Configure new GAF
Open the GAF for Edit by selecting “Open in UI Designer” option.
3.1 Change the Floor plan title – The text provided will be appear as the GAF title.
3.2 Add additional steps - As by default there will be 3 steps, add additional steps using Navigation Items - Move in Process requires 4 steps in standard along with that we need one additional step for adding Custom EC. So add 2 more steps.
3.3 Configure each step - Properties like Title & Name. Name provided here is very important as this will be used for navigating between steps. Title provided at each step level will be that Step's header.
3.4 Add an Inport for pass data into GAF - Add an Inport to the GAF which will have PremiseID as a parameter, this is how we can default a premise ID from where GAF is triggered. If your requirement is to default Customer, then you can have 2 parameters one for Premise ID and one for Customer.
One can pass any number of parameters which can be used to default the values.
3.5 Add Outports to GAF for pass data into Each Step – Outport is the way how a GAF can trigger a data transfer to embedded EC, so in our scenario as there are 5 ECs to which we must pass the data - add 5 separate outports. This will also enable GAF to have control over navigating to each step separately.
Refer the standard GAF “/BYD_COD/IndustrySolution/Utilities/UI/Extensibility/COD_UTILITIES_MOVE_IN_GAF.GAF.uicomponent” for Parameters.
3.5.1 Outport for Step1 (Premise & Customer selection step)
3.5.2 Outport for Step2 (Ticket creation step)
3.5.3 Outport for Step3 (Services selection step)
3.5.4 Outport for Step4(Contract Account & Payment related step)
3.5.5 Outport for Step5 (Move In Review)
3.6 Define Following Events for mentioned purpose -
3.6.1 EV_Cancel – This event will cancel the move in process by closing the GAF, this event must be set as “OnClick” event for “Cancel” Button, also “OnManualClose” in GAF floor plan.
3.6.2 EV_MoveIn – This event will be configured as “OnClick” for “Finish” button in GAF. In this event call the Custom Action which will be created for Move In process & Ticket Creation.
3.6.3 EV_Next – Forward navigation on Next Button Add a condition operation which will check the value of “/Root/UIState/ViewSwitchSelectedItem” which will allow set the same field for navigation.
Add Condition operation so that forward navigation happens by setting next value to the following data field “/Root/UIState/ViewSwitchSelectedItem”.
Setting the ViewSwitchSelectedItem as next Step "Name" property from navigation items.
3.6.4 EV_Previous – Backward navigation on Previous Button, add a condition operation which will check the value of “/Root/UIState/ViewSwitchSelectedItem” which will allow set the same field for navigation.
Add Condition operation so that backward navigation happens by setting previous value to the following “/Root/UIState/ViewSwitchSelectedItem”.
Setting the ViewSwitchSelectedItem as Previous Step "Name" property from navigation items.
3.6.5 EV_Sync – This will be first event which get called for this Custom GAF, for this to happen we must configure this event as a “OnFire” of already added inport. In this event we will first create a new instance of Utilities Action BO to Set a fresh Move In Context, to the same instance of Utilities Action BO we will be setting values which we got as a part of inport, in the current example we will be setting Premise ID.
Event Operations to be configured
- Add a BO Operation "Create"
- Data operation Premise ID to Contract Level MoveInServiceID
- SyncDataContainer
- FireOutport to Step1 – So that data transfer get triggered to first step.
Setting EV_Sync as OnFire event of the inport.
4. Implement Custom Action for Move In & Ticket Creation
We have to implement the Custom Action for Move In Process & Ticket creation.
4.1 Extend the BO Utilities Action BO
Enhance the BO with below changes
- Add a custom Action for Move In.
- Add a custom Action for Ticket Creation.
- Extension fields to store customer related info, Ticket creation indicator & Ticket description.
- message to display the move process is completed.
import AP.Common.GDT;

import AP.CRM.Global;

import AP.FO.BusinessPartner.Global;


[Extension] businessobject AP.CRM.Global:UtilitiesActionBo {


       		node Contract raises MoveInMsg {

			        message MoveInMsg text "Move In is SuccessFul";

					action CustomMoveIn;

					action CreateTicket;


					[Transient][Label ("Customer Name")] element Ext_Customer_Name:LANGUAGEINDEPENDENT_EXTENDED_Text;

					[Transient][Label ("Customer UUID")] element Ext_Customer_UUID:UUID;


					[Transient][Label ("Ticket Description")] element Ext_TicketDesr:LANGUAGEINDEPENDENT_EXTENDED_Text;

					[Transient][Label ("Ticket Creation Indicator")] element Ext_TicketCrIndicator:Indicator;

   	    }

    	node Installation {

   			node MeterReading {

      	    }

        }

   		node CustomerDetails {

   	    }

   		node ContractAccountDetails {

   	    }

}
4.2 Implement the Move In Action - We can make use of Move In service exposed in ERP ISU or a custom ERP implementation.
4.3 Implement the Ticket Creation Action - This action when called will create a Ticket for the current customer against Premise decided to Move In (User has to make sure he/she has to Save after the GAF Process.
import ABSL;

import AP.Common.GDT;

import AP.FO.BusinessPartner.Global;


if(!this.Ext_TicketCrIndicator)

{

       if(!this.MoveInServiceAddressID.IsInitial() && !this.CustomerUUID.content.IsInitial())

       {

              var premiseObj = UtilitiesPremise.Retrieve(this.MoveInServiceAddressID);

              var customerObj = Customer.Retrieve(this.CustomerUUID);


              if(premiseObj.IsSet() && customerObj.IsSet())

              {

                     var ticket = ServiceRequest.Create();


                    // Setting the customer

                    if(!ticket.BuyerParty.IsSet())

                    {

                            ticket.BuyerParty.Create();

                    }

                    ticket.BuyerParty.PartyKey.PartyID.content = customerObj.InternalID;


                    // Setting Subject

                    ticket.Name.content = "Move In based Ticket";


                    // Setting Description

                    if(!ticket.IncidentDescriptionTextCollectionText.IsSet())

                    {

                            ticket.IncidentDescriptionTextCollectionText.Create();

                    }

                    if(!ticket.IncidentDescriptionTextCollectionText.TextContent.IsSet())

                    {

                            ticket.IncidentDescriptionTextCollectionText.TextContent.Create();

                    }

                    ticket.IncidentDescriptionTextCollectionText.TextContent.FormattedText.content = "Move In is required.";


                    // Associating Move In Premise to the Ticket.

                    if(!ticket.MainServiceReferenceObject.IsSet())

                    {

                            ticket.MainServiceReferenceObject.Create();

                    }

					ticket.MainServiceReferenceObject.InstallationPointID.content = premiseObj.ToInstallPoint.ID.content;


                    // Setting Source.

                    ticket.DataOriginTypeCode = "8";


                    // Setting Priority.

                    if(!ticket.ServiceTerms.IsSet())

                    {

                            ticket.ServiceTerms.Create();

                    }

                    ticket.ServiceTerms.ServicePriorityCode = "1";

              }

       }

}
4.4 Associate the Custom Action on to the UI - Bind both CustomMoveIn & CreateTicket actions as respective operations of EV_MoveIn event.
Associate the EV_MoveIn as "OnClick" event for Finish button.
5. Create a Embedded Component (EC) on Utilities Action BO
By making use of new item window create a new EC where Customer offer can be displayed.
6. Add Reusable Steps (Embedded Components) to GAF
Add the existing reusable steps to GAF. All the reusable steps are part of following folder “/BYD_COD/IndustrySolution/Utilities/UI/Reuse”, by referring the standard Move In GAF “/BYD_COD/IndustrySolution/Utilities/UI/Extensibility/COD_UTILITIES_MOVE_IN_GAF.GAF.uicomponent”
- Step 1 – Premise & Customer Selection - /BYD_COD/IndustrySolution/Utilities/UI/Reuse/COD_UTILITIES_CUSTOMER_AND_PREMISE_SELECTION.EC.uicomponent
- Step 2 – Ticketing – Custom EC.
- Step 3 – Services - /BYD_COD/IndustrySolution/Utilities/UI/Reuse/COD_UTILITIES_SERVICES_AND_METER_READING_EC.EC.uicomponent
- Step 4 – Account Info - /BYD_COD/IndustrySolution/Utilities/UI/Reuse/COD_UTILITIES_ACCOUNT_AND_PAYMENT_DETAILS.EC.uicomponent
- Step 5 – Review - /BYD_COD/IndustrySolution/Utilities/UI/Reuse/COD_UTILITIES_MOVEIN_REVIEW.EC.uicomponent
We can drag and drop the reusable Embedded Component (EC) to each GAF step
7. Embed the Custom GAF to Premise TI
By adding a button to an EC and setting "Navigation" property you an achieve a simple navigation to the newly added GAF. By embedding this EC you can Launch the above custom GAF from any UI floor plans like Premise or Customer.
Completed GAF
Additional Step called Ticket
- SAP Managed Tags:
- Utilities,
- SAP Cloud for Customer add-ins,
- C4C Extensibility
15 Comments
You must be a registered user to add a comment. If you've already registered, sign in. Otherwise, register and sign in.
Labels in this area
-
Business Trends
270 -
Business Trends
10 -
chitchat
1 -
customerexperience
1 -
Event Information
256 -
Event Information
17 -
Expert Insights
30 -
Expert Insights
48 -
Life at SAP
133 -
Life at SAP
1 -
Product Updates
666 -
Product Updates
24 -
SAP HANA Service
1 -
SAPHANACloud
1 -
SAPHANAService
1 -
Technology Updates
453 -
Technology Updates
15
Related Content
- SAP Commerce Cloud Q3 ’23 Release Highlights in CRM and CX Blogs by SAP
- SAP Commerce Cloud Q2 ’23 Release Highlights in CRM and CX Blogs by SAP
- Activate CRM_MKT_HVS business function for Utilities function set in CRM and CX Questions
- NET2GRID is Drastically Increasing Customer Engagement and Improving Energy Consumption Behaviors in CRM and CX Blogs by SAP
- How the SAP.iO Foundry TLV's TVPage Brings Online Sellers to E-commerce in CRM and CX Blogs by SAP
Top kudoed authors
| User | Count |
|---|---|
| 4 | |
| 2 | |
| 2 | |
| 2 | |
| 2 | |
| 1 | |
| 1 | |
| 1 | |
| 1 | |
| 1 |