
- SAP Community
- Products and Technology
- Human Capital Management
- HCM Blogs by Members
- Leveraging Learning Groups
Human Capital Management Blogs by Members
Gain valuable knowledge and tips on SAP SuccessFactors and human capital management from member blog posts. Share your HCM insights with a post of your own.
Turn on suggestions
Auto-suggest helps you quickly narrow down your search results by suggesting possible matches as you type.
Showing results for
paul_bracy
Explorer
Options
- Subscribe to RSS Feed
- Mark as New
- Mark as Read
- Bookmark
- Subscribe
- Printer Friendly Page
- Report Inappropriate Content
06-02-2017
12:53 AM
Learning Groups are a great new addition to the LMS that help admins some features that were previously only available to organizations: slotting in scheduled offerings and use of population directed custom tiles. You might be asking 'so if was already accomplished with organizations, what's the real benefit?". Well, there are some obstacles to using organizations: 1) typically companies will ave to maintain organization data in their user feed, which may take time and effort to modify, and 2) once built and maintained, the organizations may be too broad/cover too large of the population that you are trying to cover.
Here's where groups come in: you can make them with assignment profiles! Assignment profiles can be as "large" or "small" as you need them to be, from covering your entire company to just down to one single person. Almost any attribute on an employees user record can be used to make an assignment profile, so this really unlocks a lot for admins. And there is no longer a need to wait until your userfeed/organization connectors are changed - everything can be done right on the spot.
Let's see this in action. We have a need for admins to reserve scheduled offering spots for supervisors at our headquarters locations. They also want a custom tile for this group.
First thing's first - make your assignment profile. We've selected the headquarters and supervisor user attribute for our profile.

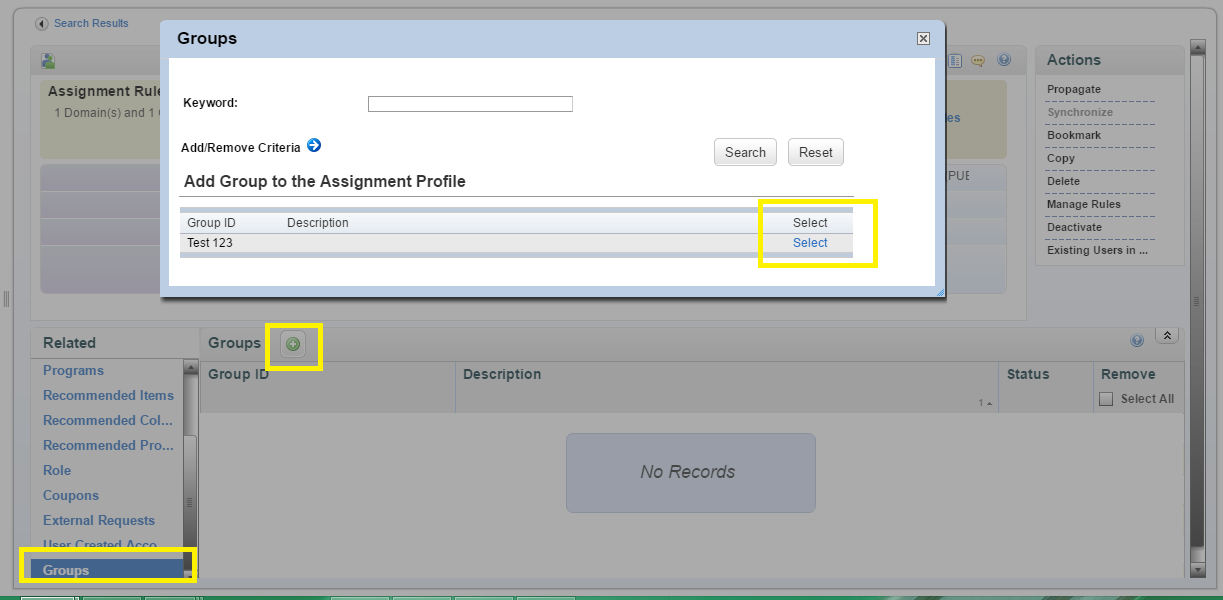
Next, under the related menu on your profile, select Groups. Click the green plus icon to search for and select your group.
Propagate your assignment profile to complete creating your group!
To reserve the slots in your offering, open it and select "add slots" from the "add user" dropdown menu.

Next, choose the Group ID radio button. Add the group ID in the text field, indicate the number of slots, then save.

Now we have slots reserved in this offering just for supervisors in Headquarters.
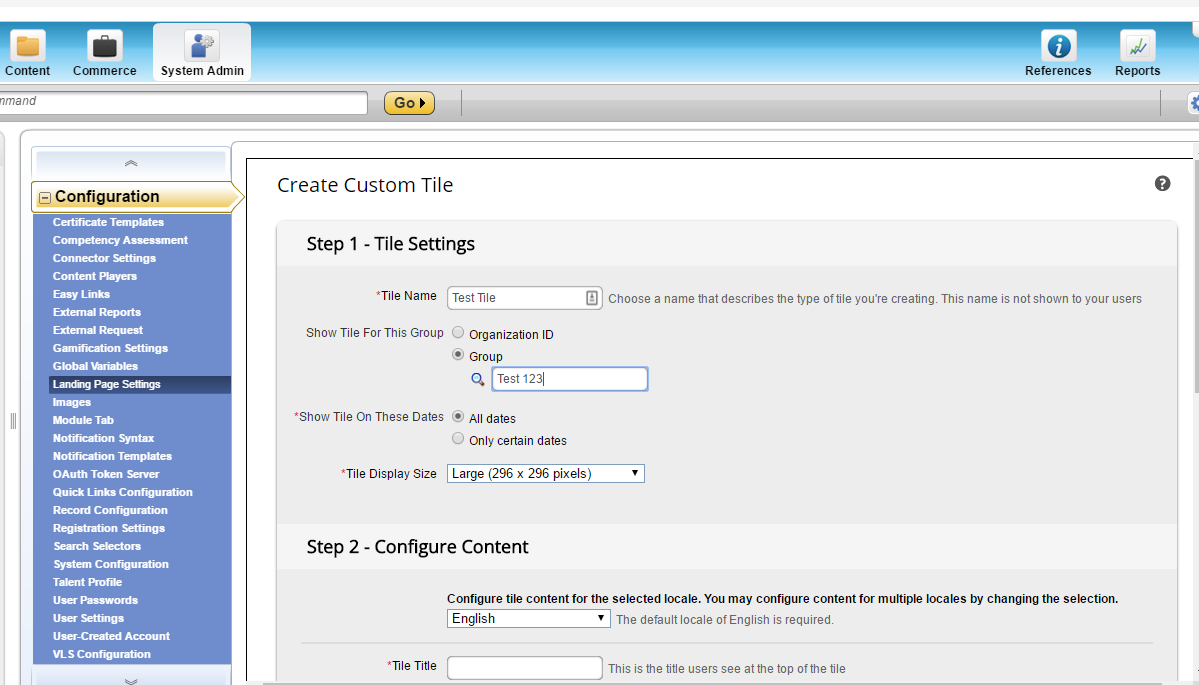
The custom tile part is even easier! When creating a custom tile in the Landing Page Settings menu (I have another blog about how this is done), just select the group option and add the ID when making the tile.
Hopefully being able to use these features without having to go through organizations makes life a little easier for LMS admins!
Here's where groups come in: you can make them with assignment profiles! Assignment profiles can be as "large" or "small" as you need them to be, from covering your entire company to just down to one single person. Almost any attribute on an employees user record can be used to make an assignment profile, so this really unlocks a lot for admins. And there is no longer a need to wait until your userfeed/organization connectors are changed - everything can be done right on the spot.
Let's see this in action. We have a need for admins to reserve scheduled offering spots for supervisors at our headquarters locations. They also want a custom tile for this group.
First thing's first - make your assignment profile. We've selected the headquarters and supervisor user attribute for our profile.
Next, under the related menu on your profile, select Groups. Click the green plus icon to search for and select your group.
Propagate your assignment profile to complete creating your group!
To reserve the slots in your offering, open it and select "add slots" from the "add user" dropdown menu.
Next, choose the Group ID radio button. Add the group ID in the text field, indicate the number of slots, then save.
Now we have slots reserved in this offering just for supervisors in Headquarters.
The custom tile part is even easier! When creating a custom tile in the Landing Page Settings menu (I have another blog about how this is done), just select the group option and add the ID when making the tile.
Hopefully being able to use these features without having to go through organizations makes life a little easier for LMS admins!
- SAP Managed Tags:
- SAP SuccessFactors Learning
You must be a registered user to add a comment. If you've already registered, sign in. Otherwise, register and sign in.
Labels in this area
-
2H 2023 Product Release
1 -
ACCRUAL TRANSFER
1 -
Advanced Workflow
1 -
Anonymization
1 -
BTP
1 -
Business Rules
1 -
Career Development
1 -
Certificate-Based Authentication
1 -
Cloud Platform Integration
1 -
Compensation
1 -
Compensation Information Management
1 -
Compensation Management
1 -
Compliance
2 -
Content
1 -
Conversational AI
2 -
Custom Data Collection
1 -
custom portlet
1 -
Data & Analytics
1 -
Data Integration
1 -
Dayforce
1 -
deep link
1 -
deeplink
1 -
Delimiting Pay Components
1 -
Deprecation
1 -
Employee Central
1 -
Employee Central Global Benefits
1 -
Employee Central Payroll
1 -
employee profile
1 -
Employee Rehires
1 -
external terminal
1 -
external time events
1 -
Generative AI
2 -
Getting Started
1 -
Global Benefits
1 -
Guidelines
1 -
H2 2023
1 -
HR
2 -
HR Data Management
1 -
HR Transformation
1 -
ilx
1 -
Incentive Management Setup (Configuration)
1 -
Integration Center
2 -
Integration Suite
1 -
internal mobility
1 -
Introduction
1 -
learning
3 -
LMS
2 -
LXP
1 -
Massively MDF attachments download
1 -
Mentoring
1 -
Metadata Framework
1 -
Middleware Solutions
1 -
OCN
1 -
OData APIs
1 -
ONB USA Compliance
1 -
Onboarding
2 -
Opportunity Marketplace
1 -
Pay Component Management
1 -
Platform
1 -
portlet
1 -
POSTMAN
1 -
Predictive AI
2 -
Recruiting
1 -
recurring payments
1 -
Role Based Permissions (RBP)
2 -
SAP CPI (Cloud Platform Integration)
1 -
SAP HCM (Human Capital Management)
2 -
SAP HR Solutions
2 -
SAP Integrations
1 -
SAP release
1 -
SAP SuccessFactors
5 -
SAP SuccessFactors Customer Community
1 -
SAP SuccessFactors OData API
1 -
SAP Workzone
1 -
SAP-PAYROLL
1 -
skills
1 -
Skills Management
1 -
sso deeplink
1 -
Stories in People Analytics
2 -
SuccessFactors
2 -
SuccessFactors Employee central home page customization.
1 -
successfactors onboarding i9
1 -
talent
1 -
Talent Intelligence Hub
2 -
talents
1 -
Tax
1 -
Tax Integration
1 -
Time Accounts
1 -
Workflows
1 -
XML Rules
1
Related Content
- Mentoring is the lubricant needed to maintain self learning organizations in Human Capital Management Blogs by Members
- Is Your Organisation Future Ready ? Beginning the Journey with Skill Development ! in Human Capital Management Blogs by Members
- Empowering the Workforce of Tomorrow: SuccessFactors' Integrated Learning Approach in Human Capital Management Blogs by Members
- Controlling the Visibility of SAP Companion Content by Date in Human Capital Management Blogs by SAP
- From Code to Logic: XML to Business Rule Shift in Human Capital Management Blogs by Members
Top kudoed authors
| User | Count |
|---|---|
| 4 | |
| 4 | |
| 2 | |
| 2 | |
| 1 | |
| 1 | |
| 1 | |
| 1 | |
| 1 | |
| 1 |