
- SAP Community
- Products and Technology
- Technology
- Technology Blogs by SAP
- Analyze Twitter Sentiment with UI5 & API Hub
Technology Blogs by SAP
Learn how to extend and personalize SAP applications. Follow the SAP technology blog for insights into SAP BTP, ABAP, SAP Analytics Cloud, SAP HANA, and more.
Turn on suggestions
Auto-suggest helps you quickly narrow down your search results by suggesting possible matches as you type.
Showing results for
former_member20
Participant
Options
- Subscribe to RSS Feed
- Mark as New
- Mark as Read
- Bookmark
- Subscribe
- Printer Friendly Page
- Report Inappropriate Content
06-01-2017
11:33 PM
Were you able to get your Twitter wall up and running from last #APIFriday? If not, my project can be found here: Github. A couple people noticed the CORS issue which is caused by the server Web IDE is hosted on. Unfortunately, we do not have the ability to modify the settings on the server. The work arounds I have found for this are the CORS plugin for Chrome and by disabling it on Safari. This is not a permanent solution.

So now that you have your tweets from your event, let’s find out what those tweets are saying. Are people posting positive comments on Twitter? Or is there something negative being said? Using the Text Analysis – Sentiment Analysis API available on the SAP API Business Hub, we can have our application read the tweets and determine the sentiment of the user. So for this week's #APIFriday, let's give sentiment analysis a shot!

Starting in your main controller for your Twitter Wall app, create a new function. This will be the function where we analyze our Tweets. This function needs to accept an input for the text to be analyzed. Keep this open as we will be adding some code here soon.
Let’s go over the API Business Hub and check out the Sentiment Analysis API. If you haven’t been to the API Hub recently, you’ll notice it has a new look and feel as well as many new APIs and services for you. Ian and I did a CodeTalk about the new features on the API Hub. So let’s go to Business Services and find the Text Analysis Fact Extraction API package.

This is where we’ll find the sentiment analysis API.

Taking a look at the documentation, we’ll see we need to base text as the data object for our POST. Make sure you are signed in the API Business Hub so that you can try out the API. If we give the Sentiment Analysis API a try on the API Hub, we can see what to expect when the analysis is returned. The results contain information about topics found, social media references, and sentiment. What we’re interested in is if a sentiment is found.

Click the Generate Code button for the Sentiment Analysis API.

Copy the Javascript copy.

In your controller over in your IDE, paste the code into the new function you just created.

Back in the API Business Hub, you will need to get your API key so that you can test against the sandbox. To get your API Key, click the Key icon towards the top right of the screen.

Copy your key.

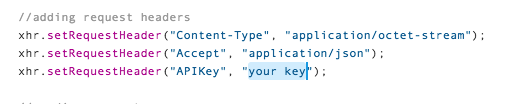
Back in your controller, replace the <API_KEY> placeholder with your API key you just copied.
In your controller, find your twitter call function. In the done() function of the AJAX call to Twitter, add a call to your new analysis function. Pass in the twitter response array as the input to the function. You can remove setting the model from this function. We will set the model for the view in the new analyze function.

Back in your analysis function, parse out the text portion of the tweets and set it to a new array. The text portion of the tweet is what we are going to pass for analysis.
We’re going to iterate over the tweets and construct a response array to set as our model for the view. So let’s set up a for loop to iterate through our tweets. Make sure the new array is defined outside of the for loop and the API call. We will use this for our new tweet array. Don't forget to define i, our iterator variable.
For each tweet, we’ll set the “text” parameter in the data body of the AJAX call to be the tweet’s text. Update the data variable to set the text to the tweet's text.
It's time to update the event listener to do more than just log the results on the console. In the event listener function, we need to get the response text from the API call to the Sentiment Analysis endpoint.
Let's start by presetting our sentiment variables.Inside of the if for the ready state, define the sentiment and the sentiment text as none or no sentiment detected. We'll use the sentiment to set the state of the tile on the view and the text for the info.
Next, parse out the response text from the completed API call.
Then we will check the string to look for a sentiment. Only if the response contains the word "sentiment" will we be able to get a positive or negative state. Start the if statement by looking for a sentiment.
Inside this if, we will look for a strong or weak negative or positive sentiment by searching for the text. The state words for UI5 are "Success", "Error", "Warning", or "None". These while use the colors green, red, yellow, and grey respectively to highlight the cell or image that the state is set for. Based on the strength of the sentiment, we'll set the state color. We'll use the info text on a UI5 tile to provide more information; is it a strong correlation or weak?
Next, we will construct a new tweet structure to minimize the size on the model for the view with only the necessary information. Parse out the text, username, user picture, user location, created date, sentiment state, and sentiment text. Create a new JSON model.
Once the JSON object is constructed, we can push it on our new tweet array.
And now the event listener function is done. The very last thing to do in the controller is to update setting the model. Before the analyze function completes, set this new array as the model for the view.
Your analyze function should look something like the one below:


Now, we need to make some adjustments to the view. Open your corresponding view file.
We need to update the <l:Grid> to match the new model structure we just created. The content of the Grid will now just be the twitterResults data. Our model name is the same.
Next, we need to update the <ObjectListItem> to match the new structure as well. Update the bindings to correspond to the new field in the updated model.
We now want to add a highlight attribute to the <ObjectListItem>. This will take our sentiment state and highlight the grid item either red, green, yellow, or none based on the state we determined from the sentiment analysis.
Finally, we can add an <ObjectStatus> which we will use to display the sentiment text discerned from the sentiment analysis API. We will add it in the <firstStatus> aggregate of the <ObjectListItem>. We can set the color state again with the sentiment state. Add this before the closing <ObjectListItem> tag.

SAVE all of your changes. Your Twitter wall now has sentiment analysis!
Performance is going to be an issue with the way we have implemented the sentiment analysis call. Putting an AJAX or XHR request in a for loop is a bad idea in practical design. It works for this demo, but if you are using this is a performance critical system, you'll want to use JS promises instead of a synchronous API call.
Happy #APIFriday! Would love to hear your feedback and check out my complete solution on Github. Give me some suggestions on performance and areas for improvement or just what you've learned through this series!
So now that you have your tweets from your event, let’s find out what those tweets are saying. Are people posting positive comments on Twitter? Or is there something negative being said? Using the Text Analysis – Sentiment Analysis API available on the SAP API Business Hub, we can have our application read the tweets and determine the sentiment of the user. So for this week's #APIFriday, let's give sentiment analysis a shot!
Starting in your main controller for your Twitter Wall app, create a new function. This will be the function where we analyze our Tweets. This function needs to accept an input for the text to be analyzed. Keep this open as we will be adding some code here soon.
analyseTweets: function(results){


}
Let’s go over the API Business Hub and check out the Sentiment Analysis API. If you haven’t been to the API Hub recently, you’ll notice it has a new look and feel as well as many new APIs and services for you. Ian and I did a CodeTalk about the new features on the API Hub. So let’s go to Business Services and find the Text Analysis Fact Extraction API package.
This is where we’ll find the sentiment analysis API.
Taking a look at the documentation, we’ll see we need to base text as the data object for our POST. Make sure you are signed in the API Business Hub so that you can try out the API. If we give the Sentiment Analysis API a try on the API Hub, we can see what to expect when the analysis is returned. The results contain information about topics found, social media references, and sentiment. What we’re interested in is if a sentiment is found.
Click the Generate Code button for the Sentiment Analysis API.
Copy the Javascript copy.
In your controller over in your IDE, paste the code into the new function you just created.
Back in the API Business Hub, you will need to get your API key so that you can test against the sandbox. To get your API Key, click the Key icon towards the top right of the screen.
Copy your key.
Back in your controller, replace the <API_KEY> placeholder with your API key you just copied.
In your controller, find your twitter call function. In the done() function of the AJAX call to Twitter, add a call to your new analysis function. Pass in the twitter response array as the input to the function. You can remove setting the model from this function. We will set the model for the view in the new analyze function.
self.analyseTweets(twitterResult); Back in your analysis function, parse out the text portion of the tweets and set it to a new array. The text portion of the tweet is what we are going to pass for analysis.
var tweets = results.oData.statuses;We’re going to iterate over the tweets and construct a response array to set as our model for the view. So let’s set up a for loop to iterate through our tweets. Make sure the new array is defined outside of the for loop and the API call. We will use this for our new tweet array. Don't forget to define i, our iterator variable.
//variables for the loop

var array = [];

var i;


//loop over tweets

for(i in tweets){


    //code copied from API Hub is here


}
For each tweet, we’ll set the “text” parameter in the data body of the AJAX call to be the tweet’s text. Update the data variable to set the text to the tweet's text.
var data = "{ \"text\": " + tweets[i].text + " }";It's time to update the event listener to do more than just log the results on the console. In the event listener function, we need to get the response text from the API call to the Sentiment Analysis endpoint.
Let's start by presetting our sentiment variables.Inside of the if for the ready state, define the sentiment and the sentiment text as none or no sentiment detected. We'll use the sentiment to set the state of the tile on the view and the text for the info.
var sentiment = "None";

var sentimentText = "No Sentiment Detected";
Next, parse out the response text from the completed API call.
var string = this.responseText;Then we will check the string to look for a sentiment. Only if the response contains the word "sentiment" will we be able to get a positive or negative state. Start the if statement by looking for a sentiment.
if(string.includes("Sentiment")){


}
Inside this if, we will look for a strong or weak negative or positive sentiment by searching for the text. The state words for UI5 are "Success", "Error", "Warning", or "None". These while use the colors green, red, yellow, and grey respectively to highlight the cell or image that the state is set for. Based on the strength of the sentiment, we'll set the state color. We'll use the info text on a UI5 tile to provide more information; is it a strong correlation or weak?
  if(string.includes("WeakPositiveSentiment")){

    sentiment="Success";

    sentimentText = "Strong";

  } else if(string.includes("StrongPositiveSentiment")){

    sentiment="Success";

    sentimentText="Weak";

  } else if(string.includes("WeakNegativeSentiment")){

    sentiment="Warning";

    sentimentText = "Weak";

  } else if(string.includes("StrongNegativeSentiment")){

    sentiment="Error";

    sentimentText = "Strong";

  } else {

    sentiment = "None";

    sentimentText = "No Sentiment Detected";

  }
Next, we will construct a new tweet structure to minimize the size on the model for the view with only the necessary information. Parse out the text, username, user picture, user location, created date, sentiment state, and sentiment text. Create a new JSON model.
var tweet = {

"text": tweets[i].text,

"username": tweets[i].user.name,

"userpic": tweets[i].user.profile_image_url,

"userlocation": tweets[i].user.location,

"created": tweets[i].created_at,

"sentiment": sentiment,

"sentimentText": sentimentText

};
Once the JSON object is constructed, we can push it on our new tweet array.
array.push(tweet);And now the event listener function is done. The very last thing to do in the controller is to update setting the model. Before the analyze function completes, set this new array as the model for the view.
this.getView().getModel("twitterResult").setProperty("/data", array);Your analyze function should look something like the one below:
Now, we need to make some adjustments to the view. Open your corresponding view file.
We need to update the <l:Grid> to match the new model structure we just created. The content of the Grid will now just be the twitterResults data. Our model name is the same.
<l:Grid defaultSpan="L4 M6 S6" class="sapUiSmallMarginTop" id="list"

  content="{twitterResult>/data}">
Next, we need to update the <ObjectListItem> to match the new structure as well. Update the bindings to correspond to the new field in the updated model.
    <ObjectListItem icon="{twitterResult>userpic}"

      intro="{twitterResult>username} - {twitterResult>created} - {twitterResult>userlocation}"

      title="{twitterResult>text}"

      type="{= ${device>/system/phone} ? 'Active' : 'Inactive'}">
We now want to add a highlight attribute to the <ObjectListItem>. This will take our sentiment state and highlight the grid item either red, green, yellow, or none based on the state we determined from the sentiment analysis.
    <ObjectListItem icon="{twitterResult>userpic}"

      highlight="{twitterResult>sentiment}"

      .... >
Finally, we can add an <ObjectStatus> which we will use to display the sentiment text discerned from the sentiment analysis API. We will add it in the <firstStatus> aggregate of the <ObjectListItem>. We can set the color state again with the sentiment state. Add this before the closing <ObjectListItem> tag.
<firstStatus>

  <ObjectStatus

    text="{twitterResult>sentimentText}"

    state="{twitterResult>sentiment}" />

</firstStatus>
SAVE all of your changes. Your Twitter wall now has sentiment analysis!
Performance is going to be an issue with the way we have implemented the sentiment analysis call. Putting an AJAX or XHR request in a for loop is a bad idea in practical design. It works for this demo, but if you are using this is a performance critical system, you'll want to use JS promises instead of a synchronous API call.
Happy #APIFriday! Would love to hear your feedback and check out my complete solution on Github. Give me some suggestions on performance and areas for improvement or just what you've learned through this series!
- SAP Managed Tags:
- SAPUI5,
- API Management,
- SAP Web IDE,
- SAP Business Technology Platform
3 Comments
You must be a registered user to add a comment. If you've already registered, sign in. Otherwise, register and sign in.
Labels in this area
-
ABAP CDS Views - CDC (Change Data Capture)
2 -
AI
1 -
Analyze Workload Data
1 -
BTP
1 -
Business and IT Integration
2 -
Business application stu
1 -
Business Technology Platform
1 -
Business Trends
1,658 -
Business Trends
92 -
CAP
1 -
cf
1 -
Cloud Foundry
1 -
Confluent
1 -
Customer COE Basics and Fundamentals
1 -
Customer COE Latest and Greatest
3 -
Customer Data Browser app
1 -
Data Analysis Tool
1 -
data migration
1 -
data transfer
1 -
Datasphere
2 -
Event Information
1,400 -
Event Information
66 -
Expert
1 -
Expert Insights
177 -
Expert Insights
295 -
General
1 -
Google cloud
1 -
Google Next'24
1 -
Kafka
1 -
Life at SAP
780 -
Life at SAP
13 -
Migrate your Data App
1 -
MTA
1 -
Network Performance Analysis
1 -
NodeJS
1 -
PDF
1 -
POC
1 -
Product Updates
4,577 -
Product Updates
341 -
Replication Flow
1 -
RisewithSAP
1 -
SAP BTP
1 -
SAP BTP Cloud Foundry
1 -
SAP Cloud ALM
1 -
SAP Cloud Application Programming Model
1 -
SAP Datasphere
2 -
SAP S4HANA Cloud
1 -
SAP S4HANA Migration Cockpit
1 -
Technology Updates
6,873 -
Technology Updates
419 -
Workload Fluctuations
1
Related Content
- Advanced Technologies in TBML Detection in Technology Q&A
- Deliver Real-World Results with SAP Business AI: Q4 2023 & Q1 2024 Release Highlights in Technology Blogs by SAP
- Harnessing Generative AI Capabilities with SAP HANA Cloud Vector Engine - Part 1 [Architecture] in Technology Blogs by SAP
- Transform digitally with SAP and AI in Technology Blogs by Members
- Fast Track your AI Strategy with SAP Business AI in Technology Blogs by SAP
Top kudoed authors
| User | Count |
|---|---|
| 36 | |
| 25 | |
| 17 | |
| 13 | |
| 8 | |
| 7 | |
| 6 | |
| 6 | |
| 6 | |
| 6 |