


- SAP Community
- Products and Technology
- Technology
- Technology Blogs by SAP
- Initiate your Workflow from SAP Cloud Platform Int...
Technology Blogs by SAP
Learn how to extend and personalize SAP applications. Follow the SAP technology blog for insights into SAP BTP, ABAP, SAP Analytics Cloud, SAP HANA, and more.
Turn on suggestions
Auto-suggest helps you quickly narrow down your search results by suggesting possible matches as you type.
Showing results for
Product and Topic Expert
Options
- Subscribe to RSS Feed
- Mark as New
- Mark as Read
- Bookmark
- Subscribe
- Printer Friendly Page
- Report Inappropriate Content
04-13-2017
6:59 AM
You must have read the blogs on this much-awaited SAP Cloud Platform Workflow Service which has been a new addition to SAP Cloud Platform services.
Among various benefits that this service offers, this blog will cover one of the most requested aspect of how-to-start workflow service from SAP Cloud Platform Integration services. By doing so, we have expanded the use of workflow services such that it can be consumed for building extension scenarios like that of Employee Onboarding inSuccessFactors, Travel Expenses Approval in Concur solutions systems, to name few.
In this blog, you will learn how can you start a workflow using HTTP protocol from your cloud integration flow. In this example, I would be showing you how to start the workflow to onboard a newly hired employee of a company that is using SuccessFactors as their employee on-boarding tool. For sake of simplicity of understanding, I have used only those integration components that are required to start the workflow.
Please note that the workflow used in this example is already designed and deployed in the cloud and this blog will not cover modelling of the workflow.
Let us get started …
Wasn’t that simple? Indeed, it is. I have already used it in few extension scenarios for SAP applications and it works seamlessly. Additionally, you can add a timer in this integration flow to automatically start the workflow for any new requests is triggered in the backend system like new employee is onboarded in SuccessFactors or new expenses report created in Concur systems etc.
Use this service to play around for your requirements and share your findings. I will be all happy to help you with your queries, if any.
Among various benefits that this service offers, this blog will cover one of the most requested aspect of how-to-start workflow service from SAP Cloud Platform Integration services. By doing so, we have expanded the use of workflow services such that it can be consumed for building extension scenarios like that of Employee Onboarding inSuccessFactors, Travel Expenses Approval in Concur solutions systems, to name few.
In this blog, you will learn how can you start a workflow using HTTP protocol from your cloud integration flow. In this example, I would be showing you how to start the workflow to onboard a newly hired employee of a company that is using SuccessFactors as their employee on-boarding tool. For sake of simplicity of understanding, I have used only those integration components that are required to start the workflow.
Please note that the workflow used in this example is already designed and deployed in the cloud and this blog will not cover modelling of the workflow.
Let us get started …
- Create an Integration Flow in SAP Cloud Integration in Web Application
https://uacp2.hana.ondemand.com/viewer/368c481cd6954bdfa5d0435479fd4eaf/Cloud/en-US/da53d93cd8fb47ff...
- Model the integration flow as shown in the screenshot

- Fill in the properties of various components of the integration flow as shown below.
- Sender Component: HTTPS

- Content Modifier

Workflow service requires XSRF token to be generated before the service call is made to create workflow instances. For this, you need a Content Modifier where you will define the headers to fetch the CSRF token

If you have specified any input payload for the workflow service, then you need to collect it for passing it later during starting the workflow service
- Next, you need to have a request-reply component and a Receiver component you have to make call to an external REST-based workflow service

- Request-Reply
- Receiver: HTTP protocol with following detail

- Address is the URL to fetch the XSRF token.
<workflow-service-URL>/workflow-service/rest/v1/xsrf-token - You can find more details from the official API documentation: https://help.sap.com/doc/wfs_api_documentation/Cloud/en-US/wfs-core-api-docu.html
- Workflow service APIs can be used only if the user has the desired roles. For more information on the Authentication and Roles refer the documentation: https://help.sap.com/viewer/f63bbdc234ce4211ab2cdb44564a0acd/Cloud/en-US/df943e71122448caaf3c49f5ffd...
- You need to define the Credentials for basic authentication in SAP Cloud Platform Integration (from eclipse application) and use the same as “Credentials” property as shown above https://uacp2.hana.ondemand.com/viewer/368c481cd6954bdfa5d0435479fd4eaf/Cloud/en-US/6912d63bbbc64aee...
- Next, you again put a Content Modifier to define the message header and property to create workflow instance by calling workflow REST-based API

Message Header and Body
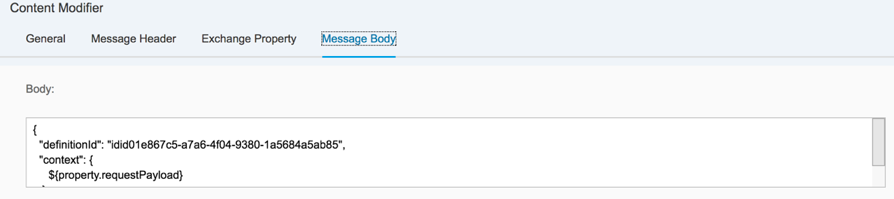
To start workflow, the message body is mandatory and that too in a specific format.
Let us study from our example above. Here is the message body
{

  "definitionId": "idid01e867c5-a7a6-4f04-9380-1a5684a5ab85",

  "context": {

     ${property.requestPayload}

   }

}
where
- definitionId is the ID of the workflow definition. You can get the same from the Workflow Monitor launch pad
- context is the input payload for the workflow. Note as we already saved the input payload in step b, we use the same here as ${property.<property-name>}

For more information on Monitor Workflow, refer the official documentation:
https://help.sap.com/viewer/f63bbdc234ce4211ab2cdb44564a0acd/Cloud/en-US/df943e71122448caaf3c49f5ffd...
For more information on the service call, refer the API documentation:
https://help.sap.com/doc/wfs_api_documentation/Cloud/en-US/wfs-core-api-docu.html#
Workflow Instances --> /v1/workflow-instances --> POST

- You finally need to have a mandatory script task that sets the cookies to the message header. You can paste the entire script as mentioned here.

import com.sap.gateway.ip.core.customdev.util.Message;

import java.util.HashMap

import java.util.ArrayList

import java.util.Map

import org.slf4j.Logger

import org.slf4j.LoggerFactory

import groovy.xml.*

import java.io.*;


def Message processData(Message message){


     def headers = message.getHeaders();

     def cookie = headers.get(“Set-Cookie”);

     StringBuffer bufferedCookie = new StringBuffer();


     for(Object item : cookie){

          bufferedCookie.append(item + “;”);

     }


     message.setHeader(“Cookie”, bufferedCookie.toString());

     Logger log = LoggerFactory.getLogger(this.getClass());

     log.error(“cookie”+ bufferedCookie);


      return message;

}

- Finally, you have make a call to the workflow service to create the new instance. For that, you need to add following two components with respective details as shown below

- End Message
- Receiver: HTTP protocol with following details

Address is the URL to create the new instance.
<workflow-service-URL>/workflow-service/rest/v1/workflow-instances - You can find more details from the official API documentation: https://help.sap.com/doc/wfs_api_documentation/Cloud/en-US/wfs-core-api-docu.html
- Workflow service APIs can be used only if the user has the desired roles. For more information on the Authentication and Roles refer the documentation:
https://help.sap.com/viewer/f63bbdc234ce4211ab2cdb44564a0acd/Cloud/en-US/df943e71122448caaf3c49f5ffd... - You need to define the Credentials for basic authentication in SAP Cloud Platform Integration (from eclipse application) and use the same as “Credentials” property as shown above.
https://uacp2.hana.ondemand.com/viewer/368c481cd6954bdfa5d0435479fd4eaf/Cloud/en-US/6912d63bbbc64aee...
- Next, you need to have a request-reply component and a Receiver component you have to make call to an external REST-based workflow service
- Once you have modelled the integration flow, Save and Deploy the integration flow to the server
- Run the integration flow from POSTMAN or any REST-client of your choice. I will use POSTMAN here to show you the execution results
- In the POSTMAN, I have entered the URL for the Cloud Integration service as:
http://<CPI host>/http/start-workflow
where start-workflow is the sender connection address - As body, I have given the input payload that is needed by my workflow to consume
- As result, you will see that an instance is created with an id and other details
 You can now go to the Workflow Monitor to see the instance
 For more information on Monitor Workflow, refer the official documentation:
https://help.sap.com/viewer/f63bbdc234ce4211ab2cdb44564a0acd/Cloud/en-US/df943e71122448caaf3c49f5ffd...
- In the POSTMAN, I have entered the URL for the Cloud Integration service as:
Wasn’t that simple? Indeed, it is. I have already used it in few extension scenarios for SAP applications and it works seamlessly. Additionally, you can add a timer in this integration flow to automatically start the workflow for any new requests is triggered in the backend system like new employee is onboarded in SuccessFactors or new expenses report created in Concur systems etc.
Use this service to play around for your requirements and share your findings. I will be all happy to help you with your queries, if any.
8 Comments
You must be a registered user to add a comment. If you've already registered, sign in. Otherwise, register and sign in.
Labels in this area
-
ABAP CDS Views - CDC (Change Data Capture)
2 -
AI
1 -
Analyze Workload Data
1 -
BTP
1 -
Business and IT Integration
2 -
Business application stu
1 -
Business Technology Platform
1 -
Business Trends
1,658 -
Business Trends
91 -
CAP
1 -
cf
1 -
Cloud Foundry
1 -
Confluent
1 -
Customer COE Basics and Fundamentals
1 -
Customer COE Latest and Greatest
3 -
Customer Data Browser app
1 -
Data Analysis Tool
1 -
data migration
1 -
data transfer
1 -
Datasphere
2 -
Event Information
1,400 -
Event Information
66 -
Expert
1 -
Expert Insights
177 -
Expert Insights
293 -
General
1 -
Google cloud
1 -
Google Next'24
1 -
Kafka
1 -
Life at SAP
780 -
Life at SAP
13 -
Migrate your Data App
1 -
MTA
1 -
Network Performance Analysis
1 -
NodeJS
1 -
PDF
1 -
POC
1 -
Product Updates
4,577 -
Product Updates
340 -
Replication Flow
1 -
RisewithSAP
1 -
SAP BTP
1 -
SAP BTP Cloud Foundry
1 -
SAP Cloud ALM
1 -
SAP Cloud Application Programming Model
1 -
SAP Datasphere
2 -
SAP S4HANA Cloud
1 -
SAP S4HANA Migration Cockpit
1 -
Technology Updates
6,873 -
Technology Updates
417 -
Workload Fluctuations
1
Related Content
- FAQ for C4C Certificate Renewal in Technology Blogs by SAP
- Now available: starter kit for genAI on SAP BTP in Technology Blogs by SAP
- How to use AI services to translate Picklists in SAP SuccessFactors - An example in Technology Blogs by SAP
- IoT - Ultimate Data Cyber Security - with Enterprise Blockchain and SAP BTP 🚀 in Technology Blogs by Members
- SAP Signavio is the highest ranked Leader in the SPARK Matrix™ Digital Twin of an Organization (DTO) in Technology Blogs by SAP
Top kudoed authors
| User | Count |
|---|---|
| 35 | |
| 25 | |
| 13 | |
| 7 | |
| 7 | |
| 6 | |
| 6 | |
| 6 | |
| 5 | |
| 4 |