SAP HANA provides a comprehensive security framework to help keep your data secure. In addition to the authentication/single sign-on, user/role and authorization management, audit logging, and encryption capabilities that we already have in place, with SAP HANA 2.0 SPS 01 we have now added native dynamic data masking. If you would like to find out more about the SAP HANA security framework in general please visit the
SAP HANA security homepage. For more information on what's new in security in SAP HANA 2.0 SPS 01 check out the
Enhanced Data Protection in SAP HANA 2.0 SPS01 blog or the
SAP HANA 2.0 SPS 01 What's New: Security - by the SAP HANA Academy blog.

Image 1: SAP HANA security framework
Authorization is the primary means for access control. SAP HANA’s privilege framework is based on standard SQL privileges that allow for fine-granular control, with extensions for specific use cases like dashboards or reporting. Roles allow for an effective separation of duties. For more information on SAP HANA roles and privileges visit the
authorization section of the SAP HANA security guide.
The new native data masking feature changes how data appears in views and does not modify the underlying data. Because the underlying data remains unchanged, the database can still perform calculations on the masked data. It provides an additional layer of access control that can be applied to views to protect sensitive or confidential data from power users with broad view access. For example, if you need to protect a column with employee social security numbers or credit card information from certain users who may have SELECT privileges on a view or schema, but should not be able to see sensitive data.
Image two below gives a high-level overview of how data masking works in SAP HANA. Imagine you have a view called “Employee Data” and you have two users who have access to this view which contains the fields: Name, FirstName, and SSN. Both users have SELECT privileges on the “Employee Data” view, this is a pre-requisite to accessing the data regardless of if it is masked or not. The field SSN is masked so that only the user with unmasked read access can see the plain text data. The user who does not have the unmask privilege will only see the masked values.

Image 2: Data masking example
Configuring masking – The basics
If you choose to leverage data masking in your SAP HANA system, configuration takes place directly in the view definition. What masked expression you use is up to you, you can choose a static value as we did with the above example, or you can leverage a built-in function or stored procedure of your choosing. It is key however that you do not change the data type or length of the original data.

Once data is masked, only the owner of a particular schema or view can initially grant the
UNMASKED privilege. If a view has dependencies on another view, the privileges of the owner of the dependent view are also taken into consideration – definer mode applies.
The
SAP HANA security guide has extensive documentation on configuring the new
data masking functionality. There you will find great examples of how to configure:
In addition to being able to configure masking directly via SQL commands as described in the SAP HANA security guide, we also offer tooling support to configure masking via the SAP HANA WebIDE.
Setting up data masking in the SAP HANA WebIDE
To set up data masking in the SAP HANA WebIDE, first you must navigate to the semantics node columns pane of the SAP HANA calculation view where you would like to mask data. There you must select the column you would like to mask and then choose to launch the data masking editor by clicking on the data masking icon. In the screen shot below, you will see that we are masking the PARTNERID column.
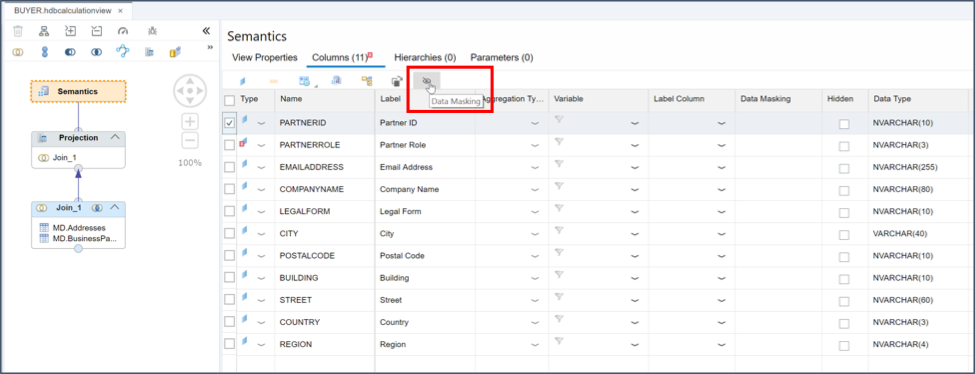
Image 3: Semantics node columns pane
Once you have selected the column that you would like to mask, you will be able to define the data masking expression for the column you selected. You have the option to define a simple static masking function as you can see in the screen shot below, or also to invoke built in functions. Once you have finished defining the masking expression validate the syntax and then click ‘OK’.

Image 4: Data masking expression definition
Now when you view the data you will see that it has been masked based on the expression that you defined. In the screen shot below, you can see that the PARTNERID column has been masked according to the masking expression which we defined.

Image 5: View masked data
One final reminder, you will need to assign the object privilege UNMASKED to any user who needs to view the plain text data.
Thanks for reading the introduction to data masking blog. Please leave any questions or comments below.
