

- SAP Community
- Products and Technology
- Technology
- Technology Blogs by SAP
- Enterprise Sales and Procurement Model (ESPM) Inst...
Technology Blogs by SAP
Learn how to extend and personalize SAP applications. Follow the SAP technology blog for insights into SAP BTP, ABAP, SAP Analytics Cloud, SAP HANA, and more.
Turn on suggestions
Auto-suggest helps you quickly narrow down your search results by suggesting possible matches as you type.
Showing results for
Advisor
Options
- Subscribe to RSS Feed
- Mark as New
- Mark as Read
- Bookmark
- Subscribe
- Printer Friendly Page
- Report Inappropriate Content
04-07-2017
3:43 PM
Installation , Build and Deployment Guide for ESPM Application

2. Eclipse Neon from official Eclipse website.


3. Install SAP Development Tools for Eclipse.


4. Install SAP Cloud Platform SDK
Go to (https://tools.hana.ondemand.com/#cloud) , download SAP Cloud platform SDK for JAVA Web Tomcat 8

5. Set up the Runtime Environment in Eclipse.
6. Set JDK in Eclipse


7. Register for a free developer account on SAP Cloud Platform.


Note! For most people the proxy value doesn’t need to be set but if you are working behind a proxy, then it should be set as per you environment.
Note! For most people the proxy value doesn’t need to be set, you can remove the entire proxy section from the snippet, but if you are working behind a proxy, then it should be set as per you environment.


Right click on the web project in ESPM > and choose Maven > Click on Update Project
The application can be built with the maven command to the parent pom.xml :
Or It can be build from eclipse , Right click on the root folder of ESPM project

Then type “clean install > Apply > Ok


After building the application update the Maven Project :
Right click on the web project in ESPM > and choose Maven > Click on Update Project
5. Deploy the application on local Cloud Runtime
i) Run the application in HCP Java Web Tomcat 8 Server


ii)Create Users and Assign Role
Create a user with the below information

Note! The application name must be "espm", else the above URL will change based on the application name given during deployment

3.Click on “Deploy Application” tab

4. Add War File Location, Give Application Name "espm" ,select Runtime Name "Java Web Tomcat 8" and JVM Version "JRE 8"

5.After Successful Deployment , Click on Start


You can access the application from the URL
Note! The application name must be "espm", else the above URL will change based on the application name given during deployment
- Setting up the developer environment
- Build the application and Deploy
Setting up the developer environment
- Install Oracle Java SE Development Kit (JDK) 8 or SAP JVM 8. *
- If You are installing Oracle Java SE Development Kit (JDK) 8, Go to Oracle website (http://www.oracle.com/technetwork/java/javase/downloads/jdk8-downloads-2133151.html) and download JDK 8 for 64 bits Windows.
- After downloading Oracle Java SE Development Kit (JDK) 8, Set Environment Variables JAVA_HOME and PATH
- Go to Control Panel> System > Advanced System Settings
- Click the Environment Variables button
- Under System Variables, click New
- In the Variable Name field, enter path of the local location of JDK as JAVA_HOME (C:/Program Files/Java/jdk1.8.0.65 ) and another system variable ie. PATH of the bin folder of JDK as PATH (C:\Program Files\Java\jdk1.8.0_65\bin)
2. Eclipse Neon from official Eclipse website.
- Go to Eclipse official website( https://www.eclipse.org/downloads), Click on Download Packages
- In the next window Click on 64 bit
- Then Click on Download/ File:eclipse-jee-neon-3-win32-x86_64.zip SHA-512
3. Install SAP Development Tools for Eclipse.
- Browse the local location of downloaded eclipse neon > Unzip eclipse-jee-neon-3-win32-x86_64.zip > Double Click on eclipse.exe > Create a workspace > Navigate to eclipse
- Click on help menu > Install new software > Add
- Add the https://tools.hana.ondemand.com/neon as an Available Software site.
- Select SAP Cloud Platform Tools checkbox > next > Agree the privacy agreement and complete the installation process
4. Install SAP Cloud Platform SDK
Go to (https://tools.hana.ondemand.com/#cloud) , download SAP Cloud platform SDK for JAVA Web Tomcat 8
5. Set up the Runtime Environment in Eclipse.
- In the Eclipse IDE main menu > Window > Preferences
- Choose > Server > Runtime Environments > Click on Add button
- Select SAP > Java Web Tomcat 8 > Next
- Add your SDK directory:
- If you have previously downloaded SDK for Java Web Tomcat 8 from Cloud Tools, choose the Browse button to locate your SDK folder.
- If you have no SDK for Java Web Tomcat 8 locally available or need the latest version, choose the Download and Install button to download it directly from the Maven Central.
- Click on Finish
- Java Web Tomcat 8 is added as a server runtime environment.
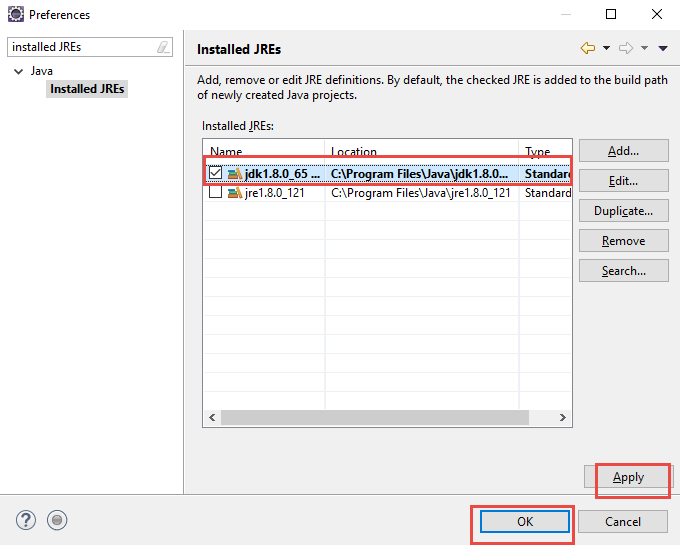
6. Set JDK in Eclipse
- In the Eclipse IDE main menu > Window > Preferences
- Enter Installed JREs in the filter field in the top-left corner
- In the Installed JREs Windows, select JDK as standard VM if it is available in the list of installed JREs, if not click on Add > Standard VM > Next
- Browse the Directory path of the JDK to add as JRE Home > Finish
- Now the JDK will be added to the list of JREs , select > Apply > Ok
7. Register for a free developer account on SAP Cloud Platform.
- Go to home page of SAP Cloud platform trial account(https://account.hanatrial.ondemand.com/#/home/welcome) > Click on Register if you do not have trial account, If you have then click on Log On
- In the Registration Page, give all the required information and register successfully. If you are already registered then in the Login Page , give user id and password and login successfully.
Build the application and deploy
1. Git configuration in Eclipse
- From the Eclipse IDE main menu, choose Window > Preferences
- Enter git in the filter field in the top-left corner
- Navigate to Team > Git > Configuration and select the Configuration node and add the following configuration
Note! For most people the proxy value doesn’t need to be set but if you are working behind a proxy, then it should be set as per you environment.
- Maven configuration
- From the Eclipse IDE main menu, choose Window > Preferences
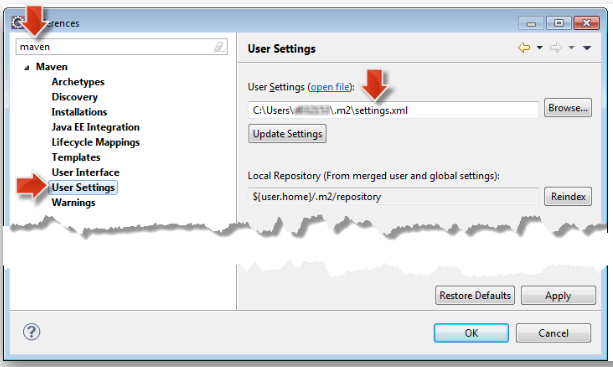
- Enter maven in the filter field in the top-left corner
- Navigate to Maven > User Settings and select the User Settings node
- If you have already installed Maven before you can click open file link. If you are using Maven for the first time you need to create a settings.xml file at the location /Users/your-user-name/.m2/settings.xml. The contents of the settings.xml file should look like the snippet below.
<settings xmlns="http://maven.apache.org/SETTINGS/1.0.0"

        xmlns:xsi="http://www.w3.org/2001/XMLSchema-instance"

        xsi:schemaLocation="http://maven.apache.org/SETTINGS/1.0.0 http://maven.apache.org/xsd/settings-1.0.0.xsd">

        <localRepository>${user.home}/.m2/repository</localRepository>

        <profiles>

            <profile>

                <id>development</id>

                <activation>

                    <activeByDefault>true</activeByDefault>

                </activation>

                <properties>

                </properties>

            </profile>

        </profiles>

        <proxies>

        <proxy>

            <active>true</active>

            <protocol>http</protocol>

            <host>proxy</host>

            <port>8080</port>

        </proxy>

    </proxies>

    </settings>
Note! For most people the proxy value doesn’t need to be set, you can remove the entire proxy section from the snippet, but if you are working behind a proxy, then it should be set as per you environment.
- Clone Git repository and import Maven project
- Open https://github.com/SAP/cloud-espm-v2 in your web browser.
- Click on the Copy to clipboard so that the Git repository URL of the opened GitHub repository is copied to your clipboard.
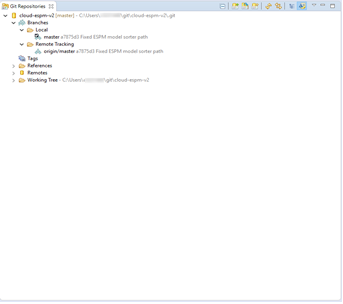
- In Eclipse, open the Git perspective. From the Eclipse IDE main menu, choose Window > Open Perspective > Other... Select Git and choose Ok to open the Git perspective.
- In this perspective you have the Git Repositories view on the left. As long as there is no Git Repository defined you will see 3 links (as shown here) to add a repository to the view.
- In the corresponding menu (top-right of the view), click on the Clone a Git repository link.
- Because you copied before the ESPM repository URL to your clipboard, the fields (URI, Host, Repository path and Protocol) of the opened dialog are filled automatically with the correct values.
- Do not change anything, just click Next.
- On this wizard page check that the master branch is selected and click again on Next.
- On the last wizard page you can adjust the location of the local Git Repository, but for the scope of this tutorial we'll just leave the default as-is.
- Click on Finish so that the remote ESPM repository (source code) is cloned to the local location specified on the last wizard page.
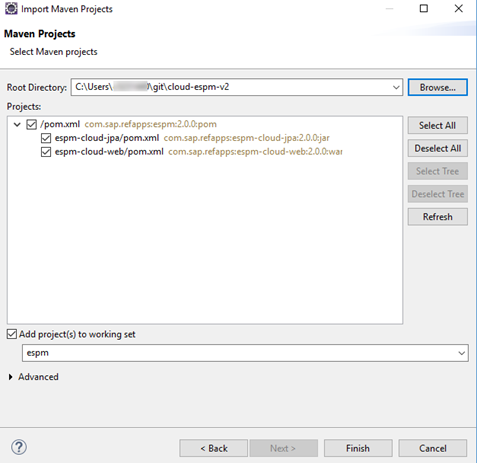
- In Eclipse, open File->Import->Existing Maven projects
- Browse the location where you have saved the ESPM project locally from git.
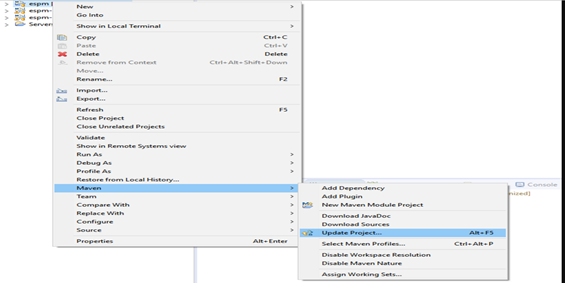
- Update dependencies and build Maven project
Right click on the web project in ESPM > and choose Maven > Click on Update Project
- Note! If you face errors you need to modify the parent pom.xml for certain property values depending on your environment:
- local.server.proxy.settings - delete this if you are not behind a proxy server, else update your proxy settings here
- browser.proxy.settings - delete this if your browser is not using a proxy, else update your browser proxy settings here
- sap.cloud.sdk.version - The SAP Cloud Platform SDK for Java Web Tomcat 8 version that you intend to run the application with, is version 3.20.3.1
- olingo.version - The Apache Olingo version that you intend the application to run with, the minimum version supported is 2.0.7
The application can be built with the maven command to the parent pom.xml :
clean installOr It can be build from eclipse , Right click on the root folder of ESPM project
Then type “clean install > Apply > Ok
After building the application update the Maven Project :
Right click on the web project in ESPM > and choose Maven > Click on Update Project
5. Deploy the application on local Cloud Runtime
i) Run the application in HCP Java Web Tomcat 8 Server
- Right click on the web project in ESPM > and choose the Run on Server option
- Make sure that Manually define a new server is selected and choose SAP > Java Web Tomcat 8 Server as server type. Leave all other settings unchanged and choose Finish
- Now a local server is started that has your espm application deployed.
ii)Create Users and Assign Role
- To enable local users to access the Retailer UI, you need to define user IDs in the local user store and assigned the role “Retailer” to this user.
Create a user with the below information
ID      Name    Password    Role


ret ret 123 Retailer- The eCommerce site can be accessed via the URL: https://localhost:<port>/espm-cloud-web/webshop
- The Retailer UI can be accessed via the URL: https://localhost:<port>/espm-cloud-web/retailer
- Deploy the application on SAP HCP via the cockpit
Note! The application name must be "espm", else the above URL will change based on the application name given during deployment
- Login to https://account.hanatrial.ondemand.com
- Go to JAVA application
3.Click on “Deploy Application” tab
4. Add War File Location, Give Application Name "espm" ,select Runtime Name "Java Web Tomcat 8" and JVM Version "JRE 8"
5.After Successful Deployment , Click on Start
- Configure the application role assignments from the cockpit. You basically need to add the "Retailer" role to your SAP Cloud Platform and user to access the Retailer UI, Go to Cockpit > Java Application > click on espm application > click on roles > Assign retailer role to user.
You can access the application from the URL
- The eCommerce site can be accessed via the URL: https://espm<account>.hanatrial.ondemand.com/espm-cloud-web/webshop
- The Retailer UI can be accessed via the URL: https://espm<account>.hanatrial.ondemand.com/espm-cloud-web/retailer
Note! The application name must be "espm", else the above URL will change based on the application name given during deployment
- SAP Managed Tags:
- Training,
- SAP Business Technology Platform
You must be a registered user to add a comment. If you've already registered, sign in. Otherwise, register and sign in.
Labels in this area
-
ABAP CDS Views - CDC (Change Data Capture)
2 -
AI
1 -
Analyze Workload Data
1 -
BTP
1 -
Business and IT Integration
2 -
Business application stu
1 -
Business Technology Platform
1 -
Business Trends
1,661 -
Business Trends
88 -
CAP
1 -
cf
1 -
Cloud Foundry
1 -
Confluent
1 -
Customer COE Basics and Fundamentals
1 -
Customer COE Latest and Greatest
3 -
Customer Data Browser app
1 -
Data Analysis Tool
1 -
data migration
1 -
data transfer
1 -
Datasphere
2 -
Event Information
1,400 -
Event Information
65 -
Expert
1 -
Expert Insights
178 -
Expert Insights
280 -
General
1 -
Google cloud
1 -
Google Next'24
1 -
Kafka
1 -
Life at SAP
784 -
Life at SAP
11 -
Migrate your Data App
1 -
MTA
1 -
Network Performance Analysis
1 -
NodeJS
1 -
PDF
1 -
POC
1 -
Product Updates
4,577 -
Product Updates
330 -
Replication Flow
1 -
RisewithSAP
1 -
SAP BTP
1 -
SAP BTP Cloud Foundry
1 -
SAP Cloud ALM
1 -
SAP Cloud Application Programming Model
1 -
SAP Datasphere
2 -
SAP S4HANA Cloud
1 -
SAP S4HANA Migration Cockpit
1 -
Technology Updates
6,886 -
Technology Updates
408 -
Workload Fluctuations
1
Related Content
- Empowering Retail Business with a Seamless Data Migration to SAP S/4HANA in Technology Blogs by Members
- Part 2:- SAP Basis OS support on SUSE Linux for beginners in Technology Blogs by Members
- Overview: SAP Ariba SSO with SAP Cloud Identity Services - Identity Authentication in Technology Blogs by SAP
- Configuration: SAP Ariba SSO with SAP Cloud Identity Services - Identity Authentication in Technology Blogs by SAP
- Pilot: SAP Datasphere Fundamentals in Technology Blogs by SAP
Top kudoed authors
| User | Count |
|---|---|
| 13 | |
| 10 | |
| 10 | |
| 9 | |
| 8 | |
| 7 | |
| 6 | |
| 5 | |
| 5 | |
| 5 |