
- SAP Community
- Products and Technology
- Technology
- Technology Blogs by SAP
- Easily add Push Notifications to your mobilised Fi...
Technology Blogs by SAP
Learn how to extend and personalize SAP applications. Follow the SAP technology blog for insights into SAP BTP, ABAP, SAP Analytics Cloud, SAP HANA, and more.
Turn on suggestions
Auto-suggest helps you quickly narrow down your search results by suggesting possible matches as you type.
Showing results for
Product and Topic Expert
Options
- Subscribe to RSS Feed
- Mark as New
- Mark as Read
- Bookmark
- Subscribe
- Printer Friendly Page
- Report Inappropriate Content
04-06-2017
12:22 PM
Hybrid Application Toolkit 1703
On 30 March we have released a new version of Hybrid Application Toolkit (HAT), as part of the Fiori Mobile Developer Experience. If you want to know more about how HAT fits into Fiori Mobile DevX, take a look at Britt's blog post. With the 1703 release comes the ability to add Push Notifications to Fiori mobile apps. We have added a step in the build wizard that allows you to configure your app for receiving Push Notifications. You will still need to add some code to your app to register and respond to the incoming notifications, but this is very straightforward. In this blog post I will provide you a simple example.
Karunaharan has recently posted this blog about what's new in our 1703 release. One of the main items mentioned is Developer Companion. Some of you who are familiar with Companion App might think this is the same thing; but there is more. The Companion App that you can download from the public stores is an app with its own identification, which you as a developer cannot change. Especially when it comes to Push Notifications, this is a problem because those Push Notifications are targeting a specific app id. So how can we send push notifications to an app we want to preview, without rebuilding the application and wasting time downloading and installing it onto our device? We have solved this by introducing the Developer Companion, which is specifically created on-demand for your project. You will only need to build this app once, in the cloud.
Daniel Silva recently published a detailed blog post here about how to add Push capabilities to your HTML5/SAPUI5 mobile app with Fiori Mobile. What is described there is still requiring a large amount of steps. We have simplified this significantly with the Fiori Mobile Developer Experience.
Developer Companion
Let me demonstrate how much easier it is now by making use of the Developer Companion. In this particular case I will show you the steps for iOS.
Let's start by creating a new project in SAP Web IDE, based on the SAP Fiori Master-Detail Application template.

In this project we will consume data from the ES4 demo system and select the Gateway Sample Basic for the Data Connection.

After configuring the data binding, the new project will be available in your SAP Web IDE workspace. Now let's turn this app into an app that provides mobile user experiences.
As a first step, we will build a Developer Companion for this project. I am starting with the Developer Companion build, because I want to quickly iterate without having to rebuild my app all the time. I'll discuss further on that in a minute.

The build wizard presented is very similar to the one presented for building a packaged app. In the first step of the build wizard, we provide the description and select the app's icon and splash screens.

In the second step of the build wizard we select the iOS platform and the provisioning profile to be used. For this particular case, we select the provisioning profile that we have generated based on the documentation provided here. We also tick the box 'Build debug-enabled binaries' to make sure we can debug the app from the Mac's Safari browser.

Push Notifications
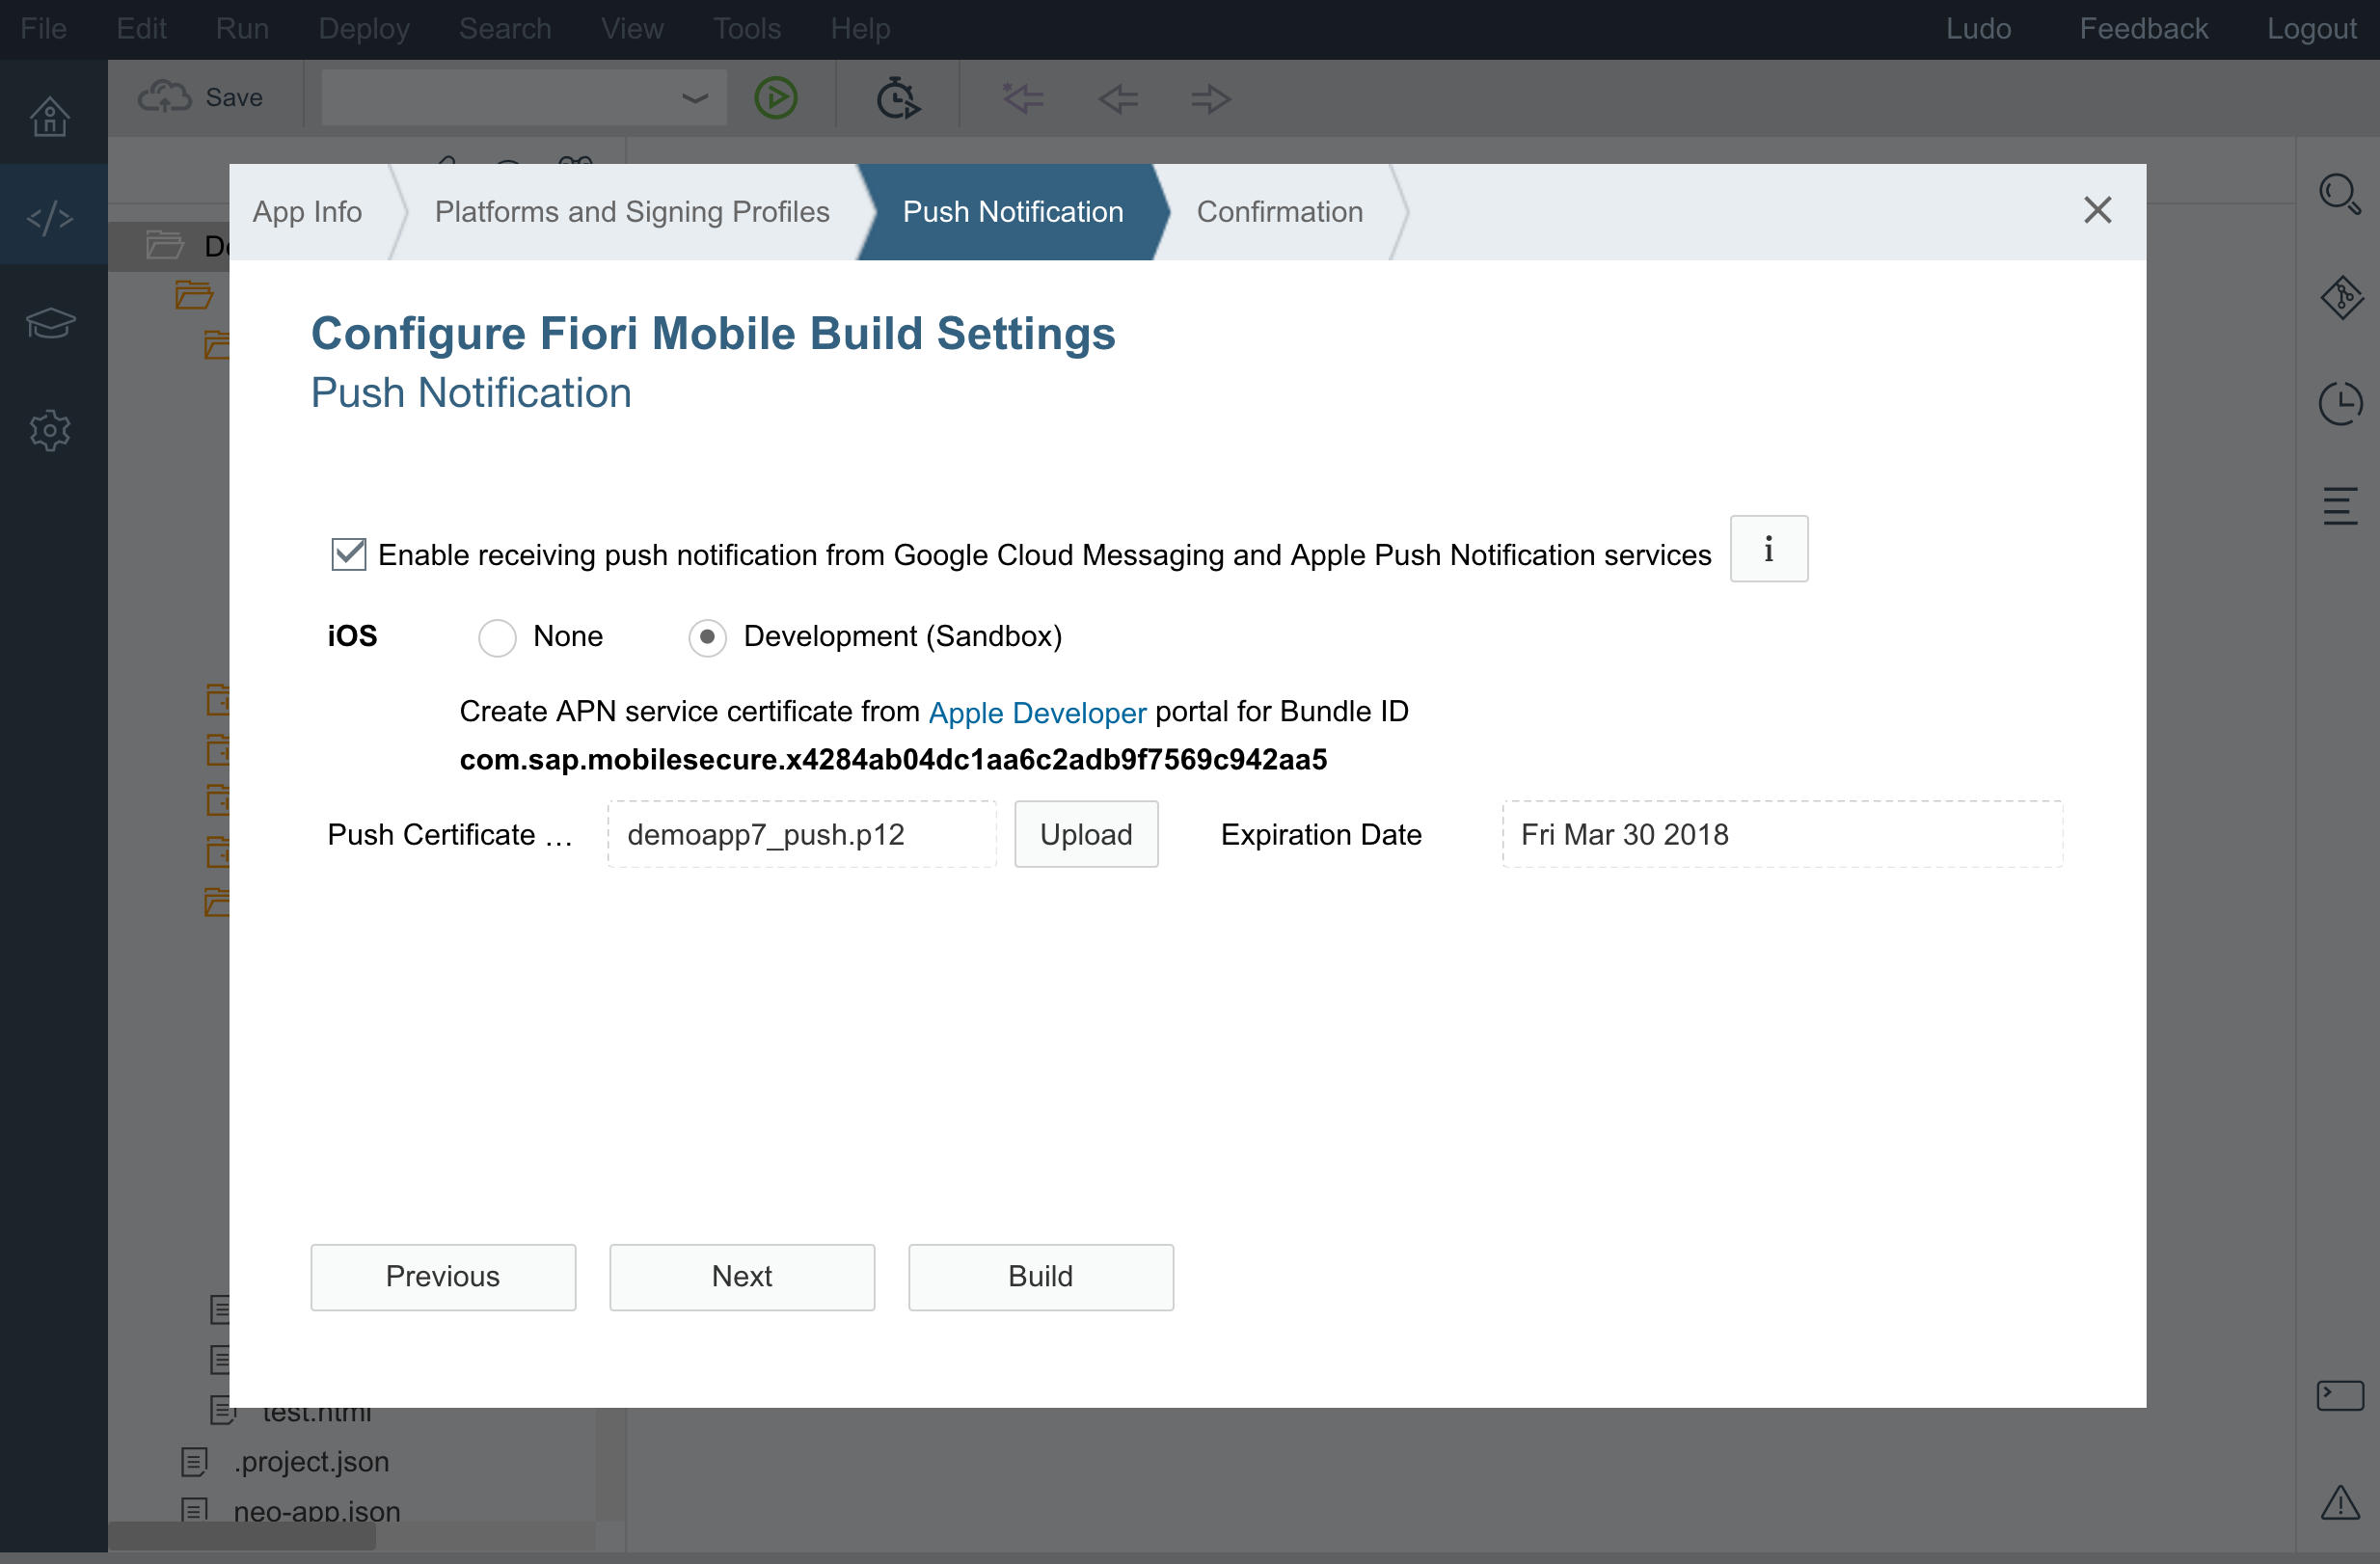
The third step of the build wizard is where you configure the Push Notifications certificate. Since we've selected only the iOS platform in the second step of the build wizard, we only see the configuration options for iOS.
When selecting the 'enable receiving push notifications from Apple Push Notification services', you will be able to configure the Development (Sandbox) certificate. The detailed steps on how to generate this Push certificate are described here. I have to admit that this part is still a bit cumbersome. What's important to note is that you will need to copy the Bundle ID that Fiori Mobile Service generated for you and register this at Apple's Developer portal. Fiori Mobile Service will configure SAP Cloud Platform mobile services for Development and Operations for you behind the scenes.
Now that we are done with the configuration, we can hit the "Build" button and generate the app in the cloud. Once the build is done (should be in approximately 3 minutes), you will receive an email and the build results dialog pops up in SAP Web IDE, from where you will be able to download and install the app on your device.

When you run the app, you will be asked to log in using your SAP Cloud Identity. After this, you need to set an application passcode. If your device has a fingerprint reader, you will have the option to unlock the app using your fingerprint (as already stored on your device). I highly recommend making use of this feature.
Once you are passed the log in and passcode screens, your app will be loaded. The web assets of a packaged app are stored on your device. However, the web assets for the Developer Companion are loaded directly from your personal SAP Web IDE workspace. And this where things become interesting for a developer.

The top toolbar visible is the screenshot above will automatically be hidden. It folds away to ensure your app has maximum screen real estate to render its content. To reveal the toolbar, simply pull down (drag) the screen content.
You will notice a refresh button on this toolbar. This button allows you to reload your app from your SAP Web IDE workspace. And this is what makes this Developer Companion an asset for rapid development. You can make changes to your code in SAP Web IDE, save them, and reload the app on your device (or multiple devices!) in seconds. You don't need to go through the build and reinstall process again and again.
Now let's add some code. Daniel Silva's blog shows a more elaborate way to implement the Push capability. To keep it simple and short, I will stick to the bare minimum here.
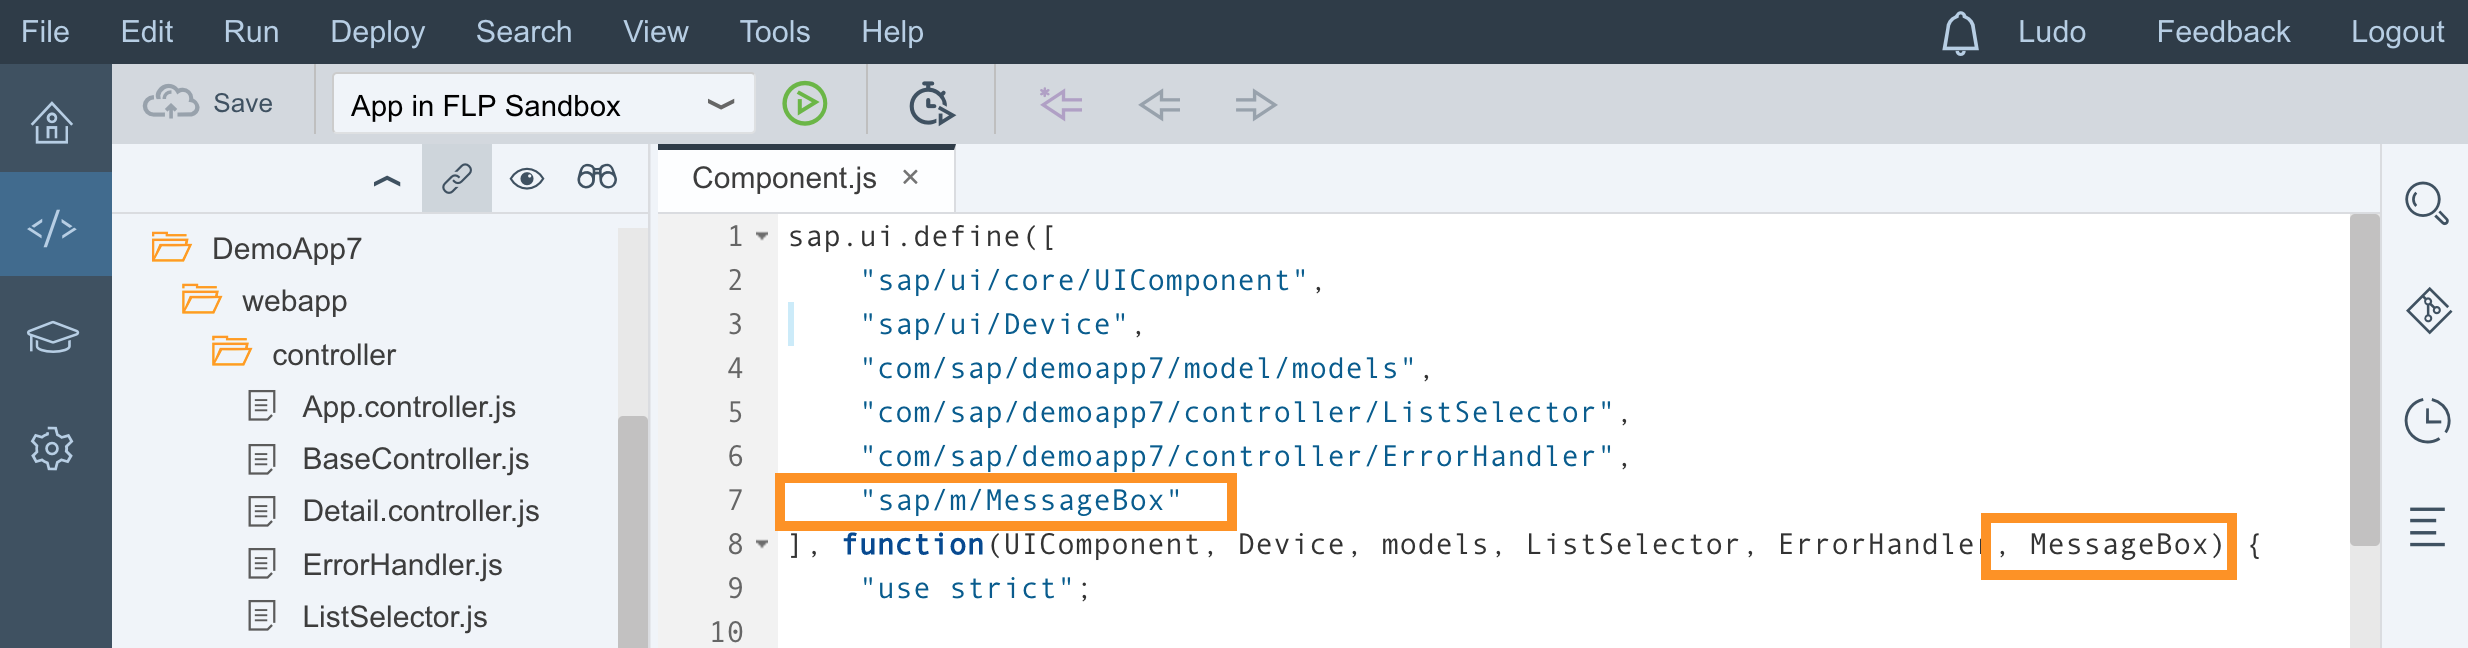
I'm going to add the Push Notification registration in the init function of my application's Component.js file:
//Push Notification Registration

var that = this;

if (sap.Push) {

	var nTypes = sap.Push.notificationType.ALERT;

	sap.Push.registerForNotificationTypes(nTypes, that.regSuccess, that.regFailure, that.processNotification);

}
And I'll add the callback functions in the same file.
regSuccess: function(result) {

	MessageBox.show("Registered For Push Notifications", {

		icon: MessageBox.Icon.INFORMATION,

		title: "Success",

		actions: [MessageBox.Action.OK]

	});

},


regFailure: function(errorInfo) {

	MessageBox.show(JSON.stringify(errorInfo), {

		icon: MessageBox.Icon.INFORMATION,

		title: "Push Registration Failed",

		actions: [MessageBox.Action.OK]

	});

},


processNotification: function(notification) {

	var notif_alert = notification.title;

	var notif_data = notification.data;


	MessageBox.show(

		notif_data, {

			icon: MessageBox.Icon.INFORMATION,

			title: notif_alert,

			actions: [MessageBox.Action.OK]

		}

	);

},
Now the only thing left, is to ensure that we can use MessageBox in this Component.
We save the changes to Component.js and hit the Refresh button on the Developer Companion running on our device. The application will reload the sources from your workspace and if all goes well, you'll see a message box indicating that registration for Push was successful.
Testing Push
So how do we test that this app can receive Push Notifications? That's easy:

Selecting Test Push Notification in the Fiori Mobile menu will show you a dialog where you can define a simple JSON string that will be sent as payload with the Push Notification. At this point the interface is bare minimum. We intend to improve this and add more options in future.

You can change the alert and data to your own needs. For now, we'll just use the default string and hit the Send button. Within seconds, a notification will arrive on your device.

You can continue changing your code, adding enhancements and hit the reload button. When you are done and want to test this application as a packaged app that includes the web assets, you can select Build Packaged App in the Fiori Mobile menu. Take note that the Developer Companion will now be replaced with the actual app. There won't be a Refresh button in this packaged app. The Fiori Mobile administrator will only be able to put the packaged app into production.
Wrapping up
To summarise, I have used two of the main features released with version 1703 of HAT: the ability to easily add Push Notifications to your app, and make use of Developer Companion so you can rapidly iterate without the need to rebuild and reinstall the application on your device.
We hope you like this developer experience. We are planning to add some more options for you in future releases, while further reducing the manual steps to get Push Notifications working in your app. We are looking forward to your feedback, so we can further improve your developer experience.
Regards,
Ludo Noens, Product Owner - Hybrid Application Toolkit
Updated on 15 December 2017 to change the sample code for handling the notification's payload.
15 Comments
You must be a registered user to add a comment. If you've already registered, sign in. Otherwise, register and sign in.
Labels in this area
-
ABAP CDS Views - CDC (Change Data Capture)
2 -
AI
1 -
Analyze Workload Data
1 -
BTP
1 -
Business and IT Integration
2 -
Business application stu
1 -
Business Technology Platform
1 -
Business Trends
1,661 -
Business Trends
88 -
CAP
1 -
cf
1 -
Cloud Foundry
1 -
Confluent
1 -
Customer COE Basics and Fundamentals
1 -
Customer COE Latest and Greatest
3 -
Customer Data Browser app
1 -
Data Analysis Tool
1 -
data migration
1 -
data transfer
1 -
Datasphere
2 -
Event Information
1,400 -
Event Information
65 -
Expert
1 -
Expert Insights
178 -
Expert Insights
282 -
General
1 -
Google cloud
1 -
Google Next'24
1 -
Kafka
1 -
Life at SAP
784 -
Life at SAP
11 -
Migrate your Data App
1 -
MTA
1 -
Network Performance Analysis
1 -
NodeJS
1 -
PDF
1 -
POC
1 -
Product Updates
4,577 -
Product Updates
330 -
Replication Flow
1 -
RisewithSAP
1 -
SAP BTP
1 -
SAP BTP Cloud Foundry
1 -
SAP Cloud ALM
1 -
SAP Cloud Application Programming Model
1 -
SAP Datasphere
2 -
SAP S4HANA Cloud
1 -
SAP S4HANA Migration Cockpit
1 -
Technology Updates
6,886 -
Technology Updates
408 -
Workload Fluctuations
1
Related Content
- Sneak Peek in to SAP Analytics Cloud release for Q2 2024 in Technology Blogs by SAP
- How to get notified when support cases are updated by SAP - SAP for Me in Technology Blogs by SAP
- 10+ ways to reshape your SAP landscape with SAP BTP: Blog 2 Interview in Technology Blogs by SAP
- What’s New in SAP Analytics Cloud Release 2024.03 in Technology Blogs by SAP
- Elevating User Experience through Progressive Web Apps (PWAs) in Technology Q&A
Top kudoed authors
| User | Count |
|---|---|
| 13 | |
| 11 | |
| 11 | |
| 10 | |
| 9 | |
| 7 | |
| 6 | |
| 5 | |
| 5 | |
| 5 |