
- SAP Community
- Products and Technology
- Enterprise Resource Planning
- ERP Blogs by SAP
- How To Integrate SAP Analytics Cloud for Planning ...
Enterprise Resource Planning Blogs by SAP
Get insights and updates about cloud ERP and RISE with SAP, SAP S/4HANA and SAP S/4HANA Cloud, and more enterprise management capabilities with SAP blog posts.
Turn on suggestions
Auto-suggest helps you quickly narrow down your search results by suggesting possible matches as you type.
Showing results for
Product and Topic Expert
Options
- Subscribe to RSS Feed
- Mark as New
- Mark as Read
- Bookmark
- Subscribe
- Printer Friendly Page
- Report Inappropriate Content
04-04-2017
1:25 PM
Summary
This article describes how Financial Planning can be implemented with SAP S/4HANA Cloud by integrating SAP Analytics Cloud (BOC) for Planning. Master data and actual data from the Universal Journal in S/4HANA are replicated into a BOC planning model. After finishing the planning round, plan data can be loaded back into the financial planning table in S/4HANA.
Table of Contents
Business Scenario
Prerequisites
SAP S/4HANA Cloud
SAP BusinessObjects Cloud
Step-by-Step Procedure
Step 1: Configure OData Service in S/4HANA Backend
Step 1.1: Create Custom CDS View
Step 1.2: Create Custom Communication Scenario
Step 1.3: Create Communication User
Step 1.4: Create Communication System
Step 1.5: Create Communication Arrangement
Step 2: Create Planning Model in BOC based on S/4HANA OData Service
Step 2.1: Create OData Import Connection
Step 2.2: Create Planning Model from an OData connection
Step 3: Perform Financial Planning in BOC
Step 4: Retract BOC plan data to S/4HANA
Step 4.1: Export Plan Data from the BOC Planning Model
Step 4.2: Adapt the csv file
Step 4.3: Import Plan Data into S/4HANA
Business Scenario
SAP S/4HANA Cloud has a different approach with regards to Financial Planning than S/4HANA On Premise. Within S/4HANA On Premise, we use SAP BPC Optimized for S/4HANA as planning solution. But BPC is not Cloud-enabled and therefore not running within S/4HANA Cloud. In S/4HANA Cloud we recommend to do the generic, flexible part of the Financial Planning (i.e. manual entry of plan data in a flexible layout, generic planning functions) in SAP BusinessObjects Cloud for Planning (BOC) and then load the plan data back into SAP S/4HANA for further processing and reporting.
This document describes how
- a BOC planning model can be created based on an S/4HANA OData service
- master data and transaction data can be loaded into the planning model
- plan data that are created in BOC can be loaded back to S/4HANA
Prerequsites
SAP S/4HANA Cloud
You need at least S/4HANA Cloud 1702. In the App “Maintain Business User” assign a role that contains the business catalogs SAP_CORE_BC_EXT and SAP_CORE_BC_COM to the user that shall execute the OData service configuration. As a result, the user will see the following Fiori Apps:
- Custom CDS Views
- Custom Communication Scenarios
- Maintain Communication Users
- Communication Systems
- Communication Arrangements
In the App “Maintain Business User” assign a role that contains the business catalogs SAP_FIN_BC_OH_PER_GPA_PC and SAP_FIN_BC_OH_REP_PLR_PC to the user that shall execute the load back of data into S/4HANA. As a result, the user will see among others the following Fiori Apps:
- Import Financial Plan Data
- P&L – Actuals
- P&L - Plan/Actual
SAP BusinessObjects Cloud
You need at least BOC 2017.05. Assign the admin role to the user that shall do the setup. As a result, the user shall be able to create an OData Import Connection and a Planning Model.
Step-by-Step Procedure
Step1: Configure OData Service in S/4HANA backend
The result of this step is an OData service together with a communication user that is assigned to the appropriate role to execute the service. The OData service reads transaction data (e.g. actual data) together with the related master data texts and attributes.
The following picture shows the required objects and their relation:

Step 1.1. Create Custom CDS View
In this step, we create a custom CDS view that is based on an SAP-delivered CDS View. For Financial Planning, the actual data in the Universal Journal (table ACDODCA) are a good starting point. But you can use as well any other released CDS view as a basis for your BOC planning model.
- Start the Fiori App Custom CDS Views
- Search for Data Source I_JournalEntryItemCube
- Select the entry and click Create
- A new CDS view is created with I_JournalEntryItemCube as primary Data source
- Enter a name and label
- Check OData and Analytical as Cube
- Go to Field selection
- As default, the key fields of the primary data source and the fields that are used in authorization objects are selected
- Deselect the fields Source Ledger, Accounting Document and LedgerGLLineItem
- Select additional fields that you need for your planning model, e.g. CostCenter and GLAccount
- Select the corresponding text fields, e.g. CostCenterName and GLAccountName
- Select a value field, e.g. AmountInCompanyCodeCurrency and the corresponding unit (CompanyCodeCurrency)
- Leave the field type as proposed by the system
- On the tabs Field properties and Parameters leave the settings as proposed by the system
- Save Draft and Publish
See the following screenshots as an example:


For additional information on the Custom CDS Views App see
https://uacp.hana.ondemand.com/http.svc/rc/PRODUCTION/1a93686c176845f0832a2a73221dd90b/1611%20500/en...
Step 1.2. Create Custom Communication Scenario
A communication scenario bundles one or more OData services. When publishing the scenario, a role is generated that contains the authorizations to access the OData services.
- Start the Fiori App Custom Communication Scenarios
- Click New
- Enter ID and description and click New again
- Click Add
- Select the OData Service that you have created in the step before. The name of the OData service is composed of the name of the CDS view concatenated with _CDS
- Click Publish
See the following screenshot as an example:

For additional information on the Custom Communication Scenarios App see
https://uacp.hana.ondemand.com/http.svc/rc/PRODUCTION/1a93686c176845f0832a2a73221dd90b/1611%20500/en...
Step 1.3. Create Communication User
The communication user is the backend user that is used to call the OData service. When creating the communication arrangement, this user will be provided with the corresponding role to access the OData service.
- Start the Fiori App Maintain Communication Users
- Click New
- Enter user name, description and password
- Click Create
For additional information on the Maintain Communication Users App see
https://uacp.hana.ondemand.com/http.svc/rc/PRODUCTION/1a93686c176845f0832a2a73221dd90b/1611%20500/en...
Step 1.4. Create Communication System
- Start the Fiori App Communication Systems
- Click New
- Enter a system ID and name
- Click Create
- Enter host name, e.g. BOC. This name is not used here at all, because we do not have an outbound service. It is only for information
- In User for Inbound Communcation click on the plus sign and select the user that you have created in the step before. Choose User Name and Password as authentication method
- Click Save
See the following screenshot as an example:

For additional information on the Communication Systems App see
https://uacp.hana.ondemand.com/http.svc/rc/PRODUCTION/1a93686c176845f0832a2a73221dd90b/1611%20500/en...
Step 1.5. Create Communication Arrangement
The communication arrangement bundles together the communication scenario and the communication system. When saving the scenario, the communication user is provided with the corresponding role to access the OData service.
- Start the Fiori App Communication Arrangements
- Click New
- Select the communication scenario that you have created before
- Enter a name for the communication arrangement
- Click Create
- Select the communication system that you have created in the step before
- Click Save
- In the Inbound Services section you find the URL to access the OData service
See the following screenshot as an example:

For additional information on the Communication Arrangements App see
https://uacp.hana.ondemand.com/http.svc/rc/PRODUCTION/1a93686c176845f0832a2a73221dd90b/1611%20500/en...
Step 2: Create Planning Model in BOC
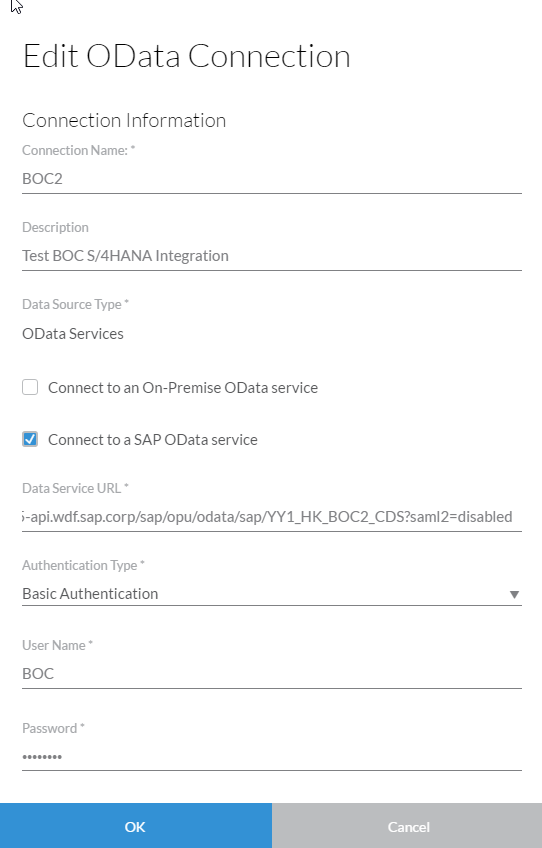
Step 2.1: Create OData Import Connection
Log on to you BOC instance now. The Import Connection is the basis for the planning model in BOC.
- Go to Main menu -> Connection
- Click on the plus sign (Add connection) -> Import Data Connection -> OData
- Enter a name and description for the connection
- Select OData Services as Data Source Type
- Leave Connect to an On-Premise OData Service unchecked
- Check Connect to a SAP OData Service
- Enter the Data Service URL that you have got in step 1.5
- You need add the URL parameter ?saml2=disabled
- Enter user name and password for the S/4HANA Communication user
- Click Create
See the following screenshot as an example:
For additional information on creating an OData Import Data Connection see
https://uacp2.hana.ondemand.com/doc/00f68c2e08b941f081002fd3691d86a7/release/en-US/1c1e36eeb99e420aa...
Step 2.2: Create Planning Model from an OData connection
In this step, a planning model is created from the OData service. At the same time, actual data and master data are replicated into BOC. Beforehand you can run the App P&L – Actuals in the S/4HANA system in order to find out the right filter criteria for the step Build OData Query.
- Go to Main menu -> Create -> Model
- Choose Get data from an app
- Choose OData Services
- On the screen Select Data Model
- Under Connection Name select the connection that you have created in the step before
- Under Query Name select Create New Query
- On the screen Create New Query
- Enter a name and description for the query
- Select your entity type (typically there is only one) and click Next
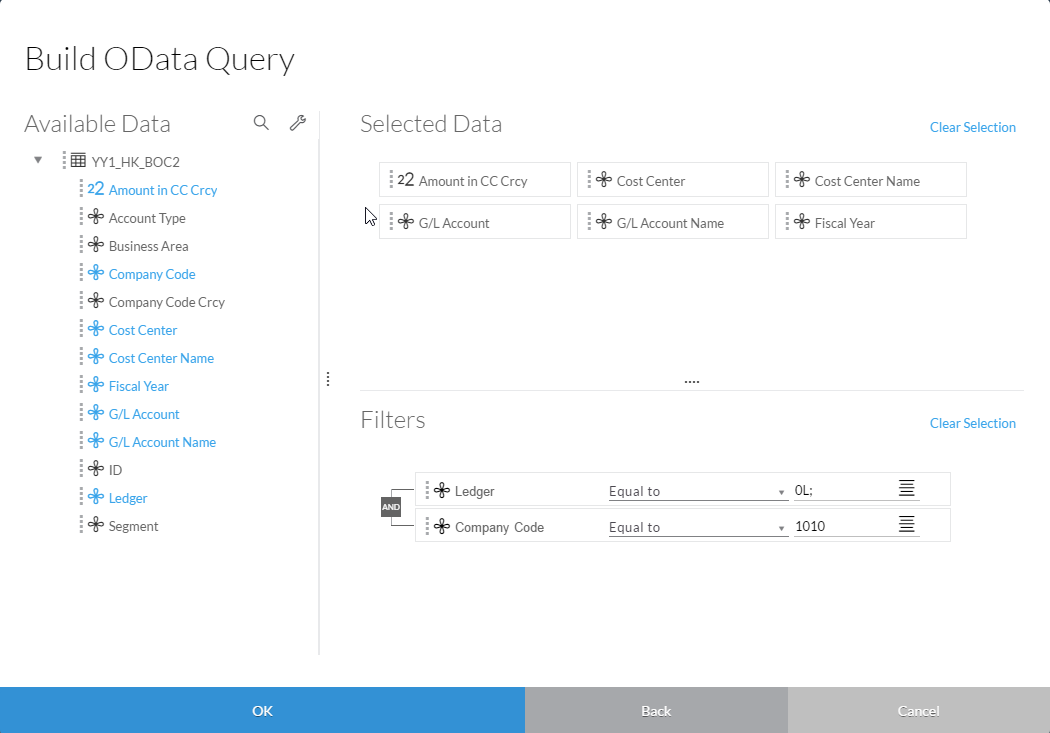
- On the screen Build OData Query
- Drag the fields that you need for the BOC model into the area Selected Data
- Select one key figure (e.g. Amount in Company Code Currency)
- Select the characteristic you want to plan on (e.g. Cost Center) and their description and attributes (e.g. Cost Center Name)
- Drag the fields that you want to filter into the area Filters
- Enter filter conditions (e.g. Ledger = 0L)
- Click OK
- Now a data preview is shown
- Click on each column and adjust the respective settings
- Adjust the column name if necessary
- Select the type (Dimension, Measure, Time, Organization, Account)
- For the fields containing an ID (e.g. Cost Center) assign the respective description: Click Add Dimension Attributes, select Description and add the column that contains the description (e.g. Cost Center Name)
- Click Model Info
- Enter model name and description
- Check Planning Enabled
- Enter a default currency for the model
- Click Create Model
- Click Create
- In the next screen, the model is shown
- Check the dimension and the uploaded master data
- If necessary, adapt the planning time horizon under Time & Categories
See the following screenshot as an example for the Build OData Query step:
For additional information on creating a planning model based on an OData Services see
https://uacp2.hana.ondemand.com/doc/00f68c2e08b941f081002fd3691d86a7/release/en-US/5c10ca68809c41308...
Step 3: Perform Financial Planning in BOC
Perform your Financial Planning in BOC. Create stories on top of the planning model, create planning users, assign planning task to them using the task workflow and let them enter their plan data. Work with private and public version, copy data and execute allocations.
For additional information on planning capabilities in BOC see
https://uacp2.hana.ondemand.com/doc/00f68c2e08b941f081002fd3691d86a7/release/en-US/1fb1f4ce92f44fc98...
Step 4: Retract BOC plan data to S/4HANA
For now, the retraction is not yet supported as a direct integration scenario like the extraction, but requires file down- and upload.
Step 4.1: Export Plan Data from the BOC Planning Model
- In BOC go to Main menu -> Browse -> Models
- Click Export Data -> Export Model as File -> Create New Schedule
- In Export Details Select your model and a folder
- In Select Data select the columns to export (typically the ID column) and set a filter to the data you want to retract
- In Scheduling select Export Now
- Click Export
- Go to Main menu -> Browse -> Files
- Select the folder where you downloaded the file
- Select the exported csv file and store it on your computer
See the following screenshot as an example for the Select Data step:

For additional information on exporting data see
https://uacp2.hana.ondemand.com/doc/00f68c2e08b941f081002fd3691d86a7/release/en-US/5a1ee6dab7ff428d9...
Step 4.2: Adapt the csv file
- Import the csv file e.g. into Microsoft Excel. Use the file import wizard (Data -> Get external data -> From Text) and choose the right separator and field format
- Delete columns that are not needed for the upload into S/4HANA
- Insert a first row for the technical field names
- If needed insert a third row for the plan data scope
See the following screenshot as an example for the adapted csv file:

For additional information see the chapter Structure of the Source File in the documentation of the Import Financial Plan Data App
https://uacp.hana.ondemand.com/http.svc/rc/PRODUCTION/cb29c254440a713be10000000a44176d/1610%20000/en...
Step 4.3: Import Plan Data into S/4HANA
- Start the Fiori App Import Financial Plan Data
- Select the adapted csv file
- Click Import
- Optional: Click Jump to Financial Plan/Actuals and check if the data arrived correctly
See the following screenshot as an example:

For additional information on the Import Financial Plan Data App see
https://uacp.hana.ondemand.com/http.svc/rc/PRODUCTION/cb29c254440a713be10000000a44176d/1610%20000/en...
- SAP Managed Tags:
- SAP Analytics Cloud,
- SAP S/4HANA Public Cloud
3 Comments
You must be a registered user to add a comment. If you've already registered, sign in. Otherwise, register and sign in.
Labels in this area
-
Artificial Intelligence (AI)
1 -
Business Trends
363 -
Business Trends
20 -
Customer COE Basics and Fundamentals
1 -
Digital Transformation with Cloud ERP (DT)
1 -
Event Information
461 -
Event Information
22 -
Expert Insights
114 -
Expert Insights
146 -
General
1 -
Governance and Organization
1 -
Introduction
1 -
Life at SAP
415 -
Life at SAP
2 -
Product Updates
4,687 -
Product Updates
199 -
Roadmap and Strategy
1 -
Technology Updates
1,502 -
Technology Updates
85
Related Content
- Futuristic Aerospace or Defense BTP Data Mesh Layer using Collibra, Next Labs ABAC/DAM, IAG and GRC in Enterprise Resource Planning Blogs by Members
- Five Key assessments for a Smooth ECC to S/4HANA Transformation in Enterprise Resource Planning Q&A
- SAP S/4HANA Cloud Extensions with SAP Build Best Practices: An Expert Roundtable in Enterprise Resource Planning Blogs by SAP
- SAP S/4HANA Cloud Public Edition 财务-成本会计常见热点问题汇总FAQ in Enterprise Resource Planning Blogs by SAP
- Demystifying Transformers and Embeddings: Some GenAI Concepts in Enterprise Resource Planning Blogs by SAP
Top kudoed authors
| User | Count |
|---|---|
| 4 | |
| 4 | |
| 4 | |
| 4 | |
| 4 | |
| 4 | |
| 4 | |
| 3 | |
| 3 | |
| 3 |