
- SAP Community
- Products and Technology
- Technology
- Technology Blogs by SAP
- Apache Edgent (Incubating) and SAP Cloud IoT
Technology Blogs by SAP
Learn how to extend and personalize SAP applications. Follow the SAP technology blog for insights into SAP BTP, ABAP, SAP Analytics Cloud, SAP HANA, and more.
Turn on suggestions
Auto-suggest helps you quickly narrow down your search results by suggesting possible matches as you type.
Showing results for
Employee
Options
- Subscribe to RSS Feed
- Mark as New
- Mark as Read
- Bookmark
- Subscribe
- Printer Friendly Page
- Report Inappropriate Content
03-31-2017
9:34 PM
Let's start with definitions.
What is Edge Computing?
Edge computing is pushing the frontier of computing applications, data, and services away from centralized nodes to the logical extremes of a network.[1] It enables analytics and knowledge generation to occur at the source of the data. This approach requires leveraging resources that may not be continuously connected to a network such as laptops, smartphones, tablets and sensoinrs.[2] Edge Computing covers a wide range of technologies including wireless sensor networks, mobile data acquisition, mobile signature analysis, cooperative distributed peer-to-peer ad hoc networking and processing also classifiable as local cloud/fog computing and grid/mesh computing, dew computing,[3] mobile edge computing,[4][5] cloudlet, distributed data storage and retrieval, autonomic self-healing networks, remote cloud services, augmented reality, and more.[6]
(Source: Wikipedia)
What is Apache Edgent
Apache Edgent is a open source programming model and micro-kernel style runtime that can be embedded in gateways and small footprint edge devices enabling local, real-time, analytics on the continuous streams of data coming from equipment, vehicles, systems, appliances, devices and sensors of all kinds (for example, Raspberry Pis or smart phones). Working in conjunction with centralized analytic systems, Apache Edgent provides efficient and timely analytics across the whole IoT ecosystem: from the center to the edge.
(Source: Apache Edgent Project Page)
Main features of Apache Edgent
The Story
IoT data is really really really big. We need to analyze all of data coming from sensors but as I mentioned data is huge and it could be very expensive to transmit all of data from sources to central analytics. This can be solved by
Apache Edgent helps us to struggle with this problem. It can be run on Java 7, 8 (including RPi devices) and Android.
Let's jump to coding.
I'll create a simple Java project with Edgent libraries and generate some numbers and make really simple analyze on that numbers and publish it to a MQTT broker to device topic. And SAP IoT will pick up that values will store this analyzed data. You can use EMQ as a MQTT Broker. After installing MQTT Broker we need make changes in SAP Cloud IoT. Go to configuration of IoT and enter MQTT Broker address, username and password.

I assume that you have already downloaded Apache Edgent. Create a new project Eclipse and jars as shown below:

Now Java Project is ready for coding.
Apache Edgent is ready for some connectors eg. messageing systems, Databases, Files, Processes etc. (Edgent Connectors) I'll not create a special connector for SAP IoT. Apache Edgent perspective of view connector is just a name. It is just some code that
So I'll generate some numbers and will send it to MQTT Broker. And SAP IoT will pick that values and put into IoT Landscape.
Now create a simple class. We need 2 methods, first one is to generate numbers like coming from a sensor called Supplier:
In the above code I just generate numbers. It will act like a sensor.
And the other method is Consumer. You can try different methods to connect to SAP IoT (HTTP API, MQTT TCP API, WebSocket API, MQTT WebSocket API). I'll use MQTT TCP API.
And now we are ready to run our code. Create a new class.
Let's review above code line by line.
The very first step is to create a DirectProvider. A Provider is an object that contains information on how and where your Edgent application will run. A DirectProvider is a type of Provider that runs your application directly within the current virtual machine when its submit() method is called.
In Edgent, Topology is a container that describes the structure of your application:
In application we have one data source. We define the source stream by calling topology.poll(), which takes both a Supplier function and a time parameter to indicate how frequently readings should be taken.
Our goal is to filter/analyze data on the source. So we filter randomly generated numbers which are below 50.
And we print data to see values and send data server with sink() method.
There are other possibilities manipulating data on the edge side(Streaming Concepts).
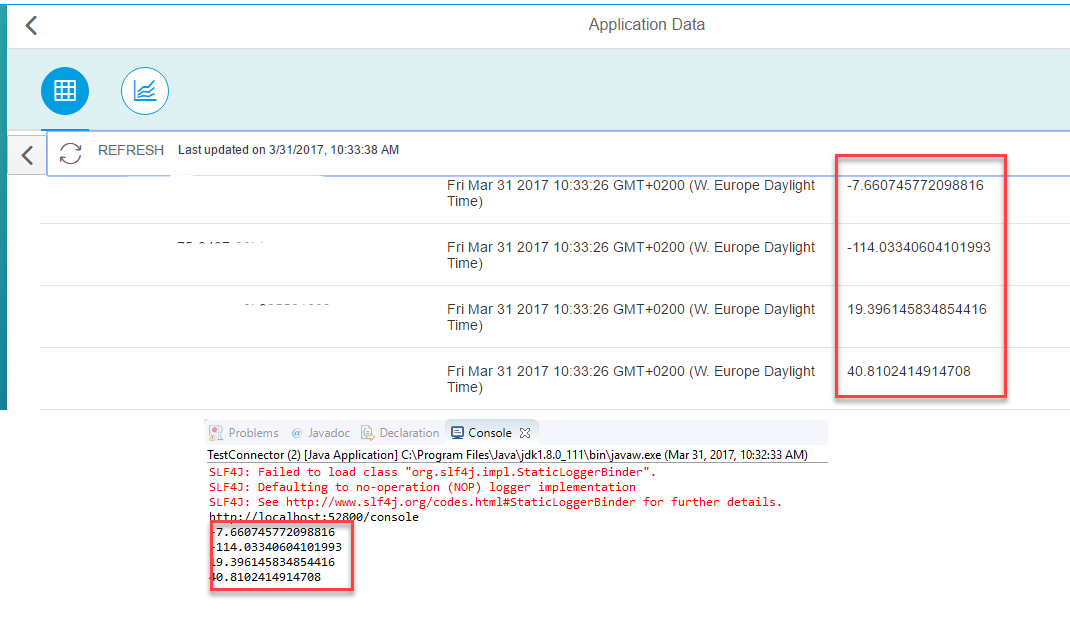
Now run your Java application and check the output. Also open the Message Management Service and check application data:
Another greate Apache Edgent feature is web console. To enable console add below imports and change provider type and print the console url:
And you will see url in the console:

Open the url shown in the console:

What is Edge Computing?
Edge computing is pushing the frontier of computing applications, data, and services away from centralized nodes to the logical extremes of a network.[1] It enables analytics and knowledge generation to occur at the source of the data. This approach requires leveraging resources that may not be continuously connected to a network such as laptops, smartphones, tablets and sensoinrs.[2] Edge Computing covers a wide range of technologies including wireless sensor networks, mobile data acquisition, mobile signature analysis, cooperative distributed peer-to-peer ad hoc networking and processing also classifiable as local cloud/fog computing and grid/mesh computing, dew computing,[3] mobile edge computing,[4][5] cloudlet, distributed data storage and retrieval, autonomic self-healing networks, remote cloud services, augmented reality, and more.[6]
(Source: Wikipedia)
What is Apache Edgent
Apache Edgent is a open source programming model and micro-kernel style runtime that can be embedded in gateways and small footprint edge devices enabling local, real-time, analytics on the continuous streams of data coming from equipment, vehicles, systems, appliances, devices and sensors of all kinds (for example, Raspberry Pis or smart phones). Working in conjunction with centralized analytic systems, Apache Edgent provides efficient and timely analytics across the whole IoT ecosystem: from the center to the edge.
(Source: Apache Edgent Project Page)
- Runs on Rasberry Pi or Android.
- Currently Java based
- A simple Linux box on the edge can run Java and Edgent
- Edgent is a programming model (functional flow API) and a lightweight embeddable runtime for edge analytics
- Edgent may speak to a central hub including:
- An MQTT broker
- Apache Kafka
- Other backend systems for analytics
Main features of Apache Edgent
- Functional flow API for streaming analytics (Map, Flatmap, Filter, Aggregate, Split, Union, Join, Deadband filter)
- Connectors (MQTT, HTTP, Websockets, JDBC, File, Kafka)
- Java API allows you to send JSON to an MQTT device
- Bi-directional communications with the backend
- Web based interface to view application graph and metrics
- Junit available
- Edgent uses Java Lambda expressions
The Story
IoT data is really really really big. We need to analyze all of data coming from sensors but as I mentioned data is huge and it could be very expensive to transmit all of data from sources to central analytics. This can be solved by
- Reducing amount of data that transmitted to central analytics server
- Reducing the amount of data that you store.
Apache Edgent helps us to struggle with this problem. It can be run on Java 7, 8 (including RPi devices) and Android.
Let's jump to coding.
I'll create a simple Java project with Edgent libraries and generate some numbers and make really simple analyze on that numbers and publish it to a MQTT broker to device topic. And SAP IoT will pick up that values will store this analyzed data. You can use EMQ as a MQTT Broker. After installing MQTT Broker we need make changes in SAP Cloud IoT. Go to configuration of IoT and enter MQTT Broker address, username and password.
I assume that you have already downloaded Apache Edgent. Create a new project Eclipse and jars as shown below:
Now Java Project is ready for coding.
Apache Edgent is ready for some connectors eg. messageing systems, Databases, Files, Processes etc. (Edgent Connectors) I'll not create a special connector for SAP IoT. Apache Edgent perspective of view connector is just a name. It is just some code that
- act as a sink for a stream - when provided with a stream tuple it can deliver that data to an external entity. The connector implements Consumer<T>.apply(T tuple).
- act as a source for a stream - when queried, or on its own, can synthesize a tuple from data from an external entity. e.g., the connector implements T Supplier<T>.get()
So I'll generate some numbers and will send it to MQTT Broker. And SAP IoT will pick that values and put into IoT Landscape.
Now create a simple class. We need 2 methods, first one is to generate numbers like coming from a sensor called Supplier:
	static Supplier<Double> source() {

		return () -> {

			rand = new Random();

			return rand.nextGaussian() * 100;

		};

	}
In the above code I just generate numbers. It will act like a sensor.
And the other method is Consumer. You can try different methods to connect to SAP IoT (HTTP API, MQTT TCP API, WebSocket API, MQTT WebSocket API). I'll use MQTT TCP API.
	static Consumer<Double> sink() {

		return t -> {

			sendMessage(String.valueOf(t));

		};

	}
	static void sendMessage(String msg){


		String content = buildDeviceJSON("async", "XXX", msg);


		String topic        = "iot/data/iotmmsXXXtrial/v1/XXX";

        String content      = content;

        int qos             = 2;

        String broker       = "tcp://";

        String clientId     = "Java";

        MemoryPersistence persistence = new MemoryPersistence();

        try {

        	MqttClient sampleClient = new MqttClient(broker, clientId, persistence);

            MqttConnectOptions connOpts = new MqttConnectOptions();

            connOpts.setCleanSession(true);

            sampleClient.connect(connOpts);

            MqttMessage message = new MqttMessage(content.getBytes());

            message.setQos(qos);

            sampleClient.publish(topic, message);

            sampleClient.disconnect();


         }catch(MqttException me) {

             System.out.println("reason "+me.getReasonCode());

             System.out.println("msg "+me.getMessage());

             System.out.println("loc "+me.getLocalizedMessage());

             System.out.println("cause "+me.getCause());

             System.out.println("excep "+me);

             me.printStackTrace();

         }

	}
And now we are ready to run our code. Create a new class.
	public static void main(String[] args) {

		 DirectProvider dp = new DirectProvider();

		 Topology top = dp.newTopology();


		 TStream<Double> sapStream= top.poll(SAPMQTTConnector.source(), 2, TimeUnit.SECONDS);


	     TStream<Double> filteredReadings = sapStream.filter(reading -> reading < 50);

	     filteredReadings.print();

	     filteredReadings.sink(SAPMQTTConnector.sink());


		 dp.submit(top);


	}
Let's review above code line by line.
The very first step is to create a DirectProvider. A Provider is an object that contains information on how and where your Edgent application will run. A DirectProvider is a type of Provider that runs your application directly within the current virtual machine when its submit() method is called.
DirectProvider dp = new DirectProvider();
In Edgent, Topology is a container that describes the structure of your application:
- Where the streams in the application come from and
- How the data in the stream is modified
Topology top = dp.newTopology();
In application we have one data source. We define the source stream by calling topology.poll(), which takes both a Supplier function and a time parameter to indicate how frequently readings should be taken.
TStream<Double> sapStream= top.poll(SAPMQTTConnector.source(), 2, TimeUnit.SECONDS);
Our goal is to filter/analyze data on the source. So we filter randomly generated numbers which are below 50.
TStream<Double> filteredReadings = sapStream.filter(reading -> reading < 50);And we print data to see values and send data server with sink() method.
filteredReadings.print();

filteredReadings.sink(SAPMQTTConnector.sink());
There are other possibilities manipulating data on the edge side(Streaming Concepts).
Now run your Java application and check the output. Also open the Message Management Service and check application data:
Another greate Apache Edgent feature is web console. To enable console add below imports and change provider type and print the console url:
import org.apache.edgent.providers.development.DevelopmentProvider;

import org.apache.edgent.providers.direct.DirectProvider;
DevelopmentProvider dp = new DevelopmentProvider();System.out.println(dp.getServices().getService(HttpServer.class).getConsoleUrl());
And you will see url in the console:
Open the url shown in the console:
- SAP Managed Tags:
- SAP Business Technology Platform
You must be a registered user to add a comment. If you've already registered, sign in. Otherwise, register and sign in.
Labels in this area
-
ABAP CDS Views - CDC (Change Data Capture)
2 -
AI
1 -
Analyze Workload Data
1 -
BTP
1 -
Business and IT Integration
2 -
Business application stu
1 -
Business Technology Platform
1 -
Business Trends
1,658 -
Business Trends
91 -
CAP
1 -
cf
1 -
Cloud Foundry
1 -
Confluent
1 -
Customer COE Basics and Fundamentals
1 -
Customer COE Latest and Greatest
3 -
Customer Data Browser app
1 -
Data Analysis Tool
1 -
data migration
1 -
data transfer
1 -
Datasphere
2 -
Event Information
1,400 -
Event Information
66 -
Expert
1 -
Expert Insights
177 -
Expert Insights
296 -
General
1 -
Google cloud
1 -
Google Next'24
1 -
Kafka
1 -
Life at SAP
780 -
Life at SAP
13 -
Migrate your Data App
1 -
MTA
1 -
Network Performance Analysis
1 -
NodeJS
1 -
PDF
1 -
POC
1 -
Product Updates
4,577 -
Product Updates
342 -
Replication Flow
1 -
RisewithSAP
1 -
SAP BTP
1 -
SAP BTP Cloud Foundry
1 -
SAP Cloud ALM
1 -
SAP Cloud Application Programming Model
1 -
SAP Datasphere
2 -
SAP S4HANA Cloud
1 -
SAP S4HANA Migration Cockpit
1 -
Technology Updates
6,873 -
Technology Updates
420 -
Workload Fluctuations
1
Related Content
- SAP BTP Unified Runtime | Ready for the Next Wave? in Technology Blogs by SAP
- Setting Up the Development Environment - Eclipse , Java, Maven, SAP CAP ,Cloud Tools for SAP Cloud Application Programming Model in Technology Blogs by SAP
- [SAP HANA Academy] Learn How to Install and Use SAP HANA Vora 1.3 in Technology Blogs by Members
- Importing tables from a HANA system into HDFS using Apache Sqoop in Technology Blogs by SAP
Top kudoed authors
| User | Count |
|---|---|
| 37 | |
| 25 | |
| 17 | |
| 13 | |
| 7 | |
| 7 | |
| 7 | |
| 6 | |
| 6 | |
| 6 |