
- SAP Community
- Products and Technology
- Human Capital Management
- HCM Blogs by Members
- Accomplishing Common Reporting Tasks with Plateau ...
Human Capital Management Blogs by Members
Gain valuable knowledge and tips on SAP SuccessFactors and human capital management from member blog posts. Share your HCM insights with a post of your own.
Turn on suggestions
Auto-suggest helps you quickly narrow down your search results by suggesting possible matches as you type.
Showing results for
daphil01
Participant
Options
- Subscribe to RSS Feed
- Mark as New
- Mark as Read
- Bookmark
- Subscribe
- Printer Friendly Page
- Report Inappropriate Content
03-31-2017
1:43 PM
Overview:
In this series of posts I will examine common issues that can be addressed through the Plateau Report Designer (PRD) custom reporting tool for the Successfactors Learning Management Sysetm (LMS.) The reporting task addressed in this post will be extending a previous post's solution for reporting on Learning History. The last report extended the Learning History (CSV) report and added in a couple of Non-Referenced custom fields. This version will demonstrate how you would bring in a custom user referenced field. To download the previous file click here, for the completed version from this article, please click here.
The documentation given out for the PRD classes goes about pulling in the custom fields in a different way than I will be discussing here. For this solution we will be utilizing view tables to get the reference id and then using that to access the table with the referenced id description.
Items Needed for Solution:
- Working knowledge of Successfactor Learning Management Systems and Plateau Report Designer(PRD.)
- Rights to import and export reports from your LMS instance.
- A working knowledge of SQL as it applies to PRD.
- A working copy of the most up to date version of Plateau Report Designer 4.4.2(PRD.)
Note: If you need more information on how to use Plateau Report designer, please read the following post.
Solution Background:
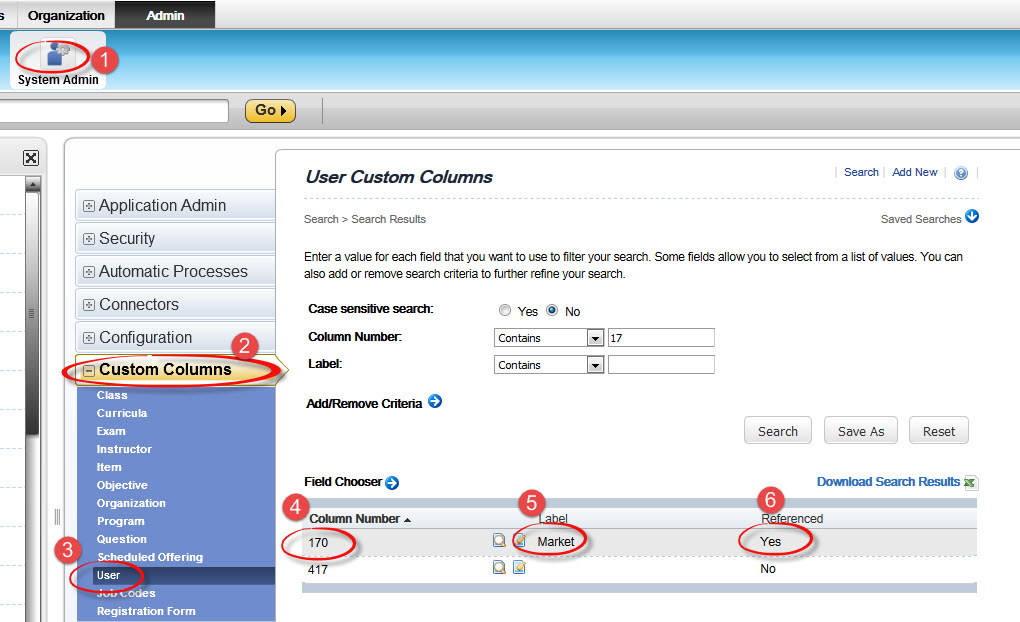
The referenced custom field I will be pulling in for this example will be the user custom field "Market," As a refresher, to find out the custom field's number you will need to go to System Admin -> Custom Columns and then select the type of custom column you are looking for.
In the following capture I have selected user and searched and as you can see the "Market" custom field is column number 170 and it is listed as referenced..
So what is the difference between a referenced and non-referenced custom field? Well one simple answer is if the field is non-referenced it is essentially going to allow an open text field to type in whatever is desired for the custom field. If a field is referenced you are going to create a list of reference ids and descriptions that will provide a drop down menu when the field is being updated. This sort of mapping of data can be useful for HR feed or reporting that needs to be normalized. It is also helpful since it gives the admin a list so there is less chance of typographical errors in entering data.
With that in mind to view the list of ids and description for Market you simply click on edit icon in the red number 5 in the last capture next to the Label name and you get the follow information.

So this gives us the last bit of information we need in order to pull in the description of the Market custom field. The information we will need for our SQL are: Column Number, Student ID, Reference ID for the tables we will be using.
From my previous post I have already supplied us with code that would allow us to bring in the reference id. The PV_ tables (PV_STUD_USER for user custom fields) when used on a referenced custom field yields the reference id for that column id and student id.
So the last piece we need is the table name to find out what the reference id's description is. The table for student custom fields for this is: PA_USRRF_STUD.
How did I know this field was what I needed? There is a section in this guide on page 196 that gives a complete breakdown of custom fields and how to determine the correct table based on what you need to know (custom fields for user,item,class, curricula, etc..) The guide also shows another way to get non-referenced data using PA_ table versions similar to the PV_ view tables I chose to use.
I think the PV_ tables and fields make more intuitive sense so that is why I use them. A good exercise from this blog would be to go back through the code and redo it using the PA_STUD_USER table instead of the PV_STUD_USDER table. You should be able to do it from the new document. Maybe even an item custom field that is referenced.
Below is the field listing for PA_USRRF_STUD:

So to get the information we need from this table we are going to need to join based on the column number (170,) the user_id is actually the reference id we have from the view table. So we will join on that value which will then let us select the USER_DESC field which is the reference id's description.
I am going to reuse some of the code from the previous post so show where we are getting the joins from. Also, I have removed the union area in the learning history report (CSV) for ease of use now so the external history will no longer be generated.I will be adding in the three areas of the previous report will be:
SELECT

.

.

pu1.user_desc as MarketDesc               --ADDITIONAL CODE

.

.


FROM

.

.

pv_stud_user psu,                         -- already exists from last report

pv_cpnt_cust_column pccc,                 -- already exists from last report

pa_usrrf_stud pu1,                        --ADDITIONAL CODE

.

.


WHERE

.

.

AND e.stud_id = psu.stud_id (+)          -- already exists from last report


AND psu.col_num_170 = pu1.user_id (+)    --ADDITIONAL CODE

AND pu1.col_num (+) = 170                --ADDITIONAL CODE


AND e.cpnt_id = pccc.cpnt_id (+)         -- already exists from last report

AND e.cpnt_typ_id = pccc.cpnt_typ_id (+) -- already exists from last report

AND e.rev_Dte = pccc.rev_dte (+)         -- already exists from last report

.
Note: This code is based on the previous blog post and on the lines with --ADDITIONAL CODE are the updates to bring in the reference id description.
Actions:
The steps involved in this process are:
- Download the previous modified Learning History report here.
- Edit the SQL code to pull in the new fields
- Add the new SQL columns to the downloaded report.
- Save the new custom report and save/export it as a ZIP to be imported back into the LMS
- Import the new custom report ZIP file into the LMS for testing
I am going to focus the example on step 3, since for the purposes of this post it is assumed that the basics of adding fields, import and export of reports are already working knowledge of the reader. Once again, if you need examples on these steps or more basic PRD steps, I recommend this post to get up to speed.
The first thing needed for this report is to identify the table and reference id that will be used to join in with the new table. In the last post I left both unions in the Learning History (CSV) report, and in this one I have taken the 2nd part of the union out so there are no more unions to confuse in the report.
The reference id for this report we are concerned with comes from the PV_STUD_USER table which is defined as table psu in this report. This means that pu.col_num_170 identifies the reference id for column 170 (Market's column number), so this is what we will use in our initial SQL join info. We will also need to hard set the column number of 170 in the table we are joining into (PA_USRRF_STUD.) This will look like pu1.col_num (+) = 170 which simple means return the information whether or not there is actually data for just col_num that = 170.
PA_USRRF_STUD_ pu1 need to be added in the FROM section, and the two join statements to set col_num and user_id (reference ID) need to be added to the WHERE section of the query which are circled below:

Note: If you are adding this code into a report you have not already linked the PV_ table into you will need to do those steps from the previous blog post.
Now the field in the PA_USRRF_STUD table is accessible and the field we are going to add is PU1.USER_DESC.
This code will be added first in the area after the select statement:

After these changes have been made you can check your preview to see if any of the records display the item custom field "Market" . Below is a sample I ran in the SQL preview window. Note: I modified the code to display a specific user with a specific item on their learning history.

At this point this column is now available to be added into the report and the SQL portion is complete. You simply add the field, save the report ZIP file and import and test. One thing to note is that the description is coded as a label so you will need to modify the column binding so that it bring in the correct translated description for the user's locale who is running the report. For more information on this go to the guide here on page 154 it gives the steps for adding in the code for localized fields.
Conclusion:
As always, if you have other solutions or issues with this post, please leave them in the comments. I think a good exercise to become more familiar would be to take this report code and attempt to duplicate the results with the guide linked above and use the PA_STUD_USER table. Getting the joins right will help your problem solving a great deal I believe for future reports.
The complete report file to view and import for this example is available here for download from my dropbox. It has the fields already added to the report so you can import and test it, or open it in PRD to view the SQL.
I will take suggestions for my next topic if there are any. I will be posting a new entry in the next 1-2 weeks.
Thanks for your attention and feedback,
Dwayne Phillips - Veritas Prime
- SAP Managed Tags:
- SAP SuccessFactors Learning
2 Comments
You must be a registered user to add a comment. If you've already registered, sign in. Otherwise, register and sign in.
Labels in this area
-
1H 2024 Product Release
5 -
2H 2023 Product Release
1 -
ACCRUAL TRANSFER
1 -
Advanced Workflow
1 -
Anonymization
1 -
BTP
1 -
Business Rules
1 -
Canvas Report
1 -
Career Development
1 -
Certificate-Based Authentication
1 -
Cloud Platform Integration
1 -
Compensation
1 -
Compensation Information Management
1 -
Compensation Management
1 -
Compliance
2 -
Content
1 -
Conversational AI
2 -
Custom Data Collection
1 -
custom portlet
1 -
Data & Analytics
1 -
Data Integration
1 -
Dayforce
1 -
deep link
1 -
deeplink
1 -
Delimiting Pay Components
1 -
Deprecation
1 -
Employee Central
1 -
Employee Central Global Benefits
1 -
Employee Central Payroll
1 -
employee profile
1 -
Employee Rehires
1 -
external terminal
1 -
external time events
1 -
Generative AI
2 -
Getting Started
1 -
Global Benefits
1 -
Guidelines
1 -
H2 2023
1 -
HR
2 -
HR Data Management
1 -
HR Transformation
1 -
ilx
1 -
Incentive Management Setup (Configuration)
1 -
Integration Center
2 -
Integration Suite
1 -
internal mobility
1 -
Introduction
1 -
learning
3 -
LMS
2 -
LXP
1 -
Massively MDF attachments download
1 -
Mentoring
1 -
Metadata Framework
1 -
Middleware Solutions
1 -
OCN
1 -
OData APIs
1 -
ONB USA Compliance
1 -
Onboarding
2 -
Opportunity Marketplace
1 -
Pay Component Management
1 -
Platform
1 -
portlet
1 -
POSTMAN
1 -
Predictive AI
2 -
Recruiting
1 -
recurring payments
1 -
Role Based Permissions (RBP)
2 -
SAP CPI (Cloud Platform Integration)
1 -
SAP HCM (Human Capital Management)
2 -
SAP HR Solutions
2 -
SAP Integrations
1 -
SAP release
1 -
SAP successfactors
5 -
SAP SuccessFactors Customer Community
1 -
SAP SuccessFactors OData API
1 -
SAP Workzone
1 -
SAP-PAYROLL
1 -
skills
1 -
Skills Management
1 -
sso deeplink
1 -
Stories in People Analytics
3 -
Story Report
1 -
SuccessFactors
2 -
SuccessFactors Employee central home page customization.
1 -
SuccessFactors Onboarding
1 -
successfactors onboarding i9
1 -
Table Report
1 -
talent
1 -
Talent Intelligence Hub
2 -
talents
1 -
Tax
1 -
Tax Integration
1 -
Time Accounts
1 -
Workflows
1 -
XML Rules
1
Related Content
- Custom Tasks in Onboarding and Offboarding in Human Capital Management Blogs by SAP
- E-Verify Implementation for Onboarding 2.0 Simplified in Human Capital Management Blogs by Members
- SuccessFactors Time Off 1H 2023 Release Highlights - Part 1 in Human Capital Management Blogs by Members
- Successfactors Time Management – new features in H2 2022 in Human Capital Management Blogs by SAP
- SuccessFactors Employee Central Global Benefits - Automating Employee Claims (Voucher Benefits) in Human Capital Management Blogs by Members
Top kudoed authors
| User | Count |
|---|---|
| 12 | |
| 8 | |
| 4 | |
| 4 | |
| 2 | |
| 2 | |
| 1 | |
| 1 | |
| 1 | |
| 1 |