
- SAP Community
- Products and Technology
- Technology
- Technology Blogs by SAP
- Setting up a CTS+ enabled transport landscape in S...
Technology Blogs by SAP
Learn how to extend and personalize SAP applications. Follow the SAP technology blog for insights into SAP BTP, ABAP, SAP Analytics Cloud, SAP HANA, and more.
Turn on suggestions
Auto-suggest helps you quickly narrow down your search results by suggesting possible matches as you type.
Showing results for
Product and Topic Expert
Options
- Subscribe to RSS Feed
- Mark as New
- Mark as Read
- Bookmark
- Subscribe
- Printer Friendly Page
- Report Inappropriate Content
03-29-2017
3:29 PM
Summary
In this blog I will describe step by step how to set up a transport landscape in SAP Cloud Platform integrated with SAP's enhanced Change and Transport System (CTS+). The procedure is derived from the very useful how-to guide 'How To... Configure HCP for CTS'. I will reference the chapters of this guide in the blog and extend the explanations of the guide where needed. On top of that I created short video clips of each and every step of the setup.
Prerequisites
You need:
- Access to a (global) account within SAP Cloud Platform (CP) in which you are allowed to create new accounts for development, test (optional) and production use or
- Access to an already existing account structure in SAP CP with the above mentioned accounts for development, test and production
- It is not possible to setup several accounts within a trial account. You need a 'real' SAP CP global account
- Access to a SAP NetWeaver 740 (support package level >= 10) system which will act as the coordinating CTS (or CTS+) system. If you are already use CTS+ for other application types you should use this system if it is already on SAP NetWeaver 740
- Optional: if you plan to integrate your SAP CP landscape into higher level change management tools like Change Request Management (ChaRM) or Quality Gate Management (QGM) this central CTS system has to be a SAP Solution Manager 7.2 system (SolMan 7.1 is not sufficient!)
Target Landscape
I will setup a three account (system) landscape with the account roles development, test and production. Enhanced CTS allows more complex landscapes as well, e.g. additional pre-production account, several production accounts, sandbox accounts, etc.
The development content will be exported from the development account, attached to a transport request and added to the import queue of the test system. When the import to the test system is performed the development artifacts are deployed to the test account in SAP CP and the transport request is added to the import queue of the production system. On import the content is deployed to the production account.

Step 1: Set up your SAP Cloud Platform accounts
The account structure within your SAP CP global account strongly depends on requirements concerning security, isolation vs. dependencies of development projects, resource sharing vs. separation etc. Separate accounts e.g. allow individual configuration of integration to backend systems or of the used identity provider. Therefore you might require more than the three accounts I will be using here.
Now let's start with the configuration of the SAP CP accounts:
- Log on to your global SAP CP account
- Go to the overview page of your global account (showing the already existing accounts)
- Click on the 'New Account' button
- Enter a name and description for the new account
- Decide whether you would like to use the beta features of SAP CP. They are not required for the CTS+ integration but you might need them for your development project
- Click on Save
- Perform further configuration tasks like adding new members (users), setting up services or connectivity. For the CTS+ integration there are no further configuration steps required
Repeat the above steps for all accounts in your landscape, in my case for development, test and production account. Please see the corresponding videos:
I have now created three accounts within the global SAP CP account:

Step 2: Set up HTTP connections from CTS system to SAP CP accounts
This step refers to chapter 5.1 ('Configuring an HTTP Destination') in the How-To guide.
Currently the CTS+ integration of SAP CP is based on loose coupling. That means that you have to export your development artifacts from your source (= development) account into a multi target application archive (MTAR) file on file system. How this is done in detail differs from development type to development type.
Then from the CTS system you have to create a transport request (or use an existing one, which has not yet been released) and attach this archive file to the transport request. When you now release the transport request it is added to the import queue of the next target system(s), in my case the test system. If you trigger the import into the target system the CTS system calls a service in the respective SAP CP account via an HTTP connection. Therefore I have to setup an HTTP connection for each and every target system (= account) in my landscape. In my example I need the connections for the test and the production system. I do not need a connection for the development account (therefore the dotted line in the target landscape picture).
Now let's set up the HTTP connection for the test system:
- Log on to your CTS+ system (SAP Solution Manager 7.2 or SAP NetWeaver 740)
- Start transaction 'SM59' (Configuration of RFC connections)
- In the displayed list select 'HTTP Connections to External Server' and press the 'Create' button (white leaf of paper)
- in the field RFC destination provide a name for the destination, e.g. 'CAT_DESTINATION' (I plan to name the representation of my test account CAT). Please observe that the name will be converted to upper case automatically. You will need the name of this destination later on.
- Enter some meaningful description (like 'Destination for SAP CP Test Account')
- Switch to the tab 'Technical Settings' (if not already there)
- The target host name depends on which datacenter hosts your account. To check that log on to the respective SAP CP account and look at the HTTPS address of that page. It should contain something like 'account.eu1.hana.ondemand.com' (eu1 standing for a Europe based datacenter). For the configuration of the CTS HTTP connection you have to replace 'account' by 'slservice'. So the complete Target Host Name would be 'slservice.eu1.hana.ondemand.com'
- The field Service No. must stay empty
- The Path Prefix follows the pattern /slservice/slp/basic/<target_account_name>/slp. You have to replace <target_account_name> by the technical name of your account, which can be found on the overview page in the Account Information area (something like 'a123xyz1')

- Press enter once and confirm the information that HTTP connections may not be secure
- If your CTS system accesses the internet via a proxy enter the proxy configuration
- Switch to the tab 'Logon & Security'
- Choose 'Basic Authentication' and enter the credentials of a member of your SAP CP account who has the 'Developer' role in the target account
- I would like to encrypt the communication via SSL (secure socket layer). Therefore I set SSL to 'active'
- Remember the Certificate List displayed, as it will be needed it in the next step
- Save the connection
Please see the video on creating the HTTP connection to the test system.
Repeat these steps for all your target accounts. In my example I have to do it for the production account (see video).
Step 3: Import SSL Certificate
This step refers to chapter 5.2 ('Import SSL Certificate') in the How-To guide.
In order to establish an encrypted communication from the CTS system to the SAP CP accounts the CTS has to validate the server identity of the SAP CP server. This is done with the root certificate which has been used to sign the SAP CP server certificate. Therefore this root certificate has to be imported into the CTS system. You get the root certificate e.g. by exporting it from a browser (shown here for Internet Explorer) or by downloading it from https://www.digicert.com.
- Start your browser (here Internet Explorer 11)
- Navigate to Tools (gear-wheel icon) -> Internet Options
- Choose the tab 'Content'
- Press 'Certificates'
- Go to the tab 'Trusted Root Certification Authorities'
- Select 'Baltimore Cyber Trust'
- Click 'Export...'
- In the Certificate Export Wizard click 'Next' and then select 'Base-64 encoded X.509 (.CER)' as export format and click 'Next ' again
- Enter a filename and click 'Next'
- Check the summary screen and click 'Finish'
- The root certificate has now been exported
The next step is to import the certificate into your central CTS system.
- Log on to your CTS system and start transaction STRUST
- Switch to change mode
- Double-click on the SSL client you have specified in the HTTP connection definition (here 'SSL client (Standard)'
- Click on the button 'Import Certificate' (bottom left in the right part of the screen)
- Enter the path and filename of the previously exported certificate and confirm by pressing the enter key
- Click on 'Add to Certificate List' and verify that 'Baltimore Cyber Trust appears in the Certificate List
Here is the video on the certificate import.
Step 4: Test HTTP connection
After you have imported the root certificate you can check if the HTTP connections work:
- In your CTS system start transaction SM59
- Open the list of HTTP connections
- Double click on one of your your connections to SAP CP
- Click on 'Connection Test'
- This should deliver an HTTP Response value '200' (= OK)
- Repeat this check for all connections
I have also created a video for this check.
I now established the connections from the CTS system to the SAP CP accounts:

Step 5: Configure the Transport Organizer Web UI
This step refers to chapter 5.3 ('Configuring the Transport Organizer Web UI') in the How-To guide.
The transport request used in the CTS+ integration of SAP CP are created and maintained with an ABAP Web Dynpro application, the Transport Organizer (Web UI). This application is made available via the Internet Connection Framework (ICF) and has to be activated when using CTS+ for the first time. If you already use CTS+ for other application types (besides SAP CP) you do not have to activate the Transport Organizer Web UI again.
- In your central CTS system start transaction SICF
- Enter 'SERVICE' in the field 'Hierarchy Type' (if not already there)
- Enter 'CTS*' in the field 'Service Name'
- Click on 'Execute' (green tick with clock)
- In the tree structure in the lower part of the screen right click on the entry 'CTS_ORGANIZER'
- From the context menu select 'Activate Service'. If this entry is greyed out and cannot be selected it means that the service is already active
- Confirm that you really want to activate the service
- Repeat the above steps for the entry 'CTS_OBJECTLIST_BROWSER'
This video shows the above steps.
Step 6: Configure SAP CP as Application Type
This step refers to chapter 6 ('Configure HCP as Application Type') in the How-To guide.
Now I will define an application type serving as a unique identifier for the SAP CP content I will transport via CTS+.
- Log on to your CTS+ system and start transaction STMS
- Click on 'System Overview' icon (one orange box above two green ones)
- From the menu select Extras -> Application Types -> Configure
- If the entry 'HCP' is not yet there click on 'New Entries'
- Enter 'HCP' in the field 'Application ID'
- Enter a meaningful description like 'Multi-Target Application (MTA) on SAP CP'
- For 'Support Details' enter 'BC-NEO-INFR'. This is the SAP support component to use when creating an incident at SAP
- Save your entry
- Confirm the question to distribute the configuration change immediately
- Click the 'Back' button (green arrow to the left)
- You should now see 'HCP' in the list of application types
This procedure is documented in a video.
Step 7: Create the development account representation in the CTS system
This step refers to chapter 7.1.1 ('Configuring the Development system (Export system)') in the How-To guide.
Sources and targets for transports are identified in the CTS system by three letter acronyms (System ID or SID) which have to be unique within the transport domain managed by the CTS system. In our example I will use CAD (Cloud Account Development), CAT (Cloud Account Test) and CAP (Cloud Account Production). I will start with the system representing the SAP CP development account.
- Log on to your central CTS system and start transaction STMS
- Click on 'System Overview' icon (one orange box above two green ones)
- From the menu select SAP System -> Create -> Non-ABAP System
- Enter your development SID in the field 'System' (in our example 'CAD')
- Enter a meaningful description like 'SAP CP development account'
- Select the flag 'Activate Transport Organizer'. This allows to call the Transport Organizer Web UI for this system
- The Client specified here should be the one used for transporting (normally the one you are currently logged on to). Please observe that all users who should be authorized to attach SAP CP content to transport via CTS+ have to have a user in this client. The users need the authorizations as specified in the template role SAP_CTS_PLUS. Please do not use the role directly but copy it to a role in the customer name range ('Z_*'). Also take a look at SAP note 1003674 for recent updates on authorizations
- Save your system definition
- Confirm the question to distribute the configuration change immediately
- Your system should now appear in the list of systems
Please also see the corresponding video.
I have now created the representation of the development account in the CTS system:

Step 8: Create the test and production account representation in the CTS system
This step refers to chapter 7.1.2 ('Configuring the Test and Production System (Import Systems)') in the How-To guide.
I will now setup the target systems for the transports, in my example the test and the production accounts.
- Log on to your CTS+ system and start transaction STMS
- Click on 'System Overview' icon (one orange box above two green ones)
- From the menu select SAP System -> Create -> Non-ABAP System
- Enter your development SID in the field 'System' (in our example 'CAT')
- Enter a meaningful description like 'SAP CP test account'
- In the frame Target System Settings activate the flag 'Activate Deployment Service'
- Activate the Method 'Other' and deactivate all other Methods
- Save your system definition
- Confirm the question to distribute the configuration change immediately
- You are automatically taken to a screen showing the deployment methods for different application types (currently none)
- Click on 'New Entries'
- In the field 'Application ID' choose 'HCP' (as defined in step 6 above)
- Set the 'Deploy method' to 'HTTP-based Deployment (application specific)'
- In the field 'HTTP destination' specify the destination you created in step 2 for your test account (in our example 'CAT_DESTINATION'). Please double-check the correct spelling and correct case (all upper case)
- Leave the other fields empty and save your setting
- Confirm the question to distribute the configuration change immediately
- Click the 'Back' button (green arrow to the left)
- You should now see the newly created deployment method for your test system
- Click the 'Back' button again
- Your new test system 'CAT' should now be listed
The creation of the test account representation is shown in this video.
Repeat the above steps for your other target accounts, in omy example for the production account, this time using another SID, e.g. 'CAP' and the HTTP destination for the production account (in this example 'CAP_DESTINATION'. Please also see this video.
I have now representations for all our accounts in the central CTS system:

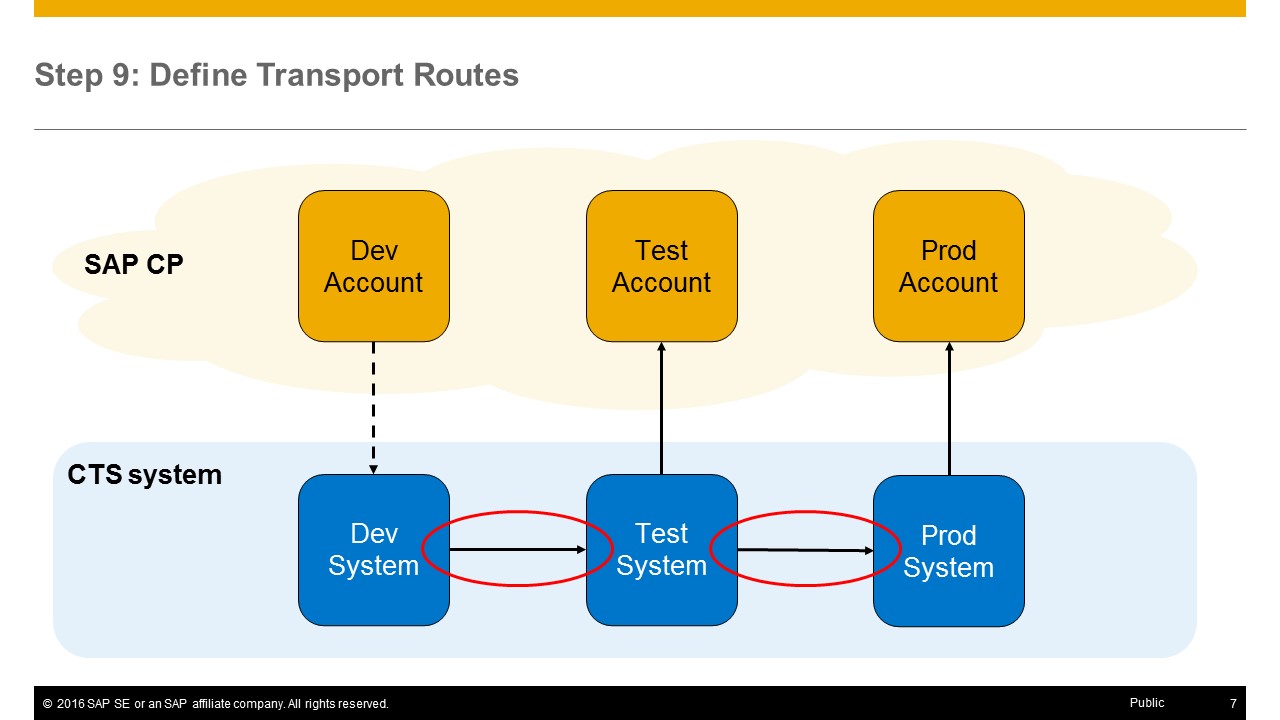
Step 9: Define Transport Routes
This step refers to chapter 7.1.3 ('Transport Landscape: Defining Transport Routes') in the How-To guide.
I will now create the transport routes connecting the three systems / accounts I have setup in the previous steps.
There are two types of transport routes: consolidation and delivery. The consolidation route is used for a connection where development artifacts are exported from one (development) system and imported into a consolidation (respectively test) system.
The delivery routes are used for all subsequent connections in your landscape. When you import a transport into a system with an outgoing delivery route the transport is automatically added to the queue of the target system.
In my example I will setup a consolidation route between the development and the test system and a delivery route between the test and the production system.
The transport routes can be created using a graphical editor (described here) or by entering the required data into dialog windows.
- Log on to your CTS+ system and start transaction STMS
- Click on 'Transport Routes' icon (three small boxes connected by a curved line)
- You now see the currently configured transport landscape. The newly created systems (CAD, CAT and CAP) should be visible on the top of the screen
- Switch from display to change mode by clicking on the corresponding icon (pen and glasses)
- Click on your development system (here CAD) and then click in the area below where the transport routes are shown
- Repeat this for your other systems (in our example CAT and CAP). Try to arrange your system from left to right in the sequence your planning to connect them by transport routes, typically development - test - production
- Switch to 'Add Transport Route' clicking on the corresponding icon (an orange box trying to get between to green boxes)
- With the mouse pointer (now shown as a pencil) draw a line between the development system (CAD) and the test system (CAT)
- In the automatically opening dialog window select 'Consolidation'
- In the field 'Transport layer' enter a four letter name starting with 'Z', e.g. 'ZHCP'
- Press Enter (or click on the green tick)
- Enter a short description for the transport layer, e.g. 'MTA Transport in HCP'
- Confirm by clicking on the green tick or pressing Enter
- You should see the newly created transport route from your development system (CAD) to your test system (CAT)
- Now draw a line from your test (CAT) to your production system (CAP)
- In the automatically opening dialog window select 'Delivery'
- Confirm by clicking on the green tick or pressing Enter
- You should see the newly created transport route from your test system (CAT) to your test system (CAP)
- If there are more systems in your landscape (like preproduction or sandbox environments) repeat the above steps as necessary. Normally you would use delivery routes for connecting the additional systems
- Save the configuration
- Confirm the question to distribute the configuration change immediately
The above sequence is shown in this video.
I have now configured the transport routes of my landscape:
Step 10: Final Checks
As an optional step I ran the 'Check Transport Tool' of CTS.
- Log on to your CTS+ system and start transaction STMS
- Click on 'System Overview' icon (one orange box above two green ones)
- Double-click on one of your systems (e.g. 'CAT')
- Switch to the tab 'Transport Tool'
- Click on the check button (balance with green and orange box). The system performs several tests, which will take a few seconds
- Expand the tree with the check results. You should only see green ticks
- If you see errors or warnings check the corresponding message and take corrective measures accordingly
Congratulations! You did it!
I have now setup a typical three account / system landscape with a development, a test and a production environment.
In upcoming blogs I will show
- how to use this environment when developing different types of artifacts
- how to do the same kind of integration for a SAP HANA database running of SAP Cloud Platform
- how to use higher level transport tools like Quality Gate Management (QGM), Change Request Management (ChaRM) or central Change and Transport System (cCTS)
Stay tuned!
- SAP Managed Tags:
- Software Logistics,
- SAP Business Technology Platform
29 Comments
You must be a registered user to add a comment. If you've already registered, sign in. Otherwise, register and sign in.
Labels in this area
-
ABAP CDS Views - CDC (Change Data Capture)
2 -
AI
1 -
Analyze Workload Data
1 -
BTP
1 -
Business and IT Integration
2 -
Business application stu
1 -
Business Technology Platform
1 -
Business Trends
1,658 -
Business Trends
91 -
CAP
1 -
cf
1 -
Cloud Foundry
1 -
Confluent
1 -
Customer COE Basics and Fundamentals
1 -
Customer COE Latest and Greatest
3 -
Customer Data Browser app
1 -
Data Analysis Tool
1 -
data migration
1 -
data transfer
1 -
Datasphere
2 -
Event Information
1,400 -
Event Information
66 -
Expert
1 -
Expert Insights
177 -
Expert Insights
293 -
General
1 -
Google cloud
1 -
Google Next'24
1 -
Kafka
1 -
Life at SAP
780 -
Life at SAP
13 -
Migrate your Data App
1 -
MTA
1 -
Network Performance Analysis
1 -
NodeJS
1 -
PDF
1 -
POC
1 -
Product Updates
4,577 -
Product Updates
341 -
Replication Flow
1 -
RisewithSAP
1 -
SAP BTP
1 -
SAP BTP Cloud Foundry
1 -
SAP Cloud ALM
1 -
SAP Cloud Application Programming Model
1 -
SAP Datasphere
2 -
SAP S4HANA Cloud
1 -
SAP S4HANA Migration Cockpit
1 -
Technology Updates
6,873 -
Technology Updates
419 -
Workload Fluctuations
1
Related Content
- SAP Signavio is the highest ranked Leader in the SPARK Matrix™ Digital Twin of an Organization (DTO) in Technology Blogs by SAP
- ABAP Cloud Developer Trial 2022 Available Now in Technology Blogs by SAP
- SAP Partners unleash Business AI potential at global Hack2Build in Technology Blogs by SAP
- Switch on gCTS (for existing packages) in Technology Blogs by SAP
- When to Use Multi-Off in 3SL in Technology Blogs by SAP
Top kudoed authors
| User | Count |
|---|---|
| 35 | |
| 25 | |
| 14 | |
| 13 | |
| 7 | |
| 7 | |
| 6 | |
| 6 | |
| 5 | |
| 5 |