
- SAP Community
- Products and Technology
- Technology
- Technology Blogs by SAP
- Develop Fiori List Report and Object Page - Fiori ...
Technology Blogs by SAP
Learn how to extend and personalize SAP applications. Follow the SAP technology blog for insights into SAP BTP, ABAP, SAP Analytics Cloud, SAP HANA, and more.
Turn on suggestions
Auto-suggest helps you quickly narrow down your search results by suggesting possible matches as you type.
Showing results for
vinayhospete
Explorer
Options
- Subscribe to RSS Feed
- Mark as New
- Mark as Read
- Bookmark
- Subscribe
- Printer Friendly Page
- Report Inappropriate Content
03-27-2017
3:26 PM
To develop fiori application using smart templates having odata service as backend.
You may have annotations on backend(preferably CDS , gateway project etc) or in frontend UI project.
Sap Web IDE comprises of several features and plugins.
With the help of Annotation Modeler tool, one can add/modify annotations in UI project.
Let's use northwind odata service which does contain any pre-set annotations from backend to create Fiori list report application.
No javascript coding required !!! Little knowledge on annotations is enough to start.
Step 1:
Sign up for a free trial account on SAP Cloud Platform
https://www.sap.com/developer/tutorials/hcp-create-trial-account.html
Step 2:
Create a Destination on SAP Cloud Platform
https://www.sap.com/developer/tutorials/hcp-create-destination.html
Step 3:
Open SAP WEB IDE
- In the navigation pane (left side), choose Services.
- On the Services pane, search for “web ide”.
- select SAP Web IDE tile, In the “SAP Web IDE Overview” page click on link Open SAP Web IDE.
Step 4:
Create List Report Application in SAP WEB IDE
- In the menu bar, select File > New > Project from Template.
- Under Template selection, select “List Report Application” and click next

Enter Basic Information details as shown below and click on next
| Project Name | orderSmartApp |
| Title | Manage Order |
| Namespace | com |
| Description | Manage Orders |

Under Sources (left side) select service URL and choose “Northwind Odata Service” as a system to connect to a required service.
Enter relative URL “V2/northwind/northwind.svc” in the text field shown below.
Click on Test button to check whether service is available. If you are able to see data in the Service Table, then connection to service is successful, click on Next.

Northwind odata service does not contain any annotations from backend. So the Table is empty. Click on Next

Choose Odata Collection and Navigation as shown below and click on Finish.
New smart template project “orderSmartApp” is created
Project files and structure is available under WEB IDE workspace.

Step 5:
Create Annotation File
- Right click on webapp folder in the project, select New à Folder
Enter folder name annotation click OK.
- Right click on annotation folder in the project, select Annotation File
- Check file name and service is already filled. Click Next

- Check whether project folder structure is as shown below.
- Open annotation.xml file, Double click on it

annotation.xml file opens up with Annotation Modeler UI.
At any point of time, you can check xml code by switching view to code editor which is available in footer bar.

Step 6:
Add annotations using Annotation modeller
List report page contains following areas.
- Header Title
- Header content – smart filter
- Smart table
- Footer toolbar
To add Smart table using annotations. Choose “Order” in Odata Entity Type dropdown and click on Annotate Button.
Select “Annotations” row in table and click on + (plus button) shown under “Actions” column
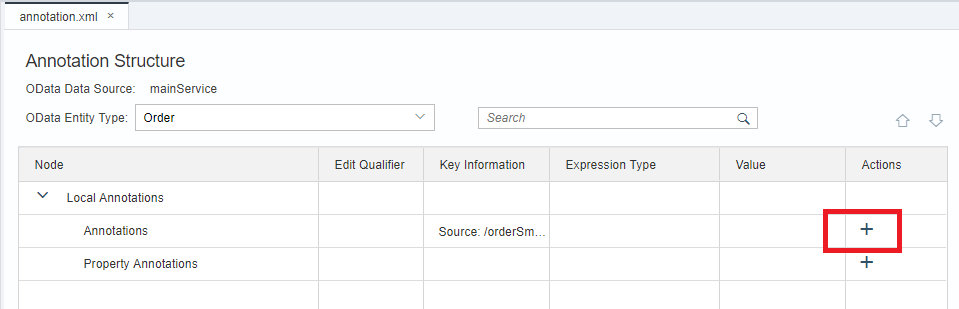
- Pop up opens up listing applicable annotations. Select LineItem (represents smart table in application) and click OK, UI.LineItem annotation is added in the Table

To show initially visible columns in smart table, add DataField as a child to UI.lineItem.
Select UI.LineItem row --> click (+) button and select Datafield under records --> OK

This resolves to first column in LRP app smart table.
Select OrderId in dropdown for UI.DataField value.
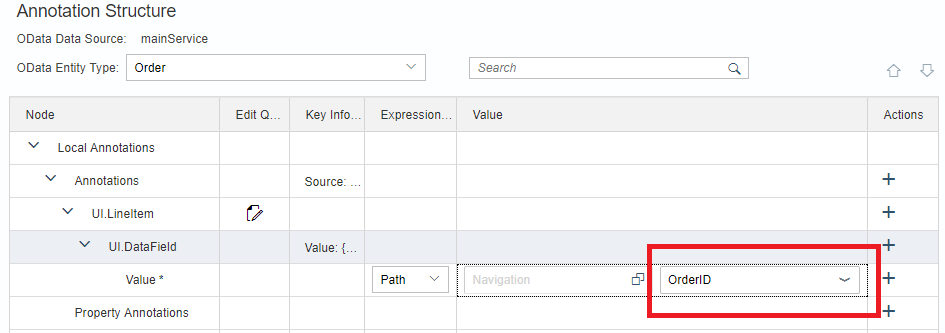
Repeat adding UI.DataField for additional columns in smart table.

To add Smart Filter using annotations.
Select “Annotations” row in table and click on + (plus button) shown under “Actions” column. Select “selectionFields” --> press OK

Select UI.selectionFields row and click on (+) button. select item and press OK
Add more Item to add selection fields as required


Step 7:
Run the Application
Select project root folder “orderSmartApp” and click on “Run” icon as shown below.

Click on GO button. Application shows list of orders.

Select any order in table, application navigates to detail page of an order(also known as Object page).
Object page contains three sections i.e snapping header, navigation bar and content area.
Now, let's add some more annotations to Odata service to see order details in object page
Step 8:
Go to Annotaion Modeler, add UI.DataPoint annotation to create snapping header for Order ID, customer Id and Order Date
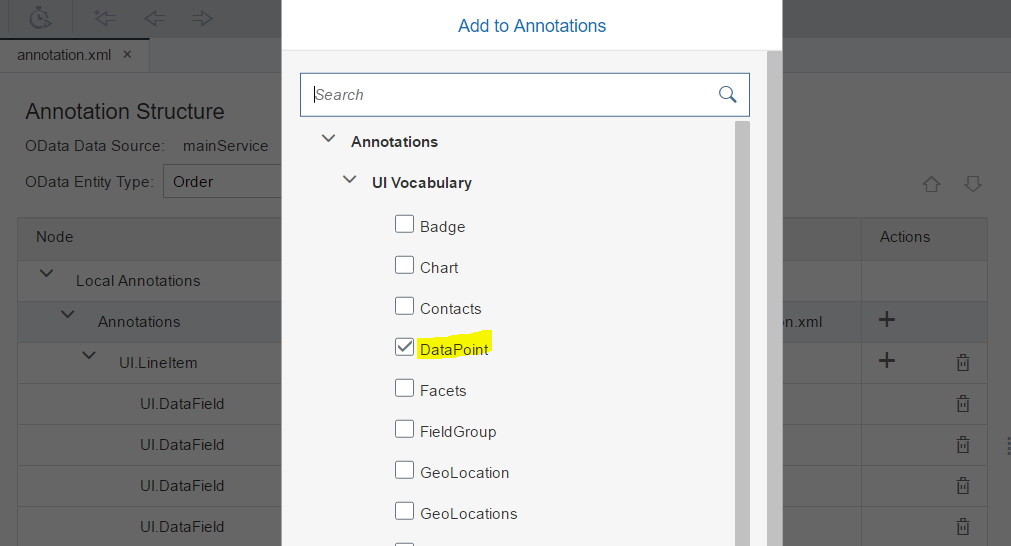
Enter value for Qualifier, title and value to show Order ID in header section of object page. Repeat adding UI.DataPoint for customer id and order date as shown in below snapshot.


Run application (step 7) and click on any order in list report. Application navigates to detail page with header section containing customer Id, order id and order date

Step 9:
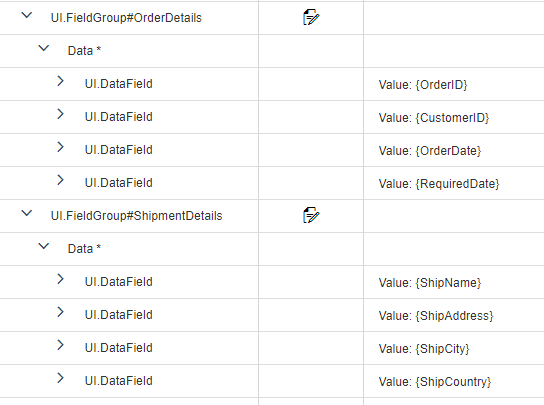
Lets add annotations to create content area containing order and shipper information.
Add UI.FieldGroup for order information having fields(order id, order date and required date)
Add UI.FieldGroup for shipper information having fields(shipper name, address, city country)
Provide Qualifier "OrderDetails" and "ShipmentDetails".
Click (+) on each UI.DataField row and add Label.
Enter value for Label.

Select value for all UI.DataField value as shown in below snapshot .
Step 10:
To create navigation area of object page and add content created in above step 9. Add UI.Facet and its children UI.ReferenceFacet as shown below

Step 11:
Run the application (step 7) . List Report and Object Page application is ready.


For more reference on other possible features using annotations, Please refer to standard documentation from SAP
https://help.sap.com/viewer/b4b7cba328bc480d9b373c7da9335537/2.08/en-US/83c89ccef12f48ab98f6c3811bd0...
https://help.sap.com/viewer/b4b7cba328bc480d9b373c7da9335537/2.08/en-US/3cdebeebb04b4205908140242c9d...
- SAP Managed Tags:
- SAP Fiori,
- SAP Fiori for SAP ERP
79 Comments
- « Previous
-
- 1
- 2
- Next »
You must be a registered user to add a comment. If you've already registered, sign in. Otherwise, register and sign in.
Labels in this area
-
ABAP CDS Views - CDC (Change Data Capture)
2 -
AI
1 -
Analyze Workload Data
1 -
BTP
1 -
Business and IT Integration
2 -
Business application stu
1 -
Business Technology Platform
1 -
Business Trends
1,661 -
Business Trends
88 -
CAP
1 -
cf
1 -
Cloud Foundry
1 -
Confluent
1 -
Customer COE Basics and Fundamentals
1 -
Customer COE Latest and Greatest
3 -
Customer Data Browser app
1 -
Data Analysis Tool
1 -
data migration
1 -
data transfer
1 -
Datasphere
2 -
Event Information
1,400 -
Event Information
65 -
Expert
1 -
Expert Insights
178 -
Expert Insights
280 -
General
1 -
Google cloud
1 -
Google Next'24
1 -
Kafka
1 -
Life at SAP
784 -
Life at SAP
11 -
Migrate your Data App
1 -
MTA
1 -
Network Performance Analysis
1 -
NodeJS
1 -
PDF
1 -
POC
1 -
Product Updates
4,577 -
Product Updates
330 -
Replication Flow
1 -
RisewithSAP
1 -
SAP BTP
1 -
SAP BTP Cloud Foundry
1 -
SAP Cloud ALM
1 -
SAP Cloud Application Programming Model
1 -
SAP Datasphere
2 -
SAP S4HANA Cloud
1 -
SAP S4HANA Migration Cockpit
1 -
Technology Updates
6,886 -
Technology Updates
408 -
Workload Fluctuations
1
Related Content
- Fiori Elements App - With Intent Based Navigation doesn't get rendered in Technology Q&A
- SAP Fiori Elements: Object Page - @UI.facet Type #COLLECTION and #FIELDGROUP_REFERENCE not working in Technology Q&A
- SAP Build - create Full-Stack application CAP+FIORI by using Joule. in Technology Blogs by Members
- SAP Fiori Elements - Save Variant/Layout not working (and want to remove unnecessary column) in Technology Q&A
- SAP Build Code - Speed up your development with Generative AI Assistant - Joule in Technology Blogs by SAP
Top kudoed authors
| User | Count |
|---|---|
| 13 | |
| 11 | |
| 10 | |
| 9 | |
| 9 | |
| 7 | |
| 6 | |
| 5 | |
| 5 | |
| 5 |